Sabvoton Controller and brake/tail and head lights

jakmobile

100 mW
Joined
Dec 21, 2024
Messages
47
Location
Virginia Beach
I recently acquired a bike that has a lot of the ingredients to make a quick little road ebike, except I'm running into some issues. The bike has either a 3000w or 5000w hub motor (was told it was 5k but I'm thinking it's 3k but really don't know how to tell). In any case, that's not the issue. The issue I'm running into is that the controller it came with, a Sabovton SVMC7280 thats more than likely faulty. Well I purchased a replacement and the cable that connects to the display has a water proof connector with 11 pin (I think). That said, after some digging (this is my first attempt at install a controller from scratch) I found out that the conroller does not actually have connectors or even wires specifically allocated for the headlight, tail light, brake lights or turn signals. With my infinite naiveness, I assumed that all of this would be plug and play for the most part with a little bit of GUI configs to make it work. Obviously not the case so now I'm asking for help.

Do they make a kit that has input connectors (from the controller) and output connections with the proper voltage/current/etc that I can just plug or hardwire the lights into? If not, can someone help me with this as I don't even know where to start. There are quite a few connectors on the controller that are not being used at this point and even after looking at a wiring diagram with is somewhat close to what I have, I still don't know how to do this. I'm not afraid of soldering, using a volt meter (very limited knowledge) but was hoping someone would be kind enough to guide me through this. I can also provide a list of the connectors and wires that are not being used. I also need to replace the throttle (I started a thread about this a few months ago) and never really got it working. I don't want to damage the controller so would like to know what I'm doing beforehand. I'm actually interested in learning and not just plugging in stuff. But I'll take whatever help I can get.

IMG_1910.JPGIMG_1909.JPGIMG_1908.JPG
 

Attachments

  • IMG_1907.JPG
    IMG_1907.JPG
    1.6 MB · Views: 4
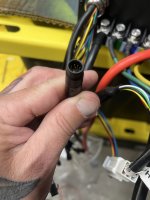
Sorry, those are just random pictures of the connections coming off of the controller. The 3rd picture is the waterproof connector that goes from the controller to the display. I'm happy to provide whatever info is needed to help assist. Sadly, this is a case where I don't know what I don't know.
 
Should I assume the pics are for the old or new controller? Are the old and new controller the same model?
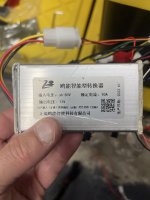
Very few controllers, except those on factory bikes, have the ability to control lights. Those that do only provide a low level output that can be used to operate a relay, with the relay controlling the lights using a separate power supply. There are a few versions of the 7280, and I don't know of a version that supports lights, and only one version that supports a display. The silver box in the first pic is a buck converter, to convert the battery level voltage down to 12V. I suspect that's what being used to power your lights.

Are the old and new controllers the same exact model?
Do you have a link to where you bought the replacement?
Is the display you mentioned the one that came with the bike, and did you buy another with the new controller?
How do you operate your lights? (are you sure they connect to the controller?

Displays are manufacturer specific when it comes to the controllers they work with, and some are model specific. It's always recommended to purchase both as a pair to ensure compatibility. If the display worked with the old controller, then if the new controller is the same model, you have a decent chance that they will work together.
 
Thanks for getting back to me.

Re: Your first paragraph, a lot of that information was the same conclusions I came to before posting here, I tried to do my due diligence before just saying HELP!

Yes, both models are the same with the exception being v1 or v2 (mounting brackets).

The replacement came from the same guy who "built the bike" on Alibaba. He's a total con artist and every time I've asked for specific technical questions about the controller, he's avoided the questions and just said plug this one in the way the old one was. Problem is that there was some splicing done and so not everything was just unplug a plastic connector and plug in back into the new controller. The display did come with the bike, it has one of those 4 button controllers on the handlebars that allows you to modify some of the config, however to turn the lights/horn on/off there's a separate control ring on the handlebars. So given what you've said about lighting, how do I go about hooking lights up, I supposed I could get a separate battery, which i've done with fog lights, but they do not power on with the bike which is a nice feature but not required. And yes, the display works but as I've mentioned the connections on the controller for the actual lights aren't the same. Since most bikes these days have lights, how do they handle this? Especially with brakes, how does it know when to illuminate when the brake lever is squeezed? Is this using the electrical wire coming from the lever itself? If so, whats the best way to splice that in?

I'm happy to provide any pics as well, or provide a list of wires not connected to anything. There is also a small black box that simply looks like a fan, it has several connections and then a negative wire that wasn't connected to anything so not sure if it was getting a ground elsewhere, if it wasn't working, or if it's not just a fan and is an alarm or something. Sadly, I cannot go back to the seller and get any info so basically this whole project is a reverse enginnering project or just build it the right way from the beginning. So i'm up for suggestions so feel free to fire away. Thanks again. Edit: This is the box that may be a fan? It has two connectors on it and an individual black wire. No idea what it's for.
 

Attachments

  • IMG_1919.JPG
    IMG_1919.JPG
    1.9 MB · Views: 0
Last edited:
So given what you've said about lighting, how do I go about hooking lights up, I supposed I could get a separate battery, which i've done with fog lights, but they do not power on with the bike which is a nice feature but not required. And yes, the display works but as I've mentioned the connections on the controller for the actual lights aren't the same. Since most bikes these days have lights, how do they handle this? Especially with brakes, how does it know when to illuminate when the brake lever is squeezed? Is this using the electrical wire coming from the lever itself? If so, whats the best way to splice that in?
Is it the connector on the silver box (buck converter) with the three wires that connected to the old controller? The buck converter has a +Battery voltage in, and a +12V out (likely red and yellow, respectively) and a common ground (black). The yellow wire should power the lighting circuit (you could verify this by tracing the yellow wire), and the red needs to receive battery power. Do your lights work when the controller is turned off, or work independent of the controller?
The brake lights probably utilize the "High Brake" connector for brake cutoffs, since high brake uses 12VDC for the cutoffs, with the additional benefit of powering the brake lights. That's likely where your brake lights are being powered, so you may be able to pick up the 12V signal at the high brake controller connector (if it checks out with a voltmeter).
Which are the wires that are not using connectors?
You could power up the little buck converter by applying battery +, that you could pick up at the controller (where the big red wire connects), to test if the rest of the lights work, and then figure out the brakes. It would be best if you could trace the existing red wire back to where it was getting power from before though, since you probably want everything to shut off with the bike, so your battery isn't affected by any parasitic drain from the buck converter.
 
Ok, that makes sense re: buck converter. So let's start with that first. Let me figure out how that is working first and then can move on to the brakes. I'll report back after some testing and tracing. (and yes, previously the lights used to turn on/off when the bike was off.
 
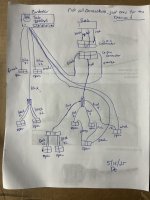
Ok, here's a drawing I did by tracing every cable. All cables have a connector on them so there are no "loose" connections.
 

Attachments

  • IMG_1929.JPG
    IMG_1929.JPG
    2.3 MB · Views: 1
Back
Top