Scott Spark comp 29er + crystalyte HS3540

Quads or multirotors are better for aerial video - they're more stable.
I built one specifically for this purpose but subsequently found they're alot more difficult to pilot than it appears and I can't ride and fly at the same time! You need a mate to either ride your bike or fly the copter.
I'll sell it to ya if you're interested :p

Re: posting more vids - by all means. But if you've got the time and inclination you need to move the camera around to make it interesting. Helmet or bar mounted cams are good for capturing surprise crashes or what ever (so I always leave mine recording even if I just erase it when I get home) but posting 10 minutes of footage riding along a path or bush trail becomes boring no matter how fast you're going or what you're doing. This is why I try to mix up my camera angles as much as possible and stop frequently to position the camera for ride bys. But even then I'm running out of things to post as it all becomes more of the same after a while. I recall reading somewhere on youtube that on average people will click off any videos after about 4 minutes.
 
Hyena, thanks for the advice. Yeah I can see your point about switching it up.
A multi copter with stabalizing gyro and gps would be sick, but a bit expensive. I can justify $100 it's like buying a camera(thats not that great) and a rc copter. as for your multi copter well sorry but it sounds like you've had some trouble with it(very entertaining to watch, that prop into the ground landing was great). if I was going to get one I'd get a kit thats got stableization..
I need a good free video editor to, any1 got a link?
 
Just got my bulk charger from bms website . It looks better than the picture and its so awsomely powerful. Crankang 13amps all the way to a solid 72v . Leaving each cell at 4v just topping up with the bc168 charger to 4.15 v per cell. The 1200watt bms charger got from 64v to 72v in about 20 mins or less (10ah pack) . I'm so glad I bought it. Would have been nice if it went to 74. I like how the case is a big heat sink with a fan through the guts.

Hey Jay, or any 1 else have you tweaked the voltage up on These units? I don't know if I would be that comfortable doing it but if others have and I get sick of waiting for the BC 168 to get the tank full I might give it a go...
 
ok - just pulled a rediculous thermal (self reseting) fuse out of my head light that was making it go off and on every 20 seconds or so. it was nice to pull it apart and see how it all goes together. (4 x 3w led moduels in series, with an ecrilic focus lens thing over it held on by a threaded "lid" that holds them th a massive heatsink) Someone said moving air has litle effect on cooling it, but when i was testing it inside i could feel too much heat to hold it in my hand, but after riding with it on it was just a little warm.

anyway

my next thing for the bike is to set up the L/H/M switch into the aux input of the cycle analyst so i can have 200w / 3Kw / 1.2Kw . so i have leagal , no limit , and 60kph with pedaling. need 2 x 5k ohm trim pots and a 8k ohm resistor.

also want to note im really loving this bike as a comuter, it actually seems a fair bit quicker than a car or possibly a motor bike , because I can ride on footpaths to get around busses and trafic lights (I go slower than on the road, safety first) and also go the speed limit. motorbike riders and scooter riders give me a few looks when i cruze next to them, they must be wondering WTF? People I've asked what the bike looks like say it looks like a push bike, so I'm pretty happy with that.
 
Just had a nice session at the park with my mate scope. Did some dowees and wheelies and jumps. But on the last one got airborne and had throttle WOT,when I landed fell off the back and bike landed with bars x ed up and front tyre pinch flated sided ways :/
Replaced tube already and added slime and went for a cruize to spread it out. Might UL vids but the good bits weren't cough on video.
 
allright had a really nice session in the park with my mate Scope. we were ripping it up. I'll upload the video later today....
Its hard to tell on video but there are some corners where the back wheel is drifting out and spinning a little. plenty of wheel spinning and a few jumps, even a bit of ebike skate park action :)
should be up in a few hrs...
.........
Edit
.........
Had computer trouble, I'll get it up eventually.
 
dogman said:
A fast wind motor is not what I'd recomend for a 29" wheel. A hubmotor stuggles enough in 26", so a faster winding AND bigger wheel just makes it worse. HT instead?

Grin cyclery simulator will help you make comparisons, to get your speed, motor winding, wheel size, and battery voltage dialed in to your needs. Provided you want realistic goals that is.
Yeah I been looking at building a 29er for a while now with a C9 motor but the correct choice of winding is bringing me the most angst, i am building for through the park/10k commuting, anyone have thoughts on windings and 29ers?
 
If I could do this build again I would probly go ht3525 but on higher voltage,so it tops out at 70kph so like 24s lipo 100 volt or maby 20s . As long as I can keep up with cars on main roads. That motor is more efficient than my hs3540. Then still use the CA v3 as I do to limit power to power required to go Max required speed then just go wot off the line and pedal a bit. According to the ebike.CA simulator I would go from 1200watt with my hs3540 to 850watt with a ht3525 (both at 60kph) so with 4 6s 5ah in series the range is more than 3 in series x 2 parallel (on my hs3540). Btw that simulator is conservative (10%) actual speed acordind to my results.
Note:my current setup should top out at 88 kph and has the torque to do power wheelies and burn outs.
 
ALRIGHT! finally got some software for editing that should actually work!
the gopro software is free, (nice of them) down load here
http://gopro.com/3d-cineform-studio-software-download/
so ill edit up some treats :)
although my pc is totally having a heart attack, i should get a new one/upgrade b4 i get a new ebike on the road but ill just wait till it gives up. converting clips:
heart attack.JPG
 
funny story
made a parallel plug with a d25 printer plug, wired it up and double checked everything. then carfully pluged in one at a time with t-shirt protectng hands just in case a got a wire wrong.. all good, so i gently push parallel plug into other side of balance cable d25 harnes and POP.. woops hmm have to check my wireing... got multi meter out and check and checked then realised i had the series plug in! that was the hole point of making the bloody d25 balance thig in the first place AGH! anyway, i have a spare plug and they are only $1 so whatever its just 30 mins work, next time ill have to make the physical barrier that stops both parralel and series at once..

ANOYING!
 
save
The burnt pin was next to the unused pin so just moved wires across.
schwalbe-big-apple-28-700c-29er-x-2.35-wired-tyre-w-kevlar-guard-reflex-60-622--2160-p.jpg

Ordered big apples from jenson USA 29" x 2.35" fat but not rediculous, the grip is definstely street only. Hopefully big ben will get released soon, that's a nice on/off road compromise in same dimensions
 
pendragon8000 said:
Also looking at charger upgrade... I didn't know there were high voltage chargers like this until a moment ago:
http://www.bmsbattery.com/alloy-shell/29-alloy-shell-1200w-lifepo4li-ionlead-acid-battery-ev-charger.html
alloy-shell-1200w-lifepo4li-ionlead-acid-battery-ev-charger.jpg

Any one use something like this?

Yes, and I have had no issues with it (them) though some say stay well clear of BMS battery, I have had no issues with them. Judy from there always is quick to answer my questions about them..like what pot does what etc
My last oen was a 2kW units set to 142 volts and 12 amps.
Since I did nto go with the 34 s build yet, I turned it down for the 20 / 24 s bike. So I turned the voltage down to 83.6 volts and the current up to 20 amps. it has done over 300 charge cycles now with no issues.

I also have a 200 W unit, and a 600. have just ordered a 1.2kW and another 600 for a mate.

Shipping prices from them is a killer though, something like $85 USD when I ordered the 2kW unit, from China to the UK.
just put in the order for the 600 and the 1.2kW and thw shipping came to $103 USD...so definite saving combining multiple orders.

Chek back through the forum, either LFP or Methods did a upgrade thread on them
 
No info on 1200 pots uet, not arrived yet, will be a few weeks.

If you already have a 1200 Watt unit then you should be able to tell us what the pots do,
If you don't yet know, open it up, take photos , label them in Paint and send an e mail to BMS asking them what each is for

Or check it out yourself by adjusting small amounts of one only at a time while charging with both a volt an ammeter connected. Before you start adjusting, note the angle of screwhead and then turn a quarter or less either way while watching meters, LED, and meter on front panel
If first screw does nothing, put it back to original position and try another.
Often some pots only adjust noticeably at certain phases of charge. Like current limit. , that will only have noticable effect with small movements, when at full charge. Cut off / LED colour changer pot will only show change near end of charge when current low.

List of lilely pots, some but not all may be present, and there could also be others.
Voltage control, fine and coarse
Current control, fine and coarse
Cut off/float/ LED colour change adjustent
Front pan volt/ ammeter calibration
 
NeilP said:
No info on 1200 pots uet, not arrived yet, will be a few weeks.

If you already have a 1200 Watt unit then you should be able to tell us what the pots do,
If you don't yet know, open it up, take photos , label them in Paint and send an e mail to BMS asking them what each is for

Or check it out yourself by adjusting small amounts of one only at a time while charging with both a volt an ammeter connected. Before you start adjusting, note the angle of screwhead and then turn a quarter or less either way while watching meters, LED, and meter on front panel
If first screw does nothing, put it back to original position and try another.
Often some pots only adjust noticeably at certain phases of charge. Like current limit. , that will only have noticable effect with small movements, when at full charge. Cut off / LED colour changer pot will only show change near end of charge when current low.

List of lilely pots, some but not all may be present, and there could also be others.
Voltage control, fine and coarse
Current control, fine and coarse
Cut off/float/ LED colour change adjustent
Front pan volt/ ammeter calibration
finally decided to open the 1200watt charger and tune up the volts. was easy, there are about 3 or 4 pots i could see.

the ones n the display.. not what you want.
they are multi turn pots so its easy to get an acurate voltage. on mine it was at the front under the display on the main board next to a chunky black relay. I turned it 1/4 turn CCW and it is now set at 73.9v finish voltage . I'm happy with this because its gives a fair amount of head rome for unbalanced cells and i fell quite safe pluging it in and not checking the cells individual voltage , particularly with regular blanace charging to 4.2v

it didnt even take long, i was just woried i would stuff it up. but the multi turn pots made it easy.
i did it while it was in the tapering off amps stage of the charge and was all turned on and charging. so i used a welding glove(over kill) and made sure i didnt drop the sall metal screwdriver on the pcb.
anyway, more jumps in the park now before voltage sag beepers call out and spoil the fun.
 
little update on this one.

Im running sensorless mode with the new controller from ebikes.ca sensored/sensorless auto detect. (40amp model)
most of the time it was working fine but a dodgee hall wire would glitch now and then.

i went for a ride around the city with the GF today , she was on the monster bike.
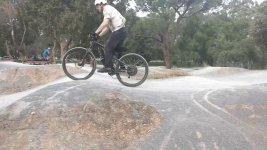
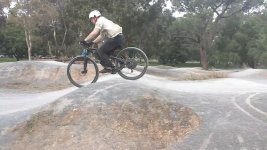
i got a video of me doing some jumps and extracted a few frames from going over a jump just to show the suspension compressing. It may be of interest to some.

btw i was going to slow to clear the jump cleanly.
View attachment 3
jump2.JPG
jump3.JPG
jump4.JPG
 
thanks, as you know this kind of shot. Would be even better to shoot it at 120 frames per second and then edit it into slow motion...

looks fun though. I've got work out why my shock pump won't thread on, I need to harden it up before the next off road adventure.
 
I finally replaced the hall wires in the motor on this one. the wires i used were a bit fatter and i put some heavy duty heatshrink on the phase + hall wires to protect it in the wire channel of the axle. it was too tight so i ground it out about 1mm wider and 1mm deeper.

I thought id share my diy plug for the hall plug that comes with the ebikes.ca controllers. it turned out fairly tidy.
 
what are the parts called? From Jaycar?

I was impatient for a solution when i put my controller on last time and just hardwired all the halls! pain in the ass for pulling apart the bike for repairs and upgrades... to say the least...
 
pendragon8000, I have read your whole thread, nice work turned out great. I am interested in converting a Scott Spark 35 full suspension bike, can you show us the torque arm you used to secured the hub motor? Has the Regenerative braking caused any problems?
Thanks Racer_X
 
Racer_X said:
pendragon8000, I have read your whole thread, nice work turned out great. I am interested in converting a Scott Spark 35 full suspension bike, can you show us the torque arm you used to secured the hub motor? Has the Regenerative braking caused any problems?
Thanks Racer_X

Hi Racer_X, the photos and videos I have up show them pretty well I think. they are made "custom" by grinding some 10mm steel into the required shape. i would say these are overkill by quite a bit. the main thing is to make them clamping onto the axle flats, to do this, use a 4.5mm drill and go through both parts of the open end and then get your 5mm bit and open 1 out to 5mm, then get a 5mm tapping tool/bit and work it in through there and youll have a 5mm hole and a 5mm tapped hole. preferably use a allen key head 5mm bolt with a spring washer and a normal washer either side and clamp it down nice and hard on the axle. use a hose clamp to hold the arm to the frame.

i made 1 arm that is so snug in on the derailer that it just sits there no problem without a clamp, but its compensated for allot by the massive arm on the brake side. this is not preferable btw, make the gear side your stronger side as thats the stronger part of the axle due to it not having the wire channel in it ( its got more matterial) the disc side is a major weak point in the axle.

hope that helps, sory for the delay. PM if need be.
peace

EDIT:
and yeah scott bikes are really nice. ive hammered the shit out of my XC and its all good.
 
MadRhino said:
pendragon8000 said:
This one tells that you need better chain guiding and tensioning.

The next few frames would be required to tell about suspension setting, showing rebound dampening.

Looks like a fun ride.
Judging by the photo that would be a fair statement, but I never have chain issues with this bike.
 
Back
Top