
You are using an out of date browser. It may not display this or other websites correctly.
You should upgrade or use an alternative browser.
You should upgrade or use an alternative browser.
Y-pedal's two stage RC drive..........
- Thread starter recumpence
- Start date

recumpence
1 GW
Hey Y. I can send you a couple heatsinks. That should help tremendously.
You sure have gotten some hard use on that motor!
Matt
You sure have gotten some hard use on that motor!
Matt
Kurt
10 kW
I guess just because something is a quality product doesn't mean it likes being abused any more then a lessor product. Although it would have been nice of them to face off the end of that shaft neat.
I think Matts more than proven the Astro motors are the king and can be very reliable when gearing and controller are dialled in. Its interesting I have worked around a lot of industrial 3 phase in runner style motors and the standard practice is. The motor can's have cooling fins on the outside of the casting. So a heat sink over the can sounds like a very good option.
Although my thinking was I can buy seven HTX 80-100 motors at $98 for the price of one astro 3220 motor. Perhaps if your going to give your motors a hard time it would be less disappointing to burn up a cheap motor when something went wrong.The bad thing about a out runner is you cant put a heat sink on the outside of the can
Kurt
recumpence
1 GW
Kurt said:Bad thing about a out runner is you cant put a heat sink on the outside of the can
Kurt
No, but you can put a fan on it. :wink:
Matt
Kurt
10 kW
recumpence said:No, but you can put a fan on it. :wink:
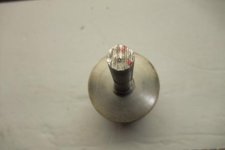
That's why I didn't cut the motor shaft off completely on the unused end of my 80-100. I kept about 25mm stub there for a fan if it was ever needed. A lot of industrial motors have a fan on one end and fins on the outside.
Kurt
recumpence
1 GW
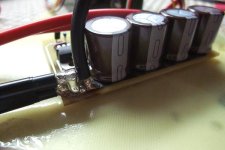
You can add solder if you feel the need. It does "look" fine, though.
Your 3210 should have room for two heatsinks. That should drop your overall temps about 25 to 30 degree F.
Matt
Your 3210 should have room for two heatsinks. That should drop your overall temps about 25 to 30 degree F.
Matt
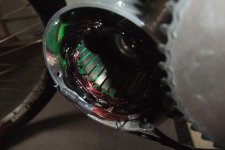
Wrapped the rogot in paper and tape to prevent metal shavings from the file process to stick to the magnets, getting metal dust off the very.. and i mean VERY strong magnets is no fun...
no more jagged surface !! 8)
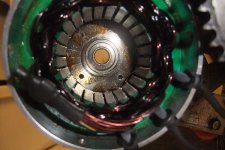
Then i removed both bearings and checked them for smoothness, the pulley side bearing had a very small amount of roughness to it, barely noticable really.
I used a light oil and applied it to the edges of the sealed bearings, spun them up and work the oil in, flipped them around and put the motor back together, powered it up and zoom zoom.. nice and smooth once again. 8)
Re-installed the chain, and went for a short test ride, so far so good !!
no more jagged surface !! 8)
Then i removed both bearings and checked them for smoothness, the pulley side bearing had a very small amount of roughness to it, barely noticable really.
I used a light oil and applied it to the edges of the sealed bearings, spun them up and work the oil in, flipped them around and put the motor back together, powered it up and zoom zoom.. nice and smooth once again. 8)
Re-installed the chain, and went for a short test ride, so far so good !!
Kurt
10 kW
Nice job,
Its looking much better than when you first opened it up. Maybe you could get a little BBQ probe or some kind of thermometer on the outside of the can. I know it would be hotter on the inside. The exact numbers don't really matter. Use it more as a guide to when its getting abnormally hot and its time to give it a rest. Would be interesting to note the difference before and after a heat sink was fitted.
Kurt
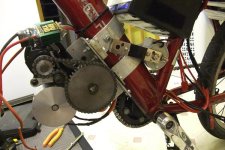
I've never had a temp probe on any of my bikes, have pretty much always gone with the idea that if i fry it, it's not up to the job.. I'm getting a few of Matt's heat sinks, that should help a fair amount, right now a lot of the heat gets soaked up by the 2 stage drive assembly, itself made of aluminum takes alot of the heat..
I do have to admit that i am running this little 3210 to it's maximum potential !
Now that i have a baseline established, the next getup will be hosting a larger motor, might just have to try one of those outrunners for the hell of it..
I do have to admit that i am running this little 3210 to it's maximum potential !
Now that i have a baseline established, the next getup will be hosting a larger motor, might just have to try one of those outrunners for the hell of it..
Kurt
10 kW
Ypedal said:might just have to try one of those outrunners for the hell of it..
For under $100 they are a lot of fun. I might eat my words but if you do a quick QC on then with you first get it there not that bad. I had to spend about $30 for good Jap bearings and 3 hall sensors and about 2hrs of my time to clean up some excessive glue and burs here and there
. Running halls and a ebike controller with them is great. I can nail the throttle from a stand still, even on a hill and the motor just spring to life and takes off. I was even doing roll-back burnouts on the lawn the other day just test the clutch.What I would like to see is HK offer the same motor but charge $200 for it. Just wind it tighter with thicker copper and put Jap bearing's in from the start. I would happily pay double the price.
Kurt
AussieJester
1 TW
Kurt said:What I would like to see is HK offer the same motor but charge $200 for it. Just wind it tighter with thicker copper and put Jap bearing's in from the start. I would happily pay double the price.
DiTTO...I got lucky on my V2 motor, nice tight windings, haven't changed shaft or bearinsg though
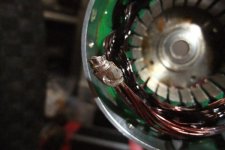
runs beauuudifully. What i think might be a good move is to pick up some electric winding spray
I spotted a can of it at local Coventry Fastners when buying some stainless steel cap scres, i forget
the exact brand and name but it is made for spraying on the windings of electrical motors
to coat them, I will pick up a can next time im there and try it out, for those with 'loose' windings
you might be able to stick them down so as not to have them catch on the magnets and wear through.
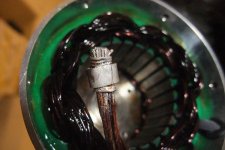
YPedal MaN, only windings i seenz darker than those are on one of Methys or Hyenas roasted frocks
that Asto looks like its had a hard life for sure...
KiM
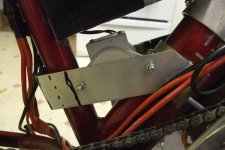
So now that the motor is back together and quiet again, it's finally time to do something about the rats nest....
I hooked up a CA with a 200 amp shunt, but never hooked up the speedometer, this model CA did not have a seperate speed sensor wire but after opening it up i tracked down the yellow and green wires that were not being used, the yellow Sp was in the right spot, but the green wire was on the Th ( throttle signal ) pad that i do not need ( like.. who wants to slow things down lol ) .. so i moved that greenie to the G i hope this will work....
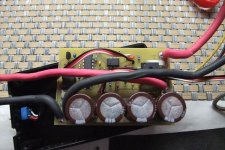
Since my lipo packs have dual leads on the parallel harness, i have been wanting to double up the leads going to the board... and i am by no means a soldering expert, this task has been something i've dreaded for some time... but turns out it's really not that difficult after all !!
Replaced the stiffy stuff that it came with, used soft turnigy 10 awg wire !!
** crosses fingers it still works when i power it up lol.. :lol:
Replaced the stiffy stuff that it came with, used soft turnigy 10 awg wire !!
** crosses fingers it still works when i power it up lol.. :lol:
Attachments

For the last few days i've been at it.. but took pictures along the way...
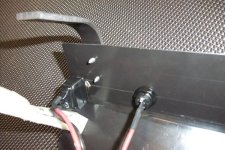
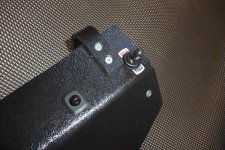
The 10 gauge silicone wires that exit the throttle box have to supply the controller with 100 amps, over a single wire, so i replaced the PP45's that were working ( without any problems btw.. ) .. and installed bullets instead.

The trick here is to secure the pieces you need to solder while you work on them, a heavy pair of vice grips works well, just finger tight on the adjuster screw of the grips to hold the bullet..
Then with the iron nice and hot, I filled the bullets with solder..

Also applied solder to the exposed strands of the wire, and with everything still hot.. put the iron between the 2 to liquify the solder and pushed the wire in all the way keeping the iron on there for a few more seconds, insuring a good fit.. then hold it long enough for the solder to set..
The 10 gauge silicone wires that exit the throttle box have to supply the controller with 100 amps, over a single wire, so i replaced the PP45's that were working ( without any problems btw.. ) .. and installed bullets instead.
The trick here is to secure the pieces you need to solder while you work on them, a heavy pair of vice grips works well, just finger tight on the adjuster screw of the grips to hold the bullet..
Then with the iron nice and hot, I filled the bullets with solder..
Also applied solder to the exposed strands of the wire, and with everything still hot.. put the iron between the 2 to liquify the solder and pushed the wire in all the way keeping the iron on there for a few more seconds, insuring a good fit.. then hold it long enough for the solder to set..
Similar threads
- Replies
- 15
- Views
- 6,213
- Replies
- 8
- Views
- 1,301
- Replies
- 45
- Views
- 3,943
- Replies
- 3
- Views
- 1,754