
You are using an out of date browser. It may not display this or other websites correctly.
You should upgrade or use an alternative browser.
You should upgrade or use an alternative browser.
Eastwood’s first battery build
- Thread starter Eastwood
- Start date
Eastwood
100 kW
- Joined
- Jan 13, 2021
- Messages
- 1,479
I think this unit or one very like it was used in another thread here...lemme see...found it

RD6006 0-60 Volt Battery Charger
Unlike most people I primarily purchased the Riden RD6006 power supply to use as a battery charger for Lithium Ion batteries that power my E-Bikes. It is a exspensive solution for that purpose but I have gone through four of the dedicated 58.8 volt chargers in a space of two years. The major...endless-sphere.com
Actually, this one you linked is just a power supply. The one I purchased off AliExpress is an actual battery charger, but it can also be used as a power supply but it’s primarily a charger.
Ah, ok. I guess I misremembered.
Eastwood
100 kW
- Joined
- Jan 13, 2021
- Messages
- 1,479
eastwood,
doctorbass tried this
how fast do you need to charge?
Yeah, his charger is very similar. Power output is the same, but it doesn’t have the same functions.
Eastwood
100 kW
- Joined
- Jan 13, 2021
- Messages
- 1,479
how fast do you need to charge?
For the most part will not be fast charging. This battery being at 11 parallel can actually handle a max charge of 92.4 amps. (8.4a per cell).
Although I would never charge with that many amps.
For my normal slow charging I guess 10 to 15 A which isn’t that much considering the cells.
For fast charging, I may use the max 30amps the charger can supply. Would be rare though, don’t plan on charging fast often.
Eastwood
100 kW
- Joined
- Jan 13, 2021
- Messages
- 1,479
So I’m wanting to add some insulation between the parallel groups. I’ve got some thin rubber-1.7mm that fits nicely between the cells.
I’m wondering is there any concerns with blocking airflow between the cells, although there’s not really any “actual” airflow. Does anyone see any negatives to adding insulation between the parallel groups?
I probably don’t need it, but I like doing everything overkill especially when it comes to the safety of this powerful battery
Some update pics below

I have a lot of hours in this rubber/insulation block. This is the very bottom of the battery. Used DP420 epoxy to glue everything together.


Used RTV silicone around the edges of the insulation to adhere to the cell blocks.


Stripped off the insulation and used marine grade heat shrink

I’m wondering is there any concerns with blocking airflow between the cells, although there’s not really any “actual” airflow. Does anyone see any negatives to adding insulation between the parallel groups?
I probably don’t need it, but I like doing everything overkill especially when it comes to the safety of this powerful battery
Some update pics below
I have a lot of hours in this rubber/insulation block. This is the very bottom of the battery. Used DP420 epoxy to glue everything together.
Used RTV silicone around the edges of the insulation to adhere to the cell blocks.
Stripped off the insulation and used marine grade heat shrink
Last edited:
Are you running the cells anywhere near their ratings? Do they generate much heat?
If either of those is "yes" then any insulation will help trap the heat inside the pack, and the outer cells next to the casing walls (if no insulation there) will cool easier, so they will age differently from the others, and perform differently (growing worse over time).
If both are "no" then it shouldn't make much difference.
If the first is "no" but you're not sure about the second, you can do some load testing before going further to find out what kind of heat the cells generate at different amounts of load around the typical range you will use them in, and the worst-case loads as well.
Eastwood
100 kW
- Joined
- Jan 13, 2021
- Messages
- 1,479
Nope, max continuous is 45a. Will be using half the max continuous for most trail/woods riding.Are you running the cells anywhere near their ratings?
Battery heat shouldn’t be problem

Probably won’t add insulation between the parallel groups though. That makes sense what you were mentioning about the insulation trapping the heat. There will be a times where I have the battery amps turned up for drag racing gas bikes so probably best to leave the insulation out.
Eastwood
100 kW
- Joined
- Jan 13, 2021
- Messages
- 1,479
Will use this gold heat shield on the back side of the battery case to block the heat from the motor, as the battery case bends around and sit on top of the motor. Also plan to install a fan on the backside of the motor that will blow air through the motor-heatsinks between the battery box and motor.
Edit: pic at bottom
Received my 24v step down. This is primarily to power the BMS display.

For the pre-charge I will go with this 5w 50ohms resistor. Unless someone thinks otherwise?

Glued the lugs and bolt to the discharge busbar. Everything was tighten down first to ensure good copper to copper contact. Applied epoxy on the outside edge of the lugs, blot and nut with the DP420.


The lug bolts should be more than secure. the last thing you want is for something to wiggle loose from the vibration.
Decided to add some extra epoxy to the nut, connecting to the lug
Once this bus bar is spot welded to the battery the lugs will never be able to come back off so that’s why I’m making it permanent.


Edit: pic at bottom
Received my 24v step down. This is primarily to power the BMS display.
For the pre-charge I will go with this 5w 50ohms resistor. Unless someone thinks otherwise?
Glued the lugs and bolt to the discharge busbar. Everything was tighten down first to ensure good copper to copper contact. Applied epoxy on the outside edge of the lugs, blot and nut with the DP420.
The lug bolts should be more than secure. the last thing you want is for something to wiggle loose from the vibration.
Decided to add some extra epoxy to the nut, connecting to the lug
Once this bus bar is spot welded to the battery the lugs will never be able to come back off so that’s why I’m making it permanent.
Last edited:
received the BMS last week
380a continuous 950a peak.
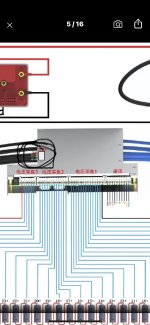
View attachment 338892I’m not even sure if I can use this display because it needs 24v to 100v to power the unit. How can I use this display without using another step down? Or maybe that’s the only way is another step down. If so, I probably won’t use it. The main reason for even using this BMS display is just to see the voltage, although it’ll be convenient to be able to Monitor the different parallel groups.
Does your BMS have a UART port on the side like this image below
Attachments
Eastwood
100 kW
- Joined
- Jan 13, 2021
- Messages
- 1,479
Does your BMS have a UART port on the side like this image below
Nope, don’t think so.
Attachments
Man I wish It did. Thanks for the help. I appreciate it.Nope, don’t think so.


Eastwood
100 kW
- Joined
- Jan 13, 2021
- Messages
- 1,479
Have some questions I’ve been pondering on..
1) Should the negative and positive discharge wires be equal lengths? With motor phase wires I always make sure they’re the same exact length but with battery discharge wires maybe they could be different lengths?
2) should I add vents to the battery box?
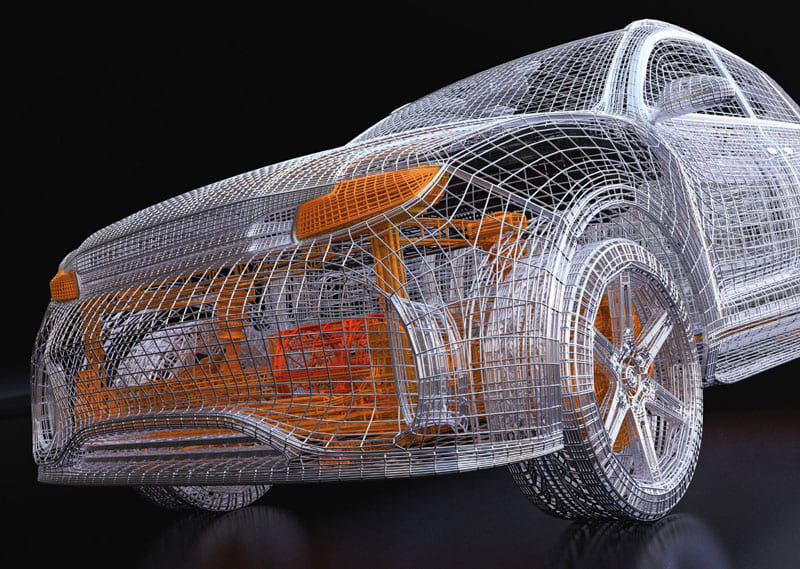
I know with electric cars they use vents, primarily dual stage vents to relieve pressure from the cells venting and to prevent thermal runaway. They use ePTFE membranes that allows venting/airflow but stops moisture and dirt from entering.
Just not sure if vents are needed for this battery build?
Here’s a good read below on EV battery venting
 www.techbriefs.com
1) Should the negative and positive discharge wires be equal lengths? With motor phase wires I always make sure they’re the same exact length but with battery discharge wires maybe they could be different lengths?
2) should I add vents to the battery box?
I know with electric cars they use vents, primarily dual stage vents to relieve pressure from the cells venting and to prevent thermal runaway. They use ePTFE membranes that allows venting/airflow but stops moisture and dirt from entering.
Just not sure if vents are needed for this battery build?
Here’s a good read below on EV battery venting
Venting for EV Battery Packs
Cell chemistries, thermal dynamics, vehicle packaging, and even weather present challenges for optimizing electric vehicle battery functional safety.
1) Should the negative and positive discharge wires be equal lengths? With motor phase wires I always make sure they’re the same exact length but with battery discharge wires maybe they could be different lengths?
It shouldn't matter; it's a series loop so the current will be going thru all of the wire regardless of what lenght any part of it is.
Since it does go thru all the wire, the less wire there is, the better, so if making them equal means adding wire to one side, it's slightly better to not do that because leaving the total lenght shorter decreases the resistance by that much (not a lot, but...).
There may be circumstances where equal length is better; I'm not an engineer so I don't know what those would be.
Depends...what kind of weather does the pack have to endure? How well-sealed is the box?2) should I add vents to the battery box?
I know with electric cars they use vents, primarily dual stage vents to relieve pressure from the cells venting and to prevent thermal runaway. They use ePTFE membranes that allows venting/airflow but stops moisture and dirt from entering.
Just not sure if vents are needed for this battery build?
Some people have used goretex vents screwed into holes in their motor casings to allow air exchange without allowing moisture to enter; don't recall how well these worked for them but should be info in the various motor cooling/etc threads.
Eastwood
100 kW
- Joined
- Jan 13, 2021
- Messages
- 1,479
That’s what I was thinking, since it’s just one continuous series loop it shouldn’t make to much of a difference. My positive discharge wire, which comes off the top of the pack will be shorter because it’s closer to the controller, contactor, etc… and my negative discharge wire comes from the very bottom of the battery, so it will be several inches longer.It shouldn't matter; it's a series loop so the current will be going thru all of the wire regardless of what lenght any part of it is.
Since it does go thru all the wire, the less wire there is, the better, so if making them equal means adding wire to one side, it's slightly better to not do that because leaving the total lenght shorter decreases the resistance by that much (not a lot, but...).
Depends...what kind of weather does the pack have to endure? How well-sealed is the box?
My local trails can get really muddy at times so moisture is definitely a concern. If I were to install vents, could put it on the very top of the battery where there would be no direct contact with Water, but yeah still moisture in the air.
The box will be 100% sealed once I’m done with it.
Some people have used goretex vents screwed into holes in their motor casings to allow air exchange without allowing moisture to enter; don't recall how well these worked for them but should be info in the various motor cooling/etc threads.
Yeah I’ve seen this material mentioned a few times on ES. Every time I Google it, I just found clothing made from the material. I’m not sure where they’re buying the material? I may consider doing this to the motor as well.
I did find some of the PTFE membrane
AMTAST PTFE Membrane Disc Filter,
Thank you sir for your input, always informative

As long as the vents can't let in anything coming in from the top (let's say you get unexpected drenching rain while on a ride?)My local trails can get really muddy at times so moisture is definitely a concern. If I were to install vents, could put it on the very top of the battery where there would be no direct contact with Water, but yeah still moisture in the air.
The box will be 100% sealed once I’m done with it.
You may wish to build the box without the battery in it, sealing up just like you're going to on the bike, then do the worst-case immersion/mudsplatter/rain/etc tests you can think of to it over as much time as you can spare, to be sure it *really* is sealed.
") You can buy bluetooth-enabled "weather sensors" like these randomly-chosen ones
You can buy bluetooth-enabled "weather sensors" like these randomly-chosen onesthat have humidity sensors in them (I have one found at goodwill, 2ACD3-WS08

SensorBlue WS08 Smart Hygrometer Thermometer
Temperature Range: -40~65℃Humidity range: 0-100%RHAccuracy Temp: 0.5 ℃ Humidity: 3.5%Bluetooth 5.0 Display: LCDFree App Control: YesSensor Type: MEMSMaterials: ABSBattery: 1*CR2477History...
sensorblue.shop
You might need to specify you're looking for vents:Yeah I’ve seen this material mentioned a few times on ES. Every time I Google it, I just found clothing made from the material. I’m not sure where they’re buying the material? I may consider doing this to the motor as well.
Eastwood
100 kW
- Joined
- Jan 13, 2021
- Messages
- 1,479
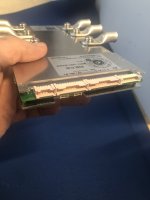
Received the charger from China. Looks well constructed! So it has 3 modes, lithium ion charger, lead acid charger and DC power supply up to 120v.

On the back of the charger, it has the negative and positive poles that can be bolted directly to. Now I need to make the charging leads, Or I need to finish the battery first so I can use the charger lol

On the back of the charger, it has the negative and positive poles that can be bolted directly to. Now I need to make the charging leads, Or I need to finish the battery first so I can use the charger lol
Eastwood
100 kW
- Joined
- Jan 13, 2021
- Messages
- 1,479
So I received these Gore Vents for the battery. These are super convenient.
The Fabric/material basically is breathable, but waterproof. (thanks amberwolf for helping me find this product!)
So the battery will be able to vent hot air and shouldn’t have to worry about moisture entering. Although I’ll still be cautious on the placement of the vents to make sure no Water comes in direct contact with the vents.
Now this is got me thinking about using something like this on the motor itself. I’ve reached out to the seller to see if they make a metal version or maybe this plastic can withstand the heat. I suppose, could test one vent to find the upper temperature threshold. I would imagine that these can handle high temperatures since they’re designed to help with thermal runaway in EV battery’s. Although I’m not using them necessarily for that, just to relieve any pressure that would build up in the sealed battery box. The way I’ve built this battery I don’t plan on having heat issues, but it certainly wouldn’t hurt to add some proper venting.
Here’s a link to the product.,
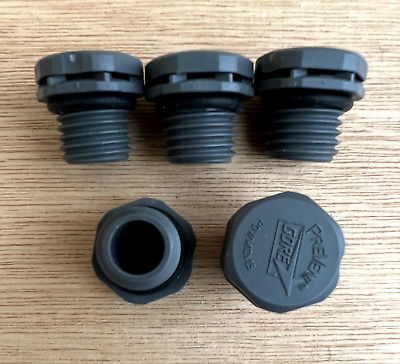

The Fabric/material basically is breathable, but waterproof. (thanks amberwolf for helping me find this product!)
So the battery will be able to vent hot air and shouldn’t have to worry about moisture entering. Although I’ll still be cautious on the placement of the vents to make sure no Water comes in direct contact with the vents.
Now this is got me thinking
about using something like this on the motor itself. I’ve reached out to the seller to see if they make a metal version or maybe this plastic can withstand the heat. I suppose, could test one vent to find the upper temperature threshold. I would imagine that these can handle high temperatures since they’re designed to help with thermal runaway in EV battery’s. Although I’m not using them necessarily for that, just to relieve any pressure that would build up in the sealed battery box. The way I’ve built this battery I don’t plan on having heat issues, but it certainly wouldn’t hurt to add some proper venting.Here’s a link to the product.,
GORE Industrial Membrane Vents - Quantity 5 **NEW** p/n PMF 100391 Excellent | eBay
For sale: Quantity 5 of Protective Screw-in Vents.
www.ebay.com
What plastic are the ones you have made from? Many plastics can handle 150F or so before severe softening; melting can take a lot more.
The datasheet
says they're polyimide pa6, and a quick google on that plus temperature finds
"Processing Conditions of PA6 and PA66The maximum permissible drying temperatures lie in the range of about 80 to 110°C. Polyamide 6 and Polyamide 66 are thermally stable up to 310°C. At temperatures above this lead to decomposition"
so you're probably good.
If you do need metal ones, they do exist:
Not sure which ones would best suit your needs.
(the datasheet also lists a metal housing version).
Attachments
Eastwood
100 kW
- Joined
- Jan 13, 2021
- Messages
- 1,479
thanks amberwolf !!
Ordered these metal ones on Amazon from your suggested search
Air Vent Plug Breather and Drainage Valves IP68 Amazon.com
I wonder how much these vents can actually help with cooling/heat?
My main purpose of using these is to relieve the pressure inside the motor from the heat build up, which then would prevent moisture from wicking in the motor as the motor begins to cool/pressure change.
Cooling and heating? Probably none, unless you have a high pressure cooling forced-air setup to push air into / suck air out of them (and I don't know if the goretex would survive that).
The vent itself is very small, and hasn't much in the way of actual air paths inside it, with a lot of flow resistance because of the goretex itself.
Ever stand at a screen door or window with a breeze blowing? Then open the screen and get way way more airflow past you? (presuming other unscreened doors or windows in a house are open to allow clear thru-flow)
Moisture-proof pressure relief is AFAICR the main purpose for these vents, so you're ok there.
I've got one of these, that I'm considering mounting on my current battery build. If I end up using it, I'll include a layer of DWR based material (similar to GTex) inside. The manuf. term used 'labyrinth' isn't as complicated as it suggests, in this case. Its just a long sided cap that umbrellas over the main fittings threaded tube piece, both parts being mechanically affixed together.
peadar
100 W
How do you like the BMS is it a good buy? i might buy for a 24cell volt module,Thinking about going with this BMS, 380a continuous and 950 peak. Its a new release from ANT BMS, like the fact you can bolt the connectors to the terminals. Since this is 380 continuous, I won’t need to bypass the BMS on the discharge. They also came out with a new 2.4 inch display for the BMS.
Thoughts on ANT BMS?
View attachment 337292
View attachment 337293

Eastwood
100 kW
- Joined
- Jan 13, 2021
- Messages
- 1,479
How do you like the BMS is it a good buy? i might buy for a 24cell volt module,
Haven’t used the BMS yet. I haven’t finish the battery build.
Similar threads
- Replies
- 20
- Views
- 1,009
- Replies
- 4
- Views
- 1,975
- Replies
- 94
- Views
- 7,525
- Replies
- 10
- Views
- 1,158