A2B build

fechter said:
ElectricGod said:
These Kenda tires are truly awful...lol...like we didn't already know that!

Boy, you can say that again! Those Schwalbes look like a great alternative for a stock A2B, which I still have a couple of. The really bad feature on the Kenda tires was that sharp edge on the side of the tread. If you lean into a corner hard enough to get on that edge, it just washes out and you crash. That and they get flats just by looking at them wrong.

LOL...I was already skeptical they were NOT any good well before people started saying they were no good. I too saw that edge on the tire tread and thought there was no way it would hold decent grip in a hard turn. The way the tire wall rolls over was disconcerting too. They didn't exactly design these bikes to be fast or powerful and the factory tire is pretty much meant for slow and easy riding. The Schwalbe bike tires might be a mistake...don't know yet how well they will do under power and speed. What I can say for sure is they are lots better than the factory tires.

This A2B won't be stock by any means! It will run a 5kw outrunner (Revolt RV-100-Pro) mid-drive at 16S or 20S. Which battery voltage is still TBD.
16S = 45 mph, 20S = 55 mph...ish...on this motor. 20S will be a heavier and bigger battery so that may keep me at 16S.

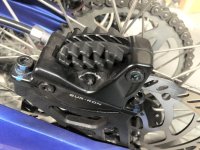
I have purchased hydraulic brakes, 203mm rotors and brake adapters. Say goodbye to the mechanical brakes!

I know there are better hydraulic bike brakes out there, but they also cost an arm and both kidneys! Lots of people use this brake on mountain bikes and they do fine. They ought to do OK for me too. Worst case, buy better ones later if they fade too fast. $50...probably still better than the mechanical brakes they will replace.

https://www.amazon.com/gp/product/B0751GN9VZ/ref=ox_sc_act_title_1?smid=A3652ZBQ53FUEE&psc=1

Magura makes a variety of brake adapters so I got a QM9 for the back and a QM5 for the front so both wheels can have 203mm rotors.

I'm not super concerned about weight and these are cheap. I looked at a variety of videos where people did 203mm upgrades and these specific rotors came up quite a lot as working well. At $22 a set...I can live with that.

https://www.amazon.com/gp/product/B073M8WF2Q/ref=ox_sc_act_title_3?smid=A2KJYE1N4P74F3&psc=1

Not as important...purely asthetic...the back wheel now has black spoke nipples. I HAD to make the front wheel match. I have pulled apart the front wheel and will be adding spoke washers under each nipple and using black ones instead. The bearings in the front wheel are smooth and turn nicely. No point in replacing them.
 
Doubt you'll regret the Shimano brakes; even the lower level ones are superb IMO.
 
2old said:
Doubt you'll regret the Shimano brakes; even the lower level ones are superb IMO.

Bike components a new thing to me. I have no idea what is good and what isn't. I'm 100% dependent on what others tell me.

Thanks for the feedback.

What about brake pads? I have no idea what comes with this brake set, but I bet it's the cheapest ones or resin pads. Is the cost difference worth it? E-bikes are never light and this one will have a decent battery pack on it that weighs something like 20 pounds. My 240 pounds and getting up to something better than 50mph. Maybe I need semi-metalic pads?

I see that there are 3 main types:
1. Resin
2. Semi-metal
3. Sintered

I'm used to scooter brakes. Even little ones are 2-4X larger than this! The pads on the factory brakes are micro small IMHO. Will the Shimano brake pads also be this tiny? For all I know...this might be just fine.

Factory%20brakes%203.jpg
 
I've been pretty impressed with the performance of the stock Avid BB5 brakes. Your main concern will be fade on a stop from high speed. I've tried all types of brake pads and each has it's strong and weak points. The sintered metallic ones I did not care for. They stopped OK, but had a bad tendency to squeak. The semi-metallic ones seem to be the best.

The real limitation with bike brakes is the thickness of the rotor. Not much you can do to fit a thicker rotor in the caliper. They'll stop good until they heat soak, then it's fade city. For flat ground it might be OK, but going fast downhill you can expect poor stopping performance. They make pads with cooling fins. I used these on my Sur-ron, which will be similar to your bike when you get it finished. These are the best I've tried. I use these on my fat bike too. The pads are Shimano.

Img_1158.jpg
 
From my limited experience (and not exposing the brakes to extreme conditions) semi-metallic pads are noisy and last longer than resin which are quieter and wear faster.
 
On a different subject...
Did anybody find forks for the A2B that use proper gas damping?

I watched quite a few videos about bike brake rotors. The majority are not about heat soaking or brake fade. I don't really care about watching a video all about installing a rotor. I did find a few that addressed brake rotor heat and pads with and without heat fins.

I was thinking about the speeds and weight, not rotor heat when I decided to get 203mm rotors and hydraulic brakes. Big rotors provide more mechanical advantage than small ones for the same clamping force. Big rotors ought to heat soak more slowly since the overall surface area is greater. This ought to allow for more time for convection to take away heat. I didn;t find any videos that addresses large vs small rotors and heat soaking, but this one seems pretty obvious that a big rotor is better than a little one.

The fact that bike rotors are so thin, they heat soak quickly. The rotors that have fins in them like the laminated IceTch rotors from Shimano are 3 layers. The 2 surfaces are stainless steel for good wear control. The center layer is aluminum with a fin on it to radiate heat. The fins helps to radiate heat and to keep the rotors from heat soaking, but at $75-100 each...OUCH! That thin aluminum fin has to be pretty fragile too.

A few videos showed thermal imaging of a brake rotor and pads. This was pretty telling. The added heat fin on the backing of the brake pad helps keep the pad cooler. The downside is heat is at the interface between the pad and rotor and only cintered pads make for decent heat conductors. Cheap pads, since they have no metal in them are the worst at conducting heat. Semi-metal is OKish.

Quad piston brakes do tend to have larger brake pads. This allows for more clamping pressure and a larger surface area for grabbing the rotor. They also heat up the rotor faster since you are rubbing on more area of the rotor. The added surface area and clamping force does make for stronger braking and probably helps overcome the extra heat somewhat.

For stamped stainless brake rotors, lots of small holes or slots in the clamping area create surface area for convection. There has to be a balance here. Too many holes and you have insufficient surface area to clamp onto and braking is compromised. Too few holes and the convection of heat to air is reduced and the rotor heat soaks too quickly and you get brake fade.

My suspicion for any of these brake rotors is that weight is a larger concern than heat. I think that aesthetics often times take greater precedence over heat control. I want rotors that heat soak the least, are cheap, stop a heavy bike and where the weight of the rotor isn't the big concern. This is probably the opposite of typical concerns for most bike components.

I have no idea if many small holes is the best balance between clamping area and venting surface area for convective heat loss.

Brake%20rotor%20-%20smallish%20holes%202.png


Brake%20rotor%20-%20smallish%20holes%201.png


Or this...lots of clamping surface area and very little venting.

Brake%20rotor%20-%20minimal%20holes.png


Or this, minimal clamping surface area and large holes. One aspect of bike brakes is weight. Lots of people count every gram in their bike so this is probably more about rotor weight than about how well they work as brakes. I imagine with so little clamping surface area and less than optimal convection surface area, that this sort of rotor heat soaks quickly.

Brake%20rotor%20-%20large%20holes%202.png


Brake%20rotor%20-%20large%20holes%201.png


New toys just arrived on my door step. The MT200 brake kit. I wasnt expecting the kit to include IS adapters. They are for 160mm rotors. Good thing I bought larger adapters too.

MT200%20brake%20kit.jpg


The new rotors are not huge compared to the old 180mm rotors. Still that extra diameter is mechanical advantage.

180mm%20vs%20203mm%20rotors.jpg


The calipers look nearly identical to the higher end versions. A little weight savings and a pad retraining screw instead of a cotter pin...that's not worth the extra cost IMHO.

MT200%20close-up%20shots%204.jpg


MT200%20close-up%20shots%205.jpg


MT200%20close-up%20shots%206.jpg


The levers are a bit more telling, but not incredibly so. No, swivel on the handlebar clamp so you have toi take off the grips to install the levers...that's not a big deal IMHO. THe set screw in the lever hinge is for setting the "swing" on the brake levers. It's a bit less conveniently located, but I can still set the levers for my hand size and finger reach.

MT200%20close-up%20shots%203.jpg


The levers are stamped steel instead of cast aluminum. That's the biggest thing I see. If they work and are comfy in my hands...who cares.

MT200%20close-up%20shots%201.jpg


The pads are something like 10-15% larger than the factory ones and clearly they are semi-metal.

new%20and%20old%20brake%20pads%202.jpg
 
The rear brake line needs to pass inside the bike frame. I need to take the brake line off the caliper to do this. So much for buying pre-bled brakes.

I have bought this brake bleeding kit. I've wanted one for a good while now for any scooter or bike brake bleeding job...just never had an excuse to get one.

https://www.amazon.com/gp/product/B07T85N3YK/ref=ppx_yo_dt_b_asin_title_o00_s00?ie=UTF8&psc=1
 
I bought DT Swiss 2.0 spoke nipples for the front wheel. The flats round over when tightening the spokes. Meh!
I bought custom length Sapim spokes for the back wheel, they came with Sapim polyax spoke nipples. Same level of tension on the spokes, never had even one roll over the flats.

100 DT Swiss 2.0 nipples cost $16
100 Sapim polyax nipples cost $47
Something is different despite them both being brass.

A friend went to a local bike shop and had a 26" rim restrung with a track hub. He already had the spokes and track hub. It cost him $150 for spoke nipples and restringing! I can't imagine why I would do that when this was sooo easy to learn to do myself.

Both wheels are ready to go tubeless. I used brass washers under all the spoke nipples for added strength. I'm still waiting on the PET tape to arrive to seal the spoke holes. I have light weight aluminum valve stems in place. Spinning the wheels, they have very little balance wobble. I'll see about removing all imbalance once they have the tires in place and are pumped up. I think the all black spoke nipples look great.

Photobucket is completely buggered right now. Can't even log in or see my image.
I get this error when I try to log in:

{"header":{"debug":[]},"status":0,"data":null,"messages":null,"hash":null,"form":null}

A2B%20wheels%20restrung.jpg
 
I got the 30mm PET tape today.
A little denatured alcohol on a clean rag cleaned up the inside of the rims nicely.
I applied two wraps of PET around the inside of the rim and then used a hard rubber roller to get solid adhesion.


Putting the tires on without tubes is remarkably easy. I didn't even need tires levers.
I bought some tubeless tire sealer so some of that went inside the back tire.
I'm thinking it is because of the flexibility of bike tires, but getting the bead to seat was a royal PITA!
Once it was seated, keeping it there was nearly impossible without constant pressure inside the tire.
With a scooter tire, pop the bead into place and it stays there.
The tire bead does not seal up easily. I have added tubeless sealer to it twice now.
It just keeps bubbling out the bead seat.
My whole tire bead bubbled like crazy at first.
I know this stuff takes a while to seal up, but geez!

I've currently got my 65 gallon air compressor set to output 3 PSI and connected to the valve stem.
Even filling to 55psi, there is too little air inside the tire to keep it inflated more than a few seconds before it leaks out again.
3 PSI is the bare minimum needed to keep the tire inflated, the bead seated and stay ahead of the leakage.
3 PSI also keeps the compressor from running all the time.
Higher pressure just leaks out faster and the compressor runs more often to keep up.

After several hours like this, the bubbling has reduced significantly, but not close to stopping.
My hope is...give it enough time (connected to the compressor over night) and the sealer will finally close up all the seeping leaks.

This sealer is pretty runny...like milk with tiny bits of teflon in it.
I think it's probably just too thin to seal up quickly.
I watched a few videos using the Stan's tubeless sealer and they get a few tiny bubbling leaks and that's it.
They do say it takes hours before the tire stops leaking.
Those videos made going tubeless look super easy.

I sure hope the front wheel is loads easier to get it to seal up!

I tried it on a scooter tire that has a slow seep at the bead. It sealed that up immediately.
 
I've done a number of tires with Stan's and with the proper air pressure they sealed almost immediately. All that was required was to spin the tire after the bead(s) "popped", and there was very minimal "oozing". Your situation sounds atypical. Tires have been known to "blurt' (don't know the proper term, but squirt out the sealant) and go flat immediately. My son, a fireman, was on a team that rescued a MTB rider who had a front tire fail and it wasn't a pretty sight.
 
2old said:
I've done a number of tires with Stan's and with the proper air pressure they sealed almost immediately. All that was required was to spin the tire after the bead(s) "popped", and there was very minimal "oozing". Your situation sounds atypical. Tires have been known to "blurt' (don't know the proper term, but squirt out the sealant) and go flat immediately. My son, a fireman, was on a team that rescued a MTB rider who had a front tire fail and it wasn't a pretty sight.

What you said...what I saw in the videos.
This looked super easy to do.

I have not had the chance to spin the wheel with air in it. It won't hold air that long.
To keep air in the tire, I have to keep it connected to the compressor hose.
I did spin it several times while deflated.
Best I can do is tilt the wheel in a circular motion with the hose attached.
I can maybe put the schrader valve back in now.
Till now, to keep the tire inflated took more air flow than the tire valve allowed.

Checked it this morning...still bubbling...grrr.
I filled the compressor tank again and left it under slight pressure. Maybe by tonight?
Maybe I should have tried it again at 55 PSI to see if it will hold air now?
I think why the MTB rider had issues is they want to use tubeless for very low tire pressures for traction.
I've read about tires burping from low pressure.
Mine will pretty much always stay at 40-55 PSI all the time.
OK...assuming I can get it to seal up!

I thought it might be cool to make my MTB bike tubeless.
After the hassle factor so far for the A2B wheel...I'm not so sure.
 
I'd be concerned that even if it seals eventually, it might be more prone to burping, never a good thing on a road bike. I've used Stan's on and off since the beginning pretty successfully on MTB. The problem for me was a couple of times my tires acquired a gash too large to seal and I had to boot the tear, then use a tube, not fun when you need to remove all the liquid first in order to prevent the tube from slipping out of the tire when it's inflated.
 
2old said:
I'd be concerned that even if it seals eventually, it might be more prone to burping, never a good thing on a road bike. I've used Stan's on and off since the beginning pretty successfully on MTB. The problem for me was a couple of times my tires acquired a gash too large to seal and I had to boot the tear, then use a tube, not fun when you need to remove all the liquid first in order to prevent the tube from slipping out of the tire when it's inflated.

I think I can "Test" this pretty harshly. Slam the tire down on concrete several times and see if it holds up or not. I plan on doing 50-55mph on the A2B. I do not want to die from a lame tire bead failure!

Any good suggestions of a solid tire in a 20" rim? Maybe the Schwalbe tires I got are not suited for this? I chose them becasue of their speed and strength ratings.
 
I have the best success with tires that are a tight fit on the rim. The front wheel on my BBS02-equipped hardtail has a Schwalbe; it sealed fine initially and holds air well. Perhaps the rims aren't suitable; you might compare the beads with ones known to be reasonably good like WTB's? IMO, don't go tubeless with the combination you have.
 
2old said:
I have the best success with tires that are a tight fit on the rim. The front wheel on my BBS02-equipped hardtail has a Schwalbe; it sealed fine initially and holds air well. Perhaps the rims aren't suitable; you might compare the beads with ones known to be reasonably good like WTB's? IMO, don't go tubeless with the combination you have.


I tried the front wheel...same thing...pisses air like a screen door out the tire bead.

I think it's the tire bead, not the rim bead. The tire bead has all these tiny radial ridges in its surface. It's not smooth at all. If they were parallel to the rim they would not matter, but they are 90 degrees to the rim. Getting air into the tire can happen, but it leaks out fast enough to not allow me to close up those zillions of tiny gaps in the bead. I'm convinced they are the problem, not the wheel. I think filling them with something like a contact cement ought to allow me to seal up the tire beads to the rims. Close up 90% of those radial ridges and I might get the tire to seal up.

Schwalbe%20tire%20bead_1.jpg


Steel and aluminum rims are usually an inner and outer part. They are rolled together and that makes the rim bead.
I did find a few spots where I had bubbles coming out around spoke holes on the ID of the rim.
It had to happen though the rolled seam between the inner and outer rim layers.
Those few leaks were tiny and sealed up quickly.

I cleaned up both wheels and tires.
There was no incursion of air or sealant under the PET tape.
 
Well...FRAK!

Some googling and research and...
This is deliberate so you have to buy their more expensive "tubeless ready" tires.
Schwalbe deliberately buggers the tire bead like on mine so you can't use them tubeless.
Probably other bike tire makers do something like it too.
Those radial ridges or grooves in the Big Ben tire bead are effective at stopping them from being used tubeless.
Looking at their various "tech" pages for the different tire types, the difference is quite small between tubeless and tubed tires.
It's so small that I read and reread the tech pages and still I'm not sure if any structural difference exists.
Essentially the added radial ridges in the bead or smooth bead is the "big difference" that I can see.
I saw in another tire that they mold a pattern into the tire bead that creates bead leaks.
GRRRRR!

Some more googling...tubeless vs tubed tires. The difference is very small. You always want to use clincher tires and rims. This is extremely common on just about any bike. Clincher just means the tire bead fits inside the rolled over edge of the rim so the tire locks into the rim bead. OK...I am all good there! The HUGE, GIANT, ENORMOUS difference (heavy sarcasm) is tubeless ready tires have an added square or sharp edge on the tire bead. This supposedly catches under the rim bead so the tire can't pop off under pressure. Regular clincher tires have the exact same bead, just no square or sharp edge. BIG GIANT WHOOPDIE DO!!! The difference is almost completely irrelevant...and for what? So bike tire makers can charge an extra $10 per tire! GRRRR!

I have a small stand-up scooter that uses 12.5 x 1.25 tires. This size tire was never intended for tubeless use or 45mph and 5kw. I went through 3 different sets of tires to find ones that would work well and hold up to my speed and power. The first set were fine, but the tread on the back tire wore off really quickly. 20 miles of use and the back tire was showing threads! The second set had weak side walls and they would roll over in curves. That was really interesting!!! The third set are doing great. One of the issues I had was the tire bead gripping the rim. The tires would migrate around the rim under torque or braking. With tubes it didn't take long to tear off the valve stems. To get the tire bead to seal up and hold in place I used spray on contact cement. I sprayed down the inside of the wheel with contact cement before installing the tires. Close to 2 years later it's doing great.

I think before I give up on these brand new Big Ben tires, I'll try a good layer of contact cement inside the rims. That ought to close up those radial ridges in the tire bead. Any small leaks after that, the tubeless sealant can handle that. No idea if this will happen, but the contact cement will stop any tire migration too.
 
I was about to test fit the back brake rotor and noticed a tiny problem. The axel on the track hub is 180mm long and I need 200mm to get nuts on the ends. I also need to put spacers on the axel to get it centered in the drop-outs.

The brake rotor is on a freewheel threaded adapter. It's moved too far inward to fit inside the caliper. I found a 6 bolt 44mm freewheel threaded adapter that pushes the rotor out by 5/8". I think between that and maybe some small amount of spacing behind the rear brake caliper, I can get the rotor and the caliper lined up. I need about 15mm to get them to meet up.

I bought a 200mm and 240mm axel. I know I don't really need 240mm, but who knows...maybe add pegs? Worst case, I'll use the hardware from one to get the spacing right for the other axel.
 
My thinking is a 20" rim needs a tire with a 20" ID right?

I can't put a 16-80/90 moto tire on my 20" rims since the moto tire has a 16" ID.

My Schwalbe bike tires are 20-64/64. That means an ID of 20". 64mm tall and 64mm wide.

How or why would moto tires be different?
This does not make sense to me.
A 4" difference in ID's is not going to work IMHO.

I've always thought the mix of measuring systems was odd. I've seen it dozens of times.
IMHO, all 3 dimensions ought to be in inches or in millimeters.
Why not just dimension my tires as 508-64/64 so it's all metric?
Or 20-2.5/2.5 so it's all SAE?
LOL!
 
ElectricGod said:
My thinking is a 20" rim needs a tire with a 20" ID right?
bicycle stuff and mc/moped stuff are different, so that depends on which kidn of tire and which kind of rim you have. afaicr the diamter of a bicycle tire is the outside diameter, and mc/moped is the inside.

but if you have a rim for a 20" bicycle tire, a 16" mc/moped tire fits it, in most cases (not all, becuase there's at least two sizes of "20 inch" bicycle rims, with different bead seat diameters, so the same "size" bic ycle tire won't fit both of them--sheldon brown's site probably ahs a page on that).

that'a what i'm using on sb cruiser--shinko sr714 16x2.25 on the wide 20" bike rims.

afaicr a 26" bicycle tire fits a 19" mc/moped rim. whole thread abou that somewhere here.


How or why would moto tires be different?
because they're for mc/moped and not bicycle, and for whatever reason, they have different standards. there are a number of threads around the forum discussing the diferences, including some stuff linked in the sticky index thread(s) of one of the forums. some of them have posts with charts and whatnot of specific stuff that cross-fits; everything else you can assume will not.


A 4" difference in ID's is not going to work IMHO.
that wouldn't work regardless of anyone's opinion. ;)
 
20” bicycle rims are really 16”. Bicycle tires go by the outside diameter of the tire. No clue why.
 
Thanks guys...that's not even slightly confusing.

Why use a different standard for measurements of bike tires?
You need to know the rim diameter so you have a reference for the tire height.
That's how car, scooter, motorcycle tires all work...seems logical to me.

I got bike tires because I thought moto tires at 16" were not going to fit my 20" rims.
Of course I was assuming they are actually 20" across. I never measured them.
I'll get some moto tires now that I understand.
 
I find these Shinko tires all over the place. I'm sure there are other 16-80/80 or 16-80/90 tires, but googling for this tire size lands me at the Shinko SR714 tire quite a lot. They are rated for speeds up to 75mph. That will do for the A2B. $41 each is the cheapest I've seen.

https://www.amazon.com/gp/product/B004126L56/ref=ox_sc_act_title_1?smid=A1P4Q6WVP7QBZ3&psc=1

I found these slightly narrower Shinko tires...57mm/2.25" wide vs 80mm/3" or 90mm/3.5". A wider tire isn't really needed on an e-bike IMHO. I'd put a 3" wide tire a on a 50cc sized or larger scooter. They are rated for 75mph and they cost a lot less ($27) than the wider versions. I don't see a down side here for an e-bike.

https://www.amazon.com/gp/product/B00274F0G6/ref=ox_sc_act_title_2?smid=A37XXUG3ZCSOX0&psc=1
 
Those don't look "tubeless ready". It will save a lot of headache if you can find ones made to run tubeless. I suspect the little grooves on the bead are there to improve grip to prevent the tire from spinning out in the rim. If there was an easy way to sand them off or something it might be OK.
 
i use that shinko model, 2.25" version, on the trike, but i'm not running tubeless. the bead on them is grooved, too, but once they've been on a rim for a while inflated, the rubber is soft enough that the bead impresses into them deeply enough that it would probably make a seal. that softness also gives the tires good grip, but they wear faster than harder tires.

i use these tubes
https://www.amazon.com/dp/B001A6D0R8/?coliid=I2XZQT95D8EU2W&colid=1RLDD8N5YW91G&psc=1&ref_=lv_ov_lig_dp_it

i'd guess the grooves are there as fechter said, to keep the tire from spinning on the rim, though they would also have the effect of making it hard to seal teh bead for tubeless.

the pirelli m75 or ml75 is another good tire that's been used on 20" bike rims here on es, especially back when ebike racing was a big thing several years to a decade back. i went with the shinko vs pirelli due to cost but the pirelli is probably worth the difference,
 
Back
Top