
You are using an out of date browser. It may not display this or other websites correctly.
You should upgrade or use an alternative browser.
You should upgrade or use an alternative browser.
Anderson Powerpoles - Soldered
- Thread starter Ypedal
- Start date
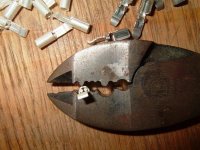
Got the old crimping tool out !
I don't have the fancy " A-PP Tool " yet.. this is the cheap 10 $ version.
It actually works, once you waste a dozen tips learning it's " Undocumented Features ".
The trick is to place the tip into the vice at the proper depth and angle.. can't just pop in there.......
Notice how the flat portion of the spoon is twisted to one side !.. You need to position the tip of the Vice so that it will push down evenly on the seam of the Powerpole. If you leave it flat.. one side digs in first and it twists the tip to one side. this will NOT enter the plastic housing very easily.
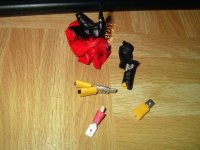
Attachments
I have been having a hard time soldering my Powerpoles to my own personal liking.. Everytime i soldered one it dis-colors the tip, I put too much or too little solder.. runs down into the wire too far and into the rubber insulation etc......
Since this project is not one of finess, i figured.. " Great time to practice my Soldering ! " :lol:
Last time i used my Iron i found it was really not getting hot fast enough or working the way it used to... Figured my Tip was burnt and needed replacing !.. Went out and picked up a new tip ( 2 actually.. while i was there.. you know how that works ! .. )
Dumb luck.. wrong size... one size too small.
Fine..
I had the old tip out of the iron anyways... and realized.. Holy Crap That sucker is dirty !!!.. Got the steel wool out and cleaned it up. Grinded the tip to a nicer shape with the dremel and re-tinned.. Dipped in flux.. wipped with a wet sponge.. re-tinned again and Voila !.. works like a charm again !
Dirty-Iron.. = No Good !
Since this project is not one of finess, i figured.. " Great time to practice my Soldering ! " :lol:
Last time i used my Iron i found it was really not getting hot fast enough or working the way it used to... Figured my Tip was burnt and needed replacing !.. Went out and picked up a new tip ( 2 actually.. while i was there.. you know how that works ! .. )
Dumb luck.. wrong size... one size too small.
Fine..
I had the old tip out of the iron anyways... and realized.. Holy Crap
That sucker is dirty !!!.. Got the steel wool out and cleaned it up. Grinded the tip to a nicer shape with the dremel and re-tinned.. Dipped in flux.. wipped with a wet sponge.. re-tinned again and Voila !.. works like a charm again !Dirty-Iron.. = No Good !
Attachments
Double post.. sorry.
Damit.. had a long reply all setup and hit the wrong key....
I have on hand ( i took Bob M's advice on solder ) 2 rolls of Kester 44
1.5mm and 0.75mm diameter, both 60/40 Rosin Solder.
Last time i used the 1.5mm stuff i was not satisfied with the result, i ended up cutting the wire and re-crimping without solder this time..
Trial and error can get costly, but i'm not going to sacrifice my dignity like that.. if it's not right... Do it again . I swear i have a touch of OCD sometimes..
Sooooo..
With clean fingers, fresh splice, properly crimped, Iron tip set to 40w, i used a clamp to secure the wire to my soldering desk, tip side up.
This time i used 0.75mm solder, Hit the barrel at the seam with the tip of the iron and waited a couple seconds, once i noticed the solder flow from the tip of the iron into the seam of the tip, i added aprox 2 inches of solder wire into the legs at the top.. Just until i noticed solder at the very bottom fo the seam then slid the iron off all along the seam to the bottom of the barrel.
Attachments
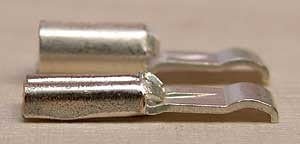
This i'm satisfied with.
The picture does not do it justice.. it look a bit better in real life :wink:
Now the next step.. Fitting them into the housings !
If you do it right, they should snap right in.. Now anyone who has used these can confirm that it's not always that easy !!!!!
If the spoon portion is not paralell with the body of the Barrel, it will NOT just slip into the housing.
http://www.flyrc.com/articles/using_powerpole_1.shtml
Quote "The contact in the foreground has been crimped. The “spoonâ€￾ component of the contact extends in a straight line; this angle must be maintained for proper mounting in the housing. "
Attachments
When you pop the tip into the housing,, it should " wiggle " a bit if you hold the wire close to the housing, and push it side to side..
If your powerpoles are in their housings by force ( Like when you use a nail to push the tip into the housing !! .. anyone else do that at times ? ) Then the surfaces of the spoons will not seat together flush when you conect your wires resulting in burnt tips, and loss of power. ( every last millivolt counts right ! )
If your powerpoles are in their housings by force ( Like when you use a nail to push the tip into the housing !! .. anyone else do that at times ? ) Then the surfaces of the spoons will not seat together flush when you conect your wires resulting in burnt tips, and loss of power. ( every last millivolt counts right ! )
TylerDurden
100 GW
Very nice tutorial Buzz...
I noticed two different types of tips in your "app-vice" photo: some have cylindrical shape, and others have a U shape.
Do they both do the same thing/ go the same place?

I noticed two different types of tips in your "app-vice" photo: some have cylindrical shape, and others have a U shape.
Do they both do the same thing/ go the same place?
Thanks !
They are indeed different.
On the left - 15/30 amp -- 12 to 16 gauge wire
On the right - 45 Amp -- 10 to 14 gauge wire
The vice has a spot for each. And the plastic-colored housings are the same regardless of wich is used.
They are indeed different.
On the left - 15/30 amp -- 12 to 16 gauge wire
On the right - 45 Amp -- 10 to 14 gauge wire
The vice has a spot for each. And the plastic-colored housings are the same regardless of wich is used.
Yes, nice job.
I've also noticed the contacts get bent slightly anytime you crimp them.
I pound them straight again before inserting.
I also highly recommend using a tiny dab of soldering paste (flux) on the wire, especially if it's old and partially oxidized. Make sure it's non-acid, electronic grade flux.
As you point out, it's important that the soldering iron is working well first. You need to dump in a lot of heat quickly so you can complete the joint before the heat conducts down the wire too much and starts melting the insulation.
very very useful link ypedal.
Thanks for that - i need to start putting my connectors on and didn't even know how they went in at all.
did you have a link to that solder you bought or have the full details so i can buy the same stuff?
i don't even have a iron yet!!lol knoxie suggested at least a 25w iron which i'll probably get from maplins do you guys think i should buy the 40w?
i will be using 45a andersons for most of my connections and i haven't soldered that much ever so any tips (especially on iron) would be great!!
any info welcome, size of tip,flux etc - i plan to crimp (have the crimper in the pics) and solder - does anyone think that crimp alone is better?
D
You'll want at LEAST a 40W iron. As Fechter pointed out, you need to dump a lot of heat very quickly. I use a large Weller butane iron for Andersons and it works well. Having a wide tip helps for this application; the more contact with the piece, the faster the transfer of heat.
With large connectors especially, you want to heat up the connector rather than the wire. Once it gets hot enough to melt solder freely, you can remove the heat and let if flow.
With large connectors especially, you want to heat up the connector rather than the wire. Once it gets hot enough to melt solder freely, you can remove the heat and let if flow.
Thanks Patrick,
Thats just the sort of info i need - i'm going to buy an iron and solder tomorrow so thanks for the quick response.
i do see myself messing up quite a few andersons so i will have a practice before i start on my kit - i'll get the 40w iron, i think maplins do one with a holder and sponge..... i'll post a link later see what you guys think.
i did hear that the crimper i have isn't the best but i guess it will do the job.
D
Good Day D !
A 25w iron will get the job done.. 35-40 will get the job done . a bit quicker.
Small stuff like soldering 10 to 14 gauge wire, or Andersons etc can be done with a 25..
Bigger tasks like soldering tabs to batteries, require a hotter iron so you can get in there and out before heating/melting the safety vent under the battery post ... a 25 w iron would require you to sit there for 10 seconds where a 50w iron will do it in 4...
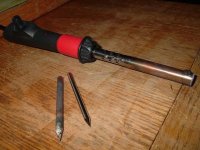
Over the years i've found myself with a few irons. i have a 15-25 selectable switch type.. and a 15-60 adjustable with knob ( in picture above ).. They are relatively cheap to buy.
Tips.. a cone shape iron tip is most common.. sometimes you can find Hammer-Head types for battery work.. or Flat types etc.. but a cone shpae is fine.
Name of the game is to work with a CLEAN iron tip. With a sponge.. or even soaked Paper-Towel.. wipe the tip clean just before you solder.. if you clean the tip and let the iron sit for a minute.. it will oxidize quickly and turn blackish...
Before you hit the tip with the iron to your work.. dab the Solder onto the tip of the iron to " Tin " the tip.. this will help the iron transfer heat to the work by producing a bigger contact patch between the iron and your work.. let the iron sit for a second or 2 and then add more solder wire.. remove the solder wire leaving the iron on the work for another second for the solder to really melt in there.. then slide the iron off ..
Done !
A 25w iron will get the job done.. 35-40 will get the job done . a bit quicker.
Small stuff like soldering 10 to 14 gauge wire, or Andersons etc can be done with a 25..
Bigger tasks like soldering tabs to batteries, require a hotter iron so you can get in there and out before heating/melting the safety vent under the battery post ... a 25 w iron would require you to sit there for 10 seconds where a 50w iron will do it in 4...
Over the years i've found myself with a few irons. i have a 15-25 selectable switch type.. and a 15-60 adjustable with knob ( in picture above ).. They are relatively cheap to buy.
Tips.. a cone shape iron tip is most common.. sometimes you can find Hammer-Head types for battery work.. or Flat types etc.. but a cone shpae is fine.
Name of the game is to work with a CLEAN iron tip. With a sponge.. or even soaked Paper-Towel.. wipe the tip clean just before you solder.. if you clean the tip and let the iron sit for a minute.. it will oxidize quickly and turn blackish...
Before you hit the tip with the iron to your work.. dab the Solder onto the tip of the iron to " Tin " the tip.. this will help the iron transfer heat to the work by producing a bigger contact patch between the iron and your work.. let the iron sit for a second or 2 and then add more solder wire.. remove the solder wire leaving the iron on the work for another second for the solder to really melt in there.. then slide the iron off ..
Done !
xyster
10 MW
I swear i have a touch of OCD sometimes..
There's good help for that these days. Call 1-800-HEADHLP and wait for the menu.
If you are depressed, press 1 and hope someone cares enough to pick up. If you are schizophrenic, press 2 and a little voice will tell you what to do next. If you have obsessive compulsive disorder, press 3 repeatedly. If you have multiple personality disorder, press all the keys in any order, one after the other. If you are co-dependent, have someone press 4 for you. If you are a sex addict, press 6 and 9. If you're trying to quit smoking, press 7-11. If you have an anger management issue, slam down the receiver, take a time out, pick up and phone again. If you are suicidal, it doesn't matter what you press, no one will help you. If you are paranoid, just hold on the line, they were expecting your call.
X- Funny ... i like it .... * hits 3333333333333333
D - Check out Youtube and search " solder "
http://www.youtube.com/results?search_query=solder
Great info out there....
D - Check out Youtube and search " solder "
http://www.youtube.com/results?search_query=solder
Great info out there....
http://www.youtube.com/watch?v=iwIZw_RTyVI
OK.. here is how NOT to do things...
1- He spliced BOTH wires of the battery pack at the same time... never do this.. work with one terminal at a time... Shorting a Lipo pack with metal tools and a hot iron in your hands can get ugly.
2- He only cleaned his iron once at the begining, Bad practice.. he also used a dry paper-towel.. this tends to burn onto the iron tip causing a dirty tip... always use a wet sponge/towel. And clean your tip before Every solder, then tin the tip.
3- Metal vice grips.... try to find plastic tools for solder work, i use plastic vices and clamps when ever possible. You will melt them at some point, but it's much safer.
4- Clutter on the work bench.. he had metal pens laying around.. avoid this situation.. keep your work area clean.. and free of metal tools that are not required.

OK.. here is how NOT to do things...
1- He spliced BOTH wires of the battery pack at the same time... never do this.. work with one terminal at a time...
2- He only cleaned his iron once at the begining, Bad practice.. he also used a dry paper-towel.. this tends to burn onto the iron tip causing a dirty tip... always use a wet sponge/towel. And clean your tip before Every solder, then tin the tip.
3- Metal vice grips.... try to find plastic tools for solder work, i use plastic vices and clamps when ever possible. You will melt them at some point, but it's much safer.
4- Clutter on the work bench.. he had metal pens laying around.. avoid this situation.. keep your work area clean.. and free of metal tools that are not required.
cheers ypedal,
they are very useful films for me as i haven't soldered since school, too many years ago to say
ill be getting some soldering gear today and putting on a few connections maybe during the week, i think i better practice on some spare wire first couple of times also.
Cheers
D
they are very useful films for me as i haven't soldered since school, too many years ago to say
ill be getting some soldering gear today and putting on a few connections maybe during the week, i think i better practice on some spare wire first couple of times also.
Cheers
D
BiGH
100 kW
Hey quick question - which soldier is best to soldier 75a anderson connectors? I used resin cored for my last set of connectors, i'm thinking maybe i should use solid core? does it matter? am i being pedantic?
i only ask because i can't crimp them - the 75a crimper is $500aud over here!
i only ask because i can't crimp them - the 75a crimper is $500aud over here!
Dalecv
1 W
I would use rosin core.
http://www.tpub.com/neets/book4/12i.htm
http://www.tpub.com/neets/book4/12i.htm
CGameProgrammer
10 kW
Solder, not soldier.
These crimping pliers are $13 US. They do a great job of crimping the 75-amp connectors if you use a vise to squeeze the handles.
These crimping pliers are $13 US. They do a great job of crimping the 75-amp connectors if you use a vise to squeeze the handles.
Attachments
Agree on the 60/40 flux cored. This stuff is designed specifically for electrical and electronic soldering.
For best reliability, assuming you can't get hold of the correct crimping tool, crimp as best you can, then solder. Let the crimp do the mechanical work, and rely on the solder only for conductivity. Also, best practice is to clean off all flux residue as the flux is mildy corrosive.
For best reliability, assuming you can't get hold of the correct crimping tool, crimp as best you can, then solder. Let the crimp do the mechanical work, and rely on the solder only for conductivity. Also, best practice is to clean off all flux residue as the flux is mildy corrosive.
Malcolm
10 kW
I reckon a sapper would be your best choice mate 
Link
1 MW
Pete said:For best reliability, assuming you can't get hold of the correct crimping tool, crimp as best you can, then solder. Let the crimp do the mechanical work, and rely on the solder only for conductivity. Also, best practice is to clean off all flux residue as the flux is mildy corrosive.
I dunno. I have a hell of a time fitting contacts in the 30A housings when I crimp them at all. It's virtually impossible for them to fit after I've crimped them, let alone added a little solder. I solder only. I abuse the connections pretty badly, and I've never had one come loose.
CGameProgrammer
10 kW
That happens when you use a generic crimper on a powerpole. You need to use something better.Link said:I dunno. I have a hell of a time fitting contacts in the 30A housings when I crimp them at all. It's virtually impossible for them to fit after I've crimped them, let alone added a little solder. I solder only. I abuse the connections pretty badly, and I've never had one come loose.
Similar threads
- Replies
- 8
- Views
- 1,301
- Replies
- 0
- Views
- 465
- Replies
- 3
- Views
- 1,754
- Replies
- 25
- Views
- 3,290