Bottom Bracket Maintenance - Help Please

Eclectic

1 kW
Joined
Aug 6, 2012
Messages
308
Location
Southern California (San Gabriel Valley)
Since I was not a bike guy before my eBike (previous bike maintenance experience was nearly 50 years ago when I had a newspaper route), I have been avoiding doing anything with my bottom bracket and cranks. But they seem to making a lot of clicking, creaking and squeaking noises so I guess I can’t avoid it any longer.

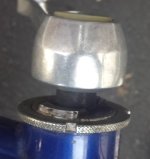
The only part that is obvious to me is that I have Sugino MP 110 cranks. Here are a couple of pictures.
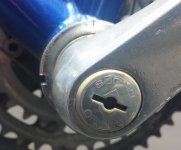
20150730_134206.jpgView attachment 2View attachment 120150730_151212.jpg
A couple of questions:
- Can anyone tell me what kind of bottom bracket, axle and bearings I might have?
- What special tools would I need to disassemble, reassemble the BB?
- Other than tools, what else might I need (parts, what kind of grease)?
- What search terms would make it easier to find specific maintenance info for my type of BB?
- Any other sugestions?

Thanks

PS – Is that just a cover on the end of the BB axle? If yes then how is it removed and what’s underneath it?
 
Probably a 9 ball roller cage inside the bracket.

Yep, those covers should pop out or maybe lightly unscrew and then either hex bolt or socket cap screw to remove. Probably need a puller to pop the crankarms off the spindle which is probably square although I've seen a few that look like big Torx bolts.

With arms off, use a drift and hammer to loosen the outer retaining ring. Clean all parts, replace pitted bearings and bad cages.

Or, better yet try to find sealed replacement bottom bracket but I warn you - there's many different widths and offsets. Might wanna show your old parts to a knowledgable bike shop and try to size up a sealed cartridge.
 
Is this what would be called an Adjustable Bottom Bracket?
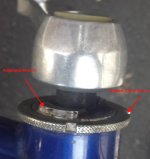
20150730_151212-notes.jpg
If I don’t have a C-spanner wrench, I think I could use a screwdriver and a hammer (see picture)?

Is the other part that I pointed to in the picture the adjustable part of the BB? I noticed some seemed to require a pin spanner. Can I use a large adjustable wrench (Crescent wrench) for that part?

It appears to be a square shank on the axle. I haven’t seen anyone suggest anything other than a crank puller. Do I need a crank puller or is there an alternative?

Everyone seems to recommend actual bicycle grease (a tube of Park Tool or similar), would that be your recommendation?
 
Yes you have square taper cranks. The piece with the flats is the adjustable cup, and you can use a large (12") adjustable wrench on it. A smaller wrench will work too, but it can be hard to engage both sides of the cup past the spindle.

A crank puller, or extractor, is the tool of choice for removing the crank arms. You can use a gear puller, but it will do cosmetic damage to the cranks, and possibly the frame.

You may be able to loosen the lockring with a punch and hammer, but it won't do for tightening it again since there won't be anyway to hold the adjustment as you tighten it.

If your BB hasn't been serviced since new it most likely has old general purpose Lithium grease. That is what I would recommend. Specific bike greases are high grade, but not special considering the price. Park Polylube is a polyurea grease, and if you use it you need to thourougly clean out all of the old grease due to incompatibility. You can buy a tub tubsof polyurea grease for a fraction of the cost of the same tube of grease in a bike specific label.

If you plan on removing the fixed cup know that it is left hand threaded, so backwards. Also, pay attention to the way the spindle comes out since many of them are assymetrical, and the long bit needs to be on the right side.
 
Ykick said:
... but I warn you - there's many different widths and offsets....
Truer words were never written. Not to mention that BB manufacturers like to create parts that require special tools.

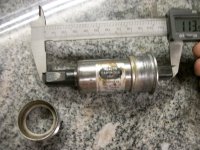
My old sugino nutted spindle measured 127.5 mm taper end to taper end and I could not find anything that matched.
I wound up purchasing a new sunlite BB but will use the old spindle. That gives me new bearings and fasteners that can be removed via a Park HCW-4 tool.
My other bike is getting a FSA crank set --- so it seems I need to acquire/build a specialized tool to remove/install the left side cap
 
The clicking is probably damaged bearings, and/or a scratched or cracked bearing cup. Could be debris inside too, but mostly that ends up being bits of the bearings or the cage that rusted apart (if water got down the frame tubes to the BB and didn't get to drain).


Grease; I use red wheel bearing grease, forgot the name, for cars. it's hight temperature stuff and stays semisolid even in the direct sunlight-heated frames here in midsummer in Phoenix, AZ. Also holds loose bearings in cups during assembly really well. ;)


Since I build tsuff from all sorts of bike types and junk parts, many of which use different tools to take apart or adjust, I don't buy many actual bike-specific tools, and tend to use what's laying around that fits well enough to get parts off and on. ;) The only tool I use on cranks that was meant for it is a Sunlite crank puller, cuz that works on all of the ones I've ever run across (except ancient cottered cranks).

I use a large set of 90-degree-jaw slot-adjust pliers (damned if I can remember what their real name is) to grab and loosen / tighten the lockring around the outside of teh adjustable BB cup (which is the part you see with the raised wrench flat on it). I hold two of the three slots with the jaws.

When doing the final adjustments for tightness, I use a regular box wrench to hold that wrench flat, while using the pliers to tighten the lockring.
 
If you've got square taper cranks you'll probably need a crank puller to get them off. You can get the lock ring and rest off with regular tools. I had to replace my bearings after a year on my Mongoose because the cages shredded. It originally had 9 ball cages and I replaced them with 11 ball cages and haven't had a problem since in ~9K miles despite one idiot here claiming they wouldn't last 2 weeks.
 
The thread on the chainwheel side is a left hand one. There's different types on that side, but the most common type has two flats, so you can remove it with a big adjustable wrench. Others have dogs or holes that you can knock round with a hammer and punch, but don't forget that it's clockwise to get it off.

Personally, I wouldn't waste my time doing anything with the stuff that you remove. I'd replace the whole lot with a sealed cartridge one, which won't cost much and will probably never trouble you again. When you've disassembled your present one, measure the length of the spindle. That's the length of the new cartridge one that you'll need. It won't matter if it's a few mm out.

You need to check that your BB tube is 68mm long, which is the most common size. Here's an example of what you want, except you have to get the right length:

http://www.ebay.com/itm/New-Shimano-BB-UN55-Bottom-Bracket-Square-68-mm-110-mm-MM110-BC137-/111611749098?hash=item19fc9422ea

To assemble it into your bike, you need a standard Shimano BB tool. Here you can get it with the necessary crank extractor:

http://www.ebay.com/itm/Bike-Bicycle-Crank-Extractor-Bottom-Bracket-Remover-Repair-Tool-Alloy-Steel-/271596743413?hash=item3f3c6d6af5
 
If you ride in any type of wet weather (particularly salty slush) you absolutely NEED sealed cartridges. Recreational, dry riders, not so much.
 
My experience is similar to yours. I thought I had a problem with my bottom crank due to clicking, creaking and squeaking noises. Turned out to be the bearings in the pedals going out. New pedals and the problem was solved.
 
Thanks guys. This is the kind of info I was looking for. The more info the better. Keep it coming.

I am more concerned with downtime than my abilities to do the work. This is my daily commuter and I am worried about getting things torn apart and then having to wait a week or two for a part or tool to show up in the mail. It is much easier to local source car parts and tools then bike stuff so I want to be as well informed and prepared as possible.

This is a 25-30 y/o MTB from CL. I've had it ~3 years (>5,000 mi). It came from a good home (upper class family) and looked like it had been reasonably maintained and seldom ridden. I only paid $60 for it and was thinking this might cost more than the bike did. :eek: BTW This is a SoCal bike so I know it hasn't seen rain since I've had it.
 
OldTimer said:
My experience is similar to yours. I thought I had a problem with my bottom crank due to clicking, creaking and squeaking noises. Turned out to be the bearings in the pedals going out. New pedals and the problem was solved.

Yep; I was wondering about them also. It seems to be difficult to diagnose a drive train problem that only shows up while you are pedaling hard and are surrounded by several ton steel monsters.
I figure that it would be a good time to service the BB while I am trying to figure out what is wrong. Ahhh...the joys of building your own transportation. But it is just so satisfying :D . I guess that most people would see this as very strange behavior. :roll:
 
I don't think there's anything special about your bottom bracket. This is a job for the bike shop, if you're not confident.
 
Unfortunately there were a dozen or more different spindles used in bottom brackets like yours. So, the easiest way to know which replacement you need is to pull the spindle out of the BB, and look for a code like "3r," or "3s." Once you have that code it's easy to figure out what modern BB length you could use to replace it. Unfortunately it's not as simple as just getting a new BB that has the same spindle length as the old one since most of the old ones had asymmetrical spindles, and gave more room to the right side for the chainwheels. Modern BB's are symmetrical, and so in most cases you'll end up with a little longer spindle than your original. The advantage is that even cheap modern BB's are much better than most of the old cup and cone BB's.

If you can figure out what replacement you need the job is actually really quick. Pull the cranks, pull the BB, put in the new BB, and install the cranks. it's not too bad if you have the right tools.
 
I’ve always been able to patch-up old ball/cone versions. Sometimes leaving the cage out and merely add a couple similar diameter balls and a bunch of grease until I can source proper replacement parts. The only tool I cringe not having is the crank-arm puller. I could probably rig something if I had no choice but one of those cheap Park tool puller's sure worth having.

My ebikes are transport too although I do have extras so nothing is ever too critical. We dealt with this on a co-worker bike last winter. I patched it up enough to get by until we found the proper sealed cartridge.
 
Either spend money on tools or pay a bike shop to fix it. The later option won't teach you anything and will cost more.

Personally prefer the former. Going down this route means less damage - can reuse things if the replacements don't fit or can't be found.

Crank puller, wrench for lockring, not sure about the washer in the middle. Yes, hammers and screwdrivers will work but they are the wrong tools for the job. You are risking damaging a lockring you may still need or damaging the end of the screwdriver. Further, you'll probably be surprised how much you will use them once you have them and it makes the job easier/quicker to complete.

I think if you use google to understand what you need to do, particularly youtube videos (i.e. search Sugino crank dissassembly).

Tools can often be purchased online much cheaper than in shops and as for grease - shimano grease or park tool is ideal and considered better than generic options. However, generic options are generally cheaper - it's up to you depending on what the bike is worth to you. Just search things on chain reaction cycles, wiggle or anywhere else online for the right tool and best price.

Yes, a sealed cartridge is superior but could be a pita to figure out which to buy. I would probably take it apart, check for damage, replace (either existing bearings or with a cartridge) if necessary and regrease and reassemble. I imagine this is a new toy which you want to ride asap, and given that, I would just service whats there to buy time to find a better sealed replacement cartridge BB at a later stage.
 
Based on what I can understand from here (and the Inter-Webs) a Crank Puller is a "Must Have" (well almost a must have).

Current game plan...Buy the one tool and take the BB apart. Take the parts to a LBS (I have 4 to choose from but none is very eBike friendly, if all I have is parts then they won't know it's from an eBike). If I can't find a contemporary replacement part right away, I'll pack it with wheel bearing grease and put it back together until I can get a sealed unit to replace it.
 
After you get everything apart put all greasy dirty parts in a can of your favorite solvent. Kerosene, paint thinner, gasoline, or whatever ya got. WARNING gasoline is flammable - dangerous. Other solvents are also flammable. Little $1 paint brush is good for cleaning parts with solvent. After everything is clean blow it off with compressed air if you have any. Shop vac on blow would also work. After everything is dry. Inspect with a good light. If things look good? Grease, reassemble, adjust. No bike shop needed. I use auto wheel bearing grease for bikes, cars, and rocket ships.

I should take a picture of my parts cleaning system. Little can with holes in the bottom. Fits in a bigger can. Put the lid back on the big can so I can reuse my kerosene. I am old and remember when coffee cans were made from metal.

Marty's rule for adjusting most all bike, car, and rocket ship bearings. Hand tight then loosen 1/4 turn.
 
I enjoy the luxury of a commercial 4L steam cleaner and leave harsh, flammable solvents alone. Water is a great solvent when delivered @ 60psi in steam form.
 
amberwolf said:
I use a large set of 90-degree-jaw slot-adjust pliers (damned if I can remember what their real name is)....
Fifty years ago they were called 'water pump pliers'. Being an old fart I still them that.

Ykick said:
If you ride in any type of wet weather (particularly salty slush) you absolutely NEED sealed cartridges. Recreational, dry riders, not so much.
The Sugino BB used a plastic sleeve between the bearing cuts to provide virtually the same functionality (keeping the water and crap out).

One can get a new bearing set and use the old spindle. The new bearing set also has rubber seals on the ID of the bearing cups (fits around the spindle). The spindle is not likely to be damaged and reusing it solves the problem of getting a 'close' match.
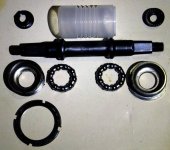
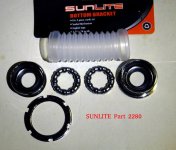
Sugino BB (smaller).JPGSunlite BB Bearing Set (smaller).JPG
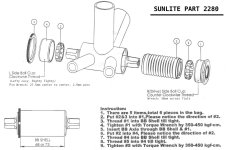
The Sunlite does have a different type bearing cup. This is a picture of the two along with the end of the Park HCW-4 tool that does NOT fit it. The tool can be used if one removes one of the pins and uses the spindle as a fulcrum.View attachment 1
The instruction (cleaned up with notes added for wrenches) includes a helpful 3D layout.
Sunlite BB Instructions.JPG
EDIT:
Apparently the 'proper tool' is Park Tool SPA-6 Adjustable Pin Spanner or SPA-1 or SPA-2. (all of theses have 2.9mm pins).

Warning: Adjustable angle grinder pin wrenches have 4mm diameter pins. Adjustable BB have 2.9mm holes. FSA Self Extracting Left Crank Arm Bolt Rings have 2.25mm holes.

Better Pin Tool:
Filzer Bottom Bracket Cup Tool (BBC-2). Comes with both 2.2mm and 2.8mm pins.
It can also be used for different center to center distances.
http://www.amazon.com/dp/B004FRWTWQ
 
Whatever you do, if you replace the bearings, get 11 ball cage bearings instead of 9 ball. The cranks will turn truer. The ones in the photos above are 9 ball bearing cages.
 
I'd bet money--and I don't have any to waste-- that the bottom bracket is a perfectly ordinary British threaded 68mm unit, cheap and not worth overhauling.

At my shop, a Shimano BB-UN26 sealed cartridge replacement costs $16 and the labor would run about $15 including any necessary adjustment of the front derailleur.
 
I believe the majority are using the square taper spindles and english threaded 1.37 x 24 threads. Those pictures look just like this set of cups I bought from niagracycle.
http://www.amazon.com/BB-SET-SUNLT-1-37x24-ENG/dp/B0010VZFSK/ref=sr_1_2?ie=UTF8&qid=1438419218&sr=8-2&keywords=bb+cups+bike
View attachment 4
One side threads in clockwise, the other goes xclockwise. One side has the shoulder, one side has the nut.

My current bike uses a un51 style sealed bb. It can work in a 68-73mm shell

113.JPG
Same principal to install/remove, just no nut.

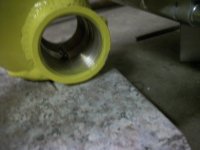
Threads are the same for the most cups and standard sealed bb's, so as long as the bb can get snug in the shell and engage a reasonable amount of threads they work well ime.
shell.JPG
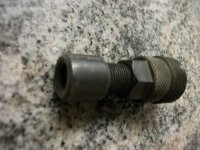
Diy, you (imo) want a crank puller, I messed with all kinds off stuff and couldn't get it. The puller is like a knife thru butter.
http://www.amazon.com/XLC-bike-tools-crank-tool/dp/B000NU2WAS/ref=sr_1_1?
ie=UTF8&qid=1438419126&sr=8-1&keywords=bike+crank+puller
puller.JPG
and then I would consider a sealed kit over the unsealed. Measure the approx bb width, probably around 68 - 73. Then measure the length of the spindle, probably 113 or so?
This one can be ordered in 68x109 -73x124 Lots of options.
http://www.amazon.com/Shimano-BB-UN26-Square-Bracket-68x113-mm/dp/B001EIAZ7A/ref=sr_1_1?ie=UTF8&qid=1438419016&sr=8-1&keywords=bb+sealed+68+113+jis
It's the un26

If you buy a sealed, buy or borrow the 20t socket for install and removal!
http://www.amazon.com/BIKEHAND-Bicycle-Shimano-Bracket-Removal/dp/B00811WQJS/ref=sr_1_12?ie=UTF8&qid=1438419795&sr=8-12&keywords=bb+tool+bike
I think most are a 20t

Utube was helpful for me to learn and see things. Keep in mind you want to know which way to spin each side of the bb to remove/replace. I think it was xclockwise on the rightside and clockwise on leftside for removal, but would def double check that. utube is great, you can find people removing cups and sealed, and probably have alot more info to gleen than this post. I recently made my first wheel, including calculating and cutting spokes, and truing without a stand, tension gauge, or dish gauge. Learned much from utube.

If you're diy, you could take a chance on the bb threads and just measure the bb and spindle length. Order that, the puller and socket, and you may be set. Worked for me.
 
nutspecial said:
... Those pictures look just like this set of cups I bought from niagracycle. ... http://www.amazon.com/dp/B0010VZFSK
I believe that is Sunlite part number: 2221
http://www.jbi.bike/web/checking_product_description.php?part_number=2221

Links for the 2280 part:
Sunlite: http://www.jbi.bike/web/checking_product_description.php?part_number=2280
Amazon: http://www.amazon.com/dp/B000AO7HD4

Both the 2221 and 2280 part numbers use bearing cages with 9 steel ball bearings.
The only difference (that I can detect) between the two part numbers are:
1) that adjusting bearing cup for the 2221 has flats as opposed to pin holes on the 2280 part
2) the 2280 part includes rubber seals in both bearing cups
3) the 2280 part includes a plastic sleeve to go between the two bearing cups

There an advantage to using a replacement bearing set (vs replacement sealed cartridge) is if one has a problem matching the spindle dimensions. :?
This is a 'can not fail' solution that guarantees no change in the chain line or Q factor (provided that the old spindle is installed the right way round). :shock:
 
Back
Top