Building battery from MAKITA Konion PACK

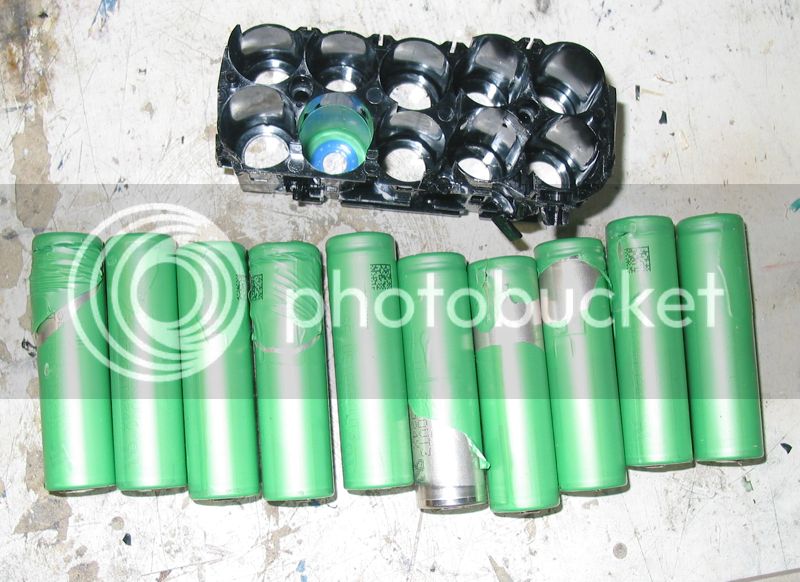
I just finished cutting out pack 8 of 30. I've yet to see one of those laser welded packs (hope not to). What has worked best for me so far is scoring the nickel with a utility knive 4 or 5 times. After #7 I haven't sliced down into my thumb again yet :shock:
Then I come up underneath with a precision screwdriver like they sell at the 99 cent stores, it breaks easily at the score. All this is done on the negative side only, I kept getting annoying sparks trying it on the positive side. I then score the positive side in the same manner. Because I first separated the negative side, the two paired cells are halfway loose from the pack and I can bend them around and simply bend once and the positive side (where they are still paired, but series'ed to the next set's negative terminals) comes loose from the adjoining pair of batteries. Rinse, repeat.
It all works pretty well except for the thumb thing. Don't think I'll ever approach 5 minutes though, but I'm not in a hurry, quality over speed for me. More or less leaving the positive side alone lessens the risk of damaging the insulator at this touchy interface. I take great care in dressing the nickel on the positive side.
I tried my Dremel but it was slower and just didn't work as well. But I don't really have a bit that is up to the task, next trip to the hardware store I'm going to pick up one of those blades & try it.
 
Has anyone used the restored makita packs whole?
I just made a copper plug to insert into that fine quality makita jack. i took 1/4" copper tubing, flattened it to .36"x.060x2" and lightly coated it with solder so it wont corrode. i'll check it for voltage sag just to be sure.
This way if a restored pack develops a problem, it can easily be removed whole, for repair on my workbench. or QUICK replacement!
Good idea or am i missing something?
 
This is just me, but I like to take the time to separate all the cells and make sure that the nickel strip on the positive sides of each cell are folded in a nice little button that will not come in contact with the can and elevate the bus bar by a millimeter off the can. I also like to let all the separated cells sit for at least a couple weeks. After a couple weeks, checking the voltage of each individual cell, I always find a few that lost a considerable amount of voltage. From what I understand, these ''duds'' would not get weeded out if the cells were left connected in parallel. Again that is just the way I like to do it, a few in here absolutely find it ridiculous to separate all the cells.
 
I was cutting them apart with small sissiors, But that was with the old packs, I think from 2009 ? ? ? When I looked in the pic's of Doc's pac's it looks like all the one's he use's hard the thicker busses. ? The ones I got from Drbass all had the thinner busses ??? So I think where 2009 or 2007 ???? Same thing with Slayer used packs. So these thinks can be very OLD and from Cananda very rusty. Cation.
 
I agree with mistercrash, with the exception, when you disconnect the "Siamese twins" on one end, they ARE separated electrically, and can easily be treated as such. And you must, I don't know how you'd separate them from the plastic holder without taking one end loose.
I'm pretty sure I'm going to spot weld mine, pending future spot weld experiments, so really to me "saving" the original nickel strip is kinda optional. But I do it anyhow, just in case.
I really like the idea of using the case whole, but one question: How would you weed out the bad batteries? They are there, that's why doctorbass and you get them.
And then there's the extra 1" at the top wasted space where the connection is.
 
999zip999 said:
I was cutting them apart with small sissiors, But that was with the old packs, I think from 2009 ? ? ? When I looked in the pic's of Doc's pac's it looks like all the one's he use's hard the thicker busses. ? The ones I got from Drbass all had the thinner busses ??? So I think where 2009 or 2007 ???? Same thing with Slayer used packs. So these thinks can be very OLD and from Cananda very rusty. Cation.


The lastest gen of makita ( 2011 and after if i remember) are using thinner nickel buss to allow more flrxibility and not break the spotweld. These also have 4 spotweld instead of 2.

the thinner buss is larger than the thicker one so the current handling remain the same.

The pictures of my 432 cells pack use the older makita. The exemple of i made to show how to assemble with 5 parallel cells is showing new pack with thinner buss.

Doc

Doc
 
Does the circuit board on these packs drain current from the pack? I had a bunch of them sitting since the summer and most of them have slowly died on me, dropping under 10v/pack.
 
if the BMS has a defect than it could drain the pack. disconnect it to find out.
 
Matt Gruber said:
if the BMS has a defect than it could drain the pack. Disconnect it to find out.

Exact, they will be drained just like any lithium packs that use BMS.

I will add a notice in the thread to inform people that if the wait months they should charge the cells at least!

Usually people that are asking for makita, are planning bnulding their pack with in days or weeks, rarely months.

Doc
 
marty said:
How do you charge a defective BL1830 Makita battery pack that has not been dissembled?

The simplest way is that you can bulk charge it slowly during 1/2 hour at C/2 directly to the positive and negative but this have the effect of also charging the lower cells that you want to reject and might make the sort work more difficult to identify the low and bad cells.

Otherwise you have to remove teh shell and cahrge thru the bus link. but it work great anyway.

I use neodyum magnet as contact and i have soldered wires on them (at lower temp as well). This make an efficient way to Quickconnect th cells.

Doc
 
marty said:
How do you charge a defective BL1830 Makita battery pack that has not been dissembled?
Takes 5 minutes to open the pack. 2 minutes with practice and a power driver.
Then you check the cell voltage. Then charge the good cells. Just up to 4.00v if they will be stored, even 3.70 is fine, but if they slowly discharge, 4.00 is better. Just my opinion from reading ES archives. This is how i do it.
 
Well, has anyone found an easy, or even POSSIBLE, way to disassemble the new packs. Mistercrash?
I just spent the whole day on 1, I've got 5 of them. I tried a nichrome hot wire, that's the best thing I've found so far, but it's not very green insulator friendly. At least I can get them out. And one cool thing about them, Sony decided to do something about the insulation around the positive terminal, there is a nice thick red, looks like rubber, washer there.
After mutilating the first 2 batteries I discovered the two plastic pieces on the ends of the batteries are held together by the same security screws that the outside shell is assembled with. Besides of course the nickel strips. I thought they were rivets & tried drilling them out. So I managed to unscrew the 1 remaining security screw, I have the hex head bit, so it doesn't fit without drilling, but managed to enlarge the hole enough to unscrew it. No help. That plastic is very firm and tight on the batteries. So I got the "great" idea that maybe I needed to drill out the hole completely through, drill grabbed, saw smoke and bubbles, threw the pack outside a few minutes ago, there it is, peaceful, but apparently one battery that won't be going into the pack.
So unless somebody's got a better idea, I reckon I'm going to have about 40 batteries covered with electrical tape. Not the end of the world, but tacky. And although it works, it's slow going.
 
If your security bit isn't long enough grind the shank back for deeper access ability into the hole.
I also use a dremel with the fibre wheel ( or that fragile one) to cut the foil.
 
I found a foldup bit set at Home Depot. Long and skinny, more sizes than needed but might need them elsware.

I put my packs on a belt sander till the foil is gone. the battery still has small buttons on them. I have red and blue positive washers.

Used a good hot iron, tinned the cells, then laid the jumpers to them. So far all done this way were good as new, full 15000mah+ for 10p. Found many of older ones with all cells still good, bad bms I would guess.

Out of 40 pacs, I have 315 good cells.
Inclding 2 like new packs that fully charge on the Mikita charger for my drill!! lucky catch.

Dan
 
Thanks a lot guys. I also found this on a google search: http://endless-sphere.com/forums/viewtopic.php?f=14&t=52883
Funny how extreme battery questions always lead to ES or candlepower.
Good suggestions all. Unfortunately, in my small town we have a junior Home Depot, this is definitely the only model of security driver I can get here. I've seen the one you describe, looks like a pocket knife, the drivers flip out one by one. Like hex keys are often.
But the grinding idea is a good one, why didn't I think of that? About 34 packs ago...
I think my other "great" idea about the hot wire was shooting me in the foot, all the plastic getting molded together in weird ways, it's only melted where the wire touches, solidifies instantly when you move. That's why it wasn't working so good for me and at the end, even with the screws gone I couldn't pull the halves apart.
I'll grind that bit down tomorrow and give it another go. And lay off of the great ideas.
 
Doctorbass said:
Matt Gruber said:
if the BMS has a defect than it could drain the pack. Disconnect it to find out.

Exact, they will be drained just like any lithium packs that use BMS.

I will add a notice in the thread to inform people that if the wait months they should charge the cells at least!

Usually people that are asking for makita, are planning bnulding their pack with in days or weeks, rarely months.

Doc

Yup, i should not have waited so long. So many projects though!
 
Can anybody post some pictures of the new packs dissassembly? I don't know how to dremel the plastic holders once all the security srews are removed. I don't know how much deep im supposed the cut into the plastic holders ???
I'm still stuck on pack #1, and did a fair amount of damage to the cells.
It's a good thing the great doctorbass provided me with a dud pack for practice...
:wink:
 
From our beloved Doctorbass from the previous page of this thread.

file.php
 
Yes thanks, I saw that already. But still I can't see how it is humanly possible to pry out the individuals batteries.
That plastic casing is so firmly set on the cells...

I am kind of happy though, I just realized the packs doctorbass sold me are from the last generations, but the "practice" pack are from the new one. There is no way in hell I would disassemble the new generation, but the old is easy enough. I just did one in 2 minutes ;), while I spent more than 10 days one the new generation. ;)
 
I took apart more than a dozen of those new packs. The first two or three, I struggled with them because I didn't have the right long thin bit to get to those two screws holding the two black plastic halves together. But once the two screws are out, the circuit board is off and the cuts are made to the nickel strips with a thin diamond disk in the Dremel, the two plastic halves come apart with some force but still easily.

EDIT: finishing to take apart the last batch of Makita packs I got from Doctorbass, I stumbled upon a difficult pack like jslabonte was mentioning earlier. It took some work to get the two plastic halves apart and when they finally gave under my super human strength, the shrink wrap tore on most of the cells. I included a pic below. It was like the cells were glued in there, but I found no traces of glue. All that work was for nothing though as all the cells were below 2.5V. Lesson learned here, next time, right after taking the cells out of the pack, that is when I will check the voltage to find out if it's worth continuing. Could the cells have swollen a bit because they were below 2.5V?

bad_makita1_zpsd307a692.jpg
 
Serie first or parallel first?

Here is a document to help you understand why PARALLEL first is best:

Connecting Batteries in Parallel: Unexpected Effects And Solutions
http://liionbms.com/pdf/BPC2012Elithion.pdf

Doc
 
mistercrash said:
Could the cells have swollen a bit because they were below 2.5V?

NOt really. This happen rarely. most of the time the cells with black stuff under the green skin is moisture. I never was able to make any correlation on the cell performance and the balck stuff. I measured cells in pretty bad shape with some black stuff and they had pretty good capacity and RI...

Lesson learned.. avoid trashing a cell because of his bad physical look... test it before! Dust, decoloration or balck stuff seem to have no reall effect on the cell performance after i tested thousand of these single cells over the 6 last years.

Doc
 
It was not an issue about cells with black residue under the shrink, as you can see in the pic, all the cells look very clean, it was just an issue of the cells coming out of the plastic holder with the shrink tearing.

As for the cells with the black underneath the shrink, I always used them if they prove to be good, but simply for aesthetics, if I have enough cells to not incorporate the black ones in a project, I will set aside the black ones for something else.
 
Back
Top