Chaos upgrade - 72v 20ah LiMn

Slow progress, but progress !

I'm on vacation this week, got out of bed at 10:30am ( I can't sleep in like i used to, am i getting old or something ? ) Had Beer and Eggs for breakfast, and i have an idea how i'm going to do this...

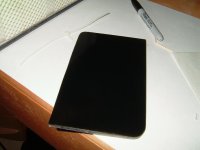
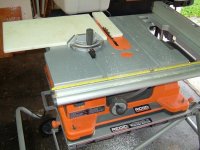
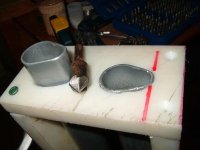
Here are the 2 pieces of Nylon cutting board, 16mm thick material, this stuff is Insane Strong, Using a scroll saw and a dremel tool with a router bit i cut 2 holes making as close a fit as i could. turned out ok.

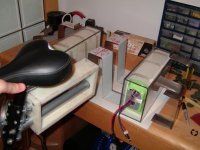
I'm going to have a piece all along the top, and in the middle of this material giving me enough room between the boxes for the rear tire when the suspension goes all the way down..

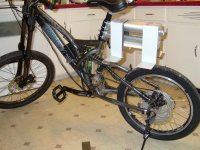
I"m feeling good about it , should not break, too easily, :lol: No squeaks, no rattles, nothing loose.. I'm ITCHING TO GO.... this is going to be fun, with 20ah on board, i don't have to be gracefull with the throttle anymore ! :twisted:
 
Its true you can sleep less as you get older, but the beer and eggs fro breakfast makes me think your not all THAT old :p
 
Then painted the inside of the 2nd piece black, this way the pain will be between the 2 layers of lexan on the inside, protected so it won't peel/scratch.

I hope the epoxy will stick to the paint layer properly, will find out tomorrow once the 1st layer dries.

I've been using this pack on my Giant to get to work, inside my back-pack..

Can't wait to have both packs strapped to the Norco.. getting close . :p
 

Attachments

  • end2.JPG
    end2.JPG
    33.8 KB · Views: 2,763
Had some banked time piled up at work so i took the afternoon off to work on the bike some more.

Pissing rain outside.. but with the garage door open it's a relaxing work enviroment ! :p

Put my trusty table saw to work, purchased this thing a few years ago and have barely used it, i should have bought the cheaper Canadian Tire brand .. but Nooooo.. I had to go buy the Ridgid ! lol.. works awsome tho ! scares the hell outa me but i'm getting used to it.

I tried using my Jig Saw to cut this Nylon stuff but the blade would not track straight against the clamped fence setup i used.. so out came the table saw ! :twisted:
 

Attachments

  • saw1.JPG
    saw1.JPG
    75.9 KB · Views: 2,733
Sick. L33t. All those wonderful things; I want one.

My table saw scares me, too. I think they do that on purpose so you'll never get too comfortable with it, but I haven't found any documents to back the theory :lol:

One more thing - I'm not sure how perm you intend for the cutting board parts to be on the rack arms, but as crazy as it sounds I've found that the rubber cement-like-stuff they seam fish tanks with works for taking jiggles out of some projects.
 
Yes, i'm going to use 2 part Epoxy Gel and 2 inch deck screws per corner. That should hold it !!!

I went to Canadian Tire last night to restock on Lepage 5 minute Epoxy, lady at the cash was looking at me like i had a " Problem " .. :shock: .. i was going to explain " Electric Bi... oh never mind.. How much.. "

Got more done tonight, quite alot done actually !

CHECK THIS OUT !!!!!
 
We bent 3" strips of Stainless Steel ( not sure what gauge, but damn THICK.. this stuff will not strech, or rust !!!

I'm going to line the straps with foam rubber to prevent any vibrations/rattles/etc..

2 Trays fit on the rear rack, then the 2 side pieces will squish the whole thing in and screw tight into the top of the rack hanging down 1 " below the deck.
 

Attachments

  • Metal2.JPG
    Metal2.JPG
    62.4 KB · Views: 2,761
Yikes, man, too much weight in the back!

Long ago (last year) I rode with all 30lbs of lithium hanging on my back rack a lot like that. It was death-wobble city at speeds over 28mph, and bad handling at speeds slower.

Now that weight is split 3/5th up front by the handlebars, and 2/5th on the back rack. Problem fixed.

But anyway, very nice looking work! :D
 
I know.. :(


But given the situation i have very few options, I really don't want to open up a pack i have barely used yet, during the winter months i may do something different, but for now it has to be back there.

I did do my best to locate the boxes as low as possible without hitting my heels when i pedal ( Yeah.. pedal.. :twisted: )

Most of the weight will be well below my ass, and i've tested the bike with both these packs in my backpack !!! .. with my 72v 8ah NIMh pack still strapped to the bike..

No more jumping curbs, but she's gonna be strong !
 

Attachments

  • bike1.JPG
    bike1.JPG
    76.2 KB · Views: 2,746
Ypedal said:
I did do my best to locate the boxes as low as possible without hitting my heels when i pedal ( Yeah.. pedal.. :twisted: )

Most of the weight will be well below my ass, and i've tested the bike with both these packs in my backpack !!! .. with my 72v 8ah NIMh pack still strapped to the bike..

If you remember my first pack build (middle pic), all the weight was below my ass too. Seems the laws of vehicular weight distribution are not be conned either. Fortunately I have lots of small cells, which can be rearranged as necessary.

4_5_6_174.jpg
 
:shock: wow !

Looks like alot of the weight was behind the rear axle. That would cause the " Wheelie effect ! " :D

I weighed the entire seat/dual posts / white plastic deck / metal brackets / everything that bolts to the frame other than the batteries

6.5 lbs total !

Battery packs with lexan boxes = 17 lbs each

17 x 2 = 34 lbs. + 6.5 = 40 lbs !


I Just put my old 48v 12ah SLA pack onto the scale = 37.6 lbs !

Lets see:

48v 12ah SLA = 37.6 lbs delivers 8 ah = aprox 400 wh of usable power

72v 20ah LiMn = 34 lbs delivers 18 ah = aprox 1300 wh of usable power !

( i say 18ah just because that's the most i've taken from one pack during bench testing, stopped at 35v at 17.x ah pack was still going but 35v is my self imposed lvc !!! bms says 30v but i have not gone there yet )


:p
 
Ypedal said:
:shock: wow !

Looks like alot of the weight was behind the rear axle. That would cause the " Wheelie effect ! " :D

A good point. In order to bring it forward, I would have had to widen the pack to clear the rear triangle. Still, much happier handling with most of the weight up front.

How wide is each pack, including the new housing? My front box extends 3" beyond each side of the 1.5" frame tubing (7.5" total width). My admittedly skinny knees have room to pedal without brushing the box. I'm wondering if you couldn't similarly hang your packs near the front if you wanted.

img_2413_132.jpg
 
WOW Ypedal -you have some serious boxwork going there :shock:

They will be safe from any bingles for sure.
My setup for my batts is very similar -haven't noticed any bad handling -i can fly around corners and don't get the wobbles.

Perhaps because Xy's rear suspension placement and batteries being further back might make the difference in handling?

Cheers
Dom
 
Xyster : I can't mount batteries up front because of the Dual-Crown forks, when i turn, the fork legs would hit the boxes unless i bring them back quite far, then it's a knee problem.

I could/will mount one of the packs down the downtube like i had with the Nimh packs eventually, i want to use these packs as i received them so if i have a problem, i'm not the cause of it ! once they prove themselves, i'll re-arrange them to my personal likes.. :wink:

Dom : Thanks, i'm pretty sure this setup will work very well.. my rear shock is decent quality ( will be replaced with an external reservoire type with an extra inch of travel during winter to bring the cranks up a bit more )

Xyster rear swingarm is made in such a way that it will flex, it's made in a " V " shape with no support going from the pivot point at the cranks to the shock mount at the top..

My front end is also heavier i suspect, this will help keep the front wheel down and going straight !


Hmm.. I need a new front 24" tire... schwallabe mabe ?
 
More parts.. :p

- Can of Dupli-Color Textured Metallic Coating, to spray the white cutting board...

- Sheet of Foam, this is found at Wall Mart in the factric/art supplies section, First found it at the dollar store scavenging for ideas. Waterproof, high-density thin sheet foam, to line the inside of the Stainless Steel straps, preventing clatter and will prevent the boxes from slipping from the brackets.

- Rubber Floor Mat, from the Auto Parts dept at Wall Mart, flat on one side, ridges on the other, I may use this instead of the foam , not sure yet.

- Drill Bits, i have a bunch of worn bits that just don't cut it no more.. so i picked up a few new one's.. 2 x Makita 5/32 Titanium Nitride Coated and 1 x Mastercraft M35 Cobalt Drill Bits .. In order to drill thru 20 gauge Stainless 2 layers thick 16 times !
 

Attachments

  • Parts1.JPG
    Parts1.JPG
    79.5 KB · Views: 2,558
And finally ( hopefully .. )

Stainless Steel machine nuts and bolts to secure the 2 strap sections together.

Everything is SS, no rusting. The batteries will be completely sealed, the controller has been sealed, should be the best ride i've had so far.

This is taking way longer than i had expected it would take, but i'm pleased with how it's going so far.

On every project something always ends up " Good Enough " and sacrifices are made along the way, alot of hands on learning going on here, but with the internet available and a growing aresenal of tools each new project gets better..
 
Ypedal said:
Xyster rear swingarm is made in such a way that it will flex, it's made in a " V " shape with no support going from the pivot point at the cranks to the shock mount at the top..

I've been thinking about this lately too. With no help from me, my bike is just barely able to pull small wheelies now -- in so doing there must be tremendous force transmitted to the area around the rear shock and rear triangle -- so I'm thinking about how best and cheapest to reinforce the rear triangle. I'm pretty sure my thick, stubby wood shock extension will hold; not so sure the thin, long, hollow aluminum triangle won't compress and crack, or compress and force some part of the shock to break. What do you think?
 
Back
Top