Connecting Powered/Voltage Display Twist Throttle to Sabvoton Controller

jakmobile

100 mW
Joined
Dec 21, 2024
Messages
42
Location
Virginia Beach
I recently bought one of those locking twist throttles that have the digital battery power readout and the keyed lock. There's a total of 5 wires on the twist throttle, 3 are dedicated for the throttle itself which. I have sorted out however there are 2 left, well 1 really that I can't figure out where to splice it in on my Sabvoton SVMC 7280. Here's a screenshot from the product page of the throttle. So I think i've got the yellow wire figured out as I have power being displayed on the readout, what I can't figure out is where to splice in the blue wire. I've been told to splice in to the orange wire on the controller but I see 3 of them and even them, I'm not sure where I need so splice them so that the lock works correctly (currently I have no way of locking the bike so this function was the main reason that I bought the throttle in the first place. That said, can someone please confirm where I need to splice the blue wire into the controller. I've also attached a wiring diagram (not everything is included of the controller but hopefully it will help. Thanks! I can also provide pictures of the controller harness and the wiring thats there.

1739580918195.pngScreenshot 2025-02-14 at 8.01.36 PM.pngScreenshot 2025-02-14 at 8.01.53 PM.pngScreenshot 2025-02-14 at 8.03.07 PM.pngScreenshot 2025-02-14 at 8.03.25 PM.pngScreenshot 2025-02-14 at 8.03.32 PM.png

1739580918195.png
 
What red and green wire? Are they in the connector marked #12?

Did you connect.disconnect the learning wires like it said in the instructions?

View attachment 364002
I'm trying to find the #6 wire on my Sabvoton SVMC 7280 but can't figure out which one it is, anyone have any suggestions? Here's the wiring diagram
 

Attachments

  • Screenshot 2025-02-14 at 8.01.53 PM.png
    Screenshot 2025-02-14 at 8.01.53 PM.png
    1.1 MB · Views: 20
  • Screenshot 2025-02-14 at 8.03.07 PM.png
    Screenshot 2025-02-14 at 8.03.07 PM.png
    1.1 MB · Views: 21
  • Screenshot 2025-02-14 at 7.52.20 PM.png
    Screenshot 2025-02-14 at 7.52.20 PM.png
    521.1 KB · Views: 19
I'm trying to find the #6 wire on my Sabvoton SVMC 7280 but can't figure out which one it is, anyone have any suggestions? Here's the wiring diagram
Same as the orange ignition wire, but instead of a jumper, connecting orange to battery (+) turns on the controller.
The second diagram is for the version that supports a display, in which case you turn it on with the display buttons. Which do you have?
 
Hi Jakmobile,

From your description it sounds like you want to be able to power the controller on and off from your new key switch.

Using your top wiring diagram for reference. (no display interface) This is done by providing battery+ power to the ORANGE controller wire labeled "orange ignition". Since it sounds as if this has been powered (or jumped) previously, you would break the present connection between the RED battery power and the ORANGE ignition wire. Abandoning and insolating the RED wire connection and connecting the ORANGE controller "ignition" wire to your new throttle BLUE wire. Which receives full battery+ power when the key is turned "ON", as well as the new voltage display.

As always, keep the high voltage wiring of the key switch far from the low voltage wiring of the throttle's hall sensor! :eek:

Hope this helps,
T.C.
 
I wasn't sure which post to respond to, so I chose the latest one.
 
Ok, I'm definitely confused. Let me start with what I'm trying to accomplish. First and foremost, I wanted to swap the throttle over to a different throttle altogether. So for that, I literally just moved the 3 wires in the black harness (picture above), 1 for 1 to the wires that was connected to the old throttle. Secondly and most importantly was that I wanted the physical keyed lock on the new throttle to actually lock either the controller from turning on or keeping the throttle signal from being sent to the controller. I'm not sure how these throttles handle this situation so as long as it accomplishes the end goal of not being able to ride the bike without the key, then I consider that a mission success. Now, with the remaining two wires on the throttle, the yellow and the blue wire is where I'm a bit confused. As there are MANY places to splice in the yellow wire to get the batteries current levek, I spliced in as close to the controller as possible, so in this case I'm connected directly to the D+ connection on the controller with an actual connector that is screwed on underneath the power cable. I"m now getting the batteries power level displayed but I'm left trying to figure out where the remaining blue wire (coming from the throttle) gets either spliced or connected directly to the controller. This last wire does its magic by getting either spliced or directly connected to the controller. I've been told (using the diagram above as reference, that I need to connect into the orange. Thats fine, providing thats the right answer, the issue is I dont know where exactly to connect into it as there are several locations where that's possible. I can take pictures of the locations unless someone knows where it should go. In any case, thanks for the help guys!
 
TommyCat provided you with a detailed solution already. Right now, the voltagre readout turns on when you turn the key. After connecting to the controllers orange ignition wire, as described above, turning the key will also turn on your controller.
That all assumes that you have the controller with the orange ignition wire, and not the other one that uses a display and PAS (from your second diagram). You never said which.
Ok, apologies. So as it stands now, the current setup of the bike has a display on the main crossbar and also has a 3 or 4 button "remote" on the left handle bar which has a power button it to turn on the display and the controller. Along with that power button, you also need to press the button on the battery itself to have the ability to turn the display and controller on. Within the diplay and the display's remote, you have the ability to change PAS. Does that answer your question? I think it does but there is an orange wire coming out of the main harness and being spliced several times. I can't tell where the orange wire ultimately terminates and which part of the wire I need to follow which is what is part of what's throwing me off.

So I follow your logic about turning the key also turns on the controller but just from a different location. So if I'm understanding this correctly, I need to combine the yellow and blue wire on the throttle side and the splice it into a single wire on the controller side, I just don't know what color it will be and where in the line it should be.

Does that make sense? Would it be helpful if I provide more pictures? Apologies, I'm not trying to be difficult, I would just prefer to know what it is that I'm doing so I can troubleshoot it later down the road if need be.

Cheers
 
Ok, I'm definitely confused. Let me start with what I'm trying to accomplish. First and foremost, I wanted to swap the throttle over to a different throttle altogether. So for that, I literally just moved the 3 wires in the black harness (picture above), 1 for 1 to the wires that was connected to the old throttle. Secondly and most importantly was that I wanted the physical keyed lock on the new throttle to actually lock either the controller from turning on or keeping the throttle signal from being sent to the controller.
These are two different things, so before explaining anything you need to decide which. Disabling the throttle signal will not disable PAS which I believe the display model of the controller supports. If that’s ok, then the steps are pretty easy and can be done within the throttle itself. Someone could still turn on the bike and ride away using PAS, but no throttle. Ok, or not?
Disabling the controller is a bit more complicated, depending how you want it to work, and probably requiring two steps to turn the bike on, once turned off.
Which direction are you leaning?
 
I'd like someone not to be able to use the throttle or PAS at all when it's locked. Essentially I want it to be like a car, lock the key and the bike cannot be powered on and off.
 
Hi Jakmobile,

From your description it sounds like you want to be able to power the controller on and off from your new key switch.

Using your top wiring diagram for reference. (no display interface) This is done by providing battery+ power to the ORANGE controller wire labeled "orange ignition". Since it sounds as if this has been powered (or jumped) previously, you would break the present connection between the RED battery power and the ORANGE ignition wire. Abandoning and insolating the RED wire connection and connecting the ORANGE controller "ignition" wire to your new throttle BLUE wire. Which receives full battery+ power when the key is turned "ON", as well as the new voltage display.

As always, keep the high voltage wiring of the key switch far from the low voltage wiring of the throttle's hall sensor! :eek:

Hope this helps,
T.C.
Hi TC,

I'm not sure I follow what you're trying to accomplish with this "
Since it sounds as if this has been powered (or jumped) previously, you would break the present connection between the RED battery power and the ORANGE ignition wire. Abandoning and insolating the RED wire connection and connecting the ORANGE controller "ignition" wire to your new throttle BLUE wire. Which receives full battery+ power when the key is turned "ON", as well as the new voltage display.

So are you saying that the orange ignition wire needs to be a straight connection from the controller directly to the blue wire on the throttle and removing any power that's being inserted in somewhere along the line with a red connection? If so, does the yellow wire from the throttle now provide the voltage display on the throttle connected the way it currently is? I wish I had Visio or something to draw out a diagram as that would be helpful for me to try and follow what needs to be connected to what and where.. The orange wire currently has several breaks in it so no knowing which one does what makes it a little more difficult. Honestly theres only so many functions going on here so this really shouldn't be this hard (I'm saying it's my fault, not yours.). Frankly I don't really care about the voltage read out on the throttle, the main goal outside of the throttle is just having a way to lock the bike wihout using just a chain lock.
 
Thanks for the clarification.

Your second diagram is cutoff at the bottom half where the display connector pin out would be shown. The rest of the diagram would be helpful. Does your display connector have a blue wire?
E-HP, which diagram, can you tell me the name of what's written down the left hand side? What if I were to splice into the orange wire that goes in/out of the alarm? The alarm does make noise, not sure what functions it has or how it accomplishes them though.
 

Attachments

  • IMG_1103.JPG
    IMG_1103.JPG
    1.9 MB · Views: 4
E-HP, which diagram, can you tell me the name of what's written down the left hand side? What if I were to splice into the orange wire that goes in/out of the alarm? The alarm does make noise, not sure what functions it has or how it accomplishes them though.
Thanks for the clarification.

Your second diagram is cutoff at the bottom half where the display connector pin out would be shown. The rest of the diagram would be helpful. Does your display connector have a blue wire?
I don't think there is a blue wire on the display but I'm having to unziptie a bunch of cables to get to the cable for verification.
 
E-HP, which diagram, can you tell me the name of what's written down the left hand side? What if I were to splice into the orange wire that goes in/out of the alarm? The alarm does make noise, not sure what functions it has or how it accomplishes them though.
The bottom of your second diagram is cutoff. The full version is below. If you are using the version of controller than supports a display and PAS, then the second diagram should be your controller, that shows the display connector at the bottom. The blue wire of the display connector is used by the display to turn the controller on or off. Inserting a switch in series with the blue wire would allow you interrupt that circuit so the controller can't be turned on by the display buttons, unless the key switch is turned on. Does the diagram below represent the version of controller that you have?:


SVMC7280-M.jpg
 
So it turns out that the wiring diagram labeled "MQ ML series Wire diagram" is the one that reflects the controller I have. It doesn't show the USB cable and there is also a black cable that has like 8 pins in it. The black cable has a female connector on it. In any case, sorry for the confusion and hopefully this helps. Screenshot 2025-02-20 at 9.37.29 PM.pngScreenshot 2025-02-20 at 9.37.44 PM.pngScreenshot 2025-02-20 at 9.39.21 PM.pngScreenshot 2025-02-20 at 9.39.41 PM.pngIMG_1130.JPGIMG_1133.JPGIMG_1132.JPGIMG_1131.JPG
 
But I do have a display and I do have PAS but the connectors and wires on the controller look exactly like the diagram I posted above. Here's pics of the display and the PAS number to the right changing.
 

Attachments

  • IMG_1134.JPG
    IMG_1134.JPG
    1.8 MB · Views: 4
  • IMG_1136.JPG
    IMG_1136.JPG
    1.5 MB · Views: 4
  • IMG_1137.JPG
    IMG_1137.JPG
    1.4 MB · Views: 4
But I do have a display and I do have PAS but the connectors and wires on the controller look exactly like the diagram I posted above. Here's pics of the display and the PAS number to the right changing.
If you follow the 8 pin cable, does it split to a 5 pin and 3 pin on the other side (display and PAS)?
 
I would like to commend you for your patience. It seems that the wiring documentation for your particular controller model is a bit sketchy. I unfortunately have been not able to find a correct match.

I wish I had Visio or something to draw out a diagram as that would be helpful for me to try and follow what needs to be connected to what and where..
You don't need anything fancy... just a white sheet of paper with a high contrasting marker. Do the best you can, label everything, take a picture and upload. :)

Please disregard my previous post's solution as after more research I have a different view at this time. Here is why...

Often controller manufactures will include an "ignition" circuit to make it easy to do what you are attempting to do.
In this example, this single wire and therefore the circuit. Is energized by providing full battery+ power to the "ignition" wire.

But it appears to me that Sabvoton has taken a different approach. Conclusion reached by looking over several similar wiring diagrams and product description pictures.

Your Sabvoton model is SVMC7280-M, correct? Referencing your description page pictures you posted above.

It looks like their ORANGE "ignition" wire, instead of an input wire. Is actually just a full battery+ wire out.
This provides battery+ voltage to a connector that has a jumper wire that is required if a switch (or key switch in your new throttle) is not used, then on to your display, and possibly the alarm system.

To verify my theory, proceed as follows...

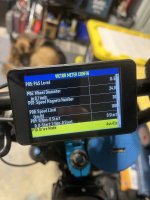
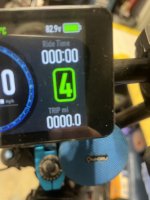
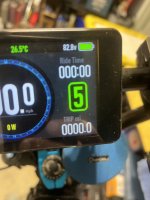
Since you haven't mentioned your testing knowledge or ownership of a multimeter. I'll continue by having you use the throttle's digital voltmeter for testing. As such, leave it connected for now to just the 3 low voltage wires during the steps below. Isolating the high voltage wires till testing requiring the use of.
If you have and know how to use the meter... by all means do so.

Full battery+ voltage is present and expected in this testing, use caution and do not short exposed connections or wiring.

Follow these instructions step by step. If something not found or acting as described or instructions are not clear enough, stop there and ask for clarification before proceeding. And upload your hand sketch diagram when available.

1) Battery off, look for the two-pin connector that has the single ORANGE wire (labeled "ignition") from the controller going into it. On the opposite side connector from this, look for a single wire loop on that pin that jumps to the other pin. The other wire on the same side as the single ORANGE "ignition" wire, will eventually go to the display pin #1.

2) Battery on, everything works as it always has. (just no key switch operation...)

3) Battery off, remove jumper connector as found above (the loop), battery on, nothing works.

4) Battery off, reconnect jumper loop, cut the jumper wire in the middle and strip both ends keeping them carefully isolated as needed.

5) Key switch off, Battery on, carefully touch throttle's BLUE wire to where the single ORANGE wire from the controller connects to. You should get full battery power voltage displayed on the throttle meter.

6) Battery off, connect the throttle's YELLOW wire to the wire you just tested. Connect the throttle's BLUE wire to the other wire at that connector. (The one that continues to the display.)

7) Battery on, key switch off, nothing works. Key switch on, throttle's voltage meter lights up and displays correct voltage. Press the power on button of the display. Everything works as desired. Great, testing complete.

Make the connections cleaner, insulated, permanent, and more secure as desired.

Hopefully you made it all the way thru, if not please post where problem appears.

Couple other things while I'm thinking about it...
The two BLUE wires in your picture holding them, what are they, and why are they like that? (I'm thinking speed limiter.)

The description of your controller states that the default throttle setting is a potentiometer type throttle. (0 to 5vdc output.)
Is your new throttle a potentiometer type, if so no problem. But if it's not, you will have to change the programming for your new throttle that probably has a hall sensor. But if the old throttle is a hall sensor throttle, this has hopefully been changed already, and your good to go.

To understand the differences in throttle types, and why it matters, see this post...
Guide to Hall Sensor Throttle operation, testing, and modification. - Electricbike.com Ebike Forum

Good luck,
T.C.
 
Looking at most of the versions of the controller on aliexpress and sabvoton’s website, I believe there are at least three versions of the controller referenced in the diagram I show in post 17.
The versions appear to have different interfaces between the controller and the PAS and display. Some use an extension with a JST connector on one end, mating up with a JST display connector from the controller, with a 5 pin HiGo on the display end. Some use a JST version of the display, connecting directly to the controller JST. The third version has a cable with a HiGo connector on the controller end, which likely splits off to a HiGo display connector (5pin) and HiGo PAS connector (3pin).
If you have the latter, then you may need to cut open the display cable housing and locate the blue conductor, which seems to equate to the orange wire on the non display models.
Does your 8 pin cable split to display and PAS connectors?
PS. On the models with a JST display connector, the connector comes with a jumper that connects the red and blue conductors so it can be run without a display as well.
 
TC and E-Hp, appreciate you guys sticking with me through this. I honestly think we would've had more success finding Hoffa than figuring this out. I had to cut a bunch of zip ties to figure out what goes where, but here's what I have so far (a very rudimentary diagram but you get the idea.

So there are 2 orange cables coming out of the bundle on the controller, both go to a harness which is basically a pass thru. One orange ends up at the alarm and the other orange ends up at the 12v DC to DC voltage converter.
 

Attachments

  • IMG_1157.JPG
    IMG_1157.JPG
    3.7 MB · Views: 6
I do have a multimeter. So coming from the bundle i found a 3 wire "loop". Controller bundle has three wires yellow/green/black-going to a 3 pin connector, comes out yellow/green/brown and then back into controller bundle. None of the 6 wires with the battery on have more than 100mV. There are a total of 5 wires going to the alarm, with the battery off, the red wire shows about 3.5-4v and the other 4 are dead. Blue wires coming from controller don't have juice with the battery on/off. Sooooooo, now I'm up for suggestions.

One side question. Ive tried unsuccessfully to connect to this controller using MQCON on my iphone. I've tried several different BT adapters to plug into the USB port but for the life of me I can't figure out how to connect to it. None of the adapters I've used are showing up on the MQCON's BT MAC address list. Have you guys run into this or know why this might occur?
 
Back
Top