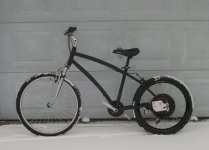
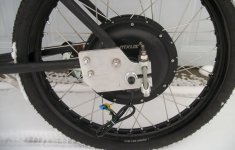
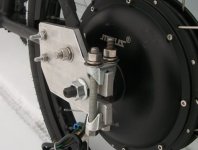
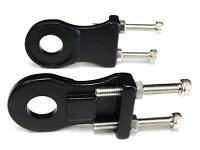
Coyote DIY Torque-arm, open source 2600W DD hub

Longer plate and two U-bolts sounds reasonable (maybe 10-inches long, instead of 6?). It was a total brain-fart for me to not realize (until now) it would widen the drop-outs (I blame the beer). I now think this is why the Cromotor and QS have 145/155/165mm drop-out shoulders (depending on source). They clearly could never be run with stock bicycle drop-outs, sooo...If they require torque-plates...why not spec the plates to be mounted on the outside, so the motor can be as wide as possible?

I think the MXUS 3000W has 135mm drop-out shoulders, but...the axle is long enough that any torque arm can be put on the outside of the frames stock drop-outs, and you still have full lugnut engagement.

There is no allowance in the design yet for a disc brake or a derailleur (I didn't want to put a lot of time and effort designing a plate that has disc and derailleur, only to find the material and thickness I chose was not strong enough), I'm just testing 9mm-3/8-inch 6061-T6 aluminum and clamp at 2600W. Anyone who wishes, copy away (open source)...and feel free to water-jet them and sell them. I hope someone makes a profit off of these, so they will be available for purchase.
 
ahah, and another point, I don't know if you did it on purpose or not, but as your plate lower the motor dropout, it's excellent use with a smaller rear motor for best efficiency.

So getting a 20" motor with 26" front wheel may not look that awkward? I'd however need picture to confirm that :lol:
 
Don't know if I mentioned that yet, good catch. When using DD hubs, there is definitely a benefit to going to a smaller tire diameter, and then raising either the voltage or the Kv to get back the desired top-speed. For the next few months I am testing out a 19-inch moped rim from Kinaye, when coupled with a 2.5-inch tire, the final OD is close to 24-inches, so....I needed to drop the new wheel axle one inch if mounted to a 26-inch wheel frame (axel-to-ground on the hubmotor is now 12-inches instead of 13), or 1-3/4 if mounting to a 27.5 frame.

The bike is just an aluminum deathtrap BSO I got at a yard sale for $20, so I don't care if I screw it up. Drop outs now 6-inches /152mm in-between the torque-plates (which is the outside dimension of the stock drop-outs, when you have a frame with this thickness of metal)

If you want to ship plates in a smallest US Postal Service (USPS) box (if it fits, it ships) which has a flat rate of $6, the max box interior dimension is 5-1/8 X 8-1/2"...the height of a stack of 9mm-3/8-inch plates will fit four of them.

PriorityMailSmallFlatRateBox.jpg
 
Some quick pics to show the proportions of a 19 X 2.2 moped tire (OD = 24-inches) on a common 26-inch bike, front tire is 26 X 1.75

Notice the horizontal line in the garage door to compare tire sizes

TACoyote5.jpg

As stated in the previous post, I would now make these 8-1/4 inches long (instead of the 6-inches long shown) and then use two U-bolts on the chainstay instead of one, with the steel half-pipe chainstay protector sleeve extended to 4 inches.

TACoyote6.jpg

Clamp as shown is only finger-tight (see the split lock-washer is not compressed). I foresee many issues trying to get a disc brake caliper to attach, while not getting any fitment interference from the bulky clamp. Look at how long that freakin axle is!

TACoyote7.jpg
 
Slick!
I was looking at a similar outboard clamping scheme and hunted around for various clevis assemblies to try to minimize the width. I settled on using a turnbuckle with the screw eyes removed and one replaced with a hex bolt as an on-end clamp. Yet another unfinished project, but it looks promising as a possible alternative to the cable clamp solution.

Turnbuckle.png
 
Just a heads up: Lawn mower blades have a perfect channel and radius at the end to fit hub motors! Anyone without a welder can cut up the 10mm channel and drill holes to fit their frame. Works up to 90Nm without starting to spread. For clamping, using a file or grinder make an indentation on the top and bottom edges and use a hose clamp. Zero welding, VERY thick and robust 8) Have 400 klickies on my custom frame using that method without a touch of problems.
 
Great idea! Rather than order steel/aluminum from an expensive online source, everyone has new and used steel lawn mower blades somewhere nearby, and even new they are fairly cheap. I've seen blades with slots on the tips, here the only google pic I could find, has slots near the center, but...got slots.

104718_front200.jpg
 
They're very thick too-Definitely a made to last solution. The metal they use (Probably Mild) takes threads nicely. The ideal is to cut at the root of the radius closest to the center and half an inch forwards from the end of the radius closer to the tip, giving you a good block. The radius on the blades is exactly the same as Hub motor axles so it'll nicely hug the axle.
 
I'm calling this experiment a success. The system is capable of 2600W, but since it accelerates so effortlessly, it quickly reaches cruising speed before it pulls 2000W. Even so, everything feels really solid. I had a high level of confidence in the clamping elements, and my biggest concern were focused on any potential flex where the plates attach to the frame.

As solid as it is performing, I would still recommend a slightly longer length, and two U-bolts per side. I would have used water-jetted steel (from "big blue saw"?) If this was a design for a specific frame, but as an open source design that might be used on a variety of frames, the thick aluminum remains strong enough, and still very easy for the end-user to drill themselves.

Again, anyone who wants to, feel free to make these for sale.
 
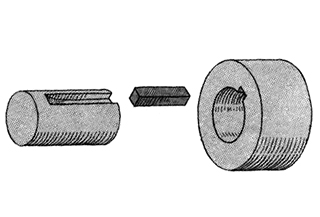
I was just thinking, it would be very easy to add a STEEL "square shaft key" into cutouts right next to the axle (top and bottom, both sides...four steel keys). A dab of DP-420 to keep them from falling out of the aluminum plate TA when the wheel is occasionally removed from the frame...hmmm. Dirt cheap, readily available in many sizes. The slot they plop into would be cut when the plates are water-jetted.

The dark colored bar in the center is a steel square "key" that is cheap and readily available.

Round-key-coupling-shaft.jpg


Also need to add slots for mounting a disc brake caliper...
 
Back
Top