CroBorg Super Commuter

Current Headlight Setup

As the days shorten I will be faced with more riding in the dark. Here I review my current lighting setup.

1) Cycle Lumenator, high voltage, four 250 lumen LEDs with TIR optics, broad pattern doesn't cut off at the horizon, no sharp cutoff anywhere so tipping down doesn't stop glare. This is similar to the ebae lights discussed in other threads. These are wonderful floodlights but they make no attempt to meet the needs of a headlight pattern, and they throw a lot of light into oncoming driver's eyes. I find turning this light off doesn't matter much when the other two are on since the pattern is so spread out. It is a good backup light in case the others separate batteries are too low as it powers from the ebike's main battery with a built in converter.

2) Fenix BT20, 750 lumens, special reflector and has lens features that attempt to make a good light pattern, it helps some. Uses separate 8V battery pack. If you are going to have only ONE headlight, this is perhaps the better unit as they made some attempt to get the pattern right.

3) MagicShine MG-808E 1000 lumens, reflector type with third party fresnel lens added to spread beam into a wide horizontal pattern and reduce glare, aimed slightly right and down, to light side of road where deer and critters dash into your path. Uses separate 8V battery pack. These have a reputation for bad glare since the bare LED is visible forward and makes a very bright small spot. The fresnel lens solves this issue and helps the pattern a lot.
 
Single Plug Charging

It is convenient to have a single plug to mate when charging, so I've been making that upgrade to the bike and chargers.

Recently I mated the three charging plugs into one 6 pin plug for both the bike and the 1Kw charger. Today I modified the plug on the cable from the 200W BMSBattery alloy charger so it is now also one-plug, and much safer since I don't have to carefully observe which connectors it is plugging into.

20141025_213449.jpg


I did not need to use a full 6 pins on the single voltage charger plug, as the plugs are in a certain order, so only the two corner pins are needed. Two more pins allowed the support of the needed two, so four plastic bodies are required, two of which are not carrying charging wires but are there for support of the other two.
 
Tonite a meeting ran late so I had the opportunity to test my lights after dark. :(

The Fenix BT20 is a light that I bought earlier but have not used much for commuting after dark. It is one of the few bike lights I've seen that makes an effort to make a pattern of illumination that matches the needs of a bicycle. It does a pretty good job. Better than the other 3 lights I've used - the Cycle Lumenator and the 1000 lumen MagicShine(w/ and w/o spreader lens). The MagicShine with a spreader lens is actually the second best, the stock MagicShine is third and the Cycle Lumenator is last when it comes to putting a good pattern down 30 yards out.

The Cycle Lumenator puts out a lot of light in a large flood pattern which is excellent for some things, but not quite what I need running in a bike lane along a dark highway.

The stock MagicShine makes a reasonable "high beam" but it puts too much light in the eyes of the oncoming traffic. Adding the spreader lens really helps a lot in terms of a nice pattern.

The Fenix BT20 has a fairly bright large spot, a fairly dark upper area, and some light kicking down lower in front of the front tire.
 
Alan B said:
Moment of Fame

http://today.lbl.gov/alss-alan-biocca-builds-his-own-e-bikes-for-commuting-to-work/

A little article in the online paper at work about my ebike.

EXCELLENT article! The author seems to have gotten all the good technical details down - I didn't see any "literary license" anywhere, which is rare and valuable in this day and age...you should be very proud to represent us in that article, Alan! GREAT JOB man!
 
Thanks for your comments James.

She (the tech writer) wrote it and let me edit it, so it is really a collaborative work. She did a great job of collecting info from a recorded interview we did, and then I helped hone the technical parts. I don't think this is the way stuff normally gets written, but it was nice to be able to help her "get it right" instead of being frustrated with missed details.

I've had a number of folks at work want to take a closer look, one fellow claims he wants to build one like it. He wanted copies of my drawings. :)

Maybe he'll show up here on ES, there's a lot to learn on the way to building one of these bikes!
 
Throttle

dsc4265.jpg


I often see folks complaining about the lack of reliability of the Magura throttle. I have two of them and have never had a problem, so I don't have much experience with that (but I don't ride in the rain which may be a weak point for the Magura). The other complaint is that the grip surface is "too hard", but I don't ride without gloves so I don't really notice that.

However I do notice that the angle of rotation is a bit more than my wrist likes to do (without putting the wrist at a bad angle), and there is a reportedly much better pot throttle available, so I ordered one. On a high powered ebike the throttle is a very important component, so I want a good one.

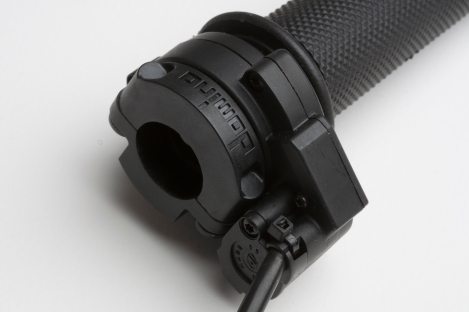
The "Domino" throttle is said to be more robust, water resistant and has a smaller angle of rotation, as well as having more standard softer rubber like standard motorcycle grips.

http://endless-sphere.com/forums/viewtopic.php?f=10&t=58516
 
I received the new Domino throttle. It appears to be good quality. The spring tension is greater than the Magura, hopefully that won't contribute to a tired wrist. The switch is closed when the throttle is rotated, and open when the throttle is released (zero throttle). There are 5 pins on the rather large connector provided, and the switch and pot are brought out separately. I was thinking of using the switch to short out the output when the throttle was released to insure that a pot failure would not be a runaway, but it is the wrong contact for shorting. Instead it could open the output, or disconnect the 5V to have a similar effect, but an open pot wiper would still result in an open throttle output, not really the safest situation. Perhaps a 1 transistor inverting output clamp, along with a resistor in series with the throttle pot would be advisable. I wonder what they had in mind for this switch?

I am looking into new front brakes. Any comments on Tektro Auriga dual hydraulics? They have a built in switch and 203mm discs that are thicker than the usual bicycle fare and have hoses the right length. The Gatorbrakes work well but came with 160mm discs, no eswitch, hoses too long, and they take a lot of hand force to operate. They do modulate well, but they get very hot very quickly. Also the Gatorbrakes pads are hard to find and costly while the Tektros are readily available and seem to be less spendy.

Tonite I ran only the Fenix BT20 light, and it did a good job. It is much easier to turn on and off and select levels than the MagicShine due to the location of the button and the direction and force one uses to push it. The MagicShine takes two hands and a lot of pressure while the Fenix can be operated easily one handed. I'm growing to like this light a lot.
 
Love the updates Alan. You are a great guy and I hope you remain a member of ES for a few more years. However, it blows my mind you take the risk of running down the dam road in the dark, no matter how many lights you got blazing. Between the cross winds, cambered road surface, low light, etc. you can easily get run down by someone drifting into the shoulder. The upgraded road is a lot safer than the old one but it is still a VERY dangerous stretch of road anytime of day.

Stay safe!
 
I think about that often. So far I've only had one vehicle get really close - within a foot or so (and not in the dark) - in a few years of ebike riding, but it is a concern. I try to watch the vehicles but diving over the side isn't a great alternative either, and I can't really look at each one. I could battle the traffic through El Cerrito, or down San Pablo Avenue, but it is a risk any way you cut it. I went on the dirt roads through the park once, they really don't want ebikes there, and it was slippery and white-knuckles for much of the descent on steep irregular dirt/gravel surfaces. No traffic of any consequence though. :)

As the weather worsens I'll drive more, so the ebike trips will drop off a lot till spring.

What would you do? Better route? Drive something bigger?

Thanks for your comments,
 
You mention the park. It's been awhile but the route along the spine of the ridge from ES to Berkeley should be fine. Enter Wildcat at Clark Road. It is dirt for awhile and ascends up then connects to the paved Inspiration Trail in Tilden. Distance wise couldn't be any longer nor any more vertical than your standard route. In fact, it would be a gentler incline than the climb on Wildcat.

Naturally, this is a dryer weather route and the dirt part is surely going to get muddy at some point.

Good luck but stay off the dam road. Just take a look at the crosses and piles of rocks of lost souls.
 
Thanks for your comments.

I will check out the Clark road entrance to Wildcat Canyon park, but I think it is like the other roads in the park and not very suitable for a commute route on a bicycle. Would be great on my ATV though, but that probably gets as bad mileage as a car, and doesn't have smog gear. Would like to convert an ATV to electric sometime... Wish I could commute to work with it. :)

The morning commute is often alongside (safer) slow cars jammed in traffic on SP Dam road, it is the evening commute with cars whizzing by that the risk is most likely higher. I've been driving that road for 20+ years, the accident rate has dropped a lot over the years, not sure exactly why. New pavement didn't correlate that well with the change, used to be sitting in a jam leading to an accident was somewhat common, haven't seen that in years now. Still a concern for certain.

The big concern is the homebound trip where folks are tired after a long day. The one construction worker type pickup truck that came pretty close to me was all over the road, and I've seen him on other occasions driving that way. Maybe he stopped by the bar on the way home. Haven't seen him in some time, perhaps he found a telephone pole to run into. He didn't seem to care if he was in the traffic lane or in the bike lane. His work probably moves around so his routes aren't consistent.

Was thinking recently that a rumble strip in the pavement would be nice to warn the drivers about straying into the bike lane. Maybe the cyclists should band together and request one.

Maybe a rear looking radar that sounds a horn would help, but probably would give me a heart attack. :shock:

I haven't heard about cyclist crashes on SP Dam Road, searching Google I don't see much, not that this is definitive.

One thing they did do when repaving SP Dam Road a few years ago was to widen the bike lane. It is quite wide in many places. There are spots where it gets fairly narrow, but a lot of it is very generous. Still there is nothing to keep cars out. Occasionally I give them an air horn blast if they cross the line, and I'm seeing a lot less of that, maybe I'm making an impression. :)

Or maybe they're waiting to ambush me. :shock:
 
Agree that the homebound route is far more precarious as the drivers are tired and in a hurry to get home. I did not mean to imply there were bicycle accidents on the road, just vehicle incidents in general. There aren't many fools, oops, I mean dedicated alternative two wheeled folks, on that road, especially after dark.

The real threat is the cars only need to drift into the bike lane and it would only take the slightest brush to send you down. Maybe it would not even take direct contact and just the wind turbulence from a large UPS truck would cross you up enough to send you down. And going down is not the big deal. It's being down and getting run over from the next fool going too fast to get home.

Anyway, ride safe or not after dark. It takes only ONE time, there are no do-overs. I'm fine if you want to will me your bike. :roll:
 
On the way home from work this evening (a long day, no ebike today since on these machine startup days I don't know how late I'll be coming home) I swung by Clark road. It was hard to see much in the darkness, but there is a locked gate for vehicles and a latched gate for bikes/hikers. The road goes upward and appears to be vehicle passable dirt. It will be the subject of a future exploration after things dry out a bit, we are having rain the next day or two, so it might not be too soon.

Thanks for the suggestion.
 
I was curious how that section of road was classified (i.e. fire road). I loaded up the park map and low and behold a number of alternative routes revealed themselves for sneaking to the west side of the ridge. I'll be keenly watching for some new stories. :)

Also looks like Clark-Boas and San Pablo Ridge Trail allow bikes legally (at least non-motorized). I don't think any motorized vehicles are allowed.
http://www.ebparks.org/Assets/_Nav_Categories/Parks/Maps/Wildcat+map.pdf.pdf
 
Front Brake Upgrade

First the Gatorbrakes, when they were first installed:

DSC_9222.JPG


Now the new Tektro brakes:

14%2520-%25201.jpg


Today I began the Borg's upgrade. I decided to install the new front hydraulic brakes first. This week looks like a good dry one for commuting, so I didn't want to disable the bike by tearing it too far apart, and swapping out the front brakes seemed like a good start.

Why upgrade the already good front brakes? I've asked this question myself, and others have asked it as well, so here's the list of differences:

from 4 pot Gatorbrakes to Tektro Auriga Ebrake
both are dual caliper mirrored caliper design (as required by forks)
from 160mm to 203mm diameter discs (more braking power)
from 1.6mm thin to 2.3mm thick discs for better thermal management and reduced stress
easier alignment process (pillar setup on new calipers)
hoses too long vs hoses cut to proper length (could have fixed this)
stainless steel mesh hoses vs plastic hoses (this was the one step down)
additional feature: ebrake switch
additional feature: parking brake
additional feature: adjustable finger reach
The new pads appear to be more available (Gatorbrakes aren't as mainstream)

Out with the old and in with the new, the test results are in. The new brakes are ... excellent. The stopping power feels better. Noticeably better, with less lever pressure required and still good modulation. Not that the Gatorbrakes were bad, they did a good job. But these feel a bit better. Maybe it is just because they are new. But those thicker larger discs are quite a bit more substantial and should help with heat dissipation. The real test will be after a few commutes, and descending the 15% grade therein.

I have not employed the brake switch yet, that will be done later on. The parking brake is quite handy for stability when the bike is leaned.
 
Did you have to use any of the 6mm spacer washers I included to get a good alignment not the disc / caliper? I have dome wheel builds that required me to space out the discs to clear the spokes in the past.

I am included 18 stainless 6mm washers with the dual brake sets to allow for fine adjustment.

Sorry I didn't get back to your email, my darn internet has been down since Friday... I just had to go and mess with it, lost an entire weekend doing tech support for myself. I officially hate wireless now (for at least a week) :mrgreen:
 
I found the instructions between the discs, had not seen them earlier.

I used four of the thick washers you supplied, one on each mounting bolt. I might have been able to not use any, but I didn't want to be at the edge of the adjustment range for alignment. I'd have to double check but as I recall one is a bit more centered than the other, but neither are near the end of the slots, so that worked nicely for the Volcano forks. On the previous Gatorbrakes I used a thick and two thin washers. As I recall they were more critical to align, these Tektro calipers were very easy to install.

I like the parking brake, it makes the bike more stable when I lean it during parking. I don't have a kickstand set up yet.
 
Rear Lights

I plan to make an ultra visible rear light array with some NeoPixel LED strips, but I have a couple of very impressive rear lights that I can add to the high voltage Ebikes.CA rear LED that I always run in the meantime. For these post Daylight Savings Time runs it is quite dark and I want to help the cars on the highway to see me on the bike lane alongside.

So I made a simple aluminum bracket that will allow clipping a pair of Radbot 1000 lights on, one to either side of the Ebikes.CA light. Suffice to say the three of them flashing away independently, plus the two good sized reflector areas really brings the bike up to a new visibility level. That plus the pool of LED headlight illumination right in front which is quite visible from behind the bike.

The green stripes on the trunk are a 3M ankle strap that lights up with 3M reflective technology as well as the stripes on the Topeak trunk itself.

The Radbot 1000 lights have 1 watt red LEDs with TIR optics to produce a long range bright red presentation, and they have a number of innovative flashing cycles to choose from. The two can be set for the same cycle or different cycles for really annoying flashing, or they have nonflashing and fading type cycles that are not quite as annoying. I also wear a motorcycle jacket that has large areas of 3M reflective yellow-green plus stripes of 3M reflective stripe material.

The camera in my phone has trouble with this high contrast lighting, I had to get off-axis to avoid some of the intensity. It is seriously bright on-axis. I'll get some better photos with a real camera later on. This was a very quick project with the simple 1/8 x 1/2 x 6" aluminum strut slid under the Ebikes.CA rear light and held on by tiewraps, two through the light as designed and two more around the strut and arms of the light bracket on the Topeak rack. The Radbot lights themselves are a good tight fit snapped over the aluminum, but I may add something at the ends to insure they don't slip off the ends (though they fit so well it is unlikely). The cargo bags on the Topeak trunk just touch the outside ends when they are open, limiting the width of the setup at this location to about 6".

20141123_210148.jpg


If I had a third unit of the Radbot 1000 lights it could be attached to the trunk which has a spot for that. Hmmm. Have to think about that.
 
Amazing Commute

This was a really fun commute day. I had new front brakes to test, new rear lights to flash, and one more thing. I left a bit late after doing some work on the ebike this morning, and it was warmer with less traffic. Very nice. Tomorrow will be even better.

I dug out a thumb throttle and wired it up to the Sabvoton controller's variable regen input. So now on the right hand side I have the twist throttle, the brake lever that merely switches the ebrake circuit on, and a thumb throttle that tells the controller how much regen to engage.

The regen did work on the first test, but the level was weak. So I dug out the programming cable and reduced slip regen to 20A while increasing ebrake regen to 100A. Still very weak regen.

Later I was reminded that there is a mistake in the Sabvoton variable regen so the current is off by a factor of 10. So putting 500A means regen to 50A. Hopefully I will be able to test that tomorrow.

The dual Radbot 1000 plus Ebikes.ca rear lights are amazing. I watched every car that passed me tonite and they actually did stay a bit further away. Excellent.
 
The dual Radbot 1000 plus Ebikes.ca rear lights are amazing. I watched every car that passed me tonite and they actually did stay a bit further away. Excellent.
Now, you just need to make the ridge trip. If you pass Clark anyway, the trip will be shorter as you avoid the entire wildcat section.
 
I will check that out. However right now it would likely be a mudbath.

Daylight Tail-Light Testing

Today I decided to run the rear triple tail-lights during the morning commute. It did seem to have an impact there too, folks left me more space, as they did on the evening run last night. On the downhill run this morning one car hooked around me and almost pulled in front of me at the right edge of the road which is weird since the road at that point is wide and cars generally don't ride way over to the right side due to rough pavement. He got a blast of my air horn, but he didn't really get dangerously close. Another vehicle following him was extra cautious when passing me, perhaps they didn't like the air horn and didn't want to earn another blast. :)

Sabvoton E-braking

This morning I dialed up the e-braking setting on the Sabvoton controller to 500. Reportedly that's supposed to be 50 amps, off by a factor of 10, but I wonder if that's the right factor. I did a test braking on my street at about 10-15, pushed the thumb throttle down and pulled in the ebrake switch on the brake lever. The rear wheel skidded and the pedals pushed backwards into my feet slightly, maybe a quarter turn or less. Wow. It is too much gain, the minimum thumb throttle braking is very minimal, but it is a bit touchy for the rear wheel to use for regular braking when it is dialed up off minimum. So I'll have to dial it down a bit, but THIS IS A REAL BRAKE. Amazing. It drops out at about 3mph.

THE ERGONOMICS of this ebrake setup are not great. The twist throttle on the right for torque control is fine, the thumb throttle on the right for braking force is okay but the brake lever on the right to enable the ebrake at the same time is a bit much to manage at once. Perhaps I should use the new switch on the left front brake handle to trigger the ebrake, and then the right hand would only need to modulate the thumb throttle to set the amount of ebraking. That might be better. Eventually I still want to try a right brake handle that does both the ebrake switching and the 0-5V signal for the braking level. I'm collecting parts for building one of those.

I set the slip regen (on throttle release) down to 20A. It is definitely nicer there, the earlier setting of 30A was a bit excessive. It gives a nice gentle deceleration on throttle release. If you want to coast you can crack the throttle a little, or pull the ebrake without pushing the thumb throttle brake control off minimum.

Phase Current Settings

I also dialed up the phase current from 100A to 160A. Now heavy throttle on startup makes the motor grumble louder and it launches harder. But it is also a bit less precise in the torque control at low speed, since it effectively has higher gain. I'm not sure I like it at that setting, perhaps I'll split the difference. At high speed it makes no difference as the phase current multiplication is reduced by the back EMF. I still have battery current limiting set to 80A.

Tektro Dual Front Disc Brake

Now I've used the Tektro Auriga front dual disc brake with 203mm discs for about 50 miles, and they are excellent. No noise when released, minimal noise when braking, no squeaking, good hard braking and modulation, low actuation force, easy to align, a useful parking brake feature, and they look good. I've tested them a few times under hard braking and they did quite well.

In summary, the brakes are good, multiple rear lights are worth doing, and I need to tweak the Sabvoton settings a bit more but it clearly has the capacity to do the job easily and produce strong electric braking.
 
This afternoon I left work a little early due to the holiday and had a nice ride home in daylight instead of darkness. I had a good opportunity to really test out the new electric braking on the way home. :)

Before I left I changed the setting for ebrake setting from 500 to 300. This resulted in better modulation of the ebrake level with the thumb throttle I use for that control, but it still resulted in rear wheel slippage at full setting, so I will reduce it further, to make it more like an ABS brake or traction control.

The wheel reversing slightly under heavy braking probably indicates that the Sabvoton uses synchronous PWM, not relying on the diodes to complete the path during the FET off cycle. In this case the FETs are connecting the windings to the battery and bypassing the diode that guarantees current flows only in the charging direction, so as the wheel stops rotating they need to recognize this (in software) and shut down or reduce the PWM, any time delay in this control change causes the current to reverse and the motor rotate in the reverse direction. Maximum braking is good but completely stopping or reversing the wheel rotation is not desirable.

So the ebrake setting of 300 is much better than 500, but still probably a bit more than desired. I'll try 250 next.

Have a good turkey day.
 
Sabvoton Controller Ebrake Tuning

Just returned from a tuning session. Tried 250, 200, 220 on the Sabvoton ebrake setting to hone in the braking current to a value that produces braking just shy of skidding the rear wheel. The results for my setup are between 220 and 250. This is on clean dry old pavement, it will vary some on other surfaces. It will also vary depending on the output of the transducer producing the braking voltage. I'm using a standard thumb throttle, so it is probably about 1-4V.

I'm a little torn as to whether I should set it a little high so it can skid some, or a little lower so it probably won't. Of course different surface conditions will change the point at which it slides, so one cannot guarantee either result for all situations. The primary braking is from the front wheel of course, but this level of rear wheel ebraking is producing significant braking, not just the modest Xie Chang regen I was getting with the previous controller.

At the other end of the scale, when I pull in the brake lever and ebraking is turned on (with no input on the thumb brake), the slide regen is disabled, so the slight braking goes away and it feels like it is coasting. Then pushing the thumb ebrake produces a very controllable regen braking. This is what I was looking for. It will be really nice when I can get this to work with the rear brake lever, both making the switch and the variable input to the controller in an automatically user-friendly way.

This Sabvoton Controller has a wide range of settings to optimize for our specific setups. There are many I have not adjusted yet, the defaults are adequate, but the flexibility is there when needed.
 
Back
Top