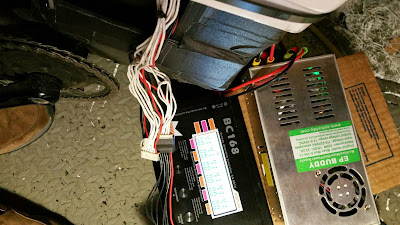
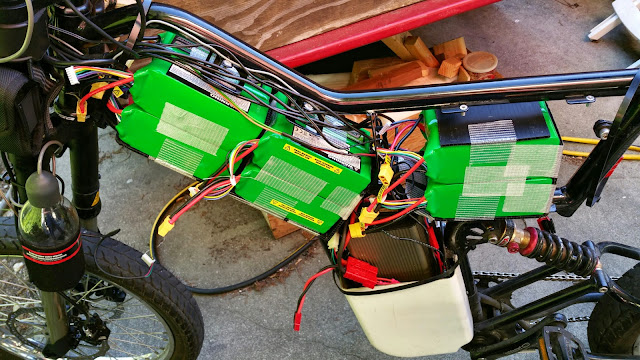
CroBorg Super Commuter

20150119_220250.jpg


So we broke out the balancing charger and interrupted the bulk charging before it had completed, and then ran 3 cycles on the BC168, once for each 6S bank to balance the whole 18S pack. This is the first time I've balanced the pack, early this year I charged each brick and put the pack together and started bulk charging it right away. It was about 50mV in the worst case, most of the pack was within 10-20mV.

erik_m said:
How many watt hours is your battery system? What range do you get?

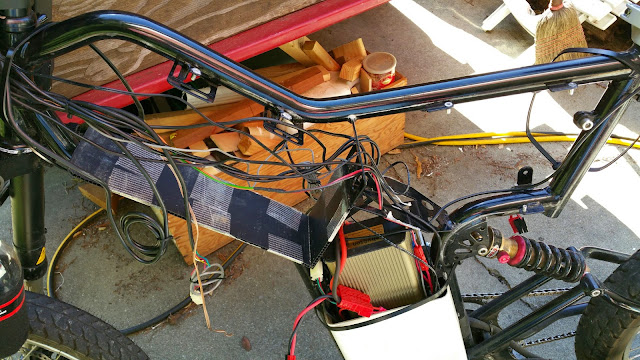
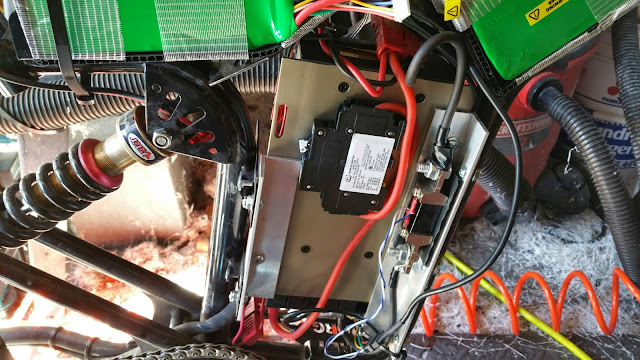
I am really glad that the 24 MOSFET controllers don't heat up too much since your controller is in your compartment. I sent you a PM about the fact that I am looking for a place to buy a 24 MOSFET controller. When I was researching Edward Lyen it said something about someone hacking his email, so I am scared to email him. I will read about the Sabvoton and check out Jeremy Wolf aka zombiess, also.

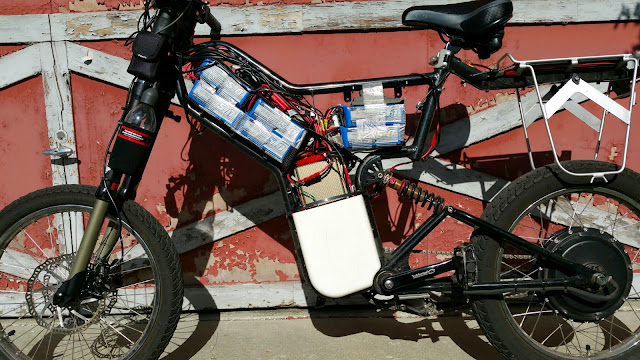
How long did it take you from the time you bought your frame until the time you put CroBorg into service? [b:3m28al6b][i:3m28al6b]Such[/i:3m28al6b][/b:3m28al6b] an epic rig!

Hi Erik, welcome to ES!

I made the decision to embark on this project the day after Christmas, and it took until about June to get it going (as I recall, it is all early in this thread). However, this was my ebike #3 or 4 and I resolved to not rush. I was waiting for some long lead items (like aluminum moped rims) when Stevil encouraged me and provided some new steel rims and built the wheels. He also provided some other parts and helped get some issues resolved, otherwise it would have taken even longer.

It is a great commuter. The large Sabvoton controller required a major effort to fit it in there, but it is smooth and has nice power, I really like it. I have about five of Lyen's controllers and they are good (the 24 FET is the only one that has ever failed), but they lack the smooth torque throttle response and variable ebrake features. Sorry to hear about his email problem, hopefully that is all resolved now. He may respond to PMs as well.

The current Turnigy Lipo pack is around 70V 20AH so 1.4KWH. It takes about half that to get to work, 13 miles with lots of climbing, so range is about 25 miles of difficult terrain or double that for running easy in the flats. The new pack will upgrade that by a bit more than 50%.
 
Just reviewed the timeline (in the thread here) and December 25th was the initial decision to build and June 3rd was the test ride at Stevil's. It took about a month to get the frame and motor shipped and the forks were missing from the box so another shipment was required (actually it was 3 since the motor was separately shipped). It was before there was a US dealer so lots of long range shipping required.
 
Bulk charged at work and measured the cell voltages. Most are 4.16, a few 4.17, that's one count on the six cell Battery Medic readout, so essentially identical. Before it was up to 3 counts off in either direction (50-60mV). Much better now. We'll see how well it holds, the drift rate has been very slow, the 50mV built up in 10 months. :)
 
Weather has cleared up here after some badly needed rainfall. Days are getting long enough to make the commute runs just after sunrise and just before sunset - very pretty time to be out. Temperatures are cool at commute time, just right for wearing the all-weather armor. Great times for e-bike commuting. :D

The machine just hums along. The usual commute run is 40 minutes, 30 is possible if I'm pressed for time. I'm saving time on the heavy traffic mornings either way, losing a bit on other days, but I don't mind at all. I get just enough exercise to get the heart rate up, but not enough to sweat. Seems about perfect. I generally slow and visit with the bicyclists, most are very positive, I get the occasional cheating comment but they're usually smiling.

Rear tire wear is pretty significant by now (on the second rear tire for this bike), but not quite needing replacement yet. I wonder if the more gentle acceleration of the torque throttle is helping extend the tire life.

I'm tempted to tear it apart and upgrade it, but maybe I'll just enjoy it the way it is.

I corresponded with one vendor about fenders, but theirs are all for 26" fatbikes and won't match the curvature of the 24" tires. Any suggestions for fenders? I get a bit of crud tossed up from the road, and splatter on the bike.
 
I was going to install them right away, but didn't have the parts to make a new wiring harness. By the time the parts had arrived I was enjoying the bike so much I didn't want to take it out of service. This is going to be a bit of a cram job, possibly, and making a new wiring harness is something I don't take lightly. I very nearly undertook the project this 4 day weekend, but with Valentines day and a few other things on my Todo list, I let it slip again.

I will get to it eventually. Maybe quite soon. :)
 
The Turnigy Pack first bank is showing some imbalance, so I took a more careful measurement.

4.14-4.18V, the sixth reading on the battery medic is the low one, all others are in a narrow range. So this is a 40mV imbalance when usually I don't see more than 10. The battery medic only reads out to 10. The balance charger claims 1mV, and after the balancing the medic reported 10mV or less. So there is definitely a drift.

The other two banks are fine, within 10mV.

It was only a few weeks ago this pack was balanced. Still the highest I'm seeing is 4.18, so not a problem, but as I recall one or two of the bricks in this whole battery were less than well balanced to start with and I would have culled them out but didn't have enough bricks to do so.

Still have the 8AH Multistars sitting to go in this bike. Need to have a block of time to do the work and build a new wiring harness and make a few other improvements.
 
Installed a Solar AC/DC circuit breaker, retired the fuse. Working on wiring cleanup and reorganization first, and adding some battery support brackets.

This breaker is made to handle the DC arc issues up to 125V, and carry 63A, trip at 81A thermally after a few minutes.

20150301_132647.jpg


The current shunt is just to the right, both are on the back side of the Sabvoton controller in the lower section of the GreyBorg frame.
 
Did a major cleanup on wiring and extra handlebar clutter, removed several items no longer used including the temperature readout, air horn and three speed switch. I plan to go to some type of electric horn so the air horn was in the way, and I had problems with the pressure bottle moving around and causing problems.

I installed the chainring side lower Greyborg frame cover which has never been used before. Had to make a slot on the edge to allow the motor cable out. Haven't grabbed a photo yet, but it looks nice and newly white. It is a tight fit with the chainring I'm using.

I'm going to bring out the charging lines under the seat so I won't need the lower area access that caused me to leave that one lower cover off in the past. These lower covers also retain the upper covers so the large lower tiewrap that was holding that side cover at the bottom was removed.
 
Sabvoton controller from Zombiess:

I received more questions on this, so I thought I would post my details here.

Note - I cannot guarantee this works or is safe for your controller, it worked for mine and is based on the documentation Zombiess included with my controller.

1. J23-4 transparent insulated wire on the four pin throttle connector is 0-5V input for ebrake, I connected output of a standard thumb throttle producing 1-4 V or so to this input and it works nicely.

2. J7-2 purple wire to single pin connector through ebrake switch to +5V during braking (disables power and enables ebraking), this connects through the switch on the brake lever to +5V from the red throttle which is +5V (really about +4.3V).

3. Set the ebrake parameter to approx 10x the current you want during ebraking, there is a scaling error so values of 200 worked well for me producing about 20 amps of regen. Values of 20 did nothing, 50 was very weak regen. A value of 250 produced skidding, so I reduced it to around 220 which was just shy of skidding on dry level pavement (these values from memory, subject to revision).
 
I ordered some BIG crimp sleeves based on a suggestion from icecube57. These are able to handle more wire than the hardware store sleeves, reducing the number of crimped joints necessary to make the harness. Earlier designs based on the hardware store sleeves contained too many joints and were too labor intensive. Even these larger sleeves cannot contain all that is needed, which is a #8, four #10 and a #12 wire, but they will handle a #8, two #10's and a #12, so two crimp sleeves can handle one 4P polarity, four sleeves can handle one 4P bank, and it will take three of those or about 12 sleeves for the entire 18S 4P battery. Earlier designs had at least double that number of sleeves (and crimped joints) to deal with. This is progress!

These connections are UL listed, too. Nice.

Crimp sleeves are generally designed for all wires to enter from one direction. I like to have some wires from each direction as it makes the harness fit better. This requires belling the other end of the sleeve, which normally turns in, so both ends turn out (to protect the wire and insulation). Tonite I modified more than a dozen of these large sleeves in preparation for making the harness. There are still a few dimensions to work out, and some details of how the dual layer heatshrink insulation is going to work. I made a diagram which will have to be updated with the new plan.

Soon I'll be ready to fire up the hydraulic crimper and make some connections!
 
I made a test crimp this evening using the new sleeves with a #8 and two #10 wires. I used the hydraulic crimper's #10 jaws which are probably 10 square mm. The wires were very tightly gripped, I could not tear them out with my fingers. Then I tested the glue-lined heatshrink, 1/2" diameter by 1-1/2" long on the sleeve and that worked fine as well. So the crimping plan looks reasonable.

I'm taking this slowly since there is quite an investment in the components, and it is a safety issue as well, so I want it to be done right. I need to triple check the measurements so the harness fits the pack well and the wires are neither short nor long.
 
Today is one of those days I'm glad I have a choice to not ride my ebike. It was a dark and foggy morning, with a light first drizzle, producing very slippery pavement. The traffic was slow and annoying, but being warm and dry and not worrying much about slipping and falling down was nice. Unfortunately my four wheel ride is not electric, but I can slip it into 4wd on the more hazardous curves and develop lots of traction when needed.

Besides, my battery wiring is not ready. :)

Another day at work..

Stay safe.
 
The ones i suggested should be able to handle much more that what you put in there.
 
icecube57 said:
The ones i suggested should be able to handle much more that what you put in there.

Thanks for your comments and suggestions!

Yes, they will handle more. But it does not look like they will handle this which is what is needed for one instead of two sleeves:

one each #8 main
four each #10 battery connecting wires
one each #12 charging wire

I looked at fitting it all in but it did not look like it would work, and it is beyond their rated specs which show one #8 and three #10's max. I did not actually try it. It might be possible but difficult, the #8 plus 2x #10 plus #12 is easy to do.

Even with my current plan it is still a big improvement over the hardware store sleeves. I think a #8 will almost fill them up by itself. :)

Edit - actually the Gardner Bender 14-8 crimp sleeves from the hardware store are very useful, and they will handle up to a pair of #8's, or 2-3 #10's, 3-5 #12's, etc.

Another reason for using two sleeves instead of one is the pairs of connectors from the batteries are offset by 2.5" due to the physical stacking, so having all the connectors at one level is not as good a fit has having them in two pairs separated by the 2.5". The harness will lay better in the space over the battery.
 
Have you got a link for the crimp sleeves and glue lined shrink? Sounds ideal for my requirements :)

I'm trying to get away from soldered connections for various reasons, crimped is vastly superior.
 
Back
Top