CroBorg Super Commuter

Alan B said:
Front Brake Upgrade

First the Gatorbrakes, when they were first installed:

DSC_9222.JPG


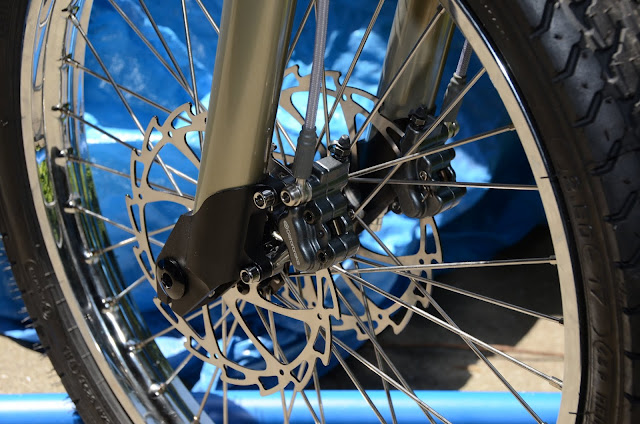
Now the new Tektro brakes:

14%2520-%25201.jpg


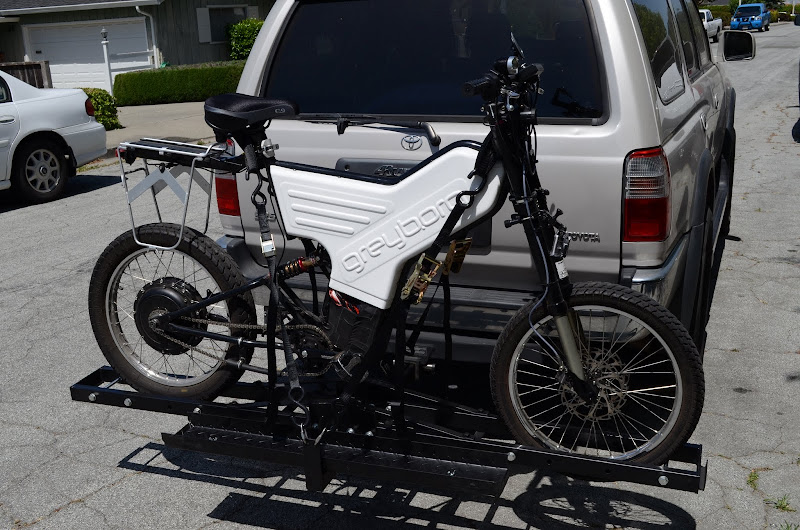
Today I began the Borg's upgrade. I decided to install the new front hydraulic brakes first. This week looks like a good dry one for commuting, so I didn't want to disable the bike by tearing it too far apart, and swapping out the front brakes seemed like a good start.

Why upgrade the already good front brakes? I've asked this question myself, and others have asked it as well, so here's the list of differences:

from 4 pot Gatorbrakes to Tektro Auriga Ebrake
both are dual caliper mirrored caliper design (as required by forks)
from 160mm to 203mm diameter discs (more braking power)
from 1.6mm thin to 2.3mm thick discs for better thermal management and reduced stress
easier alignment process (pillar setup on new calipers)
hoses too long vs hoses cut to proper length (could have fixed this)
stainless steel mesh hoses vs plastic hoses (this was the one step down)
additional feature: ebrake switch
additional feature: parking brake
additional feature: adjustable finger reach
The new pads appear to be more available (Gatorbrakes aren't as mainstream)

Out with the old and in with the new, the test results are in. The new brakes are ... excellent. The stopping power feels better. Noticeably better, with less lever pressure required and still good modulation. Not that the Gatorbrakes were bad, they did a good job. But these feel a bit better. Maybe it is just because they are new. But those thicker larger discs are quite a bit more substantial and should help with heat dissipation. The real test will be after a few commutes, and descending the 15% grade therein.

I have not employed the brake switch yet, that will be done later on. The parking brake is quite handy for stability when the bike is leaned.

are these front brake adaptor? I have rim brake on the front and I need to find a way to fix disc on it
 
Tonite I connected the switch in the new Tektro front hydraulic brakes to the ebrake input on the Sabvoton controller. So now to use the regen/electric rear brakes the front (left) brake lever is depressed just a little bit to close the switch, and then the thumb "throttle" on the right will control the regen (the real throttle is a Magura twist grip type). This should be more ergonomic than using the switch in the right brake lever to enable the ebrake, and then using the right thumb to control it, that was a bit of a stretch for the right hand. This will spread the load to both hands, and prepare the left fingers for actuating the front brake if needed. It is too wet to do a test ride now, but we are getting some badly needed moisture. A quick test shows that it is disabling the throttle so the wiring is checked out.
 
Took a spin today taking advantage of a lull in the weather this weekend. Did the three bears loop, one goal was to test out the new variable regen ebrake setup. That didn't work out so well, almost none of the gradients on this ride exceeded the mild braking provided by the Sabvoton slip regen set to 20. I did use the variable regen a few times, and I found it inconvenient to use with the thumb throttle for braking. It is a bit of a reach for my thumb due to the twist throttle, plus I need to "enable" it with the opposite brake lever. It does work, and it modulates fairly well, but it will mostly be useful on steeper gradients.

I used a bit less that 12 amp hours on this leisurely trip of 22 miles. It would have been even less but it appeared to be about ready to rain again so I stepped it up on the last quarter of the trip, lowering the overall efficiency.

This tells me that the 0-5V generated from the brake lever is what i need to be working on. That would be much easier to use than this setup. I'm sure I'll get used to this, but it is not as easy to override all the existing muscle memory.

One other thing I found is that the Tektro dual front disc brakes are noisy when damp, they howl for a couple of rotations as they dry out. Then they get much quieter.
 
Alan B said:
I did use the variable regen a few times, and I found it inconvenient to use with the thumb throttle for braking. It is a bit of a reach for my thumb due to the twist throttle, plus I need to "enable" it with the opposite brake lever.

Hi Alan,

Enjoying your thread, and following along as usual. :D

You can create a more intuitive regen brake setup using a cable brake lever and a Hall-effect throttle, ala Hyena's suggestion.

The Hall-effect throttle electronics are mounted somewhere inside the bike, and connected via cable to the right-hand brake lever. You get a nicely linear 0-5v signal from the Hall throttle, which will give you well-modulated and proportional regen braking from the right-brake lever. Use the regular twist grip throttle to control your "eGo", and you have the ultimate setup: Intuitive controls for stop and go, just like on a motorbike... 8)

Note that with regen controlled by the right-hand brake lever, you'll naturally release the twist-grip throttle to cut power as you begin to squeeze the ebrake-lever... Just like on the big bikes. :twisted:

It should also be possible to actuate all 3 disc brakes (2f+r) with a single left-hand lever. I'd also recommend a proportional/adjustable line-splitter valve to allow f/r brake balance adjustments. Again, motorcycle components may be a simple/cheap solution if you find your existing bike-spec hydraulic master cylinder isn't up to the job of actuating all three discs... :wink:

Cheers, and have fun!
Holocene
 
Thanks for your comments Holocene. It is nice to know that someone is actually out there. :)

I definitely want a lever generated rear regen / electric brake. The question is how to make it. I hadn't thought about actually using a Hall Throttle as a component, that is an interesting idea. I've been working with some linear pots and some linear magnetic sensors. I made one but it isn't good enough to mount on the bike. I will make a better one soon.

I don't presently have a rear disc. The motor is so wide there is not enough room without bending the swingarm, which can be done but it is bending asymmetrically so I need to jig it to bend the stiffer side and make it even. The less stiff side is already a little offset so the rear wheel is slightly out of line (not enough to matter), and I don't want to make it worse. But that is on my list.

Incidentally, I see regen when I put the electric brake on gently, at some point it must transition to lossy mode (consuming more energy than it is producing). This is NOT just regen, it is variable from nothing to regen to limited reverse power into the motor. So it is as much braking as a disc would be. When turned up high it actually reversed the rear wheel slightly and the pedals pushed into my feet a partial turn, so this is a very strong brake.
 
Alan B said:
When turned up high it actually reversed the rear wheel slightly and the pedals pushed into my feet a partial turn, so this is a very strong brake.

Wow, e-reverse. Nice! Would be good on a heavily loaded bike, ie: backing out of those steep bay-area parking spots. :D

Cheers, and stay dry!
Holocene
 
Hey Alan. Love your build log here you have a lot of good info.

I have been reading up on your new controller as I thnk I am going to get one from zombie as well.

The issue I have is mounting as it will need to be on the bottom front of my frame and just worried
about it sticking out. How do you have yours mounted inside your frame body ? Sorry if I missed a
pic I did look , but could have missed it.

https://www.dropbox.com/s/d79r5n4ld43cgh3/2014-12-07%2023.54.24%20HDR.jpg?dl=0

Stil need to redo the headset on mine , but it's about 95% a bike.
 
Thanks for the feedback ohzee.

I don't think I have put any photos up of the mounting, and I need to do that. It is mounted inside the lower battery section near the crank (it fills that section pretty much up), so I moved the 4x 6S 5AH batteries that were there to the upper rear section. The front upper section has 8x 6S5AH batteries, so we have 18S 63-75V 20AH onboard for just shy of 1.5KWH. The Sabvoton is too large to fit in the upper rear controller area, so the batteries moved there and the controller took their previous location. The Sabvoton is also heavy so I made real mounts for it, no tie wraps and foam this time. I cut some aluminum "L" extrusions to span the Greyborg frame's battery mounts and bolted them to the Sabvoton flanges and the battery flanges. It is really solid, and there is room all around it for good air circulation. The motor control is wonderful, especially set the way I have it now at 80/120 amps battery/motor current. When I turn up the motor current higher it increases the low end acceleration but reduces the smoothness and control, and makes the motor grumble louder under the higher low speed torque so I reduced it to 120A, no need for that much acceleration, it just wears out my tires. Even 120A accelerates really well, and the motor only grumbles momentarily at low speed on steep starts, then goes silent the rest of the time. :)

The grumbling is probably the commutation at high current, it is not apparent at higher speed or lower current. It is really quiet, generally the only noise I hear is the front tire meeting the pavement, and a little wind noise at higher speeds. Depending on the pavement surface sometimes the tire sings on really smooth new pavement, on older pavement it is lower pitch, the music of the road. :)

The Turnigy 6S 5AH batteries fit the frame well, fully using the width between the covers, the length in the forward upper section, and leaving a bit of room above them to route the surprising collection of wire and cable that builds up. I was planning to put more of them in but didn't allow for the coroplast protection volume and the wire routing space. I'd like to get more battery onboard but to do that I'll have to get more efficient with the support and protection and the wiring, and perhaps use more energy dense batteries.

Mounting the Sabvoton on your frame is going to be a challenge, it is pretty wide even with the flanges cut off, if you were planning that. Your bike is looking good, getting close! Are you going to have a front derailleur, or just make that shift a "by hand" mode change?
 
Thanks man for replying and yea that was my concern also on how to mount it.

I was wondering if I could bend the flanges 90 degrees and attach it to the frame that way.
Frame is right at 4 inches so if that's 5 it would be about 1/2 inch off each side but would be secure id hope.
Anyway great comments and helps me think it out a bit better.

LOL about the front derailer. Honestly I think I want to get a schlumpf just figured id get something that works for now
and come revisit that when I had a chance to pedal the bike and see how it feels.

Keep up the good work.
 
If it is like my bike, it pedals like a moped, which is not good. Pedaling is for downhill or level, can't do much uphill due to rolling resistance of tires and insufficient gear ratios.

I'm suspecting that bending the flanges on the controller will snap them off or make them crack and be very weak. Best to mill them off and come up with some other mounting. Or go with Adaptto that is much less wide, or build a custom controller or use an 18 FET Infineon type. This Sabvoton is a great controller, but fitting on your bike is going to be problematic, I suspect.
 
Alan B said:
I've been working on the new bike rack today:

DSC_0407.JPG


This steel rack claims to be good for 500-600 pounds, which I question, but at least it is more than adequate for a GreyBorg! It is part number TMS T-NS-MRC001. I also looked at aluminum racks but they seemed to have some problems and cost more so I went with the higher rated steel one.

It is pretty easy to load and unload by myself, I can lean the bike against the back window temporarily while strapping it down.

I did have to get some threaded links to make it easier to connect the hooks to the rack as the holes were a bit tight for the big hooks on the strap kit.

Hi Alan,

How are you liking this rack? I also have a 4Runner and would like to mount my greyborg like this. Would you recommend another rack or is this one holding up for you?
 
That rack looks really nice and just like mine! Oh, it is mine. :)

Great vehicle!

Good thing I fixed that hokey chain tensioner. :)

No complaints with the rack, I don't use it too often, but it is quite solid and does the job, and it was not expensive. I did mod the rack slightly with some threaded links to make it easier to hook straps to the rack. I also left out some of the cross-bolts on the track to make the wheels drop in a bit and locate the bike positively left-right. The rack is a chore to store, being heavy and non-folding. Most of its use the last couple of years has been to rescue the bike when the controller failed at work. :(

Hopefully that won't occur again. :)

It is a bit of a challenge to get the bike on the rack, and then apply the straps. Lucky the 4Runner allows supporting the handlebar end against the window (with a rag to cushion it) while the straps are set up, and pre-positioning the straps helps also. As they are tensioned and the suspension depressed the whole setup gets quite sturdy. The straps are not included with the rack, I got a set of short straps, two ratchet type and two cam-lock type.
 
Bigger Battery Upgrade

56845.jpg


One thing I've contemplated is a higher capacity battery upgrade. The new Multistar's are only 10C rated, and more like 2-3C conservatively used, but they do offer more capacity for the same size and weight. The size batteries used in this bike in the Multistars would have a capacity of 26 or 33 amp hours at 72 volts, whereas now it has 20 amp hours. That's 30% to almost 50% improvement. Right now a round trip to work pretty much totals the battery, with a Multistar pack it would use about half the pack.

This would require a new XT90 type wiring harness, and some careful packing to get them all to fit on the bike, and would take some cleanup to fit all the wiring as well. It would raise the weight about 6 pounds. The XT90 connectors are smaller and safer than the 4mm Turnigy connectors, and they would have prevented the shorting problem that occurred when this pack was installed.

If the capacity was raised to the full 33 amp hours, and the peak current is 80 amps, then 2.5C would be more than enough to handle the peak load (and that doesn't happen often or last long).

I'll have to think about that upgrade. I would love the capacity, but it is not exactly low cost.
 
Multistar Superpack

I was looking at the dimensions of the various Multistar battery packs, and I realized that another configuration might fit (earlier I looked only at the 16AH packs which are not a good fit for the Borg battery compartment). I made some new measurements. Yes! So it looks like we can fit four of the 6S 8AH packs in almost the same space of the existing four 6S 5AH packs (times three places). So the capacity will grow to 32AH from 20AH at the cost of building a new harness, re-installing the batteries, and cleaning up the cables a bit as the cable space will drop slightly. Battery length is okay, width okay, height grows slightly. That's the one direction we have some room in.

This looks like a go!

Maximum current? 2.5C times 32AH gives 80A, so that's about as much current draw as one would want. And it is exactly what I have the peak current set to on the Sabvoton controller.

So the pack would be 18S 4P 8AH Multistar Lipo. Similar to the Zippy 8AH units but those are larger and don't fit the space.

For anyone with one of these Greyborg Warp frames, this looks like a good fit. Mount 8 in the front compartment, 4 in the controller space, 12 total. 2.2KWH up from 1.4KWH. Room for the Sabvoton controller in the lower section near the crank. Room for cabling and a bit more here and there.

Need to design a new XT90 8 gauge wiring harness with a circuit breaker and precharge pushbutton, and a new parallel balance lead board (though I could use the ones I have as well).

This is a major improvement. It will have capacity to make a round trip to work using about 60% of the new pack. It will greatly increase the utility of the bike, and it all fits under the hood.
 
Ride Tomorrow

We're going on a small group ride tomorrow. To get some extra range I charged up three Zippy 6S 8AH packs, put them in the trunk, and made a parallel connection to the main pack through the charging lines. So we're up to 28 amp hours for this. Unfortunately the trunk and batteries now weighs 14 pounds, which is not too good for a cantilever rack. It should hold up for this easy trip, I should make a triangulation piece that supports the cantilever rack for more strength.

In any case this is a trial run for having more capacity. It is not quite up to the 32AH that I'm planning, but it is a step in that direction.
 
Three Bears Ride the long way

Starting 74.2 Volts, 28 Amp Hour "label" capacity

From my house to Orinda BART, met Jeff and Abram there, status:

71.3 Volts
9.5 Miles
4.5 Amp Hours

From there, to the Three Bears Loop, around the 20 mile loop, then back to home

67.4 Volts
37.1 Miles
17.4 Amp Hours

We had a nice ride, pedaled a lot and travelled at bicycle speed. Met another e-biker who joined us for awhile.

Had a great ride.

The Zippy Range Extender seemed to help as the voltage stayed high longer than usual. The extra weight in the trunk was not a problem, but it did concern me as the Topeak racks have been known to fail with battery weight in them, though the case I read about was more batteries and off-road with a hard-tail so much harder on the cantilever rack.
 
Zippy Extended Range Pack

20141214_101329.jpg


In the trunk are three 6S 8AH Zippy batteries with a cable under the rack, visible here below the seat, connecting to the bulk charge port near the crank on the far side. This, plus the 20 amp hours under the hood brings the total capacity up to 28 amp hours, and adds about 10 pounds to the trunk.
 
Will the MultiStars Fit?

Multistar 6S 8AH 10C 146x64x50mm

Compares to

Turnigy 6S 5AH 25C 150x52x50mm

CroBorg space is:

300x150x105mm in the main battery compartment where 2/3 of the pack goes, and about half that in the controller compartment where the other 1/3 goes.

So I'll lose about 24mm of height for the two layers, total stack height 128mm plus padding compared to previous 104mm.

I should have about 20mm of space left for wiring, minus whatever protection I put on the pack. Which is not a lot but should be adequate if I do a good job on the wiring. Some wires will have to be shortened to reduce the wire storage requirements.

Total battery weight 11.5kg or 25.3 pounds. Not much different from what's there now weight wise at about 24 pounds, not including wiring harness.

Range - trip to work takes about 12 AH, return takes about 6, total 18. Which is just about the whole 20AH pack, 90% which is a very deep discharge. On the new pack this will be 18/32 = 56% of the pack for 26 hard miles, which extrapolates to a 46 mile range. These amp hour values are for riding hard on a steep commute round trip route. At the other end of the scale we did 37 miles on 17 amp hours last Sunday, so this extrapolates to 68 easier miles (slower but still a fair amount of climbing). So call it 65 miles, for a range 45-65 miles. On the flat it will go farther, so a more optimistic range is about 45-70 miles.
 
Have had good weather lately, for the time of year at least, and many ebike commuting days.

On one stretch of road the gravel from some roadwork had piled up deep at both sides in the bike lane, as well as in the middle of the intersection. I would slow down and "plow" through it. Yesterday as I passed through there a street sweeper truck was nearby. When I returned home the gravel was all gone, I don't know whether that was his appointed task, or whether he saw the problems I was having and he reacted to that.

But either way the gravel gone is excellent. Many thanks to the sweeper. :)

2/2015 update, gravel is slowly collecting, not nearly the level it was, but enough to be concerning. Glad I have wide tires, though sometimes penetrating is better than floating.
 
erik_m said:
Obviously an epic rig. How does your controller do with regard to heat issues? Does your controller get pretty warm? It looks like it sits right up against the frame, so that might help with heat dissipation.

Controller Heat

I've had four different controllers in the CroBorg. Three by or own ES Vendor Lyen and the current unit, a Sabvoton from zombiess.

The Lyen 12 FET 100V gets quite warm on my commute, occasionally warm enough to cut out.

Lyen 18 FET 150V gets fairly warm on my commute, as I recall a good 10C cooler than the 12 FET, and never cut out.

Lyen 24 FET 100V doesn't warm up at all. (It did fail, but not from getting hot).

Sabvoton 24 FET 90V doesn't warm up at all.

When I say they don't warm up at all, I mean you can't feel warmth with your hand. With my thermometer I see a few degrees rise.

The Sabvoton is mounted to aluminum angles that are bolted to the battery mounts which are in turn welded to the frame. They are not large enough or low enough in thermal impedance to conduct any significant amount of thermal energy. There is good clearance around the sabvoton for air to move inside the covers, I'm not sure there is much airflow but there must be some. I made some cooling holes to get some flow for the 12 FET, but there is so much blockage from batteries and wires that it cannot be much. The Sabvoton is below that area, and it is mostly closed in at the bottom of the covers, so I don't expect there is a lot of flow. But it doesn't seem to matter at this power level.
 
Back
Top