• Howdy! we're looking for donations to finish custom knowledgebase software for this forum. Please see our Funding drive thread

CYC PHOTON

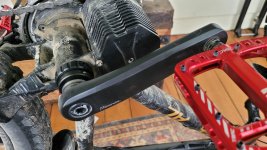
Left ISIS Crank Continually Working Loose/150mm Cranks

I (and I believe, several others) have experienced the CYC supplied left crank randomly working loose. This is even with using thread locking compound on the fixing screw and regularly checking tightness. The problem is that if it works slightly loose for even a very short time, the crank gets damaged and becomes an even looser fit on the axle. I think this is actually a tolerance issue, and may be made worse by the vague installation instructions. The ISIS standard requires the crank to seat up against a shoulder ~16mm from the outer end of the shaft. Less than this, the crank will be loose, and more than this, the crank interface may be deformed. The way CYC has designed their system the left shoulder is movable depending on the position of the locking ring and how many spacers the user installs, and it isn't clear exactly which side of the line is intended to be used to gauge all this. And the line isn't actually 16mm from the end of the shaft anyway.

CYC did replace my worn crank, though I had to pay shipping of course. I added a few other items and a warranty replacement part to make it worthwhile.

My original cranks were 165mm. While I was resolving the issue I decided to try some Miranda 150mm cranks, and I really like them. For a start, these are FAR tighter on the ISIS splines than the CYC ones; in fact, I had to fit shims just to get them something to seat against, on both sides. They come with self-extracting bolts, unfortunately these are shorter than I would prefer but seem to work OK.

The crank length is absolutely fine, this is an ebike after all, and I tend to be a higher cadence rider since I have a 34T chainring; short cranks help with this. Even riding up steep sections I don't notice any difference from the 165mm cranks in terms of effort. There is a lot more ground clearance, and the higher seat position isn't a problem since I've just installed new forks with a slightly longer steerer tube :)

Miranda are reasonably priced (but not the cheapest) compared to most out there, they have a wide range of sizes and offsets. 150mm was one of the few sizes available in 0mm offset. Service was good and shipping was fast. Self extraction works OK, but I don't think the extraction thread is a well cut as CYCs or other cranks I have used.


HTH

20240522_150851.jpg
 
Last edited:
In the latest Photon video on the CYC channel they stated that the most efficient power level for the Photon is 700W. Well, I just tried it limited to 700W on a normal ride and it shit the bed. So I don’t know what to make of that other than this motor is simply not what they claim, or I have a defective unit. But I paid Apple prices to have a system that just works, and my experience with the vendor I bought the photon from has not been good. So the best way to keep my sanity is to just choose a more capable motor.
It would have been a LOT more useful if Rikus had indicated what cadence is most efficient as well. You could have the limit set at 700W and if you are running stalled out the motor will get hot as well. Have CYC (or anyone else) published these curves anywhere?
 
Here's something to consider.

Nervagon is running this on a cargo bike ( not known for stellar aerodynamics ), he's a large framed individual, and his riding position is fairly upright.

The bike's weight, geometry, tire choices, and riding position can vary the load at a given speed by hundreds of watts.
That in itself could create enough variance that the motor overheats versus not.

In this case, the bike is being operated right at it's supposed nominal rating. A nominal rating should be based around a 24 hour use at that wattage. If we're overheating at that wattage in the course of minutes, then the nominal rating is incorrect.

I user with a known good motor should reproduce what nervagon is doing - if they can, and the motor doesn't overheat, then we could say with pretty good certainty that nervagon's motor is faulty. Otherwise we're arguing theoreticals without proper information.
In general, the peripheral factors might affect how much power is required, but for this analysis the factors are more likely to be
  1. Power input by motor
  2. Ambient temps
  3. Cadence
  4. Airflow (maybe)
I'm pretty sure that recording the ride would show useful information, as opposed to a single screenshot.
 
I visited their website and they look pretty good but holy cow they have a ton of different ISIS crank models with many the same price so I am not sure what the differences are... although maybe that is the length and offsets offered in each? But IDK. Doesn't make a lot of sense to me that they would be different models and all be ~the same price. Why not just one crank in the different offsets??

You have 150mm cranks? Damn those are awfully short. I can't imagine riding anything that small. Like for little kids. Those would be ~a full inch shorter than my 175s. The Miranda site says the 175s are available in 0 offset with the Delta RF ISIS cranks. I'll make a note of this in case I need some in the future.

Thanks for reminding me to check the tightness of my cranks. I haven't ridden this bike since last fall but I will check that out before my next ride. Doc says I need to wait until early July. :-(

My original cranks were 165mm. While I was resolving the issue I decided to try some Miranda 150mm cranks...
 
Last edited:
For a crank bolt alternative, I'm trying out some hollow ones on one Photon build:
71DRzOdwc3L._SL1500_.jpg

It takes a 10mm tool, and I use a long "L" hex key to get leverage - so far, so good, has stayed tight, and the tool doesn't slip or pop like can happen with the stock caps.
 
For a crank bolt alternative, I'm trying out some hollow ones on one Photon build:
71DRzOdwc3L._SL1500_.jpg

It takes a 10mm tool, and I use a long "L" hex key to get leverage - so far, so good, has stayed tight, and the tool doesn't slip or pop like can happen with the stock caps.
Where from? Did they include the washer?
 
I visited their website and they look pretty good but holy cow they have a ton of different ISIS crank models with many the same price so I am not sure what the differences are... although maybe that is the length and offsets offered in each? But IDK. Doesn't make a lot of sense to me that they would be different models and all be ~the same price. Why not just one crank in the different offsets??
Many OTS bikes with motors from Bosch, Brose etc have different offsets for right and left cranks, and they differ between motors and bike models.

You have 150mm cranks? Damn those are awfully short. I can't imagine riding anything that small. Like for little kids.
And old people. People who have hip and knee issues would benefit from shorter cranks, as would smaller adults. For example, you are reducing the height that you have to lift your knee by about 50mm.
Those would be ~a full inch shorter than my 175s.
Only 15mm shorter in my case. Intuitively you might think 150mm is too short, but they feel absolutely fine.
The Miranda site says the 175s are available in 0 offset with the Delta RF ISIS cranks. I'll make a note of this in case I need some in the future.
For standard cranks I think the CYC ones are cheaper.
Thanks for reminding me to check the tightness of my cranks. I haven't ridden this bike since last fall but I will check that out before my next ride. Doc says I need to wait until early July. :-(
Don't leave it too long :)
 
I checked it today as I walked by the bike in my workshop. The right bolt was tight and the left was just a tad loose. Well, not really loose, it was "snug" and I got maybe 5 degrees of tightening on it. The arm itself had no play on the shaft.


Don't leave it too long :)
 
Last edited:
I checked it today as I walked by the bike in my workshop. The right bolt was snug and the left was just a tad loose. Well, not really loose, I got maybe 5 degrees of tightening on it. The arm itself was still snug.
I meant the riding part :)
 
I have to leave it until July, new hip and all. At 6 weeks post surgery I am riding indoors and it feels great and I could easily ride outside... except the hip joint implants need 12 weeks to join with the bone enough to resist any impacts. As unlikely as falling is, it is a risk that I won't take yet... though I may sneak out in June.

I meant the riding part :)
 
Last edited:
Left ISIS Crank Continually Working Loose/150mm Cranks

Thanks for the explanation why the left cranks comes off.
Yes, the short Miranda cranks, 420 gr. and 60 € are really ok.
The160mm FSA KFX CK-9011 cranks, I initially intended to order does´nt justify the additional 220 € for 70gr. less weight.
I will go Miranda too. (y)
 
Amazon, IIRC - some come with washers, these did not. I applied a dab of blue Loctite.
The washer is part of the ISIS spec, BTW. They are actually very important - both as to size and thickness, but also that they need decent lubrication during assembly. Lubricating the washer might also help to prevent any movement in the interface to be transmitted back through to loosen the bolt.
 
Last edited:
Thanks for the explanation why the left cranks comes off.
Yes, the short Miranda cranks, 420 gr. and 60 € are really ok.
The160mm FSA KFX CK-9011 cranks, I initially intended to order does´nt justify the additional 220 € for 70gr. less weight.
I will go Miranda too. (y)
There's several high end options with insane pricing (more than my original bike cost!), but Miranda seemed OK and they have a decent range. There is also Unicycle who sell ISIS cranks with low offsets. Sometimes other low priced options turn up on Amazon or Aliexpress, but with so many businesses closing now stocks and choice seem to be limited. We'll have less choices in the near future. 0mm offset cranks are not common.

I could only find ISIS crank failures related to early Truvativ cranksets, and that only affected the left crank. I think is was also assumed to be a manufacturing tolerance problem. ISIS failures don't seem to be common, they've had a resurgence with OTS ebikes but those are now tending to move to different proprietary standards now unfortunately.
 
You have 150mm cranks? Damn those are awfully short. I can't imagine riding anything that small. Like for little kids. Those would be ~a full inch shorter than my 175s.

My usual bikes have cranks between 185mm and 225mm, and all else equal I like the longer ones better. But I put 152mm cranks on my mid drive because they're so much easier to spin up to the motor's happy running speed.

Keep in mind that power = torque x RPM, and that while short cranks cost you on one factor , they can add to the other.
 
Left bearing Cup

Early owners of the Photon might benefit by inspecting their left bearing cup.

IMNSHO CYC made a small error with the design of this component - it isn't a big deal but might affect the longevity of the BB. CYC have addressed this with at least 2 revisions of the left bearing cup design since Photons original release. Rikus' recent video shows an updated bearing cup, and the one I received recently was different to that.

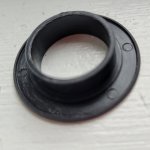
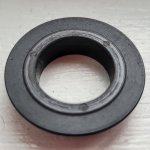
The issue is that their application of the BB bearing shield was incorrect. In normal use, the bearing shield is intended to protect the BB bearing from direct water and dirt ingress. It isn't intended to seal or to touch the bearing cup, just move freely beside it. It is a shield, not a seal. The shield that CYC use has a flange on the "underside" or inward facing perimeter, which runs against the bearing cup outer face. This causes the new bearing to feel unusually stiff when you spin it by hand.

Clipped_image_20240523_160250.png

20240401_155346-01.jpeg

This has implications for assembly. If you put no preload on the bearing, there is still existing preload from the shield itself, because it clips into place inside the bearing and puts tension against the bearing cup face. With no or little preload added at installation, that friction may be enough to cause the shaft to spin inside the shield but generally there is enough friction from the shaft o-rings to make the shield and bearing spin..

As you increase the preload slightly, you actually increase the friction between the shield and the cup as you press the centre of the shield inward, and the shaft spins inside the shield. You may have seen how this causes shiny wear on the shaft itself in at least one teardown video - the bearing is not spinning, the shaft is wearing against the shield itself. Additionally, the adjustable preload collar wears against the outer face of the shield, this is obvious on inspection as the shield becomes contaminated with aluminium, and the inside face of the collar has its finish removed.

20240401_155359-01.jpeg

20240401_160539-01.jpeg

As you increase the preload further, the shield rotates with the bearing and things appear to be working correctly. They are not. Now the shield flange is cutting a groove in the face of the bearing cup, just outside of the bearing perimeter. The material from this seems to stay behind the shield and perhaps may contaminate the bearing. My bearing failed after ~1000km.

20240401_154833-01 (1).jpeg

20240401_154942-01.jpeg

CYC have addressed this and replaced my bearing cup assembly under warranty (though for me, shipping is expensive). Owners could undertake their own workaround, the easiest is probably to just remove the back perimeter lip on the shield. Bearings are easily available. Bearing is S6805RS - stainless 25x37x7 rubber seal. There are many alternative configurations that should work - chrome steel and ceramic options, with one or 2 rubber seals. Bearings 61805 are the same size and should also work. If you are out of warranty, the bearing cup assembly is not an expensive item.

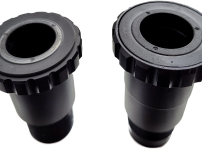
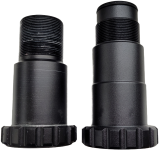
CYC made the cup flange thicker and introduced a recess for the shield to correctly sit into. They also increased the length of the unit and introduced and O-ring to seal the connection where the cup threads in to the motor body. Old on left, new on right. It should be reassuring that CYC are continually improving the Photon behind the scenes.

When setting preload, ensure the shield is rotating with the shaft.

HTH...

Clipped_image_20240523_160241.png

Clipped_image_20240523_155831.png
 

Attachments

  • Clipped_image_20240523_160250.png
    Clipped_image_20240523_160250.png
    2.6 MB · Views: 2
My usual bikes have cranks between 185mm and 225mm, and all else equal I like the longer ones better. But I put 152mm cranks on my mid drive because they're so much easier to spin up to the motor's happy running speed.

Keep in mind that power = torque x RPM, and that while short cranks cost you on one factor , they can add to the other.
I probably wouldn't bother with shorter cranks on an acoustic bike, but ebikes can make up for the torque factor. Plus, the loss in torque isn't linear since this is a fairly complex mechanical situation. Tests seem to show the loss in torque is not as great as you'd intuitively expect.

Higher cadence gets your heart rate up, so there's that, everything else aside.
 
Not really. I am already very comfy with the 175s. As for spinning vs leverage these seem right for me and I never had trouble spinning to whatever RPM I need. No different on an e-bike, for me anyway.

Thanks for the BB design info. It might be a good idea to lay in a spare at some point if they are shipping the new design.

Sounds like you'd be a candidate for short cranks while recovering. Maybe talk to your physio. All the best, take care - you only get one shot at this.
 
I'm even using 145mm short cranks (QX BlackZeroQ ISIS 145mm) on my Photon MTB. Takes a few rides to get used to it, but then I would not like to go back to longer ones.Nice clearance against ground, and good for high cadence riding. Pretty good matches characteristic of the Photon.
Have to add here: These also fit very tight of the ISIS axle. Never got loose until now (~2000 km MTB).
 
Hello,
When assembling for the first time, is the ISIS spindle somewhat diffult to insert entirely by hand or it is just me ?
Especially, it seems that there's a very tight fit between the axle and the left bearing cup plastic shield

According to the hindesit post, I have the older left bearing cup

Maybe I will try to use a rubber mallet to help but I don't want to break anything

Yet, on the CYC's Photon official assembly video, they manage to insert the axle very easily without any kind of tool ??

Once you have insured the splines are aligned on the drive side, the axle can be tapped into place gently with a rubber mallet. I had the same problem, and my left bearing actually popped out of the retaining cup when installing the axle. I had to press in back into its cup and then reinstall the axle which then went in easier. I am assuming that my left bearing was not pressed into the cup straight or fully seated from the factory. I used a headset bearing press to re-seat the left bearing.
 
@hindesite I do have the new left side bearing cup design but mine didn’t come with the O-ring! And it is nowhere to be found in the packaging either:

IMG_7018.jpeg
 
Once you have insured the splines are aligned on the drive side, the axle can be tapped into place gently with a rubber mallet. I had the same problem, and my left bearing actually popped out of the retaining cup when installing the axle. I had to press in back into its cup and then reinstall the axle which then went in easier. I am assuming that my left bearing was not pressed into the cup straight or fully seated from the factory. I used a headset bearing press to re-seat the left bearing.
Ok I have used a rubber mallet and the axle is now fully inserted but the plastic left bearing shield pop out in the process and I can't set it back :LOL:

Moreover the axle O-rings seem to be pretty fragile (there are damaged by the sharp groove of the axle), CYC should include some spare
 
@hindesite I do have the new left side bearing cup design but mine didn’t come with the O-ring! And it is nowhere to be found in the packaging either:

View attachment 353463
That seems similar to the version shown by Rikus in his video, mine is different to that, probably lighter. I wouldn't worry about the O-ring, it didn't have one before the revision. Unless your BB is getting really wet.
 
Back
Top