Direct Drive #219 Pitch Monster Sprocket

liveforphysics said:
I'm using that double sided CNC router tape you showed me on ebay, and it sticks and plants the parts much more solidly than I had expected.

If I made a jig, and cut a block of lexan to exactly 16"x16" that fits snug into the jig, couldn't I cut the area on both sides with in the bounds of my x-axis, then turn the block a 1/4 turn, re-run the same program, and the sprocket would be finished right?

i think the fastest way would be to put a dowel pin thru the center, make the first cut, put another dowel pin snugly in one of the teeth and index on that.

instead of tabs and double-sided tape, you can also clamp the piece down and cut leaving .1mm material left-over, then flip the piece and face it til the piece drops out. less burrs that way.
 
Just picked up some various materials to try out the code Thud gave me for cutting sprockets. :)

I picked up a pair of 48" x 20" sheets of 1/4" 6061 aluminum, (2) 14" x 48" sheets of lexan, and a 20x 60" sheet of 1/4" lexan, and a partial sheet of 1/4" nylon. Then at my trip to the other plastic supply place in town, I picked up a very cool scrap off a very pricey sort of sheet. It's a woven Kevlar reinforced phenolic plastic sheet. It's 3/8" x 24" x 24". It's crazy rigid! Just playing with it and playing with the aluminum sheet, it feels more rigid than the aluminum! It's heavier than the sheets of 1/4" carbon fiber I've got, but it feels equally rigid. Unfortunately, even buying it as scrap was about 5x the price of an equal sized price of aluminum, but that is still about 1/4 the price of carbon fiber, so it's still kinda a good deal. :)


I also mounted a vacuum setup on my spindle to pick up the chips and dust. I'm now headed out to get a sheet of melamine board to be my new milling table floor, because I hated the performance of the MDF sheet I layed in there. MDF = suck for table material because it fluffs up when you cut into it so nothing wants to sit flat.

I'm going to pick up some weather stripping for my acrylic enclosure panels as well, because dust just pours out of the little seam areas on my panels right now. lol Puts a lot of dust in the air, and I worry about my reef aquarium getting nuked from some sort of toxic dust settling onto it. Reef = extremely delicate.
 
Huge thanks to Thud for the G-code. :)

[youtube]fC9dWIQxfec[/youtube]
 
Cool Luke, I would like to see one of these with light sensors along with bright blue LED's that control timing. :mrgreen:

Anyway, my buddy made a steel sprocket today and will lighten it tomorrow. I told him your idea about following the forward swept blades of a brake disc, and he is drawing it out tonite!! :twisted: I told him to take out ALOT of material for lightening, and add holes where he pleases. Never too many lightening holes, heh AJ? This one will disc brake mounted, so the cuts will be made deep. I can't imagine the aluminum being worth it considering the price of that stuff!! :shock:
I paid $80 for a 20"-40" remnant of 6061 T6 .190" damn that hurt. But I also had a grand time looking at all the huge blocks of metal. I found a piece of structural C channel perfect for my detachable drive. Then this sprocket for my dirtjumper!! It's gonna be a good year. 8)
 
You're gettin stung on aluminum bro!

At the metal scrap place, each 24x60" 1/4" sheet was $25.
 
Doooood!! :evil: WTF!! This was a metal supplier house, and this was a remnant at that, no special cuts. Where should I be going?
 
I just paid close to $3 per pound at a supply house.. I need to find a cheaper source. I guess I'll try to find some scrap places. Getting familiar with the cnc software here, almost ready to try making a sprocket. The little motor side drive sprockets probably have to be steel eh? How long do you think a 6061 or 7005 drive sprocket would last? A day?? :p
 
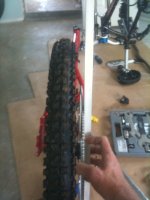
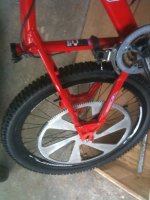
My friend FINALLY finished one sprocket for me. This thing is HUGE!! I will have pics up tomorrow mounted on a rim if it fits right. There has got to be another way, this thing cost me $100. :shock: With the homie hookup!
 
etard said:
My friend FINALLY finished one sprocket for me. This thing is HUGE!! I will have pics up tomorrow mounted on a rim if it fits right. There has got to be another way, this thing cost me $100. :shock: With the homie hookup!


Thud sent me more code. I just need to get a few hours of freetime and I will try to whip some out at only the cost of materials, or even maybe even free.
 
Damn Luke, your alright!! :p

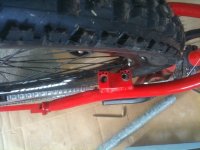
I'm really not very pleased on the finish of this thing. It has a few noticeable mistakes, the disc brake holes are too big and the mesh with the chain is "sticky" if you know what I mean ( I wonder how this will act at speed). When I get home I will post the pics of it. If you ate programming the brake rotor sweep pattern into it, hold off until you see my pics. I think LIGHTENING Holes would be the way to go, with rings of different sized holes. I have enough metal to do another, so I can send it to you, or since you get it soo much cheaper, I can just send you $$$.

Now, the issue we all will have with this size sprocket: CLEARANCE. I need more room dammit!! I think a top hat style of adapter will be necesary for this size sprocket. I also will have add some freewheel threads on the adapter if I can't find a BMX hub to fit my frame. The first mounting will be on my hardtail for ease of mounting. Pics to come....
 
Is this a monster 165t sprocket?
 
You tell me:
 

Attachments

  • photo(14).jpg
    photo(14).jpg
    41.3 KB · Views: 1,879
  • photo(15).jpg
    photo(15).jpg
    50.8 KB · Views: 1,881
  • photo(16).jpg
    photo(16).jpg
    63.1 KB · Views: 1,881
  • photo(17).jpg
    photo(17).jpg
    73.9 KB · Views: 1,881
  • photo(18).jpg
    photo(18).jpg
    79.6 KB · Views: 1,879
  • photo(19).jpg
    photo(19).jpg
    66 KB · Views: 1,879
  • photo(20).jpg
    photo(20).jpg
    65.9 KB · Views: 1,881
  • photo(21).jpg
    photo(21).jpg
    79.1 KB · Views: 1,881
Must be a monster; can you see the look the dog has? :lol:

Also, the "sticky" problem with the chain can be fixed with a file, maybe even just an emery board. Spin the wheel with the chainring on it, using the file/board to lightly work away some of the tooth sides.

If you have access to a lathe it will fit on (it's way too big for mine), you can machine it off easier there.
 
Whoa! That's a heck of a big sprocket! Makes the 125t sprocket look tiny!
 
:shock:

looks quite nice tho to be fair, maybe just needs some deburr to sit right?
sorry is that on a 26" or 24"??


D
 
That's a 26" rim and it will prolly look better if I paint it black.

Amberwolf,
Is it possible the sprocket will "break in" after a few hundred miles? The chain is steel and the sprocket aluminum so I would think any wear would occur on the sprocket side of things. Maybe just clean the chain good after every run in the beginning to get the grindy bits out, after that it should be all butta baby!!

Now that I am going to have to design a mounting adapter, I am thinking about an even bigger sprocket that just mounts directly to the rim. It would actually end up being much lighter and more stealth seeing as how you won't see anything coming off the hub. Be easy to line things up by just using different sized spacers depending on tire size etc... I'm not really too worried about stealth, but I do prefer to remain under the radar if you know what I mean. :wink:

Luke,
Can your mill make a sprocket that is 22" in diameter? Could even be two, maybe four different pieces, and only be 1 1/2" thick. Wouldn't need all the teeth either, just a few here and there to ensure at least 10 teeth engaged at all times. So can you?? Can it?? Dammit! Why this constant need to improve things??
 
etard said:
Is it possible the sprocket will "break in" after a few hundred miles? The chain is steel and the sprocket aluminum so I would think any wear would occur on the sprocket side of things. Maybe just clean the chain good after every run in the beginning to get the grindy bits out, after that it should be all butta baby!!
Oh, it'll wear in after a while, and may not even take that long. But then you're going to have aluminum dust or bits in your chain, potentially gumming it up, so you definitely should do that cleaning. :)

The latheing or filing would be better, because you can put an angle on the tooth for better catching/seating.

Potential worst-case scenarios below. They aren't likely to happen, but they *can*. ;)

I've found that on sprockets that tightly fit a chain, if there is any bounce in the chain, especially at higher speeds, sometimes it's possible for the chain edge to just barely grab the tip of a tooth instead of falling on each side of it. It could also happen if there is a long chainline, because there can be a lot of slop in it even with good tensioners. When that happens, if there's sufficient chain tension against an aluminum sprocket it will *probably* just chop more off the side of that tooth than usual. But it could do the same thing that happens on steel ones:

On a steel one, it almost always just rides up on top of that, and if everything is ok just flops back down where it's supposed to be after a few links. But if you're leaning in the direction that the tooth ride starts, the chain now can slip farther over so it's edge is on the top of all the teeth, and it usually flops over the other side and now you have a loose chainsaw running on your bike. :( If that is on the outside of the sprocket, toward the dropout, probably nothing horrendous will happen before you cut power, as long as the chain doesn't tangle. If it's on the inside, there's a fair chance it'll cut thru spoke heads, possibly enough of them to do this:
http://www.endless-sphere.com/forums/viewtopic.php?p=254962#p254962
Keep in mind *that* was from pedalling, not a motor. :shock:
If the chain tangles on either side, I'd expect that it'll pull the wheel out of the dropouts if you have horizontally-angled ones. If they're vertical enough, it might just break stuff instead.
 
I'd hit that sprocket with a drill using a wire brush attachment. You can even have the brush make the wheel spin for nice even wear on all the teeth.

To get the clearance resolved, I've used a combination of thick rubber, plywood scraps, C-clamp, and vise to flatten/crush the inside of AL and steel chainstays and seatstays without marring or bending the outside. I used the rubber backed by wood on the outside so the rubber deforms to the shape of the tube, which spreads the pressure on the outside over a much greater surface area. On the inside, I used a small piece of wood against the tube I wanted to bend without gouging the metal from direct pressure of metal on metal with the clamp. Then just crank down with the clamp or vise to get the clearance needed with very little visible damage to the frame.

John
 
Nice sprocket, Etard! What is you optimum size to match up with your motor sprocket? Is your motor in the 6-10,000 rpm range?

Dave
 
I have two Hacker RC motors here that seem to be good efficient motors in the RC world, we will see how it stands up to the abuse in my world though. :lol: One is 168 KV the other 220 KV, I have a 12 tooth and a 14 tooth motor sprocket coming from gocartgalaxy this week and I plan to run 36 volt for the time being. With single stage, 12 tooth to 165 tooth sprocket, 168 kv motor @ 36 volts with 80% efficiency on a 26" rim, I figure top speed will be around 25 mph. What I want for this is low speed grunt, if it proves to be not enough speed, I will just swap out to 48 volt later.

If the sprocket turns out to be too wide, I will throw it on the lathe at work and sand it down or hit it with the wire brush like John says. I am going down to the LBS today and see if I can't get some ragged disc rotors to use as a spacer, I will cut out the center of the sprocket and attach it to the disk brake rotors (2 for strength). That way it will be recessed into the dropouts by the width of itself, which is not going to be enough :roll: so I will just use washers to get the remaining clearance I need. Hopefully I won't have to get a skinny tire in the back, we will see. I'm not opposed to kicking up some dirt with loss of traction though. :twisted:
 
Hey Etard,
just a bump to pay you the highest compliment. plagerism. :p
I ran a 121 tooth today & designed a chain guide to mount directly to my bullet resistant sprocket. I am attempting to use this on my ohio bike build. more will be in the photo section where i will post that bike when i have a little more to show.
 
Thud, that's badass! I kinda wish I would have tried that route with the teeth pattern, prolly less friction. :? Although, it was a pain I'm the ars to get my current setup. I got the metal to do the "top hat" adapters. Now I just need to find the time to squeeze some lathe time in. :p

By the way, those adapters are perfect and I appreciate you finding the time to help me out with that.

Can't wait to see what beast you put this on.
 
Back
Top