• Hello ES! We could use some help to get us past the finish line on building the new knowledgebase for the forum.
    Can you donate? Please see our fundraising page. Thank you!

DIY Pulse Arc welding copper directly to cells

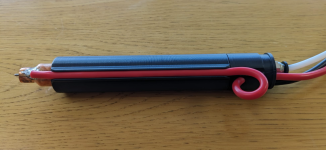
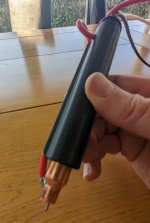
I've been working on a new handpiece for the welder that will be simpler to produce with improved reliability and ergonomics. Maintaining gas seals and allowing free retraction of the electrode whilst retaining a low resistance, low friction flexible high current connection onto the electrode has been challenging but this design is now fairly reproducible. I have sent out RFQs for the internal CNC brass parts that I would need to make a short production run.
1744218075420.png

1744218113796.png
 

Attachments

  • 1744218100666.png
    1744218100666.png
    774.6 KB · Views: 5
I wish I had this incredible tool in my workbench to make perfect weld and eliminate the risk of damaging cells.
Any update on your prototype, do you anticipate releasing something soon?
As an alternative would there be available TIG welders that would be safer than spot welder? I have no prior experience in spot welding, and a bunch of cells is on its way to my house tomorrow..
 
I used my welder to build a 16S4P EVE 40PL pack this morning. Was very quick, I don't think I spent longer than 15 minutes actually welding, I think the cycle time can be at least halved as well. I used 0.3mm copper and 70J welds, 3 welds per cell for ~6mm^2 fusion area per cell which is plenty.
1747131877795.png

1747131849561.png
Electrode is still shiny afterwards, i.e. no contamination.
1747131914163.png
 
Nice video! Near the end, I see soldered wires. Can you spot weld copper crimp terminals (examples below) to the pack instead of soldering?
I soldered the cables to the copper then welded the copper to the battery

I don't know how or why you would weld that style of crimp to a battery they are intended for terminating cables. You could certainly weld some sort of terminal on if it has a nice flat area to place the welds onto.
 
I soldered the cables to the copper then welded the copper to the battery

I don't know how or why you would weld that style of crimp to a battery they are intended for terminating cables. You could certainly weld some sort of terminal on if it has a nice flat area to place the welds onto.
I wonder if you can get crimp terminals w/o the hole so it can be spot welded with your machine? I suppose the lug hole is preventing the shielding gas from doing its job? It'd be nice not having a soldered termination.

edit: With copper flux and the right resistance spot welder, those copper lugs can be welded to copper per this video.

 
Last edited:
I wonder if you can get crimp terminals w/o the hole so it can be spot welded with your machine? I suppose the lug hole is preventing the shielding gas from doing its job? It'd be nice not having a soldered termination.

edit: With copper flux and the right resistance spot welder, those copper lugs can be welded to copper per this video.

You can terminate however you like, I can easily weld the ring end of a lug terminal onto copper, it is just a bad idea. I thought you meant the tube end. If you want to crimp then roll the copper around the cable, hydraulic crimp, then wekd the tail to the cells.Never try and crimp something you have already welded or soldered, crimping will obviously distort and likely fracture the material.
 
I can easily weld the ring end of a lug terminal onto copper, it is just a bad idea.
Good to hear your welder can do that. Why is it a bad idea? Crimp is better than solder for high current connections. Crimp the wire to the ferrule, spot weld the ring terminal to the busbar. As long the busbar is strong enough mechanically, what's the problem?.
 
Good to hear your welder can do that. Why is it a bad idea? Crimp is better than solder for high current connections. Crimp the wire to the ferrule, spot weld the ring terminal to the busbar. As long the busbar is strong enough mechanically, what's the problem?
I think you can make a crimp for welding many times more suitable than a ring terminal. For a start something with a decent weld area so you can get a load of fusion area. Anyway I think this is getting off topic. It is also possible to weld the cable straight to the copper.
 
I think you can make a crimp for welding many times more suitable than a ring terminal. For a start something with a decent weld area so you can get a load of fusion area. Anyway I think this is getting off topic. It is also possible to weld the cable straight to the copper.
The reason I chose the 2 crimp terminals as examples is because they are available and inexpensive. Who wants to make a "crimp for welding"? I doubt one can easily make a round crimp ferrule that is airtight like the examples.

I do not like soldered high current connections if it can be avoided. Can you do a video demo of welding 8 gauge silicone insulation copper wire onto copper busbar?
 
The reason I chose the 2 crimp terminals as examples is because they are available and inexpensive. Who wants to make a "crimp for welding"? I doubt one can easily make a round crimp ferrule that is airtight like the examples.

I do not like soldered high current connections if it can be avoided. Can you do a video demo of welding 8 gauge silicone insulation copper wire onto copper busbar?
Nope you need a different weld head for anything other than.cell tab welds / sheet welds for which my weld head has been designed, checkout the commercial sunstone pulse arc videos if you want to see what can be done with a normal pulse arc weld head to stranded copper. This isnt likely to be a priority for me anytime soon albeit such a weld head would be much simpler than the cell weld head, basically just a solenoid. The same welder can be used.

Fyi crimp lugs are just squashed copper tube with a hole drilled, you can make them any size you like using a vice and for welding just don't drill the hole. You need to maintain the combined area of the cell welds up through the connection otherwise you are bottle necking the current. If you must use a ring lug then bolt it on to maximise the area.
 
Last edited:
The project has moved on considerably since I last updated this thread.

I have completely redesigned the actuation system, the current former, the power source and changed MCU. All this effort has been to make a unit that is (volume) manufacturable, cheaper and can run off easily available power sources.

For example the old unit sourced power from a large capacitor bank running at 34v, this is a fairly easy voltage to work with short electrical arcs - the arc drops ~16v so you have a lot of head room for managing it. However the cap bank is large and expensive and I wanted the unit to run off a simple battery power source. So the new unit runs off ~24v and I've been targeting a cheap and easily obtained or built 6S pack. The lower voltage required a completely new arc control algorithm and a 100% different power stage which is just entering the third and hopefully final iteration.

The original unit used a custom built actuator that could never be manufactured at a reasonable cost / effort. The new unit uses an off the shelf stepper motor however it cannot be driven in the traditional manner with a stepper driver as that does not provide the torque precision required to manage the electrode as it moves, particularly the critical accelerations around arc starting as the electrode begins to leave the workpiece that ensure the arc starts reliably every time. The new unit overcomes this by directly controlling the stepper phase currents (and therefore the electrode acceleration, velocity and position) from within the current former / weld control loop.

Hope that gives a flavour of what I've been up to and that the pulse arc battery welder is still progressing at speed.
 
Last edited:
This is so cool, I designed a pack for these new tabless cells but got stuck on how to make a connection to an 18650 cell that i can pull 100amps out of each cell for 10 seconds. This might actually get me there. Please keep up posted on progress
 
This is so cool, I designed a pack for these new tabless cells but got stuck on how to make a connection to an 18650 cell that i can pull 100amps out of each cell for 10 seconds. This might actually get me there. Please keep up posted on progress
Currently I am using copper nickel composite with copper bus bars. Standard kind of stuff you can buy where its a sheet of copper with holes punched in it, and a thinner more easily welded strip connecting from the busbar to the cell.

The thickest I have experimented with is a 1mm copper bus bar with .1mm nickel copper composite- 35 microns of copper, 65 microns of nickel, 8mm wide strip connected on both ends.

This means the connection is effectively .6mm² of copper and 1mm² of nickel. Nickel is 4x as resistive approximately, meaning we have .85mm² of equivalent copper connection.

Now .85mm² isn't very much for a c2c connection, and I would only generally put 20 amps through that- but it's about 1-2mm from where it welds to the cell and where it welds to the bus bar.

From there, assuming 2mm length, I calculate a resistance of .04 mOhms.

At 100A, using P = I²R, you will lose about .4 watts to that connection due to it being thin composite over straight welding the cell, which is about .1% of the power output of that cell being wasted. And any super cap welded gets consistent clean welds with it.

However, if the resistance at the weld points are reduce by this...
 
Some more progress. Latest design is powered from 6S pack and is working perfectly. Latest PCB has an oled and eeprom for storing weld profiles, so no need to attach to a PC or phone. Welder is now standalone, unit is compact - only about 4" cube.

1763216420769.png1763216748191.png
 
How about a video showing the entire setup (including the shield gas supply) doing welds?
 
How about a video showing the entire setup (including the shield gas supply) doing welds?
I'm just using my normal argon bottle from my TIG, but you can use one of the tiny disposable bottles. These cost about $15 in the UK, probably good for many thousands of welds. I have been using a flow rate of 1 litre/min which is as low as the regulator can regulate and the welder has a solenoid valve so the gas only flows when required. My current weld profile switches the gas on for 300ms before the weld, then does the weld 50ms, then 300ms post flow so <0.5-1s of gas flow per weld, say 100 welds per litre. This is a disposable bottle and regulator (regulator is not disposable), it says it has 60 litres of Argon so presumably that could do 6000 welds. I don't need to weld another battery at the moment but can make a quick video of welding copper to disposable knife blades which I've been using as tabs to test with.

1763225695837.png
 
Back
Top