* * * Ebike Simulation Program * * *

Installation

Unzip the simulation into a new directory.

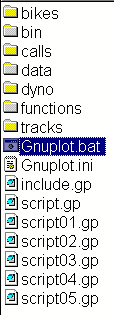
You will get something that looks like:

Unzipped.gif

:arrow: By starting the Gnuplot.bat file you will start the simulation.

(you are done reading if you just want to try it now :) )

The program actually goes to Gnuplot.ini and reads:

load "include.gp"
load "script.gp"


...which makes sure all the necessary calls and functions are avaliable to the script file. This is ultimately a scripted simulation with a very limited set of possible commands.

If you do NOT have a windows operating system then you will need to figure out how to get a gnuplot executable for your system and do whatever else is necessary to set things up right. This is a windows only executable.
 
Scripts

There are a lot of script commands that you can use, but it's not necessary to know all of them. There are a few commands that when called end up calling all the others that are in their same category.

These are the four main script commands:

:arrow: Bike
:arrow: Dyno
:arrow: Track
:arrow: Evaluate


--------------------------------------------------------------------------

Script Command - Bike

Invoking the script command:

call Bike Crystalyte407

...will load the "reset" values into the simulation for a particular bike. The reason I'm focusing on this idea of "reset" is that the simulation only deals with one bike at a time and so this script command sets up the starting conditions for other script commands to work. Later we will look at more complicated scripts that involve multiple track segments and even multiple bikes and understanding what the Bike script command does will help a lot for that.

As a rule you want to:

:arrow: Call the Bike command if no bikes have been specified.

:arrow: Call the Bike command when you want to reset to zero all your bikes settings. (like if you wanted to sample several tracks one at a time)

:arrow: Call the Bike command when you switch bikes so that the following scripts will be based on the new bikes configuration rather than the old.

...the Dyno script command has the ability to autoload the Bike command if needed, but the Track command cannot and will give an error message.
 
Script Command - Dyno

When you invoke the call:

call Dyno Crystalyte407

...it will actually call:

call Bike Crystalyte407
call DynoCurrent Crystalyte407
call DynoDutyCycle Crystalyte407
call DynoEfficiency Crystalyte407
call DynoHeat Crystalyte407
call DynoPowerIn Crystalyte407
call DynoPowerOut Crystalyte407
call DynoTorque Crystalyte407
call DynoSelected Crystalyte407
call DynoExport Crystalyte407


..which are all the script commands that the Dyno is capable of doing. You might find yourself bothered by getting so much stuff that you don't want to see and so you might instead just call:

call DynoSelected Crystalyte407

...since it's the most likely thing you will want to look at. (a dyno of the controller behavior that you have selected to use rather than all the possible combinations the motor can deliver)

Something like:

call DynoExport Crystalyte407

...will export the dyno information into a file that matches the bike name and will be placed into the dyno directory. The format for the dyno data looks like:

Current
DutyCycle
Efficiency
PowerIn
PowerOut
Heat
Torque


...and each record in the file will represent one rpm of the motor. So the record count will match whatever No Load rpm your motor will attain... which for a motor that revs to 8000 rpm means you get a big file.
 
Script Command - Track

Invoking the Track script command will load preconfigured tracks from the tracks directory. The command will look like:

call Track Default

...it is assumed that before you ride the track that you have selected a bike to ride, so you will have either called the Dyno command or the Bike command before calling the Track command.

The Track file format is:

@Meter
Throttle (0-1)
Gear ratio
Elevation (meters)
Headwind speed (m/s)
Pedal power (watts)


...and it's important to note that the first column is filled with the text "@Meter" which when this file is loaded by Gnuplot will interpret that as an actual script command. So the tracks are actually a long series of commands being given to Gnuplot to do something. Gnuplot doesn't have any formal file reading or writing abilities, so this is a way to get something like a track loaded in a way that it's usable.

There are a few preconfigured tracks that I've included in the package and they are:

Default
Hill
Valley
Flat
Climb


...but you can build new tracks if you want.

Also, for people that are using custom gearing you would want to load these tracks into a spreadsheet (yes they do load) and edit the gear ratio column so that you can put into place the gear shift points that best match the track. It's not easy to do and there's an automatic gear ratio capability that I've added and will discuss later.

Data file Format

When you load the track files they get interpreted by the conditions configured with the bike and output a file that "rides the track". So before we go on to the next major script command it's probably a good time to look at the file format for the output goes into the data directory.

Rpm
DutyCycle
Current
Voltage
WattHours
GearRatio
Velocity
Torque
PowerIn
PowerOut
Heat
HeatTotal
Elevation
Seconds
Pedal


...you might never even look at these files, but if you do this is the format you would see. They are used later.
 
Script Command - Evaluate

The Evaluate script command is used to examine the data files produced previously with the Track command. The command will look like:

call Evaluate Crystalyte407

...but if you have already run other bikes you can make the Evaluate call with more than one bike:

call Evaluate Crystalyte407 Crystalyte408

...and this will work for up to six bikes.

If you call Evaluate it will actually call a bunch of other things, so the complete call translates to:

call EvaluateElevation Crystalyte407 Crystalyte408
call EvaluateRpm Crystalyte407 Crystalyte408
call EvaluateSeconds Crystalyte407 Crystalyte408
call EvaluateVelocity Crystalyte407 Crystalyte408
call EvaluateVelocityKph Crystalyte407 Crystalyte408
call EvaluateVelocityMph Crystalyte407 Crystalyte408
call EvaluateDutyCycle Crystalyte407 Crystalyte408
call EvaluateVoltage Crystalyte407 Crystalyte408
call EvaluateWattHours Crystalyte407 Crystalyte408
call EvaluateCurrent Crystalyte407 Crystalyte408
call EvaluateGearRatio Crystalyte407 Crystalyte408
call EvaluateTorqueMotor Crystalyte407 Crystalyte408
call EvaluateTorqueWheel Crystalyte407 Crystalyte408
call EvaluateEfficiency Crystalyte407 Crystalyte408
call EvaluatePowerIn Crystalyte407 Crystalyte408
call EvaluatePowerOut Crystalyte407 Crystalyte408
call EvaluatePowerPedal Crystalyte407 Crystalyte408
call EvaluateHeat Crystalyte407 Crystalyte408
call EvaluateHeatTotal Crystalyte407 Crystalyte408


...but if all you really want is to look at which bike is faster (shortest time) you could get just the Seconds it takes for each bike with:

call EvaluateSeconds Crystalyte407 Crystalyte408

...when you get annoyed by too much information you can focus on just the things you want to. :)

:arrow: So the shortest script to achieve a bike verses bike comparision based on time would be:

call Bike Crystalyte407
call Track Default

call Bike Crystalyte408
call Track Default

call EvaluateSeconds Crystalyte407 Crystalyte408
 
Bike File Configuration

In the bikes directory there are files that are used to configure the bikes that are loaded by the Bike script command. These files contain the essential charactoristics that make each machine unique. What follows is a review of each parameter.

--------------------------------------------------------------------

Bike File Configuration - Motor

#
# Motor
# -----
#
# rm : motor resistance
# k : motor constant (voc/maxrpm)
# a0 : cogging torque
# mu : motors used (1 or more)
#

rm = 0.4310
k = 0.1154
a0 = 1.1125
mu = 1


Motor Resistance
You need to know the motor resistance of the motor. The lower the resistance the better.

Motor Constant
The motor constant is the voltage divided by the maximum rpms of the motor. It's the inverse of volts per rpm which is one way that motor constants are presented.

Cogging Torque
The cogging torque is the resistance to motion that the motor causes and is a constant. If you already know the efficiency of the motor under certain conditions then you could guess at this one.

Motors Used
You can use more than one motor in the simulation and it will automatically adjust everything to produce the correct output.
 
Bike File Configuration - Battery

#
# Battery
# -------
#
# voc : battery voltage (open circuit)
# rb : battery internal resistance
# wh : battery total watt hour
# pk : battery peukert constant
# vs : battery voltage sag (volt per Wh)
#

voc = 48
rb = 0.4
wh = 500
pk = 1.2
vs = 0.008


Battery Voltage
This is the starting voltage of the battery. It's value will go down as the bike is ridden, so it's a dynamic variable when the bike is being simulated.

Battery Internal Resistance
The battery internal resistance is actually effected by many things such as age, chemistry and temperature, but for this simulation it's a constant.

Battery Total Watt Hour
This is the calculated starting watt hour of the battery before one considers the Peukert Effect.

Battery Peukert Constant
For SLA batteries the value of Peukert is about 1.2 or 1.1. For some chemistries the value is just barely over 1.0. This represents the tendency for the battery to lose watt hours because of higher discharge rates.

Battery Voltage Sag
If you know what your starting voltage is and your ending voltage and how many watt hours you anticipate using in perfect conditions you can figure a ballpark estimate of voltage sag. In the real world this is not at all linear and tends to drop suddenly at the end. It's just an approximation but at least in the simulation you will notice the declining voltage in the performance.
 
Bike File Configuration - Controller

#
# Controller
# ----------
#
# ic : controller current limit
# wc : controller watt limit
# rc : controller internal resistance
# lmt : controller limiting
# value = 0, no current limiting
# value = 1, battery current limiting
# value = 2, armature current limiting
# value = 3, watt limiting
# value = 4, armature and watt combined
#

ic = 20
wc = 1000
rc = 0.03
lmt = 1


Current Limit
Most controllers use a battery side current limit. Some might choose to run with an armature side current limit. Either way this is the constant to define and it's metric is amps.

Watt Limit
There is talk of wattage restriction racing and if that develops into something that is commonplace then you can set that parameter here. In most cases you can ignore this parameter.

Internal Resistance
This is the internal resistance of the controller. This is usually a small value, but it's hard to know this with certainty since little information is available about it.

Controller Limiting
This parameter will define the way that the controller limits the motor. Some of the RC motors apparently do no current limiting at all. Most ebikes use regular battery side current limiting. Some more rare bikes will use motor side (armature) current limiting. Even more rare is the use of wattage limiting. For most people they will use the value 1.
 
Bike File Configuration - Gearing

#
# Gearing
# -------
#
# gr : gear ratio
# value = 1, hub motor
# value > 0, fixed gear ratio
# value = 0, taken from user defined track
# value = -1, solve for maximum power
# value = -2, solve for maximum efficiency
#

gr = 1


Gear Ratio
All hub motors will use a value of 1. Bikes that use a motor that is connected directly to the wheel will do so with some gear ratio greater than 0. So, for example, if your motor sprocket is 10 teeth and the wheel sprocket is 100 teeth then the gear ratio is 10:100 and you would use 0.1 as a value. If you have a multispeed bike you have the option of manually loading your gear ratios into a user defined (custom) track and when the track files are read they will use those values rather than fixed values. For multispeed bikes you would set the value to 0. Sometimes you just want a "ballpark" idea about what kind of gearing would work best over a given track. If speed is your goal then you would use a value of -1 and the simulation will solve for perfect gearing to achieve maximum power. If you want to solve for perfect efficiency (some kind of slow speed high mileage contest) then use the value -2 and the simulation will solve for that. The "ideal" gear ratios can also help someone with a fixed gear estimate what a good gear would be to test further, so you might start off with a -1 and then eventually use the fractional gear ratio that you arrive at.
 
Bike File Configuration - Aerodynamics

#
# Aerodynamics
# ------------
#
# rho : air density in kg/m^3
# cda : effective frontal area in m^2
#

rho = 1.18
cda = 0.4


Air Density
Pretty much what you would expect, it's whatever air density conditions you are operating within.

Effective Frontal Area
The more smooth and compact the design the lower the effective frontal area will be. If 0.4 is a fully upright bike, then a recumbent is probably close to 0.2 or 0.25.

----------------------------------------------------------------------

Bike File Configuration - Hill Climbing

#
# Hill Climbing
# -------------
#
# wt : weight of bike plus rider in kg
#

wt = 100


Weight
The total weight of the bike and rider expressed in kg.

----------------------------------------------------------------------

Bike File Configuration - Rolling Resistance

#
# Rolling Resistance
# ------------------
#
# cr : coefficient of rolling resistance
# dw : diameter of wheel (mm)
#

cr = 0.01
dw = 700


Coefficient of Rolling Resistance
The coefficient of rolling resistance has to do with how rigid your tires are and how well they roll. The thin tires roll better, but the difference between the larger diameter and the smaller diameter is much more than the width in many cases.

Diameter of Wheel
The diameter of the wheel in millimeters. Be sure to convert from inches to mm. (26" is about 660 mm)
 
An Example

Running a script like:

call Bike Crystalyte407
call Dyno Crystalyte407
call Track Default

call Bike Crystalyte408
call Dyno Crystalyte408
call Track Default

call Evaluate Crystalyte407 Crystalyte408


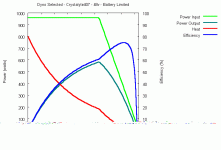
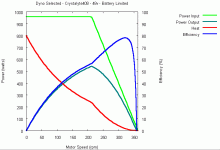
...gives us a ton of information. I've pulled out a few of the charts to give some guidance about what to look for in comparing machines. First let's look at the Dyno charts to see if they give any indication of what the two hub motors want to do:

DynoSelected 407.gif
DynoSelected 408.gif
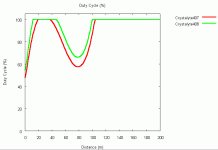
...just by looking at the Dyno charts we can see that the two hub motors behave very differently despite being given the same voltage and current limits. When we run these two bikes over the default track they also behave differently. Looking at the Duty Cycle comparison chart:
DutyCycle Comparison.gif
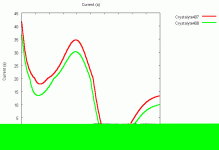
...we see that the Crystalyte407 runs at a lower Duty Cycle when it has to climb the hill in the default track. Lower duty cycles mean lower efficiency and more current and more heat. When we look at the Current Comparison chart we validate this:
Current Comparison.gif
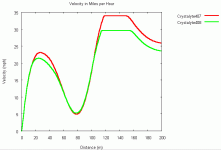
...so we can conclude that the Crystalyte407 is functionally "higher geared" than the alternative Crystalyte408. If you had plans to do mostly hill climbing you would favor the Crystalyte408. But if you look at the top speeds that these two attain you realize that the Crystalyte407 is the faster hub motor downhill:
Mph Comparison.gif
...you can use this simulation to understand not just what the Dyno can tell you, but also see how it will behave in different situations on the road.
 
Functions

Accelerate
Acceleration
BatteryPeukertEffect
BatteryVoltageSag
CurrentActual
CurrentArmatureLimited
CurrentArmatureWattLimited
CurrentBatteryLimited
CurrentLimitingLabel
CurrentLimitingType
CurrentUnLimited
CurrentWattLimited
DutyCycle
Efficiency
Heat
Kph
Mph
NoLoad
PowerIn
PowerOut
PowerPedaling
PowerAerodynamic
PowerActual
PowerHillClimbing
PowerRequired
PowerRollingResistance
Rotation
Seconds
Start
Torque
Velocity


These are the functions that exist underneath the layer of the scripting commands. You never need to know anything about them to run the simulations, but if you are curious about how it all works they do have the parameters listed with them. Here's an example:

#
# PowerRollingResistance(w)
# -------------------------
#
# Global Parameters
# -----------------
#
# cr : coefficient of rolling resistance
# wt : weight of bike plus rider in kg
#
# Function Parameters
# -------------------
#
# w : rotational speed (rpm)
#
# Returns
# -------
#
# watts
#

PowerRollingResistance(w) = cr * wt * 9.8 * Velocity(w)
 
Calls

These are all the possible "user called" script commands:

Bike
Track

Dyno
DynoCurrent
DynoDutyCycle
DynoEfficiency
DynoExport
DynoHeat
DynoPowerIn
DynoPowerOut
DynoTorque
DynoSelected

Evaluate
EvaluateCurrent
EvaluateDutyCycle
EvaluateEfficiency
EvaluateElevation
EvaluateGearRatio
EvaluateHeatTotal
EvaluateHeat
EvaluatePowerIn
EvaluatePowerOut
EvaluatePowerPedal
EvaluateRpm
EvaluateSeconds
EvaluateTorqueMotor
EvaluateTorqueWheel
EvaluateVelocityKph
EvaluateVelocityMph
EvaluateVelocity
EvaluateVoltage
EvaluateWattHours
 
Building Tracks By Segments

If you run this script:

call Bike Crystalyte407
call Track Flat
call Track Hill
call Track Valley
call Track Flat
call Track Climb

call Evaluate Crystalyte407


...first you cross a flat kilometer, then you travel over a segment with a 20 meter high hill in the middle of a kilometer segment, then a 20 meter valley over another kilometer, another flat stretch and then you finish with a hill climb that is so steep that most bikes will stall.

As long as you keep adding tracks to a bike that's been previously loaded you will continue to extend the track length. Only when you load another bike or reload the same bike do the values get zeroed out. So if you are going 30 mph at the end of one segment you are still going that same speed in the next and all your other parameters are also unchanged. If you could model the entire track you wanted to ride on you could load that track as many times as you wanted up to whatever file size limit you want to go. Each meter is evaluated one at a time, so it should never get a memory error. I say "should" because I've neve been able to cause a crash. (never say never I guess)
 
Tech Support, Bug Reports, Suggestions, Chat

Okay folks, what do you want to say about the simulation?
 
safe said:
Okay folks, what do you want to say about the simulation?

he don't know me veh-wee well, do he? :twisted:


well... I've been dutifully resisting the urge (a-la Strangelove) from saying anything all this time, but since you've graciously thrown open the floor...

i think you'd make more money programming fart apps for iphone.
but to pull in $10k/day, I guess you'd have to be some kind of GDMFgenius.

http://venturebeat.com/2008/12/23/iphone-fart-app-pulls-in-nearly-10000-a-day/


so dumm this down for us nukkle-draggirz.
exactly how does this differ from justin's sim from which this is pirated?
(which he in turn likely ah, enhanced from UBC).
yeah, I know his doesn't do r/c motors ATM, but that doesn't mean it couldn't or eventually will if he was asked or someone offered?
 
Toorbough ULL-Zeveigh said:
exactly how does this differ from justin's sim

...I know his doesn't do r/c motors ATM, but that doesn't mean it couldn't or eventually will if he was asked or someone offered?
The difference is that this can simulate the motor on a track. So you can get a better sense of how effective the motor will be in real world situations with hills and valleys.

Also, I already have three RC motors available with this, so it does do RC motors.

And this simulation can model multispeed bikes... not many simulations out there that can actually give so many real world options to play with. :) (that are free and open)
 
Drag Racing Anyone?

Ever wanted to race bikes against each other in a simulation?

Crystalyte407
Crystalyte408
Crystalyte5304
Crystalyte5305


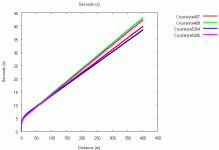
...sitting at a stop light. All are identically prepared with 48 volts and 20 amps for current. The light goes green and a quarter of a mile later (402 meters) you get:

Drag Racing - Seconds.gif
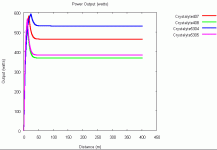
...then if you look at the power output:

Drag Racing - Power Output.gif
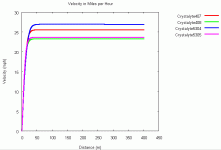
...who went the fastest:

Drag Racing - Mph.gif
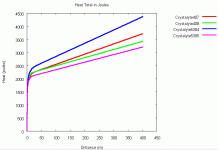
...and who created the most waste as far as heat:

Drag Racing - Heat Total.gif
 
A Different Drag Race

How about a race between a fully tricked out Crystalyte5304 running at 100 volts and 80 amps verses a Pmg132 running at 72 volts and 100 amps?

:?: Can the hub motor keep up?

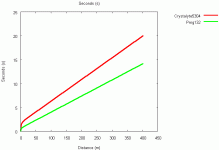
It doesn't look like it can:

Drag Racing2 - Seconds.gif
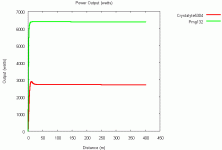
...and the power difference is huge:

Drag Racing2 - Power Output.gif
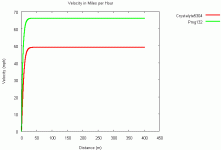
...the top speed goes to the Pmg132:

Drag Racing2 - Mph.gif
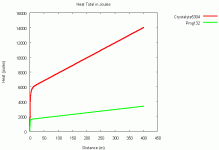
...and the heat is less with the Pmg132.

Drag Racing2 - Heat Total.gif
Seems that the Pmg132 easily defeats the best that the hub motor can deliver.
 
can this be used in reverse, kinda?
Like at what incline does the higher wind count take over from its lower count sibling?

run the race again up a 23.65º ¼ mile hill with a 5305.
still wanna bet on the perm?
c'mon, baby needs a new pair of shoes.
 
Toorbough ULL-Zeveigh said:
run the race again up a 23.65º ¼ mile hill with a 5305.
still wanna bet on the perm?
No problem... that's the "Climb" track. :twisted:

First I just finished another drag race and want to post it, then I'll do the other.
 
Drag Race of RC Motor vs Hub Motor

:?: How about an RC motor, Axi5345_14 running at 36 volts and 80 amps verses that Crystalyte5304 running at 100 volts and 80 amps.

The race looks to be really close:

Drag Racing3 - Seconds.gif
...and the speeds are the same:

View attachment 2
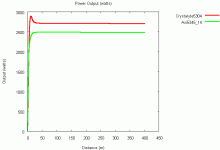
...and the power output is about the same:

Drag Racing3 - Power Output.gif
...but the heat is very different:

View attachment 3
...the efficiency of the RC motor is much like the Pmg132 and is far, far better. Your range would be much further with the RC motor even though the peak power is about equal.
 
Back
Top