
You are using an out of date browser. It may not display this or other websites correctly.
You should upgrade or use an alternative browser.
You should upgrade or use an alternative browser.
Evolve Carbon AT with 50km+ range
- Thread starter whitepony
- Start date
Rev
1 mW
I have a 2nd, likely 3rd hand carbon AT. I suspect the battery might be on it last legs. I get power cut outs after about 5-7 kms of riding. Any advice on how I can test the state of the battery?
whitepony
10 kW
- Joined
- Feb 19, 2015
- Messages
- 663
Rev said:I have a 2nd, likely 3rd hand carbon AT. I suspect the battery might be on it last legs. I get power cut outs after about 5-7 kms of riding. Any advice on how I can test the state of the battery?
usually with AT, you can get to 15km if you drive normal, up to 25km if you drive 18km/h nonstop on flat terrain. my guess is, you drove normally, so 5-7k means you are probably down to 50% battery capacity. time to build your own!
")
Rev
1 mW
whitepony said:Rev said:I have a 2nd, likely 3rd hand carbon AT. I suspect the battery might be on it last legs. I get power cut outs after about 5-7 kms of riding. Any advice on how I can test the state of the battery?
usually with AT, you can get to 15km if you drive normal, up to 25km if you drive 18km/h nonstop on flat terrain. my guess is, you drove normally, so 5-7k means you are probably down to 50% battery capacity. time to build your own!
Yeah that's what I suspect but I'd love to know a way I could test it. My ebike commuter records batt cycles so that would be an indication but I don't know what I could measure on the board.
I definitely would be up for a new battery build but I'll have a look at the new dual motor evolve is about to release and maybe consider an upgrade holus bolus.
DaDo.Bzz
100 W
- Joined
- Feb 12, 2015
- Messages
- 218
whitepony said:built a new pack for the evolve carbon these days! did a much better job overall compared to my very first pack, many small details are better, much better cells with the Sanyo NCR18650GA (even though the panasonic hold up well tbh).
Ill just drop some pictures here, maybe it will motivate you to make your own pack.
new bench from my granddad, fixed up with hard wood and aluminum angle for much easier and more professional alignment of up to 10 cells parallel:
work time: about 1 day!
Hello mate.
What a nice idea to add copper strips on top of nickel! Didn't cells heat up too much while ironing it?
Regards,
whitepony said:its me again! as a "p.s." for the double evolve range article, I wanted to describe quickly how to build your own spot welder for ridiculously low money for pretty much professional DIY battery constructions.
most of the things were actually common knowledge from various pedelec forums - best thread ever here http://www.pedelecforum.de/forum/in...u-punktschweißgerät-für-akku-verbinder.11421/ (but its sadly in a german forum). I think I built one of the most simple version though!
Material list:
* 2F power cap (40€)
* 2x 8mm thick and 10cm long copper rods (2€)
* 20x5mm copper bar, length 30ish cm (3€)
* very thick cables, I bought 25mm^2 which was probably overkill (10€)
* 6 ring connectors (2€)
* old battery charger, charge voltage 17V
* some screws and a wood plank
Basically you use the power caps stored energy 0.5*C*U^2 (C = capacity, U = voltage), to weld thin materials together within microseconds. So all you gotta do is:
* loading up your powercap
* putting the electrodes where you want to spot weld
* connect powercap with electrodes with a switch who can take 1000-2000 ampere and unload it in fractions of a second
* start over
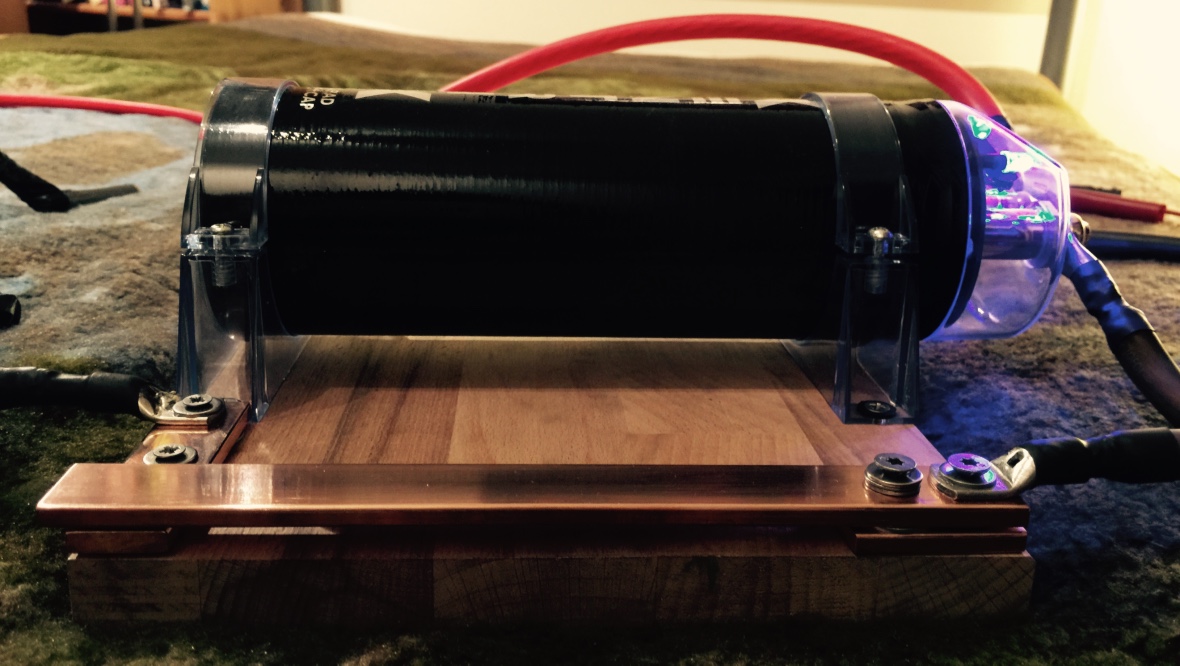
Most use fairly complicated and expensive electronic things to switch - thyristors, and other stuff. I went for the archaic 20x5mm copper switch version (see pictures). made the electrodes from the 8mm copper rods, drilled a hole in their back, cut in a thread and connected the ring connectors of the huge cables with screws at the electrodes.
A tip for soldering 25mm^2 cables into ring connectors: https://www.youtube.com/watch?v=zssIlnwH8dY
here you can see the full setup sort of - powercap, copper electrodes, copper switch:

and here the copper switch closeup - you can tune the gap on the left side with adding washers of different thickness on the right - if you make the gap on the left side too small, the force pulling the copper back will be too weak and it will weld together eventually.
hope this helps - its very simple, very cheap and works like a charm (this is me in action on my very first battery pack - at that point i killed one cell cause my copper switch welded together - thats when i learnt that the gap needed to be large enough - it happened never again after that, but I was cautious anyway and put together the electrodes every time for a quick check if the switch actually disconnected the powercap): https://www.youtube.com/watch?v=cfbOmuBMLZc
have fun
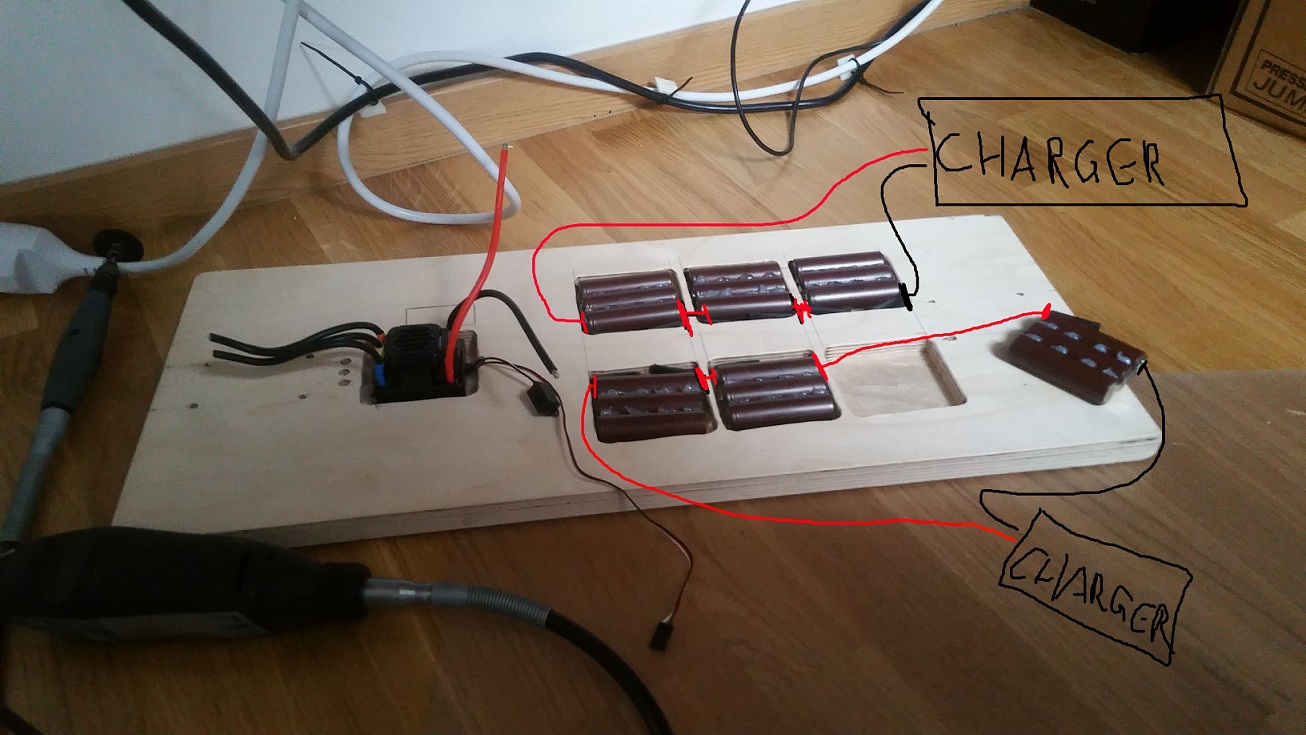
was just wondering if i could get some clarification on this? i have drawn a simple diagram and was wondering if it was right.

so this is how i think your welder is set-up but i still have a few questions.
how do you charge the cap using a laptop charger? just plug the probes in and call it a day?
do you have any sort of current limiter?
is the high voltage cap needed or can i use a bunch of small low voltage caps?
whitepony
10 kW
- Joined
- Feb 19, 2015
- Messages
- 663
diagram is correct
I got a very old car battery charger from my dad - it looks like it was build 1945, very sturdy - so I connected it directly to the cap, i.e. the moment I discharge the powercap until its loaded back up, the charger is pretty much shortened. it didnt feel great, but it was also not a problem and I welded about 500 cells by now in total! you can always put a strong heavy load resistor between charger and cap, but recharging the cap will take some more patience then. its already going too slow for my taste, always takes 3-4seconds until the cap is really up in saturation again! If i weld too fast and the cap is only at 12-13V I can tell right away from the weld spots. thats cause the energy that goes through the spot depends on the square of the voltage.
no current limiter
many smaller capacitors are probably even better, because their discharge current should be even higher I guess. only important part is, that the amount of unloaded energy must be reasonable. apparently my 0.5*C*U^2 is working very well, you should probably try and keep similar values. you can vary C and U of course - smaller capacity but higher voltage should work well too! its just that I only had that 17V charger, so the cap had to be chosen accordingly!
DaDo.Bzz said:how do you charge the cap using a laptop charger? just plug the probes in and call it a day?
do you have any sort of current limiter?
is the high voltage cap needed or can i use a bunch of small low voltage caps?
I got a very old car battery charger from my dad - it looks like it was build 1945, very sturdy - so I connected it directly to the cap, i.e. the moment I discharge the powercap until its loaded back up, the charger is pretty much shortened. it didnt feel great, but it was also not a problem and I welded about 500 cells by now in total! you can always put a strong heavy load resistor between charger and cap, but recharging the cap will take some more patience then. its already going too slow for my taste, always takes 3-4seconds until the cap is really up in saturation again! If i weld too fast and the cap is only at 12-13V I can tell right away from the weld spots. thats cause the energy that goes through the spot depends on the square of the voltage.
no current limiter
many smaller capacitors are probably even better, because their discharge current should be even higher I guess. only important part is, that the amount of unloaded energy must be reasonable. apparently my 0.5*C*U^2 is working very well, you should probably try and keep similar values. you can vary C and U of course - smaller capacity but higher voltage should work well too! its just that I only had that 17V charger, so the cap had to be chosen accordingly!
whitepony said:diagram is correct
DaDo.Bzz said:how do you charge the cap using a laptop charger? just plug the probes in and call it a day?
do you have any sort of current limiter?
is the high voltage cap needed or can i use a bunch of small low voltage caps?
I got a very old car battery charger from my dad - it looks like it was build 1945, very sturdy - so I connected it directly to the cap, i.e. the moment I discharge the powercap until its loaded back up, the charger is pretty much shortened. it didnt feel great, but it was also not a problem and I welded about 500 cells by now in total! you can always put a strong heavy load resistor between charger and cap, but recharging the cap will take some more patience then. its already going too slow for my taste, always takes 3-4seconds until the cap is really up in saturation again! If i weld too fast and the cap is only at 12-13V I can tell right away from the weld spots. thats cause the energy that goes through the spot depends on the square of the voltage.
no current limiter
many smaller capacitors are probably even better, because their discharge current should be even higher I guess. only important part is, that the amount of unloaded energy must be reasonable. apparently my 0.5*C*U^2 is working very well, you should probably try and keep similar values. you can vary C and U of course - smaller capacity but higher voltage should work well too! its just that I only had that 17V charger, so the cap had to be chosen accordingly!
OK so LV is a no go needs to be a minimum of 12v at 2 Farads. So I may get a 3F cap at BB or go the cap bank route but, either way thanks for the help.
delta_19 said:whitepony said:diagram is correct
DaDo.Bzz said:how do you charge the cap using a laptop charger? just plug the probes in and call it a day?
do you have any sort of current limiter?
is the high voltage cap needed or can i use a bunch of small low voltage caps?
I got a very old car battery charger from my dad - it looks like it was build 1945, very sturdy - so I connected it directly to the cap, i.e. the moment I discharge the powercap until its loaded back up, the charger is pretty much shortened. it didnt feel great, but it was also not a problem and I welded about 500 cells by now in total! you can always put a strong heavy load resistor between charger and cap, but recharging the cap will take some more patience then. its already going too slow for my taste, always takes 3-4seconds until the cap is really up in saturation again! If i weld too fast and the cap is only at 12-13V I can tell right away from the weld spots. thats cause the energy that goes through the spot depends on the square of the voltage.
no current limiter
many smaller capacitors are probably even better, because their discharge current should be even higher I guess. only important part is, that the amount of unloaded energy must be reasonable. apparently my 0.5*C*U^2 is working very well, you should probably try and keep similar values. you can vary C and U of course - smaller capacity but higher voltage should work well too! its just that I only had that 17V charger, so the cap had to be chosen accordingly!
OK so LV is a no go needs to be a minimum of 12v at 2 Farads. So I may get a 3F cap at BB or go the cap bank route but, either way thanks for the help.
ok got a 1.9F cap and charge it to 16-17V but with my probes i just melt through or make a weak weld so i think my probe surface area is two small. and also after every weld the cap dies but in your video yours is fine, is yours always on the charger?
Hi Whitepony.
When you eliminate the BMS on your Evolve Carbon AT , The Charger will charge to 42V,... but what stops the battery from over Discharging ?
On my board like your DIY, the Vesc will do that job, but what about the Evolve without BMS??
Thanks .
When you eliminate the BMS on your Evolve Carbon AT , The Charger will charge to 42V,... but what stops the battery from over Discharging ?
On my board like your DIY, the Vesc will do that job, but what about the Evolve without BMS??
Thanks .
dannydoyle2
1 mW
- Joined
- May 31, 2016
- Messages
- 19
randyc1 said:Hi Whitepony.
When you eliminate the BMS on your Evolve Carbon AT , The Charger will charge to 42V,... but what stops the battery from over Discharging ?
On my board like your DIY, the Vesc will do that job, but what about the Evolve without BMS??
Thanks .
Curious about that too. I have a bunch of HE2 cells at home and I'm looking to replace my old lipos on one of my e-penny boards. No idea how to go about it. I've read whitepony's opinion about BMS and about them most likely not even being necessary. How would I even go about the wiring for charging?
Connect plus and minus to the charger and it'll just charge all the way to 42V and then stop automatically?
whitepony
10 kW
- Joined
- Feb 19, 2015
- Messages
- 663
if you build a battery without a bms, you simply cannot charge to 4.2V/cell because any drift will immediatly overcharge cells.
my evolve charger stops at 4.14V per cell and I recently ordered a charger with a poti that allows me to tune the end-of-charge voltage, which is now 4.05V/cell - thats a LOT of headroom for potential drift ... and increases the lifetime of the battery!
the over-discharge is handled by the evolve carbon esc, that also cuts the power below a certain 3.XV threshold.
yea!
btw, I still cant measure ANY drift in any of my batteries! 8)
*charger with customizeable end-of-charge voltage*
my evolve charger stops at 4.14V per cell and I recently ordered a charger with a poti that allows me to tune the end-of-charge voltage, which is now 4.05V/cell - thats a LOT of headroom for potential drift ... and increases the lifetime of the battery!
the over-discharge is handled by the evolve carbon esc, that also cuts the power below a certain 3.XV threshold.
How would I even go about the wiring for charging?
Connect plus and minus to the charger and it'll just charge all the way to 42V and then stop automatically?
yea!
btw, I still cant measure ANY drift in any of my batteries! 8)
*charger with customizeable end-of-charge voltage*
dannydoyle2
1 mW
- Joined
- May 31, 2016
- Messages
- 19
Awww yiss. Whitepony delivers!
You, sir are a gentleman and a scholar!
Too bad they don't have a 6s charger. I'll have to get the 3s one and just charge 2x3p3s separately. Assuming the 7s/24V one will overcharge the batteries.
So basically charging like this, right?
You, sir are a gentleman and a scholar!
Too bad they don't have a 6s charger. I'll have to get the 3s one and just charge 2x3p3s separately. Assuming the 7s/24V one will overcharge the batteries.
So basically charging like this, right?
dannydoyle2
1 mW
- Joined
- May 31, 2016
- Messages
- 19
Oh I was aware that there are 6s chargers as well. It just sucks that there are none on the website that whitepony posted, since those guys aren't too far away from where I live and I wouldn't have to wait a month for it to arrive (as is often the case with alibaba).randyc1 said:There are 6s chargers ! , just search for 25.2(4.2vx6) on Alibaba web site.
whitepony said:if you build a battery without a bms, you simply cannot charge to 4.2V/cell because any drift will immediatly overcharge cells.
my evolve charger stops at 4.14V per cell and I recently ordered a charger with a poti that allows me to tune the end-of-charge voltage, which is now 4.05V/cell - thats a LOT of headroom for potential drift ... and increases the lifetime of the battery!
the over-discharge is handled by the evolve carbon esc, that also cuts the power below a certain 3.XV threshold.
How would I even go about the wiring for charging?
Connect plus and minus to the charger and it'll just charge all the way to 42V and then stop automatically?
yea!
btw, I still cant measure ANY drift in any of my batteries! 8)
*charger with customizeable end-of-charge voltage*
Thanks !!
I did 'nt know the Evolve Esc could handle Low V cutoff , thought their BMS did all the work.
A friend i ride with has the Evolve AT and his range is about like yours, 13 km, so i was telling him about this Range Mod
So basically i could just build a 10s6p pack and just connect it to the Esc and charger port.
Are the battery Leads soldered to the Esc or are there bullet connectors?
whitepony
10 kW
- Joined
- Feb 19, 2015
- Messages
- 663
hm, I dont remember anymore - not bullet connectors at least, think some xt60 kind of thing - I just soldered it. be careful about the battery port - the connections on that jack are superclose together and if you short it it will be a nice firework. dont ask how I know ... after soldering to the jack, I would encase that jack in hot glue tbh!
its easy to use the evolve stock bms though, all you need is a 2mm pin distance 11pin JST connector, that goes plug n play into the stock bms!
its easy to use the evolve stock bms though, all you need is a 2mm pin distance 11pin JST connector, that goes plug n play into the stock bms!
whitepony
10 kW
- Joined
- Feb 19, 2015
- Messages
- 663
yea, bms has that 11pin JST connector and 3 soldered wires: ESC "-", battery "-" and charger "-". you unsolder battery "-" and add your 10S6P "-", then connect your 11pin JST balance connector (pin every 2mm) to the bms - make sure that you have the same order of serial segments (ascending from 0 to 36V from either left to right or otherway round - compare with stock battery with a voltmeter and do it just like that on your 10S6P battery)! that way the BMS is fully functional and the battery will be fire and forget!
Similar threads
- Replies
- 34
- Views
- 1,292
- Replies
- 0
- Views
- 400
- Replies
- 74
- Views
- 3,036
- Replies
- 10
- Views
- 795
- Replies
- 3
- Views
- 516