• Hello ES! We could use some help to get us past the finish line on building the new knowledgebase for the forum.
    Can you donate? Please see our fundraising page. Thank you!

FarGrin -- Time to push some amps

Considering you have known protocol at both ends, it's actually simpler than it looks, just tedious, perhaps. I might take a look at it if more peeps are interested because I've been considering exposing CAN from my battery as well.
 
Benjamin is listed as part of vesclabs. That's a great sign for products making it to market
 
The last couple of days i have also been thinking about moving away from ASI and going to VESC. Woke up this morning and ordered the ubox 85v 150a:D. Have you found any info on ANT canbus data to vesc yet? I have ANT bms's in both my packs.

JBD info https://endless-sphere.com/sphere/threads/making-bmss-vesc-compatible.124742/
I believe all the open source code needed to implement this already exists, I just don't own any ANT bms to test with. (I am the author of that JBD project)

Considering you have known protocol at both ends, it's actually simpler than it looks, just tedious, perhaps. I might take a look at it if more peeps are interested because I've been considering exposing CAN from my battery as well.
Pretty much this/\, I would be willing to assist figuring it out.

chuyskywalker, I can start an ANT specific thread.....
 
I believe all the open source code needed to implement this already exists, I just don't own any ANT bms to test with. (I am the author of that JBD project)


Pretty much this/\, I would be willing to assist figuring it out.

chuyskywalker, I can start an ANT specific thread.....
That would be awesome if you could start an ANT specific thread. I have my hardware setup so far and trying to teach myself the rest but for my brain its pretty complicated.

IMG_20250912_131454998_HDR.jpg
 
Last edited:
Considering you have known protocol at both ends, it's actually simpler than it looks, just tedious, perhaps. I might take a look at it if more peeps are interested because I've been considering exposing CAN from my battery as well.
As a vesc/ant bms user I am very interested ;)
 
 
A goofy update on this project:

I ended up moving the max45 over to my RadRunner+ build as a front motor (super fun).

I dug out an old phaserunner that had a sticky note on it "comm-timeout issue" and thought, "maybe it's been in timeout long enough to behave" and, sure enough, it seems to work fine now. At least, with the superharness.

I had a decent, if generic, dd hub from another bike that was in bits and pieces so I tossed together a scootery build out of these parts.

The only functional battery I had spare was an old Rad 48v case pack. It....works, to power the build, but it's woefully underpowered so take off and getting up to speed are all very lack-luster, in the extreme.

At 48v, even fully charged, the KV of the motor is such that it peaks around 20-22mph. The battery for this build was intended to be a 96v monster, but the phaserunner can't handle voltage above 72. However... the battery was welded up in two parts with me thinking that I'd series them in the case later once I figured that out. Which means I could, instead, just parallel them for a MONSTER of a 48v battery.

So I did that:

IMG_5748.HEIC_compressed.JPEG
IMG_5750.HEIC_compressed.JPEGIMG_5751.HEIC_compressed.JPEG

A bit of high temp epoxy to bond the two sets of cell holders together. Then some parallel jumpers soldered on to make the 8p setup, slap in the negative/positive leads, and wire up a BMS lead. Wrap it all up nicely and now I have a 48v pack that could, according to the cells, push 480a -- of which the phase runner could only ever peak to 90, but realistically can only run at 40 continuous. This thing will never see voltage drop, nor likely any temps higher than ambient, lol.

I did only put a 100A bms in there and DID NOT use wire capable of anywhere near 200A, let alone 480, but it won't see that kind of draw, so it's fine.

I'm waiting on some supplies to make a hardcase for it to attach to the bike.

It is, interestingly, one of the rare cases in which Field Weakening will make sense, imo. Since I'm kinda just putting this together with the remnants of other builds, coordinating the motor, controller, and battery to get the power/speed combo I want isn't something I have perfect control over. With the battery is so luckily overbuilt, I can afford the head room to pay the FW tax to increase the speed, should I desire to do so.
 
I did only put a 100A bms in there and DID NOT use wire capable of anywhere near 200A, let alone 480, but it won't see that kind of draw, so it's fine.
I'd derate the entire pack to the lowest component - I think that'd be the main power cables in this case, looking at their thickness.

It is, interestingly, one of the rare cases in which Field Weakening will make sense
I use it quite a lot on my motorbike but only sporadically; I think it makes a lot of sense for offroad where you only need top speed from time to time, and the extra torque is well worth it.
 
IMG_5789.HEIC_compressed.JPEG

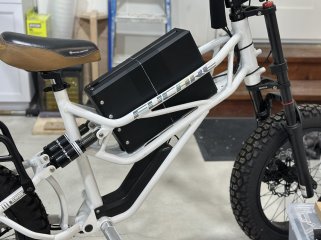
Hardcase complete.

My first attempt was to cut out a frame from HDPE and kinda sandwhich it together. The work was...fine, but turned out..poorly. I went with some "1inch thick hdpe cutting boards" off amazon so I could mill out the shape I wanted. The work on the CNC went pretty great, but I soon discovered that the price was too good to be true. Each piece displayed some incredible surface warping, and as I milled the material most of the pieces released some major internal tension and bowed/warped really badly. Ultimately, just really was not happy with how to shaped up because of my penny pinching on the source material.

So, I went back to the 'ol tried and true 3d printing. Took the CNC model, along with a (rough) 3d scan of the bike and remade a
version that would fit on a build plate (albeit, split into some pieces and epoxied back together later).

Screenshot 2026-06-07 at 9.46.50 PM.png

About 20 hours of printing at 100% infill, the shell was done. Apply epoxy, sink heatset inserts, and jam the battery inside. Wires were made, padding was added, whole thing is ready to rock-and-roll. Stuck it on the charger, as the cells are still brand-new and at the shipping half-charged state, and let it get up to a full charge. Took 3.5 hours, lol this thing is going to go for DAYS.

I reconfigured the Phaserunner for the higher power battery and also gave it 40A of field weakening to play with. In mid-air, the speedo now reads 40mph -- I suspect when I get it out for a test right it'll likely settle around 35, but we'll see.

The one "ugh" is that there's not really a good way to secure this to the bike, There are battery tray M5 bosses in the battery tray area, but there's no way to screw into them from "inside" the case. I'll pickup some basic straps tomorrow so I can at least hold it down, so that may have to do.

I also haven't setup a charger port yet, lol. Gotta get an xt60 split in there along with a charger ports...somewhere to accommodate. Tomorrow problems.

First, looking forward to a test ride!
 
Each piece displayed some incredible surface warping, and as I milled the material most of the pieces released some major internal tension and bowed/warped really badly. Ultimately, just really was not happy with how to shaped up because of my penny pinching on the source material.
Oh yeah, been there, done that. I at one point even tried to see if I could remove the internal stresses prior to machining, did not go well.

I'll pickup some basic straps tomorrow so I can at least hold it down, so that may have to do.
Honestly as long as there is a good way to prevent the battery from sliding I think straps are just fine, if you want something sleeker making custom straps can work better. I've been playing around with the best way to have a low profile strap system that can also be tensioned well. A bit more annoying to tension than using rope or fishing line though. Especially with a plastic case I trust straps, rope, fishing line more than bolts. Those you can spread out the force over a larger area and the result is much stronger.
 
I'm surprised there wasn't some 3D model out there of some tilt in battery mount like Reention that couldn't have just been union'ed on to the case model. Then just bolting a $12 Reention rail down would have been enough.
 
3D model out there of some tilt in battery mount like Reention that couldn't have just been union'ed on to the case model
There very well could be! Plus, since I have the 3d scanner now, I could probably use that to get a rough and then remodel it to be precise. I think the real problem would be relying on that after a 3d printing process. Those tend to have a lot of very shallow, very sharp "catches" for the slot/slide/retain process, and that's one of those areas where the print orientation matters a LOT, and the right way to print that might not really be compatible with the way the rest of the case shell might need to be printed.

Especially with a plastic case I trust straps, rope, fishing line more than bolts. Those you can spread out the force over a larger area and the result is much stronger.
Indeed. The more I looked at how a few bolts in the bottom of this case would compare to a good strap going around the whole thing, the less appealing the bolts became. This battery is 2x the height (and weight) of a normal case, so the side-to-side rocking motion would put way more stress on bottom held bolts or the battery tray style setup.

Ultimately, I popped over to the store and picked up the cheapest (200lb capacity, lol) straps and just wrenched it down. Two across the top and one across the front pulling it tight in every direction. I gave it a good slap and a "that's not goin' nowhere" so it's all sorted!

Test ride -- 29mph top speed via GPS.
 
Back
Top