chuyskywalker
10 kW
Now that I've got the nuts-and-bolts figured out on logging the PR/CA/GPS data down, I need to get it mounted.
First, I've updated my wiring chart to include the rpi; a new 5v dcdc that can be shared between the pi, dashcam, and potentially other things down the line, I suppose.
I also need to upgrade the rear electronics storage area; the aliexpress dime-a-dozen controller bag was simply out of room for stuffing in wires and components, and tbh, I wasn't super happy with how haphazard it was.

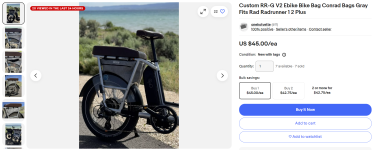
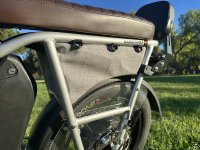
So I picked up one of these custom made RadRunner bags specifically to fit that whole gap in the rear of the bike. This should give me a lot more room -- and it sure as heck does.
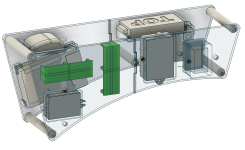
After modeling every hard component that needs to go in the back, I took some internal measures of the bag, mocked that out, and have now modeled up a two-part electronics holder that I can mount everything into and sandwich into the bag. And to top it all off, there will still even be room in the bag for my repair kit (spare tire, inflator, tools, zips & snips, etc).

It'll probably be another day or two of print-test-refine loop, but nothing really new is being added to the system, just got to get it all to fit better, and less jumbled, than before.
Finally, I'm going to take this opportunity to swap out to some thinner wire for signals/power going from the bag to the front -- 16awg was insanely overkill, especially now that I've measured all the power draw devices and found that not a single thing pulls more than 1A at whatever voltage it runs. Plus, most of the wires are signal wires.
First, I've updated my wiring chart to include the rpi; a new 5v dcdc that can be shared between the pi, dashcam, and potentially other things down the line, I suppose.
I also need to upgrade the rear electronics storage area; the aliexpress dime-a-dozen controller bag was simply out of room for stuffing in wires and components, and tbh, I wasn't super happy with how haphazard it was.

So I picked up one of these custom made RadRunner bags specifically to fit that whole gap in the rear of the bike. This should give me a lot more room -- and it sure as heck does.
After modeling every hard component that needs to go in the back, I took some internal measures of the bag, mocked that out, and have now modeled up a two-part electronics holder that I can mount everything into and sandwich into the bag. And to top it all off, there will still even be room in the bag for my repair kit (spare tire, inflator, tools, zips & snips, etc).

It'll probably be another day or two of print-test-refine loop, but nothing really new is being added to the system, just got to get it all to fit better, and less jumbled, than before.
Finally, I'm going to take this opportunity to swap out to some thinner wire for signals/power going from the bag to the front -- 16awg was insanely overkill, especially now that I've measured all the power draw devices and found that not a single thing pulls more than 1A at whatever voltage it runs. Plus, most of the wires are signal wires.


