dannyboyohyeah
100 W
- Joined
- Dec 28, 2009
- Messages
- 157
Hi to All~
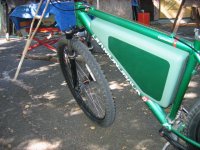
As promised, I'm submitting my sequential photos and abit've narration of the latest enclosure build. My hope is that someone can use the process in creating their very own. It is simple, if not abit tedius, but then it always is, tedious. The difference perhaps, most simply said...it that I created a form and then encapsulated it with resin/fabric, rather than using foam core and having to remove all that from the inside. This thing is nearly indestructable, and yet, weighs only 3lbs, 7oz. I just ran out've space for photos...this will have to do.
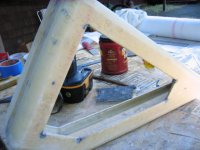
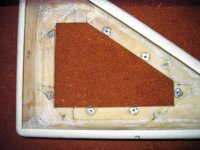
Started with 1/4" luan for body of carcass....all cornered radiused for safety....sharp edges at 30mph become more deadly somehow. 1 1/2" pvc plumbing pipe around perimeter for radiuses.
Note...difficult to glue pvc and wood together. I did a series of test joints with epoxy, pvc cement, and gorrilla glue...let them cure for 24hrs and subjected to a 5# hanging weight test. Epoxy failed, pvc failed quickly, gorrilla glue...solid as a rock. That is what I used.
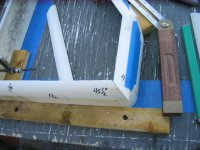
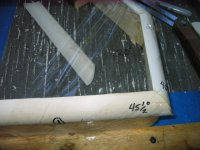
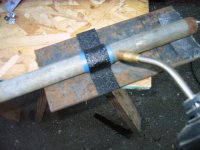
Cutting the 1/4rounds of pvc. Do not cut the pipe into quarters...the edges will NOT be 90degrees to each other. Instead, first jamb a section of pipe into a mold of 90degree wood sections screwed together to make it flat and straight. Then, cut into two pieces, leaving 1/16" beyond centerline, because you are going to cut it in half again and that extra 1/16" leaves enough stock for the kerf of the final cut. Now you have a perfect quarter with 90 edges.
Cut many more pieces than you imagine you are going to need (it's cheap stuff). Your workbench has a perimeter set of cleats representing the exact shape of your triangle. Before pulling these angles from my bike, I taped two battens of 3/16" wood to seatpost tube and lower diagonal tube, to represent the firmly compressed 3/8" closed-cell foam that was beneath and behind my enclosure (glued to it). This worked out very nicely.
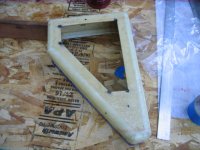
Work your way around the carcass splitting the angles and mitreing the pvc....index the test pieces to the carcass so that you can accurately measure the final cut pieces....after discovering exact angles. Write the angles down...you will not remember them...lol. (I know). Since your carcass also has radiused corners...the mitres of the pipe edges will overhang the radiused corners significantly. I made a mash of gorilla glue and chopped fiberglass strand...and smeared it into the INSIDE corners of the box....to reinforce the miters and provide a backing, when sanding out the final contours required sanding right through the pipewalls and into thin air, otherwise. I used the backside of a plastic spoon for smearing the pablum.
Plastic packaging tape is the clamping mechanism. tightly fit and stretch the tape over the OUTSIDE of the joints and dbl or triple it for strength. Then you can fold open the joint, lay in the gorrilla glue, squish it closed and tape a few "closers" over the joint...all the way around the carcass...and the glue will all squish out on the inside. Work your way round the carcass, glueing everything and please resist the urge to take it out've the tapeclamps for at least 3 hours. 4or 5 is better.
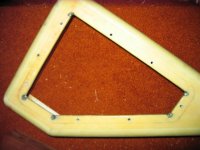
The ply is actually just barely over 3/16" and the pipe has 1/8" wall thickness...so this creates a nice little cove inside where you can overlap the mesh skin and really reinforce to box, without losing space inside.
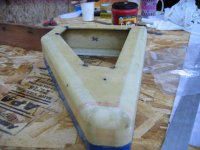
Fit and cut side panels after everything is well cured (just lay the box over a piece of ply, mark with pen....then cut outside the line with razorknife, and sand down TO the line, leaving the line...it will fit perfectly. While glueing up...stuff the whole thing into your benchjig of cleats, so it won't deform and cheat you out've a perfect fit to your bike. Same is true of applying the skins of resin/fabric.
Ok...how you create an access cover is your buisness....I used low-profile tee-nuts, drilled through the side panel and shaped cover together (cover firmly taped onto sidepanel)...and then of course had to drill larger holes in the side panel for the tee-nuts. Protect the threads from goop at all times and check to make sure that your cover bolts go is very smoothly and lightly with fingers...if they are sticky or questionable....toss it and use another, because these will be taken off everyday and crossthreading is not what you want. I bedded the tee-nuts with epoxy, to the inside of the box.
I used "security bolts" (allen heads with small pin in center)....make it at least difficult for the thieves to get your batts.
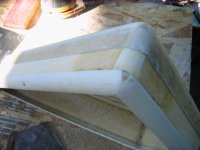
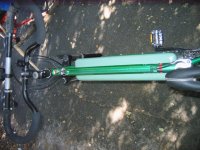
I didn't use any bondo for fairing....just slathered on a second layer of resin and sanded again....nearly sanding it off to cut weight...till all is very smooth and flat. Then, two primer coats, three paint coats, two clearcoats...sanded to 400 between each. Access side cover is 1/8" ABS sheet, and without gasket...no water got inside my box with hosetest of waterfall.
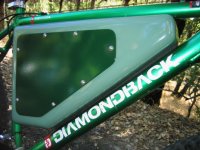
I was lucky...my diamondback had two waterbottle mounts...so there were my two lower connecting points....the top tube will have abs clips also to tee-nuts in the enclosure.
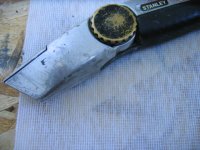
NOTE....screwing a horizontal stop to the vertical fence of your chopsaw or compound saw is vital to cutting your 1/4-round trim pieces accurately and predicably. I'd say it's impossible to HOLD the sections firmly and accurately enough, without it. With the stop...you can really mash it in there and grip it firmly....keep the rpms up and the pressure light, when cutting. You can shave off a 64th" with that stop as your assistant.
I would be lost without EP...all the generous teaching and endless assistance. This is just what I can give back...and I truely hope it gets someone their enclosure with enjoyment. I'll be offerring these for sale as well. The need is obvious. Best wishes to all and thanks again. Dan
As promised, I'm submitting my sequential photos and abit've narration of the latest enclosure build. My hope is that someone can use the process in creating their very own. It is simple, if not abit tedius, but then it always is, tedious. The difference perhaps, most simply said...it that I created a form and then encapsulated it with resin/fabric, rather than using foam core and having to remove all that from the inside. This thing is nearly indestructable, and yet, weighs only 3lbs, 7oz. I just ran out've space for photos...this will have to do.
Started with 1/4" luan for body of carcass....all cornered radiused for safety....sharp edges at 30mph become more deadly somehow. 1 1/2" pvc plumbing pipe around perimeter for radiuses.
Note...difficult to glue pvc and wood together. I did a series of test joints with epoxy, pvc cement, and gorrilla glue...let them cure for 24hrs and subjected to a 5# hanging weight test. Epoxy failed, pvc failed quickly, gorrilla glue...solid as a rock. That is what I used.
Cutting the 1/4rounds of pvc. Do not cut the pipe into quarters...the edges will NOT be 90degrees to each other. Instead, first jamb a section of pipe into a mold of 90degree wood sections screwed together to make it flat and straight. Then, cut into two pieces, leaving 1/16" beyond centerline, because you are going to cut it in half again and that extra 1/16" leaves enough stock for the kerf of the final cut. Now you have a perfect quarter with 90 edges.
Cut many more pieces than you imagine you are going to need (it's cheap stuff). Your workbench has a perimeter set of cleats representing the exact shape of your triangle. Before pulling these angles from my bike, I taped two battens of 3/16" wood to seatpost tube and lower diagonal tube, to represent the firmly compressed 3/8" closed-cell foam that was beneath and behind my enclosure (glued to it). This worked out very nicely.
Work your way around the carcass splitting the angles and mitreing the pvc....index the test pieces to the carcass so that you can accurately measure the final cut pieces....after discovering exact angles. Write the angles down...you will not remember them...lol. (I know). Since your carcass also has radiused corners...the mitres of the pipe edges will overhang the radiused corners significantly. I made a mash of gorilla glue and chopped fiberglass strand...and smeared it into the INSIDE corners of the box....to reinforce the miters and provide a backing, when sanding out the final contours required sanding right through the pipewalls and into thin air, otherwise. I used the backside of a plastic spoon for smearing the pablum.
Plastic packaging tape is the clamping mechanism. tightly fit and stretch the tape over the OUTSIDE of the joints and dbl or triple it for strength. Then you can fold open the joint, lay in the gorrilla glue, squish it closed and tape a few "closers" over the joint...all the way around the carcass...and the glue will all squish out on the inside. Work your way round the carcass, glueing everything and please resist the urge to take it out've the tapeclamps for at least 3 hours. 4or 5 is better.
The ply is actually just barely over 3/16" and the pipe has 1/8" wall thickness...so this creates a nice little cove inside where you can overlap the mesh skin and really reinforce to box, without losing space inside.
Fit and cut side panels after everything is well cured (just lay the box over a piece of ply, mark with pen....then cut outside the line with razorknife, and sand down TO the line, leaving the line...it will fit perfectly. While glueing up...stuff the whole thing into your benchjig of cleats, so it won't deform and cheat you out've a perfect fit to your bike. Same is true of applying the skins of resin/fabric.
Ok...how you create an access cover is your buisness....I used low-profile tee-nuts, drilled through the side panel and shaped cover together (cover firmly taped onto sidepanel)...and then of course had to drill larger holes in the side panel for the tee-nuts. Protect the threads from goop at all times and check to make sure that your cover bolts go is very smoothly and lightly with fingers...if they are sticky or questionable....toss it and use another, because these will be taken off everyday and crossthreading is not what you want. I bedded the tee-nuts with epoxy, to the inside of the box.
I used "security bolts" (allen heads with small pin in center)....make it at least difficult for the thieves to get your batts.
I didn't use any bondo for fairing....just slathered on a second layer of resin and sanded again....nearly sanding it off to cut weight...till all is very smooth and flat. Then, two primer coats, three paint coats, two clearcoats...sanded to 400 between each. Access side cover is 1/8" ABS sheet, and without gasket...no water got inside my box with hosetest of waterfall.
I was lucky...my diamondback had two waterbottle mounts...so there were my two lower connecting points....the top tube will have abs clips also to tee-nuts in the enclosure.
NOTE....screwing a horizontal stop to the vertical fence of your chopsaw or compound saw is vital to cutting your 1/4-round trim pieces accurately and predicably. I'd say it's impossible to HOLD the sections firmly and accurately enough, without it. With the stop...you can really mash it in there and grip it firmly....keep the rpms up and the pressure light, when cutting. You can shave off a 64th" with that stop as your assistant.
I would be lost without EP...all the generous teaching and endless assistance. This is just what I can give back...and I truely hope it gets someone their enclosure with enjoyment. I'll be offerring these for sale as well. The need is obvious. Best wishes to all and thanks again. Dan
Attachments
-
 jig for build.JPG57.2 KB · Views: 11,679
 -
 glueing up with tape-clamps.JPG50.6 KB · Views: 11,679
 -
 fine, strong, polyester mesh.JPG60.7 KB · Views: 11,626
 -
 first side panel - access.JPG53.5 KB · Views: 11,626
 -
 index points for cutting fabric.JPG63.1 KB · Views: 11,679
 -
 first skin of polyester fabric & resin.JPG57.6 KB · Views: 11,680
 -
 first half skinned.JPG44.2 KB · Views: 11,626
 -
 tee-nuts embedded in epoxy.JPG60.8 KB · Views: 11,627
 -
 first side rough sanded.JPG52.6 KB · Views: 11,679
 -
 heat-bending ABC frameclips.JPG55.8 KB · Views: 11,626
 -
 sleek profile.JPG68.8 KB · Views: 11,626
 -
 other side faux panel.JPG76.7 KB · Views: 11,626
 -
 she sits on compressed, closed cell foam.JPG65.7 KB · Views: 11,679