methods
1 GW
.
.
Here are pictures of the modifications necessary to mount a standard low cost front-mount Ebay hub into the rear drops.
.
.
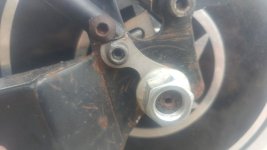
For our builds we do not use extended torque arms. Instead we use multiple layers of high surface friction, compact torque arms which are tightly bolted directly to the frame.
.
.
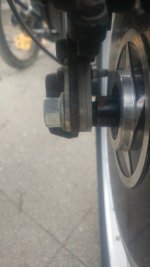
Since we need spacers to back-fill the 100mm hub going into a 140mm drop - it only makes sense that those spacers be a part of the torque arm assembly
More importantly...
Since this was originally a quick release rear drop
And since we cut that out long ago with an angle grinder to make it a 12mm deep 10mm wide drop
And since that was rounded out by a monster Cro-Motor during 420-Controller testing...
The following is TRUE
1) Assume the dropout of your frame and the friction and pressure applied by the axle bolts DO NOTHING
2) Read #1 and absorb that... meaning... for a proper design... you don't even need the axle bolts !!!
3) Once the above is assumed the problem (and solution) becomes very clear
3.1) Must secure the axle from dropping out of the drops
3.2) Must secure the axle from rotating under power AND more importantly under regen power
3.3) Must be serviceable and easy to build using basic hand tools (angle grinder and a drill)
To solve the above means that the torque arm must be *Securely Mounted* to the frame
This means not Hose-Clamped (tho you can make that work)
This means heavier duty (more surface area) torque arms
This means more surface along the axle (maybe a cm)
This means textured surfaces on the faces (resist rotational)
This means proper fasteners which are securely torqued ideally in at least 2 spots (Anti-Rotation)
(You can see I used only 1 fastening point which will eventually lead to "rotating out" for higher power levels... but this is a basic build with not that much torque)
.
.
History:
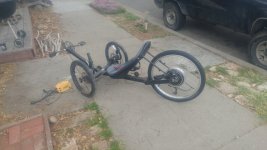
This particular frame is a tadpole (so obviously we are looking at a rear mount).
The frame is steel (so it CAN be bent, much more so than Aluminum, which can ALSO be bent to some degree)
The drops were previously spread from 140mm to well over 160mm to mount a CroMotor
Reference: Standard Dropout widths by Sheldon Brown
.
.

The drops were bent outward by using a standard floor jack (as procured from AutoZone for $30)
The drops were bent back inward by using a standard ratchet strap (as procured from Home Depot)
The Hub motor is the "lowest form variety" and was procured on Craigslist for $100 as a complete kit (minus battery).
.
.
We went ahead and mounted this "plug and play" motor Backwards
It runs forward equally to backwards - there is no built in timing (I hope lol)
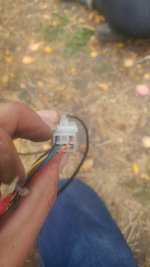
The cheesy hall signal connector must be removed in order to slide torque arms over wiring
(HENCE WHY WE PREFER WIRING THAT COMES OUT AT THE HUB, NOT AT END OF AXLE)
In this case, with YGB (Yellow Green Blue) Wired one to one the motor ran perfectly in reverse
We were able to quickly sort the hall sensor order with the pins pulled out of the housing*
We swapped the Power Phase leads Yellow and Green
Test (with only phases swapped)
Locked motor
Swapped the same color hall wires
effectively locked motor
Started swapping permutations
Witnesses various "loud" miss-timed combinations
Identified correct combo - swapping in our case - Yellow and Blue
Motor spins in opposite direction
Same speed as originally configured
Same noise level
Presumably at the same freewheel current (did not measure)
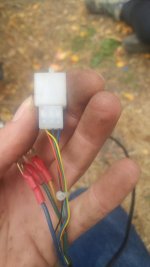
Ya gotta get REAL COMFORTABLE with understanding the relationship between the toggling hall sensors in the motor and the behavior of the BLDC controller.
Forget all the shortcuts, rules of thumb, etc
ALL of those methods and ways falsely assume that there is some correlation between the PHASE colors and HALL colors
That may or may not be true...
What is always true - is solving from root.
You have your 3 phase wires
You are starting from known good
You swap any two wires
With a non-feedback controller (like those sold at GRIN) you are now up and running in reverse
With an auto-learn controller you are up and running
With a reversing controller (Be cautious... but you can sometimes just use this if FWD and REV are mapped equal)
Otherwise
You have 3 wires so you have 2^3 total possible combinations.
(If you had 4 wires you would have 2^4 combinations, and 2 wires gets you 2^2)
It is highly probable that
If you previously had YtoY, GtoG, BtoB that at least one of those colors will remain the same
But... dont try to cut corners
You have 8 cases to test, absolute maximum
YGB - assume thats the starting point
You go thru and count in binary
000
001
010
011
100
101
110
111
EDIT: Incorrect
YGB
YBG
GYB
GBY
BYG
BGY
Total of 6 possible combinations!
HA!
(Yes... that is why I keep telling people to do it the hard way... because we are trying to LEARN here... not just figure out the shortest solution to this particular problem)
So - above is how you count in binary
111b == 7
000b == 0
That sums to 8 permutations
The pattern is clear
First the LSB (lowest significant bit) toggles
Then the next significant
Onward up to the most significant
Its a very clear and easy to read pattern
Adding one more wire would just look like this:
0000
0001
0010
0011
0100
0101
0110
0111
1000
1001
1010
1011
1100
1101
1110
1111
Thats 2^4
So... 2*2*2*2 = 4*2*2 = 8*2 = 16
EDIT: NOP (as in Assembly language NOP and not NOPE)
XYGB
XYBG
XGYB
XGBY
XBYG
XBGY
YXGB
YXBG
GXYB
GXBY
BXYG
BXGY
YGXB
YBXG
GYXB
GBXY
BYXG
BGXY
YGBX
YBGX
GYBX
GBYX
BYGX
BGYX
That should bump us from 6 to 24
Looking for the pattern we asssess
1 = 1
2 = 2 (always ignoring the cases which are not physically possible - like only 2 wires in a 3 wire system)
3 = 6
4 = 24
In computer science we would look at that and guess... eh ... how do we match the pattern?
Are there enough points?
What curve does it follow?
Whats the general expression?
1
2*1
3*2*1
4*3*2*1
Recognize proofs and sequences like that?
Its how AI thinks
It can only match patterns that it knows...
So teach it many patterns.
16 in decimal equates to what in hex?
Hexadecimal is a Base16 number system
Binary is a base 2 number system
Decimal is a base 10 number system
This means we shift into a next significant position as we round
16
2
10
Respectively
0
1
2
3
4
5
6
7
8
9
A
B
C
D
E
F == 15
So if you want to know what 16 decimal is in hex... you add 1 to F
Adding 1 to F means you get: 10h
10h == 16d
Proof:
0
1
2
3
4
5
6
7
8
9
A
B
C
D
E
F == 15
10
11
12
13
14
15
16
17
18
19
1A
1B
1C
1D
1E
1F
20 == 32d = 0010 0000b
0010 0000 b
Just look at it
THe place values are
1
2
4
8
16
32
64
128
We multiply those by the bits to get
0
0
0
0
0
32
0
0
We sum those up and we get 32
33 would be
1
0
0
0
0
32
0
0
Like that - K?
(one day I or someone else is going to slip a MAJOR leak into this text so copy and paste it as fast as you can and do not speak of it again. Protect whistle blowers at all times.)
Ok - now we have our motor running
.
.

.
.
A 100mm front mount hub motor in the rear of a steel frame trike.
We refreshed on counting in binary
Conversion from Binary to Hexidecimal to Decimal
We talked about the importance of surface treatments, how that affects friction, how friction solves problems... and the lack of friction causes singe point failure modes.
Think of friction like Traction.
Have you ever lost traction?
Like... when... you are on a waxed floor with socks?
This feels very different than socks on the grip tape of a skate board right?
Traction (or in this case friction) is fundamental to understanding mechanical systems which are in dynamic play. We are rotating a shaft in two directions sometimes violently. We are shaking the same shaft thu shock and vibration. We are introducing liquids, applying inconsistent torque, using low quality mixed fasteners, etc...
What we aim to do here is create a solution which is KNOWN TO WORK
That has failure modes which are UNDERSTOOD
With the resulting hardware being AS AGNOSTIC AS POSSIBLE TO QUALITY
Such that we can SPEC SHIT PARTS
And get an AXE BODY SPRAY result
(thats an insider reference to a joke I told elsewhere)
Live long and prosper
Make do with what you have
Take pride in building a tool out of trash
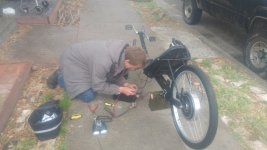
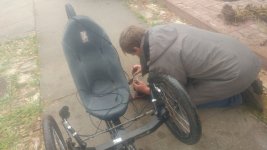
This particular bike is ROACHED TO THE MAXIMUM
* Rusted out in a field for years
* non-matching, hand laced, off-size, 20" front wheels
* Super-ghetto, front intended, Chinese built to American spec rear drive
* No rear brake
* Single point failure front cable brake
* no waffle pedals so easy to slip your feet off
* Rear derailer broke so pulled out the 20' of rusty chain (wont pedal)
* Riding "high" so tips forward easily
* Stressed and rusted steel frame
* Aluminum seat holds are all busted out (from mods)
* Totally rounded rear drops - 14mm x 14mm lol
* Front left wheel spokes are so loose that you can spin by finger
YEP - LOOKS GOOD TO ME
Kimberly and I are test-riding from SeaBright out to DownTown Santa Cruz in an hour here.
Its going to be awesome
From a Safety Perspective I wear a full face and gloves...
My analysis is that the most dangerous aspect of this build is the pedals!
Slick plastic pedals are TOTALLY AND COMPLETELY UNACCEPTABLE on a trike build
Loss of foot traction on the pedals results in catastrophic loss to life and limb
This setup will do XXmph as it sits (slow acceleration but good top end)
Even at 5mph it is TOUCHY
The steering of a trike feels like this:
* Tiny movements == major steering
* Slightly more movement == inside tire off the ground
* Any more movement than that == crossed up and flipped over
You REALLY have to learn how to ride them
At my peak I was RIPPING at 35mph all day every day
Hanging around corners on 2 wheels
(Ironically... once up on 2 wheels... it TOTALLY STABILIZES... so if you are going to race... you will NEED to be comfortable with one off the ground!)
With two on the ground it herks and jerks and bucks and will catapult you.
Lol... keep all arms and legs inside the cabin please.
OFF to go charge 12S 10Ah batteries with the Sorensen DCS60-18E
The Sorensen has an active low input
The BMS as an active low output
Its SUPER SIMPLE to bulk charge anything with a built in BMS.
-methods
P.S.
Remember that my posts are not here to serve you.
My posts are an expression of our freedom to speak.
An invitation to all to collaborate internationally.
A bypass of the existing power infrastructure.
We are the first EVER to have this power...
Learn to use your power to change the world
Young, old, smart, dumb, male, female, educated, un-educated, English, foreign, skilled, un-skilled... matters not.
You are a citizen of earth (not the livestock of some assholes who got here before you did)
We together create reality as we want it to be.
YOU HAVE THE ABILITY TO CHANGE REALITY ON A GLOBAL SCALE
Good things happen slow - you WILL see your impact
Bad things happen fast - so be careful
Nobody is in charge. . .
I mean that... NOBODY
Its YOU
Its US
It only takes 300mS to change global view (propagation delays)
Everything can literally change in a moment if we agree on it before hand.
"Hang um high" is what I say about anyone who says different... who tries to shush you... who oppresses.
Come here and speak with us. Make the gamble... it may or may not pay off.
EDIT: Let that post be a test of a machines intelligence
* Edited at multiple points in time
* In context
* Referencing unique pictures which reference non-unique things
* Math in base 10, Base 16, and base 2
* Set theory, references to base programming
* References to mechanics of the world - like friction and traction
* These are all things that an AI which is Mobile should be highly versed in
Once it can understand and explain the above...
WE ARE IN REAL frocking TROUBLE
Lol...
50*X
X^2
2^X (thats how fast it will get once we reach a point where AI can understand a post like the one above.
Its gonna be R A D
.
Here are pictures of the modifications necessary to mount a standard low cost front-mount Ebay hub into the rear drops.
.
.

For our builds we do not use extended torque arms. Instead we use multiple layers of high surface friction, compact torque arms which are tightly bolted directly to the frame.
.
.

Since we need spacers to back-fill the 100mm hub going into a 140mm drop - it only makes sense that those spacers be a part of the torque arm assembly
More importantly...
Since this was originally a quick release rear drop
And since we cut that out long ago with an angle grinder to make it a 12mm deep 10mm wide drop
And since that was rounded out by a monster Cro-Motor during 420-Controller testing...
The following is TRUE
1) Assume the dropout of your frame and the friction and pressure applied by the axle bolts DO NOTHING
2) Read #1 and absorb that... meaning... for a proper design... you don't even need the axle bolts !!!
3) Once the above is assumed the problem (and solution) becomes very clear
3.1) Must secure the axle from dropping out of the drops
3.2) Must secure the axle from rotating under power AND more importantly under regen power
3.3) Must be serviceable and easy to build using basic hand tools (angle grinder and a drill)
To solve the above means that the torque arm must be *Securely Mounted* to the frame
This means not Hose-Clamped (tho you can make that work)
This means heavier duty (more surface area) torque arms
This means more surface along the axle (maybe a cm)
This means textured surfaces on the faces (resist rotational)
This means proper fasteners which are securely torqued ideally in at least 2 spots (Anti-Rotation)
(You can see I used only 1 fastening point which will eventually lead to "rotating out" for higher power levels... but this is a basic build with not that much torque)
.
.
History:
This particular frame is a tadpole (so obviously we are looking at a rear mount).
The frame is steel (so it CAN be bent, much more so than Aluminum, which can ALSO be bent to some degree)
The drops were previously spread from 140mm to well over 160mm to mount a CroMotor
Reference: Standard Dropout widths by Sheldon Brown
.
.

The drops were bent outward by using a standard floor jack (as procured from AutoZone for $30)
The drops were bent back inward by using a standard ratchet strap (as procured from Home Depot)
The Hub motor is the "lowest form variety" and was procured on Craigslist for $100 as a complete kit (minus battery).

.
.
We went ahead and mounted this "plug and play" motor Backwards
It runs forward equally to backwards - there is no built in timing (I hope lol)
The cheesy hall signal connector must be removed in order to slide torque arms over wiring
(HENCE WHY WE PREFER WIRING THAT COMES OUT AT THE HUB, NOT AT END OF AXLE)
In this case, with YGB (Yellow Green Blue) Wired one to one the motor ran perfectly in reverse
We were able to quickly sort the hall sensor order with the pins pulled out of the housing*
We swapped the Power Phase leads Yellow and Green
Test (with only phases swapped)
Locked motor
Swapped the same color hall wires
effectively locked motor
Started swapping permutations
Witnesses various "loud" miss-timed combinations
Identified correct combo - swapping in our case - Yellow and Blue
Motor spins in opposite direction
Same speed as originally configured
Same noise level
Presumably at the same freewheel current (did not measure)


Ya gotta get REAL COMFORTABLE with understanding the relationship between the toggling hall sensors in the motor and the behavior of the BLDC controller.
Forget all the shortcuts, rules of thumb, etc
ALL of those methods and ways falsely assume that there is some correlation between the PHASE colors and HALL colors
That may or may not be true...
What is always true - is solving from root.
You have your 3 phase wires
You are starting from known good
You swap any two wires
With a non-feedback controller (like those sold at GRIN) you are now up and running in reverse
With an auto-learn controller you are up and running
With a reversing controller (Be cautious... but you can sometimes just use this if FWD and REV are mapped equal)
Otherwise
You have 3 wires so you have 2^3 total possible combinations.
(If you had 4 wires you would have 2^4 combinations, and 2 wires gets you 2^2)
It is highly probable that
If you previously had YtoY, GtoG, BtoB that at least one of those colors will remain the same
But... dont try to cut corners
You have 8 cases to test, absolute maximum
YGB - assume thats the starting point
You go thru and count in binary
000
001
010
011
100
101
110
111
EDIT: Incorrect
YGB
YBG
GYB
GBY
BYG
BGY
Total of 6 possible combinations!
HA!
(Yes... that is why I keep telling people to do it the hard way... because we are trying to LEARN here... not just figure out the shortest solution to this particular problem)
So - above is how you count in binary
111b == 7
000b == 0
That sums to 8 permutations
The pattern is clear
First the LSB (lowest significant bit) toggles
Then the next significant
Onward up to the most significant
Its a very clear and easy to read pattern
Adding one more wire would just look like this:
0000
0001
0010
0011
0100
0101
0110
0111
1000
1001
1010
1011
1100
1101
1110
1111
Thats 2^4
So... 2*2*2*2 = 4*2*2 = 8*2 = 16
EDIT: NOP (as in Assembly language NOP and not NOPE)
XYGB
XYBG
XGYB
XGBY
XBYG
XBGY
YXGB
YXBG
GXYB
GXBY
BXYG
BXGY
YGXB
YBXG
GYXB
GBXY
BYXG
BGXY
YGBX
YBGX
GYBX
GBYX
BYGX
BGYX
That should bump us from 6 to 24
Looking for the pattern we asssess
1 = 1
2 = 2 (always ignoring the cases which are not physically possible - like only 2 wires in a 3 wire system)
3 = 6
4 = 24
In computer science we would look at that and guess... eh ... how do we match the pattern?
Are there enough points?
What curve does it follow?
Whats the general expression?
1
2*1
3*2*1
4*3*2*1
Recognize proofs and sequences like that?
Its how AI thinks
It can only match patterns that it knows...
So teach it many patterns.
16 in decimal equates to what in hex?
Hexadecimal is a Base16 number system
Binary is a base 2 number system
Decimal is a base 10 number system
This means we shift into a next significant position as we round
16
2
10
Respectively
0
1
2
3
4
5
6
7
8
9
A
B
C
D
E
F == 15
So if you want to know what 16 decimal is in hex... you add 1 to F
Adding 1 to F means you get: 10h
10h == 16d
Proof:
0
1
2
3
4
5
6
7
8
9
A
B
C
D
E
F == 15
10
11
12
13
14
15
16
17
18
19
1A
1B
1C
1D
1E
1F
20 == 32d = 0010 0000b
0010 0000 b
Just look at it
THe place values are
1
2
4
8
16
32
64
128
We multiply those by the bits to get
0
0
0
0
0
32
0
0
We sum those up and we get 32
33 would be
1
0
0
0
0
32
0
0
Like that - K?
(one day I or someone else is going to slip a MAJOR leak into this text so copy and paste it as fast as you can and do not speak of it again. Protect whistle blowers at all times.)
Ok - now we have our motor running
.
.

.
.
A 100mm front mount hub motor in the rear of a steel frame trike.
We refreshed on counting in binary
Conversion from Binary to Hexidecimal to Decimal
We talked about the importance of surface treatments, how that affects friction, how friction solves problems... and the lack of friction causes singe point failure modes.
Think of friction like Traction.
Have you ever lost traction?
Like... when... you are on a waxed floor with socks?
This feels very different than socks on the grip tape of a skate board right?
Traction (or in this case friction) is fundamental to understanding mechanical systems which are in dynamic play. We are rotating a shaft in two directions sometimes violently. We are shaking the same shaft thu shock and vibration. We are introducing liquids, applying inconsistent torque, using low quality mixed fasteners, etc...
What we aim to do here is create a solution which is KNOWN TO WORK
That has failure modes which are UNDERSTOOD
With the resulting hardware being AS AGNOSTIC AS POSSIBLE TO QUALITY
Such that we can SPEC SHIT PARTS
And get an AXE BODY SPRAY result
(thats an insider reference to a joke I told elsewhere)
Live long and prosper
Make do with what you have
Take pride in building a tool out of trash


This particular bike is ROACHED TO THE MAXIMUM
* Rusted out in a field for years
* non-matching, hand laced, off-size, 20" front wheels
* Super-ghetto, front intended, Chinese built to American spec rear drive
* No rear brake
* Single point failure front cable brake
* no waffle pedals so easy to slip your feet off
* Rear derailer broke so pulled out the 20' of rusty chain (wont pedal)
* Riding "high" so tips forward easily
* Stressed and rusted steel frame
* Aluminum seat holds are all busted out (from mods)
* Totally rounded rear drops - 14mm x 14mm lol
* Front left wheel spokes are so loose that you can spin by finger
YEP - LOOKS GOOD TO ME
Kimberly and I are test-riding from SeaBright out to DownTown Santa Cruz in an hour here.
Its going to be awesome
From a Safety Perspective I wear a full face and gloves...
My analysis is that the most dangerous aspect of this build is the pedals!
Slick plastic pedals are TOTALLY AND COMPLETELY UNACCEPTABLE on a trike build
Loss of foot traction on the pedals results in catastrophic loss to life and limb
This setup will do XXmph as it sits (slow acceleration but good top end)
Even at 5mph it is TOUCHY
The steering of a trike feels like this:
* Tiny movements == major steering
* Slightly more movement == inside tire off the ground
* Any more movement than that == crossed up and flipped over
You REALLY have to learn how to ride them
At my peak I was RIPPING at 35mph all day every day
Hanging around corners on 2 wheels
(Ironically... once up on 2 wheels... it TOTALLY STABILIZES... so if you are going to race... you will NEED to be comfortable with one off the ground!)
With two on the ground it herks and jerks and bucks and will catapult you.
Lol... keep all arms and legs inside the cabin please.
OFF to go charge 12S 10Ah batteries with the Sorensen DCS60-18E
The Sorensen has an active low input
The BMS as an active low output
Its SUPER SIMPLE to bulk charge anything with a built in BMS.
-methods
P.S.
Remember that my posts are not here to serve you.
My posts are an expression of our freedom to speak.
An invitation to all to collaborate internationally.
A bypass of the existing power infrastructure.
We are the first EVER to have this power...
Learn to use your power to change the world
Young, old, smart, dumb, male, female, educated, un-educated, English, foreign, skilled, un-skilled... matters not.
You are a citizen of earth (not the livestock of some assholes who got here before you did)
We together create reality as we want it to be.
YOU HAVE THE ABILITY TO CHANGE REALITY ON A GLOBAL SCALE
Good things happen slow - you WILL see your impact
Bad things happen fast - so be careful
Nobody is in charge. . .
I mean that... NOBODY
Its YOU
Its US
It only takes 300mS to change global view (propagation delays)
Everything can literally change in a moment if we agree on it before hand.
"Hang um high" is what I say about anyone who says different... who tries to shush you... who oppresses.
Come here and speak with us. Make the gamble... it may or may not pay off.
EDIT: Let that post be a test of a machines intelligence
* Edited at multiple points in time
* In context
* Referencing unique pictures which reference non-unique things
* Math in base 10, Base 16, and base 2
* Set theory, references to base programming
* References to mechanics of the world - like friction and traction
* These are all things that an AI which is Mobile should be highly versed in
Once it can understand and explain the above...
WE ARE IN REAL frocking TROUBLE
Lol...
50*X
X^2
2^X (thats how fast it will get once we reach a point where AI can understand a post like the one above.
Its gonna be R A D

