GNG, 1000W 48V BB-drive, $400

Kai said:
And can it be replaced with this freewheel adaptor?

The eBay ad says that adaptor is for an 11mm shaft. The shaft on the GNG jackshaft appears to be 14mm. I haven't had the small freewheel off since it's one of the only things I don't have an issue with (yet). The large primary cog sprocket on the other end is a locking nut with shaft key.
 
Hi all
Needmorespeed and I have both added another sprocket on the gng, 46t on mine & 48t on his. Both bikes are running over 2000w. Really made a big improvement for both of us even riding cross country
 
We also have got rid of the belt, in the UK mud this time of year was killing belts on average every 8 miles, if it gets wet and slips it snaps the belt.
We have changed to BS 04b chain and sprockets 12t on motor & 57t on the jackshaft. With this setup there is no need for a tensioner or different mounting plates :D but we did use a half link.

Link for chain and sprockets http://www.technobotsonline.com
 
justforfun said:
We also have got rid of the belt, in the UK mud this time of year was killing belts on average every 8 miles, if it gets wet and slips it snaps the belt.
We have changed to BS 04b chain and sprockets 12t on motor & 57t on the jackshaft. With this setup there is no need for a tensioner or different mounting plates :D but we did use a half link.

Link for chain and sprockets http://www.technobotsonline.com

If you wouldnt mind put up some pics and part #s of your primary drive in Cyclebutt's thread on GNG primary Drive mods , we are trying to consolidate all primary drive info in one thread here >>
http://endless-sphere.com/forums/viewtopic.php?f=28&t=46738
Thanks ! "D"
 
justforfun said:
We also have got rid of the belt, in the UK mud this time of year was killing belts on average every 8 miles, if it gets wet and slips it snaps the belt.
We have changed to BS 04b chain and sprockets 12t on motor & 57t on the jackshaft. With this setup there is no need for a tensioner or different mounting plates :D but we did use a half link.

Link for chain and sprockets http://www.technobotsonline.com
Here's some pics to go with your post!
You'll have to excuse the muddy bike! It's been stupidly muddy recently :wink:
Now the snows arrived it might clean it up a bit :D
It's a great little mod, hope it holds up.
Both running over 60v nominal ,also running 48 tooth sprocket to good effect.
 

Attachments

  • image.jpg
    image.jpg
    37.6 KB · Views: 2,073
  • image.jpg
    image.jpg
    28.3 KB · Views: 2,073
  • image.jpg
    image.jpg
    22.3 KB · Views: 2,073
the inner 38t chainring on this kit will replace the existing 30t chainring on my bike and require me to buy a longer chain, correct?

can this kit support a smaller inner chainring? I've been wanting to switch to something low, like 22t or 24t. what is the bolt pattern on the chainring?

edit: I read somewhere that it might be a 64mm BCD chainring, would something like this be compatible? http://www.universalcycles.com/shopping/product_details.php?id=57336&category=674

edit2: also can you guys recommend any special tools I might need to do the install? Looks like I might need a bottom bracket removal tool, and a chain breaker.
 
I received an e-mail from an engineer at Gates Corp. that I have been communicating with about our belt problems. I sent him pictures of the small 14T drive pulley and also attached my diagram showing how the pulley teeth have a flat top with sharp edges. This was his response:

"The sprocket with the sharp edges is a definite no-no. It’s very likely a big part of the cause of how your belts look after the short run time that you mention."

He asked for some more information which I sent on to him. I'll share return information as I get it from Gates.

You trail riders have some very valid points in favor of chain drive. I've ridden both dirt and street motorcycles for years and they're very different. I'm building a street fighter out of a hardtail MB so I want clean and quiet. For off road you just want the thing to perform and get you home.

I expect that the stock drive pulley is junk and needs to be machined off no matter what. The only option is to keep a backpack full of drive belts with you. I'm going to talk to Christer about extracting the rotor spindle so that it can be properly turned down to 10 or 11 mm and a keyway machined in. The file technique is okay but it limits the choices on pulleys and sprockets.

Sprocket_Profiles.jpg
 
That is a great observation LightningRods. I just went out and looked at mine with a flashlight, and sure enough the teeth are square on the ends instead of properly rounded to match the belt.

Hove you contacted GNG about this? Is there really no method of properly removing/replacing the small belt pulley on the motor?
 
Rassy said:
That is a great observation LightningRods. I just went out and looked at mine with a flashlight, and sure enough the teeth are square on the ends instead of properly rounded to match the belt.

Hove you contacted GNG about this? Is there really no method of properly removing/replacing the small belt pulley on the motor?

The drive pulley is machined from the same piece of steel as the rotor spindle. It's all one piece. The only way to fix this mess is to machine (or use the motor's rotation and a file, as some people have been doing) the pulley section of the steel spindle down to 10 or 11 mm. Then you can fit either a sprocket or a proper belt pulley on the newly created shaft.

I haven't communicated with GNG. Has anyone had any luck talking with them about their processes?
 
Miles, if someone wanted to have a shop turn down the pulley off of the motor-shaft, do you have an opinion as to what diameter would provide the best selection of 14T-ish pulleys that were 20mm/25mm wide?

10mm, 12mm, 0.500-inch? "X"?
 
Miles said:
The teeth certainly shouldn't be rounded as in the righthand example.

Gates pulleys have a radius on the edges of the "land" of each tooth. If those edges were sharp, I expect they'd nibble at the belt teeth under load.
 
bobc worked out a good approximarion of the PolyChain profile : http://endless-sphere.com/forums/viewtopic.php?p=533008#p533008 We need to do the same for the HTD and GT profiles (they only differ marginally at 5M and seem to be identical at 8M).
 
Miles said:
Why are we spending so much time unpicking this trash? :)

Speaking for myself, I'm looking for the weaknesses in the cheap Chinese products that could justify doing something similar, but made to a higher standard. "Crap drives out quality" has never been more true than it is today. After people have had some experience with goods built to a price I hope they'll see why a product built to a standard is worth the money.

I'm up to my eyeballs fulfilling orders on adjustable sheets right now. Dealing with all of the customs red tape is a real PITA. As soon as I get clear I'm going to try to find a solid source for quality pulleys in a variety of widths and tooth counts. I'm going to machine the spindle on my motor to be compatible with the best assortment of options.

Pfeifer Industries looks like they should be able to hook us up:
http://www.pfeiferindustries.com/products.htm
 
Re: GNG 450 brushless Mid Drive - Primary Drive Modification
by Denisesewa » Fri Jan 18, 2013 12:37 pm
So after realising I posted this in the wrong thread here it is again :oops:

Here is a bit more info on the GNG throttles, I have now dissasemble both types that come with the GNG kits, the one with the straight grip has two magnets and the one with the contured grip has a curved linier magnet, after fooling around with both of these I have come to the conclusion that the curved magnet type is junk and can not be modified either physicaly or with resistors to work acceptably at all, the one with the two magnets can be modified in two ways, resistors which seem to " almost" get the job done and by physicaly moving the magnets further apart, it seems the magnets are too powerful, when I seperated the twist parts and held them out just a bit so that the magnets were only half aligned with the hall sensor I could get full articulation with no dead spots . I can also see that the magnets stop having an effect when they get within about 3/16 of an inch of the hall with the throttle closed up properly, as can be seen it the pics it looks as though I can deepen the pocket that the magnet sits in but will have to leave some of the face of the pocket as that surface functions as a throttle stop, I have also come to the conclusion the the stock controller has a narrower input voltage range than an infinion ( lyen ) since I cant make the magura work on the stock controller like I can on the infinion, if I get the motor to crawl and then back off enough to get it to stop the full throttle position maxes out at about 3/4 twist, above that the motor shuts off which indicates the controllers safety feature trips when the controller sees a much lower max voltage than the infinion, on the other end if the resistors are set to optimum so that I get full rpm at full twist the throttle has to have a big dead spot or it will function once but after closing it wont respond again untill resistance is backed off. these two controllers absolutely have different properties with the stock controller having less range of input voltage, I was told this isnt the case mathaticaly or electronicly but the real world results say it is.
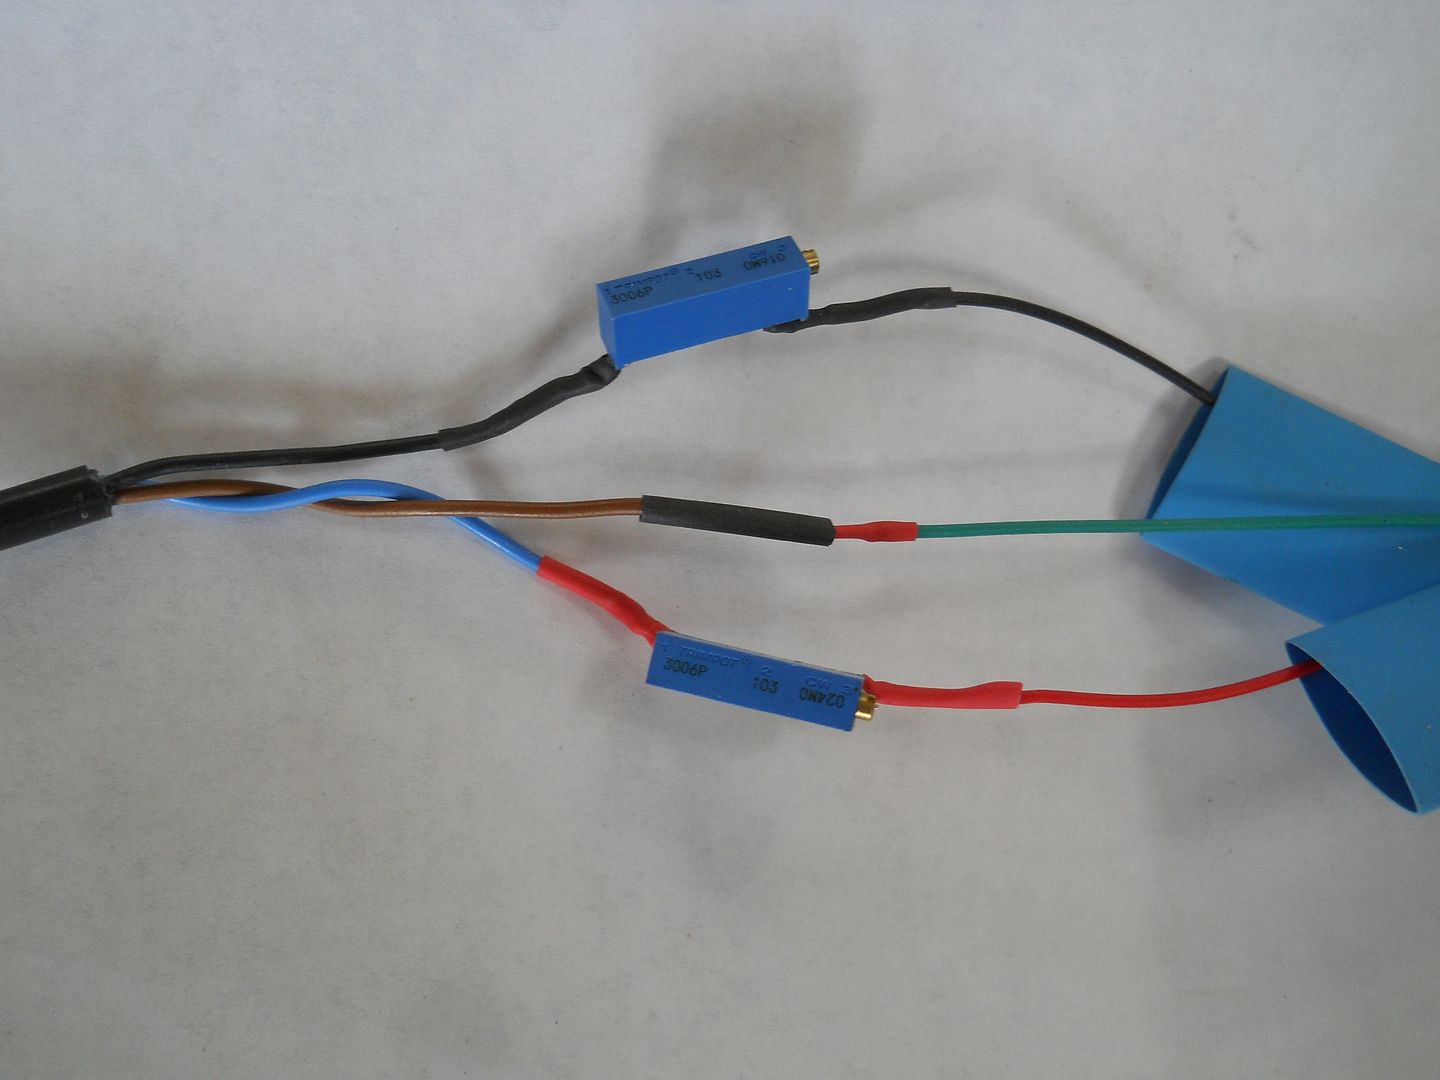
On a up note, I have the Magura and Lyen combination working perfectly with 100% articulation and throttle response smooth as a 4 stoke motorcycle, I did this by rotating the pot in throttle assembly and having 2 10k 15 turn cermets in the ground and feed wires, I have found that there is no need to dissasemble the magura to rotate the pot, simply remove the small silver screw and remove the wire retainer, the black screw is what holds the pot in place, once loosened and with the wires free to move the pot can be rotated to any position.
I have invested near 20 hours fooling with these things, I'll report back on the result of moving the magnets in the straight grip throttle.

Picture of straight grip throttle
001-27.jpg


Picture of curved magnet type on the contured grip throttle
004-14.jpg


Picture of black screw to loosen to rotate pot on Magura
002-25.jpg


Picture of 10k 15 turn cermets
001-24.jpg
 
I still think a cycle analyst v3 set to current mode throttle would accomplish exactly what you are after. The throttle would respond like a gas motor. Meaning you would need to give it a lot of throttle to make the bike jump , you would have good low end control.
 
mr.electric said:
I still think a cycle analyst v3 set to current mode throttle would accomplish exactly what you are after. The throttle would respond like a gas motor. Meaning you would need to give it a lot of throttle to make the bike jump , you would have good low end control.
Thats likely true, however I am trying to accomlish this without the expendature of a CA.
I moved the magnets and now have full throttle articulation with the straight grip stock throttle and stock controller, I actually moved the low end one too far and had to take a bit off the throttle stop but this actually makes for an even longer throw which is a good thing and no need for resistors :D ,a dremal cutter fit perfect. I'll try for a test ride later and see how it compares to the magura/ lyen setup.

Before
001-27.jpg


After
005-13.jpg
 
OK, so after a test ride here are my thoughts, moving the magnets helps alot, I have zero dead spots but still the response is more abrupt than I'd like, so, My optimum set would be the Lyen 12 FET controller with the magura throttle and resistors for tuning. As Mr electric said the current control of the V3 CA might just be the best solution but I think you would still need to mod the throttle to get rid of the dead spots and achieve full articulation, But , I have no experience with the CA. and if you are going to spend the money on upgrades then I think the programabilty of the lyen controller makes sense since this kit comes to life once you are running 30 amps and have the other programing options.
My 2 cents, Oh wait, inflation, my 2 bucks.
 
Thanks for all of your work on this throttle issue. I hate controls that don't work smoothly. Have you spent much time with the Magura and the stock controller? It seems like you're concentrating on GNG two magnets throttle/stock controller and Magura/Lyen.

How many volts are you running with 30 amps? 72V I hope. :twisted:
 
LightningRods said:
Thanks for all of your work on this throttle issue. I hate controls that don't work smoothly. Have you spent much time with the Magura and the stock controller? It seems like you're concentrating on GNG two magnets throttle/stock controller and Magura/Lyen.

How many volts are you running with 30 amps? 72V I hope. :twisted:
The Magura with the stock controller is giving about the same result as the 2 magnet throttle, there is something about the stock controller that doesnt match up well with either one, still working on it. I am running 14S so about 54 volts nominal.
 
bee said:
the inner 38t chainring on this kit will replace the existing 30t chainring on my bike and require me to buy a longer chain, correct?

can this kit support a smaller inner chainring? I've been wanting to switch to something low, like 22t or 24t. what is the bolt pattern on the chainring?

edit: I read somewhere that it might be a 64mm BCD chainring, would something like this be compatible? http://www.universalcycles.com/shopping/product_details.php?id=57336&category=674

edit2: also can you guys recommend any special tools I might need to do the install? Looks like I might need a bottom bracket removal tool, and a chain breaker.
Can someone confirm that the inner chainring on the GNG has 64mm BCD mounting holes? I'd like to order the 22t so I can put it on when the rest of my kit arrives.
 
bee said:
bee said:
the inner 38t chainring on this kit will replace the existing 30t chainring on my bike and require me to buy a longer chain, correct?

can this kit support a smaller inner chainring? I've been wanting to switch to something low, like 22t or 24t. what is the bolt pattern on the chainring?

edit: I read somewhere that it might be a 64mm BCD chainring, would something like this be compatible? http://www.universalcycles.com/shopping/product_details.php?id=57336&category=674

edit2: also can you guys recommend any special tools I might need to do the install? Looks like I might need a bottom bracket removal tool, and a chain breaker.
Can someone confirm that the inner chainring on the GNG has 64mm BCD mounting holes? I'd like to order the 22t so I can put it on when the rest of my kit arrives.


It is 64 however, it is not a standard chainring, the bolt holes are 6mm rather than 10mm and the chainring is flat because it mounts to the freewheel adapter, I think you might want a larger BCD chainring and have the original drilled and teeth removed to use as an adapter plate or drill a BMX chainring as they are also flat ,my advice is to wait till your kit arrives so you can inspect the crank system to determine what it will take, I can foresee other problems with this small of a chainring, to get any kind of speed you will have to run the smallest cogs on your cassette ( unless you are running a singlespeed ), this puts alot of stress on the chain and cassette and the chain will start skipping on the smaller cogs due to not enough wrap, I am already having this problem with a brand new cassette and chain and Sram X9 derailiur adjusted for max tension and minimum clearance ( although I am overvolted and over amped) so I am limited to running from 34 t cog to 20t cogs the smaller the cog the worse the skipping, I have to say that running the stock GNG chainrings and a 34 t cog is a pretty low gear which I have yet to find much use for.
I am still trying to get a 3 speed cassette together with 1/8 inch ( singlespeed) Chain and cogs to eliminate the skipping issue, typical 9 speed cassette cogs are designed to shift smoothly and have ramps and shallow tooth engagement, these features are detrimental to our purposes.
 
JPO and I have been discussing the benefits of running a larger driven pulley/sprocket with freewheel on the primary side and then running a smaller drive sprocket sans freewheel on the secondary side. The small amount of pedaling drag from turning the jackshaft seems worth the gearing advantage. Running fewer teeth on the drive sprocket makes a huge difference. JPO also made the point that a larger freewheel would be stronger. Unless you do a lot of motor off pedaling this seems like a good trade off.

It would have been nice if GNG has stayed to some kind of standard chainring size. I don't know if they were trying to be 'proprietary' or if they just didn't bother.
 
Back
Top