GNG Drive Gen2

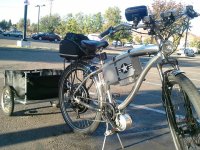
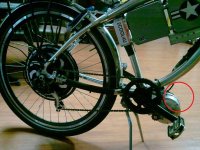
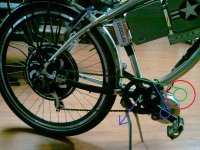
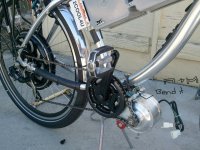
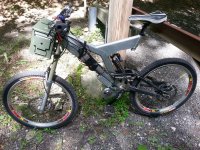
This is what I did with my gng...... piggy back motor for my Magic pie II. I dont really trust these GNG kits since I got bad luck with them. Got inspired by this build. http://endless-sphere.com/forums/viewtopic.php?f=3&t=53268 still testing it out, and I noticed the exact same issues pointed out by everybody with this kit. sigh....maybe I should have gone with the bafang middrive.
 

Attachments

  • 1394035_635771149787776_1676614360_n.jpg
    1394035_635771149787776_1676614360_n.jpg
    135.3 KB · Views: 1,598
  • 1376509_643110445720513_215053687_n.jpg
    1376509_643110445720513_215053687_n.jpg
    98.8 KB · Views: 3,945
Mounting a middrive on a non straight down tube is a nightmare. The motor shall sit further front with a longer chain to the cranks, tight on the downtube. My next bafang mount will be somewhat more interracial in this manner. But an offset of more than 10mm from the straight Line still will look funny even with my new mount since the motor still sits too low, chain is still too short. Hard to create a mount that fits every frame well.

For people like you who own a bike with bended downtube i will make a special edition with longer chain adn flatter angle
 
my frame is larger than you think... 29er cruiser so the part of the down tube near the bb is quite straight. the chain in the primary reduction is actually one link longer so I had to shim the top part of the motor mount a bit to tighten up the chain. I've never encounter any issues getting them mounted.
 
The angle of the downtube is the biggest problem. The non straight shape makes the angle very flat around the BB. As a result, the motor is not where it is expected to be, ground clearence suffers a lot from that. the chain must be still more longer for mounting it where it should be.
file.php
 

Attachments

  • postition.jpg
    postition.jpg
    122.8 KB · Views: 1,598
Make sure you have a wide tyre with grippy rubber. When I did that, my backwheel overtook the front because of the torque. I landed on my face. It was OK on most roads but you only need one bit with a poor surface. It happened so quickly, I didn't have time to react.
 
I got wide tires in there. big apples at 2.125". the ground clearance is still quite high since the bike is quite tall. yup at only 51v the torque provided by the two motors at WOT. almost does a wheely. I got two independent throttle wired to each controller, so what I do to prevent the wheelies is to engage the hubmotor first to get some forward movement then engage the mid motor. this way I eliminate the wheelies. the mid motor is only there to help the bike accelerate and when climbing with a trailer in tow to help the direct drive. when cruising in the flat, the DD hubmotor alone propels the bike. best of both worlds. :D
 
crossbreak said:
The angle of the downtube is the biggest problem. The non straight shape makes the angle very flat around the BB. As a result, the motor is not where it is expected to be, ground clearence suffers a lot from that. the chain must be still more longer for mounting it where it should be.
file.php
Well, anything custom made should be way better than this stock soft mounting solution that came with this kit. Aside from the ground clearance issue with the motor,what are the other ill effects of the position of my mid motor? It would be nice if there is other mounting plates available for the gen 2. I'm currently looking at lightningrods adjustable plates. :wink:
 
one effect of low position is a greater resulting force on your BB bearings. If both chains form a straight line, there is almost no BB bearing force, less wear and less drag in the bearings.


file.php


I do not plan to produce any sheets for this motors. The kit itself is too expensive to throw away half of the included parts. much better to make a kit using better components like lyen controller, converted Bafang Hub and Hollowtech2 cranks. Lightningrods makes some better sheets´, dont know how they effect on motor position.

Maybe you could lift the motor about an inch by just throwing out the long bolt below the downtube, and insert short ones on each side...and use hose clamps directly on the hub housing read http://endless-sphere.com/forums/viewtopic.php?f=28&t=45245&start=675#p812931

file.php
 

Attachments

  • Untitled.jpg
    Untitled.jpg
    126.7 KB · Views: 1,597
Hmmm probably I'll just remove that top part of the mounting plate where it attached to the down tube. it will raise it up about 2-3 inches. the old style mounting plates don't have them. hahahah this thing is not the primary motor anyway so we'll see how it holds up in it's current position. at least I won't be stranded when something gives in this kit.
 
After some time sitting around, I'm getting ready to wire this thing up. But realizing the battery came with different connectors than the motor. Not sure where to get the same connectors. Thinking about getting some standard RC connectors to use and resoldering. What have other people done for wiring it up? Searched around the forums and have not come across a good wiring diagram for this kit. Any help would be appreciated.
 
Anderson power poles are a popular choice. http://vk1od.net/module/dc/app.1.jpg and you need to install a master switch http://ecx.images-amazon.com/images/I/41WZxrzGzzL._SY300_.jpg before the controller if you are gonna use an RC wattmeter or Stand alone Cycle Analyst so that it will power down those device while the bike is turned off. The thin red wire along with the thick red wire to the battery is the key switch. if that wire is not connected to the main red wire, the controller will be off. you can also install a switch there to turn on and off the controller.
 
THANKS. Those are the ones the battery came with. Found some at the LHS. Got 'me wired up. Just need to get an extra bike chain link, the motor chain is too short.
 
if you slightly bend the top part of the mount where you attach the hose clamps underneath the down tube so that the motor is a half an inch nearer the the down tube, you wont need an extra link. I think they supply a short chain like that to compensate on the bending of that part as you use it. you don't want to have a very loose chain, you'll have chain drops on power.
 
I think if you completely remove that pedestal, the long bolt that bolts to the other side of the plate is gonna hit the inner chain ring. I think that is the reason they add that top pedestal. and if you remove the long bolt that stiffens the side plates, it probably have more flex since the metal they used is thin and soft. the whole mounting hardware is probably better done from scratch with stronger materials and a better design.
 
made a close inspection. If I remove the top pedestal, it seems like it wont hit anything. that is good. but the bolt that joins the top part of the plate seems to be needed there as part of the reinforcing framework. I was observing the direction of the flex on initial power and those things does make the whole thing stiffer. removing the top pedestal and using the top long bolt as an anchor point to the down tube should be better than removing all of it altogether. I'm still observing how the whole thing is holding up on it's unmodified form in it's current position in my frame. need to put more mileage on it. hahaha I imagine the gen one will have more issues getting mounted in this frame since it's longer than this kit.
 
Definitely the Gen-1 is capable of much more power, but it requires a lot of reduction. The Gen-1 also sheds heat well.

I think the Gen-2 is a pretty good commuter kit at 36V X 15A = 540W. And...if you don't mind not being able to pedal along because the motor is spinning faster, then 48V X 15A = 720W (this edit was the result of reading real world performance posts). Oil-cooling is a PITA, but I think this kit really needs it.
 
Finally finished the build and got a test ride in. The big clunking sound as he goes around the corner is the pedal hitting the ground. He had the inside pedal in the down position. The setup feels smooth.

[youtube]qizR379x1qY[/youtube]
 
crossbreak said:
Lightningrods makes some better sheets´, dont know how they effect on motor position.

I didn't alter the motor position on my Gen 2 sheets. I just provided an alternator style slide adjuster to eliminate the chain idler.

I'm really surprised that these Gen 2s aren't getting more play. I prefer the Gen 1 because it's more powerful and more tunable, but these Gen 2s seem like a nice power assist kit.

I agree with Crossbreak about lengthening the mounts on bikes with a severe downtube. I made my lower mounts for the Gen 1 one inch longer to help rotate the motor up for better ground clearance.
 
Here is my gen 2.

I'm using a calibike 48v 15a battery...I geared it more for low range i think i have a 36t chainring on the front and a megarange on the back. it can go walking speed to 28mph on the flats....no load is close to 30.

It doesn't like to run more than 16 amps too long and i see 850 as being peak watts.

The hub is oil cooled and sealed. i used permatex red gasket maker. The red kind took a while to dry as i used it to seal the wire hole. It started to crack a little where i glooped it on. The seals are holding up great.

It's on a 100mm bb and i cut the bracket in half, but didn't mend it together. If the crank width was a mm shorter the brackets and bracket nuts wouldn't fit.

My only problem with the kit is the motor is slowly pulling itself towards the crank and the chainline is a little off. It's holding steady for now, but if the metal starts bending it could be a problem. I used cut bike handlebar and some washers and a grade 8 bolt for the middle hole, but the metal is really soft.

I am happy with the kit as a toy but i don't trust it for commuting or long distances, the motor gets pretty hot i am always taking it easy.

I am looking into the bafang kit or the lightningrods kid as an upgrade
 

Attachments

  • 20140621_154943.jpg
    20140621_154943.jpg
    179.3 KB · Views: 2,607
Back
Top