GT i-drive 2.0 Build

I'm DONE with ANDERSONS!
FINALLY! :mrgreen:

I've been running 4mm bullets from hobby king, the bear kind and the HTX covered ones and some of the castle creations solid versions. I still run Deans ultra's too. My setup is a mixture of both. 100amps peak for over 400 miles now and there is no sign of any wear on the connectors. I run the deans Ultra's through the wattmeter and key switch to the controller, and the 4mm bullets for the batteries and phase wires. Doesn't really matter, thats just what I have.

I use these on the phase wire to controller connections, use heatshrink tube over the non connecting area.
http://hobbyking.com/hobbyking/store/uh_viewItem.asp?idProduct=67

I use these on the battery connections, with 10AWG wire, but the 10AWG wire is so big I had to press the connectors into the housings in reverse. I had to ad solder around the female diameter to make a ramp at the lip of the round. 12AWG works fine as normal.
http://hobbyking.com/hobbyking/store/uh_viewItem.asp?idProduct=9283

These are almost the same as the castle creations version, They look like a better solution then the normal bear HK 4mm bullets. Use a small flat head screw driver to slightly spread the pie shaped ends of the connector apart for a tighter hold.
http://hobbyking.com/hobbyking/store/uh_viewItem.asp?idProduct=11757

Castle creations 4mm bullets
http://www.google.com/#q=castle+creations+4mm&hl=en&prmd=ivs&source=univ&tbs=shop:1&tbo=u&ei=rHDdTPv2FsGBlAfstrTrDQ&sa=X&oi=product_result_group&ct=title&resnum=3&sqi=2&ved=0CCoQrQQwAg&fp=180c07a4ca199aa8

Deans ultra's can be found at pretty much any RC hobby store, but they are pricey. I have some slightly used ones here if you want to try a few I can mail you a few pairs. hehe. Really I like the Deans Ultra's the best, but they are not rated as high as the 4mm bullets. But Like I said I have had no problem with them at all.

Greg, you need to start using Flux when you solder if you don't already.... :D Your joints are so cold and not flowing, probably most of your problem. I've found the stock phase wires don't like to be soldered very well, and you gotta use flux. Not just the rosin core inside the solder. Just clean it up after with some isorobic alchohol and a tooth brush or paper towel nub. Hop to radioshack and get you some flux. :D I have been using a 40W iron to solder the deans, but the 4mm bullets I use a 80W iron. You want to have good flow and lots of heat. Your solder should sheen, be smooth, and look like chrome almost when it is in melted form. If you want I have record or make a short video of me soldering some connectors and wires.
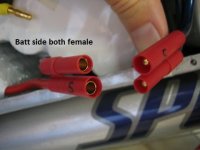
 

Attachments

  • IMG_6827.JPG
    253.6 KB · Views: 2,706
  • IMG_696277.jpg
    226.5 KB · Views: 1,283
  • IMG_7004.JPG
    IMG_7004.JPG
    21.5 KB · Views: 2,692
GCinDC said:
woke up thinking i should bulk charge... more later.

in the meantime, i had a nice lunchtime ride yesterday:
file.php


working on a higher def one for later, but just the trip highlights (music at 480 now):
[youtube]-RVX3wvqOYU[/youtube]


Wow :D 3 bridges in one day 8) What was total length of your trip and ending pack voltage?
 
Thanks, TMaster! That's very helpful! Not to mention very clean!! I appreciate the tips. Kinda funny to be this far in and still lack some fundamentals like good soldering... :oops:

Dave, I rode easy most of the way cause i knew i was pushing it. :mrgreen:
Used up 6.8Ah. At end resting Voltage was 68V. At WOT it dropped once to 55V, so I nursed it, pedaling hard the last mile (and ran out of video before that).
MyTracks data said:
Total Distance: 20.05 km (12.5 mi)
Total Time: 46:14
Moving Time: 38:52
Average Speed: 27.77 km/h (17.3 mi/h)
Average Moving Speed: 30.96 km/h (19.2 mi/h)
Max Speed: 65.70 km/h (40.8 mi/h)
 
PS. TMaster, how do you charge?

I'm tempted to keep my 5s charging setup, but would need to make up handy charge/discharge plugs to replace my anderson plug. What do you think about that? I'm reasonably confident about making an exact plug with those Turnigy housings...
 
I have to charge each pack in there seperately. I have 5 packs in there, 6S, 6S, 6S, 4S, 1S. I use 2 Bantam balancing chargers. It usually takes me about 1.5 to 3 hours to charge everything depending on capacity used. Its kinda a drawback having to take the side panel off the bike every time and charge all the packs seperately, but Its a cheap way to do it. I would get a 24S BMS and a huge PSU and rig something up to charge everything at once, but that would cost a lot.
 
tmaster,im gonna check out your build, very nice and well put together frame box wow. as always great video gcindc,i cant get over that camera it looks like pro filming,very cool. :D
 
Here's a couple pics for ya. The box is made from 0.20"-.025" galzanized steel. I formed it with a hammer, vise, and some machinist parallels. Used 1/8" shank aluminum pop rivets on the closed side, and attached to the bike drink holder mount areas. Zip ties on the top bar to the top of it. Its around 3.5" wide so plenty of leg room. I used M3 screws to hold the side panel on, but 2 of them have stripped already. I need to figure out a better way to hold it on. It really balances out the bike well having everything in the center. It pretty much looks like a normal bike when people are behind me. I did not make it water resistant because I don't ride in the rain. The controller sides are exposed to the outside so the air can flow next to it. I did a lot of work on this! I wanted to make the bike look as stealth as possible. I only wish I was able to fit a 18 fet controller in there! Maybe If i ran lipo's, but I wanted to be safe so I went with A123's. I have a Regen switch on top of the box so i can turn the regen off and on whenever I want. ALso I have a fan swtich that is on the other side for cooling the controller even more.

http://endless-sphere.com/forums/download/file.php?id=37223
http://endless-sphere.com/forums/download/file.php?id=37224
 
TMaster said:
Here's a couple pics for ya. The box is made from 0.20"-.025" galzanized steel. I formed it with a hammer, vise, and some machinist parallels. Used 1/8" shank aluminum pop rivets on the closed side, and attached to the bike drink holder mount areas. Zip ties on the top bar to the top of it. Its around 3.5" wide so plenty of leg room. I used M3 screws to hold the side panel on, but 2 of them have stripped already. I need to figure out a better way to hold it on. It really balances out the bike well having everything in the center. It pretty much looks like a normal bike when people are behind me. I did not make it water resistant because I don't ride in the rain. The controller sides are exposed to the outside so the air can flow next to it. I did a lot of work on this! I wanted to make the bike look as stealth as possible. I only wish I was able to fit a 18 fet controller in there! Maybe If i ran lipo's, but I wanted to be safe so I went with A123's. I have a Regen switch on top of the box so i can turn the regen off and on whenever I want. ALso I have a fan swtich that is on the other side for cooling the controller even more.

http://endless-sphere.com/forums/download/file.php?id=37223
http://endless-sphere.com/forums/download/file.php?id=37224

These and many variants of the idea keep stuff from falling off at 100 mph and a few G's. Cruise the book and try some of the different methods? :mrgreen:
http://www.aircraftspruce.com/menus/ha/rivnuts.html
 
Ok, for now I've decided to switch out the andersons on my 8 connector charge/discharge plugs. And to parallel the pack pairs.

I count a minimum of 22, so will order much more to be safe. And I want to do it right!

Any suggestions welcome. Here are a couple that came in too late for the phase wires... :lol:
P1000415.JPG
I know from experience that it's hard to solder loose wires, where they don't connect snugly...

What is the best practice? Strip how much? Hit with flux then tin? (normally, i would press the tip of the soldering iron to wires against a piece of wood, but this would leave it flattened, unable to go into the connector...) Twisted up, this fits much easier than I expected? Too much room for the wire to get hot? Am I supposed to put solder in that hole?
P1000425.JPG
 
You will have as much trouble with those spring connectors as the andersons. You need Castle style bullets or just hard wired connections.


Shove as much wire in the cup as possible, the better mechanical fit the better conduction. Then heat up the bullet with a bit of solder on your iron, and shove solder into the hole where it can meld the wire and bullet together.
 
Make sure you are going to use the Plastic Red covered HTX 4mm bullets on the battery wires/harness. They have a larger inner diameter hole and will accept up to 10AWG easily, then the normal plain non covered 4mm bullets, that only accept 12AWG easily. I have put 10AWG into both, but I had to cut a little of the 10AWG wire off around the outside for the plain non covered bullets.

Theres two ways to solder the bullets. You can tin the wire and the inside of the hole first, then put it together with a little flux then heat it up. Or you can put the bare wires in first with nothing tinned, then heat everything up and ad solder into that hole or the end where the wire covering is and the wire will suck up the solder. Either way both should have some wire showing comming out of the back next to the covering so you can touch the iron there.

I think I will make up some quick soldering videos today... :)
 
Another quick tip for a good soldering job:

For those 4mm bullet connectors, I drill a hole half an inch deep in a piece of scrap wood using a drill bit that will make a hole just the right size so that the connector fits tightly in it (different size for male/female). I then put the connector in so that it stands vertically.

Then I use a little soldering "third hand" clip to hold the 10AWG wire vertically in the connector. This way the connector and wire can't move and you have both hands free to do the soldering. Simple but it makes all the difference between a sh1tty job and a perfect joint.
 
El_Steak said:
drill a hole half an inch deep in a piece of scrap wood using a drill bit that will make a hole just the right size so that the connector fits tightly in it (different size for male/female). I then put the connector in so that it stands vertically.
awesome tip! do you touch the soldering iron to the side of the bullet near the hole? how much solder do you use? i heard that if you use too much, the housing won't fit on...

I'm waiting for that vid, Tmaster!
 
bzhwindtalker said:
I like the EC5 from hobbyking, they fit 10awg easy, are protected from reverse pluging, rated 100amps continuous.
Having square sides, these do look easier to attach side by side to make plugs... and 5mm from the reviews! :shock: might be time to beef up the controller next.. :lol:

too bad they're not in stock.
 
GCinDC said:
do you touch the soldering iron to the side of the bullet near the hole? how much solder do you use? i heard that if you use too much, the housing won't fit on

I use a 60W iron and first pre-tin both the wire and connector. Then I insert the pre-tinned wire in the connector and hit the connector on the side (not the wire) with the soldering iron. I'm not a fan of soldering through the little hole on the connector, I instead do it from the top (around the wire/connector). Solder will get sucked in fast and as soon as I see that some solder starts to exit from the little hole on the side, I stop. Make sure you have some extra connectors/wire for practice!

Its true that if too much solder gets on the connector the housing won't fit, but you can still have a little bit of spill.

Make sure your soldering tip is always squeaky clean (wipe it on a wet sponge when its hot)!
 
bzhwindtalker said:
They ain't in stock because I got 10 pairs :p
:evil: :lol:
i could get them through amazonfor just $6.78/pair + shipping... another nice business model there. buy in bulk from china, sell high locally w/ prompt shipping.
 
I made up some videos yesterday. I sound like a teenager so don't make too much fun! I'm really in my 30's. :mrgreen:

Soldering supplies info
http://www.youtube.com/watch?v=hW9xn0mYMqI
Deans Ultra and 4mm bullet connectors info
http://www.youtube.com/watch?v=H-6odVAY70U
Soldering a Deans Connectors
http://www.youtube.com/watch?v=i8CslwOXhaI
Soldering a 4mm bullet connector
http://www.youtube.com/watch?v=Pn3-SqUf8hA

I forgot to mention that I wipe the iron tip with the wet sponge after every time I use solder or touch the iron to the connection. It get rid of the slag and junk that sticks on the tip.
 
THe EC5's are nice, if I ever do a 150 amp peak build, I will go with those, also the 5mm, 5.5mm mpi or polymax bare ones for the phase wires.
 
thanks guys, I thought about starting a new thread in the battery section for soldering tips and connectors, that people could ad info too. What do you guys think?
 
Tmaster,

You are indeed a Master! Thanks for those wonderful videos!

Ambrose
 
TMaster said:
thanks guys, I thought about starting a new thread in the battery section for soldering tips and connectors, that people could ad info too. What do you guys think?
absolutely. it's valuable content. other's will add tips. dbaker mentioned one that you seemed to be following which was to slant the connector downward, so solder won't run down it!
 
Back
Top