Deciphering the tsdz2 torque sensor circuit

beemac

1 kW
Joined
Dec 5, 2020
Messages
495
Location
Bristol, UK
I posted this here rather than in the general tsdz2 threads as they are behemoths - and the question is about general electronics than the tsdz2 really...

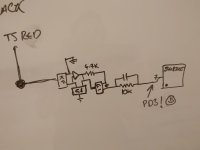
I'm trying to work out the circuit that is used to read the torque sensor - so I can replicate it and interface to an nrf52840 (or any other microcontroller).

I've traced a pcb I depotted - and I believe the circuit is as the image shows. But I'm not really sure what the components KF or G1 are - I *think* the component marked KF is a diode - something like this https://www.s-manuals.com/pdf/datasheet/b/z/bzx84_series_r6_nxp.pdf and the G1 is a transistor - something like this https://assets.nexperia.com/documents/data-sheet/PMBT5551.pdf but they are just ill-informed guesses based on googling and my basic electronic knowledge.

Image shows the red connection to the torque sensor - from what I can tell black is just connected to ground.

Unfortunately the pcb i'm tracing has a broken power stage - so I can't power it up to see where any voltages are input to the circuit. My guess is there's at least a 5v connection missing somewhere.

The circuit connects back to an ADC pin on the STM8 controller - and that maps to PD3 which is the right pin - so it's def the torque sensor circuit.

Can anyone shed any light on what the circuit is doing and clarify any of the components by any chance? :thumb:

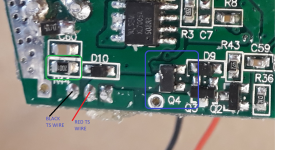
I've added a pic of the pcb - ignore the blue/green rings. KF/G1 packages are SOT23 I believe. Or are they - i've just noticed KF is fatter - but I can't find my calipers to confirm the sizes.

Q4 = KF
Q3/Q2 = G1
 

Attachments

  • 20221231_181623.JPG
    20221231_181623.JPG
    1.3 MB · Views: 194
  • ts circuit.png
    ts circuit.png
    1.3 MB · Views: 187
beemac said:
I've traced a pcb I depotted - and I believe the circuit is as the image shows. But I'm not really sure what the components KF or G1 are - I *think* the component marked KF is a diode - something like this https://www.s-manuals.com/pdf/datasheet/b/z/bzx84_series_r6_nxp.pdf and the G1 is a transistor - something like this https://assets.nexperia.com/documents/data-sheet/PMBT5551.pdf but they are just ill-informed guesses based on googling and my basic electronic knowledge.

They would probably both have to be transistors (or other control / amplifier / buffer devices) of some type to do what the traced circuit shows.

The basic thing the circuit must do is re-scale the torque sensor voltage up (or down) to the range the ADC input can take, full scale, to give the best resolution possible of the signal.

How exactly it does that I haven't enough info to determine, but my best guess at first glance is the input device KF is used to match impedance from the torque sensor (which IIRC is a large coil?) to the op-amp input so the op-amp can then buffer the signal and amplify it. The first G1 is then used to control the feedback on the op-amp, and the next G1 is used to buffer the op-amp signal to the ADC pin. The RC circuit is probably used to dampen the oscillations in the sensor output to make it easier for the ADC to read the signal, or it's filtering out a specific range of frequencies the torque sensor generates that aren't useful for sensing pedalling torque.

I don't know how the torque sensor works, but if it is a large coil, it is likely using a signal generated by the MCU to create a field in it that interferes with something else in the sensor (magnets, other coils, etc), and so the signal in this circuit is then not a DC voltage, but a switching signal that either changes frequency or amplitude (of voltage, or more likely current with a coil) or both in response.

I'd guess the OSFW TSDZ2 project(s) either here on ES in various threads, or on Github/etc have details on how the sensor works so that the programmers could create code to operate it and read it, so that should also help you with this circuit.
 
I have no info on the circuit on the Controller-side, but the basic functional principle of this torque sensor is that the torque is measured via a CURRENT variation, originating from a Hall-sensor. That is why you only need 2 wires to connect the sensor.
So your circuit must generate a ~kHz Signal and measure the current of that signal.
Some more details are here (unfortunately only in german):
https://www.pedelecforum.de/forum/index.php?threads/funktionsprinzip-drehmomentsensor-im-mittelmotor-sfm-du-250-p-tsdz2.45029/
Hope this helps to understand the circuit on the Controller-side
 
amberwolf said:
How exactly it does that I haven't enough info to determine, but my best guess at first glance is the input device KF is used to match impedance from the torque sensor (which IIRC is a large coil?) to the op-amp input so the op-amp can then buffer the signal and amplify it. The first G1 is then used to control the feedback on the op-amp, and the next G1 is used to buffer the op-amp signal to the ADC pin. The RC circuit is probably used to dampen the oscillations in the sensor output to make it easier for the ADC to read the signal, or it's filtering out a specific range of frequencies the torque sensor generates that aren't useful for sensing pedalling torque.

I don't know how the torque sensor works, but if it is a large coil, it is likely using a signal generated by the MCU to create a field in it that interferes with something else in the sensor (magnets, other coils, etc), and so the signal in this circuit is then not a DC voltage, but a switching signal that either changes frequency or amplitude (of voltage, or more likely current with a coil) or both in response.

I'd guess the OSFW TSDZ2 project(s) either here on ES in various threads, or on Github/etc have details on how the sensor works so that the programmers could create code to operate it and read it, so that should also help you with this circuit.

Sorry for the delay in replying - bad hangover from nye - couldn't look at a screen yesterday :mrgreen:

Thanks very much, yes I believe the sensor is a coil, code-wise it's just reading an adc value, there's nothing the code does to send any activation/excitation pulse. Casainho took oscilloscope traces of the signal here https://opensourceebikefirmware.bit...TSDZ2_mid_drive_motors--Motor_controller.html

"The torque sensor signal is measured on ADC channel 3. There is a specific circuit to excite the primary coil of the torque sensor and it needs a pulse signal that is generated on PD3 and has a period of 20us and a 2us Ton:"

I'll do some more tracing and see if I can find any missing parts of the circuit to map out - I'm sure there must be a connection to power somewhere - but so far I can't find it...

endlessolli said:
I have no info on the circuit on the Controller-side, but the basic functional principle of this torque sensor is that the torque is measured via a CURRENT variation, originating from a Hall-sensor. That is why you only need 2 wires to connect the sensor.
So your circuit must generate a ~kHz Signal and measure the current of that signal.
Some more details are here (unfortunately only in german):
https://www.pedelecforum.de/forum/index.php?threads/funktionsprinzip-drehmomentsensor-im-mittelmotor-sfm-du-250-p-tsdz2.45029/
Hope this helps to understand the circuit on the Controller-side

Great thanks very much - yes I've read somewhere else that it's a current measurement but I can't find that reference right now - I'll have a read of that link with a bit of help from google translate.
 
beemac said:
there's nothing the code does to send any activation/excitation pulse.

Oh maybe there is - i forgot to check the code that initialises the ADC pin - will look into how the adc pins work on the stm8

Screenshot 2023-01-02 144903.png
 
And Timer2 is on the same pin as PD3. Ok great think I'm getting there... I'll do some tests using the existing circuit hooked up to a nrf52 - then if that works I'll need to confirm the unknown components and build a replica circuit.
 

Attachments

  • Screenshot 2023-01-02 155620.png
    Screenshot 2023-01-02 155620.png
    105.4 KB · Views: 116
beemac said:
Thanks very much, yes I believe the sensor is a coil, code-wise it's just reading an adc value, there's nothing the code does to send any activation/excitation pulse. Casainho took oscilloscope traces of the signal here https://opensourceebikefirmware.bit...TSDZ2_mid_drive_motors--Motor_controller.html

"The torque sensor signal is measured on ADC channel 3. There is a specific circuit to excite the primary coil of the torque sensor and it needs a pulse signal that is generated on PD3 and has a period of 20us and a 2us Ton:"


FWIW, that quoted statement actually says there *is* an activation / excitation pulse, and what that pulse must be. It doesnt' say if code is used to generate the pulse timing/etc, but that would be a simple way to do it that would save some power vs having a completely independent circuit that simply always generates it, if there are any times or modes where the signal would not be generated but the system would still be on. If the signal is required the entire time, and the signal never needs to vary, then a dedicated hardware circuit to generate it always is simpler.

I'll do some more tracing and see if I can find any missing parts of the circuit to map out - I'm sure there must be a connection to power somewhere - but so far I can't find it...
I would expect the complete circuit diagram would already exist in the OSFW stuff, because to write software from scratch for something you need to know how the hardware works and is wired. ;)
 
amberwolf said:
I would expect the complete circuit diagram would already exist in the OSFW stuff, because to write software from scratch for something you need to know how the hardware works and is wired. ;)

Cheers - I think/hope I've got the handle on how it works now - the pin is both a timer and ADC - the timer is setup to send the required pulse, then the ADC is used to read the value from the circuit which amplifies the current sensed.

It's not documented in the osfw stuff from a circuit pov - i've chatted to casainho on the other thread, he just used an oscilloscope to measure what was happening and read the value from the adc pin it's connected to - so didn't need to understand the circuit completely, where as I do since I want to replicate it on a new hardware board hence the quest for new information :)
 
It's been a while, but I finally got my dev stuff out of storage - still have too much work to do on the house (and campervan, and so many other things) but I miss a bit of tinkering...

So I had a look again at the torque sensor on the tsdz2 - as unless I can work out how to read it separately from the stock controller my project to stuff a vesc in the case isn't going to fly - so until I get this nailed I can't proceed with the rest.

It became clear that I really had no idea how it worked based on my last attempt. My primary issue was that I was testing the circuits with only logic voltages applied - I naively assumed that all sensors work with just logic voltages. So I missed lots...

So this time I got my test tsdz2 out, attached full battery voltage and looked at the signal between the controller and the torque sensor (no idea why I didn't do this before) as really that's the part I need to understand - and if I can do that then maybe I can create my own circuit (or even better use an off the shelf module) rather than trying to reverse engineer and copy what's on the controller board.

This is what I observed (this is running casainho's osf btw - not that it should matter that much from the sensor PoV - all the osfs follow the same process from the stm8 side of things as far as I'm aware - pulse of 2us every 20us then read the adc).

With the sensor disconnected - the scope recorded a 50kHz (20uS period) sawtooth 2.5v peak to trough with -1.25v offset.

20240127_164447.JPG

With the sensor connected, the waveform changes considerably -

20240127_165843.JPG

Oddly (and my oscilloscope is new so I might be misreading) the frequency seems to change as well as the waveform... to 10uS/100kHz and also the peak to peak voltage changes significantly (about 25v peak to trough, offset about -10v). I'm also a bit confused as it looks like there are two overlapping waveforms. I wonder if the scope is a bit awry.. might that explain the apparent frequency doubling?

When torque is applied - the waveform deforms slightly - I've no idea how much force I'm applying but it's not a lot - I'm using a crank arm and holding the disk the chainring connects to still with a screwdriver. Anyway - it deforms that's the positive thing.


When I put a mA meter inline - the current varies with torque applied - from about 8.85mA to 9.35mA - based on the response curve seen by the osf I wouldn't expect this to rise linearly - it will likely flatten out a lot. So max current might be 10mA or maybe a bit higher when say 100kgs is applied at the pedal but that's all a total guess.


DC resistance of the torque sensor is c. 2.5ohms . Really this isn't actually the resistance of the sensor itself - as there are a pair of flat coils that slip against each other between the controller and the actual strain sensor itself - to allow 'wireless' transmission of the signal from the spinning spindle. So this resistance is the resistance of the first coil.

20240127_173005.JPG

So - seems like I need an amplified waveform to feed into the sensor - 50kHz about 25V AC limited to say 15mA - and a shunt with ADC to measure the current. Is that a reasonable assumption based on the above? :)

I really want to get this sorted, I've also found a different VESC that should cope with 60V or even higher - I wasn't happy about dropping voltage and going 12S to use the flipsky mini. It's a little bigger - but I reckon I can squeeze this into the case if I extend the cap leads a tiny bit.

20240127_175019.JPG

20240127_175216.JPG
 
Last edited:
Hi @endlessolli I took a video today when I tested the sensor still works with the original controller - and I also did a retest with the nano running the code you provided... Unfortunately same result - sensor works but no apparent response when connected to the nano. I also tested with a magnet in both situations - again that gave no apparent effect to the nano setup...

Tbh I'm not sure if this diagram is correct - @Zambam pointed out it differs from your diagram in that two of the pins of the TL431 are shorted in the below diagram, but not in yours. But this is easier for me to follow :)

TSDZ2_TorqueSensor1_Schematic.png

I really think it needs a signal with a bit more voltage to get across the pair of coils, then the diode - and provide enough voltage to run the 5v voltage regulator etc. but until i get it working - that's just a guess :)

 
Looking closer at the trace - I don't think the pulse is bipolar AC. The 2us pulse is about 18v so I'm going to make a quick x6 gain non-inverting op-amp circuit so with a 3v peak input should give 18v... Image below is the pulse when the coil is off the sensor.

pulse.png
 
oh another side bit of info. I dropped the battery voltage i was feeding the unit from 48v down to 24v and the pulse voltage didn't change...
 
Looking closer at the trace - I don't think the pulse is bipolar AC. The 2us pulse is about 18v so I'm going to make a quick x6 gain non-inverting op-amp circuit so with a 3v peak input should give 18v... Image below is the pulse when the coil is off the sensor.

View attachment 346843
dammit i need to order some better opamps, the 741s i have lying around won't work from a single supply - and I don't have a +/- 20v supply to hand...
 
Well, keep us posted!
( meanwhile wonder what I have measured…. I did not have an Oszi, but I definetely saw a reaction of the current when changing the Hall postion relative to the magnets)

But your video shows no reacton at all. So strange.
What Voltage did you measure on the secondary side - controller vs Arduino?
 
Last edited:
Well, keep us posted!
( meanwhile wonder what I have measured…. I did not have an Oszi, but I definetely saw a reaction of the current when changing the Hall postion relative to the magnets)

But your video shows no reacton at all. So strange.
What Voltage did you measure on the secondary side - controller vs Arduino?
Yes I'm really puzzled, I've got some more opamp bits arriving tomorrow that should allow me to do a test at 18v so we'll see.

I'll also do another test with the Arduino - just in case something didn't have a good connection or something silly.

I don't know what the voltage is on the 2nd side - I haven't removed the black gunk - and when I take the two screws out the board seems quite stuck down and I didn't want to risk breaking it. So in short I can't measure any voltages on the 2nd side at the moment...
 
** Before i build the test circuit - if anyone can see any obvious issues with the components i've selected - or see where I might have made a mistake with the traced circuit, please shout - I really am a novice at this. I know how much I don't know - and it's a lot! **

So I had a bit of time yesterday to have a bit more of a play. I made simple transistor amplifier and got 20V output unloaded - but the voltage plummeted under load and despite showing an encouraging 8mA or so draw on the sensor (like the tsdz2 controller) there was no deflection when i poked the torque sensor.

I went back again to the tsdz2 controller circuit to see if I can see what it's doing. This is all good learning for me, my basic electronics is terrible, but getting better as a result of this - and I want to learn how to fix things electronically, not just electrically...

My depotted tsdz2 is one that I'd previously broken when I connected my ghetto bench psu in constant-current mode to it - blew the buck converters, but the stm8 was ok when powered from the speedsensor and it could still be flashed with new firmware, so perfect for code testing... and this is what i've been using to trace the torque sensor circuit.

There are two buck converters on the tsdz2 controller board - both XL7005. One on the bottom outputs 3.3v and the one on the top outputs 12v. Tbh I haven't measured this - but I worked it out from the voltage dividers connected to the feedback pins on each - and it correlates with markings on the pcb.

When they blew due to the CC event - what I hadn't realised is they had shorted their outputs to ground. So any 3.3v or 12v connection on the pcb looked like a ground connection when probing with a meter...

So all the time I couldn't work out where power was being injected into the torque sensor circuit was because everything was ground! I cut the power output pins on both blown XL7005s and voila - everything changes!

Now i can see there's two cascaded transistors (SOT-323 packages marked G1) amplifying the GPIO exciter pulse - with 12v power at that stage - and then feeding it through a mosfet (i think still an SOT-323 package, but a bit bigger - marked 'KF') to give a beefier signal to send to the sensor. I still can't find where the current is sensed - but tbh I don't care, adding a current sensing circuit once I actually get current deflection should be easy enough.

I've guessed likely parts based on searching - and also what's available in LTSpice - but i can only tell what's a mosfet and what's a transistor - and then what's pnp or npn. I don't know how to tell if a mosfet is low side or high side..

I modeled the circuit up to the VDO on the torque sensor and it seems to work ok - at least I see 5v on the other side of the pair of coils - but i have no idea how accurate this is... So I'll build it and find out :)

ts circuit.png


When I run the simulator - i get this output - cyan line is the voltage at C3 - green line is the voltage at D2. So can see the pulse - and can see a voltage or approx 5v building up in the capacitor. The missing onward parts are the LDO 5v regulator - then the hall sensor - then a shunt regulator that (from what I think I've worked out) - tries to maintain a voltage by increasing the current drawn - so this is what causes the current fluctuation based on the voltage output from the hall sensor (this is all very much speculation - as I really have only a vague idea what I'm talking about!).

ts output.png

So far, so interesting... One day I'll actually manage to read this thing... one day!
 
Last edited:
@endlessolli when you documented the circuit on the small pcb with the hall sensor - is that all on the top side, so I just need to scrape the black gunk off to be able to take measurements? I don't need to unscrew it and prise it off to get to the back side to probe?

I think before I build the test circuit above I want to do a bit more testing and modelling, so need to see what's going on on the other side of the coils!
 
Ahh and the other test I can do now - is connect 12v and a arduino/esp to my borked tsdz board and see if at least that works...
 
@endlessolli when you documented the circuit on the small pcb with the hall sensor - is that all on the top side, so I just need to scrape the black gunk off to be able to take measurements? I don't need to unscrew it and prise it off to get to the back side to probe?

I think before I build the test circuit above I want to do a bit more testing and modelling, so need to see what's going on on the other side of the coils!
To the best of my recollection there were no traces on the backside.
Thnx for keeping us in the loop.
I am really curious what you will find out
 
Ok, I connected up my test controller to the 12V input to the area of the board that deals with the ts and had a poke around with the scope to see how the real circuit compared to my simulation. At first I was completely confused because I was seeing a 50kHz pulse even without a signal generator connected! Somehow the 12V I was attaching was powering the STM8 and kicking the osf into life - via a voltage divider somewhere I assume since the two buck converters on the board are isolated. Anyway... So now I can feed whatever signal I like into the torque sensor circuit on the rear of the controller board and measure whatever I want. (i just uploaded a new fw with disableInterrupts();while(1) at the start to keep it quiet!)

I went back and redid the Spice model of the exciter circuit using the measurements to help choose the right bits, and now it models as close af to what I can measure in real life... If I get some time at the weekend, I'll build and test it!

Output to the torque sensor is the unconnected track heading off to the right - I haven't included any current sensing circuitry. I'm going to use an off-the-shelf 0-35mA module initially if the below works.

ts rc.png
 
Last edited:
Ok, so we have some progress finally :)


When I built the circuit as show in the previous post - it didn't work - everything tested out ok up to the mosfet - but the mosfet was just on constantly. LTSpice showed that it should be creating a sawtooth/triangle wave, but it wasn't - and tbh even in LTSpice the peak to peak variance was only about 3v not enough to generate the required 5+V AC to get across the coil pairs and power the voltage regulator.

So I had a bit more of a test and play with LTSpice and found that using a p-channel mosfet BSS84 gave a much better wave with at least 6-7V peak to peak (but still with a large DC component) - so I bought a few, and today soldered one into the circuit - and voila - I get current deflection. The waveform is nothing like* what the tsdz2 controller generates - but it's good enough to power the hall sensor and cause current deflection. So I'm happy to see some progress finally!

As an aside, I think this might be the original mosfet - but it appears to be end-of-life and quite hard to find - and if the BSS84 works...

This is the circuit as built.

tsdz2 ts circuit working.png


* actually looking back again - it's not that far from the stock controller wave... when you compare it to the wave on the youtube thumbnail

wave.png
 
Last edited:
Oh i wish electronics was as straightforward as writing code :)

Not had a lot of time to play with this since the we're heading into spring, but I did build up the circuit with a current shunt and did some testing.

Some unexpected results - all good learning experiences - but also slightly frustrating.

Putting the current shunt inline with the torque sensor between the sensor and the mosfet drain didn't really work - presumably because the signal is too 'ac' - so I moved it between the 12v supply and the mosfet source. That seemed to work better - but there was a problem....

All is well rebooting the mcu without the torque sensor attached - but if I rebooted the mcu controlling the excite pulse with the sensor connected then hey presto magic smoke appeared in two places on my board. :eek: The mosfet and the 10r current shunt...

This was because the circuit is effectively an inverting amplifier/driver/whatever it's called - the key is the inverting part... When fed with a flat excite pulse (i.e. when rebooting and no timers to generate the pulse are running) - it switches on the mosfet and connects the 12v source directly to the torque sensor - which has a DC resistance of about 2-3 ohms - effectively causing a short and pushing >2.5W through the mosfet and current shunt. The mosfet blew shorting source to drain - and whilst the 10R resistor on my sparkfun current shunt module coped with 2.5W bursts a few times eventually it crumbled into pieces...

After forgetting to unplug the sensor between reboots a couple of times, and therefore having to resolder a new tiny mosfet, I realised I had to find a solution...

Replacing the mosfet with something that can handle a bit more current (IRLML6402) fixed that issue... but I still think I need to limit the current the 12v supply provides - at present i'm using a dc-dc that can provide about 300mA - way more than I need...

But that still leaves the issue of the glowing current shunt. One solution would be to get a 5W 10R resistor, but that seems to be a poor solution workaround to the problem. So i think I need to find a better place to put the shunt that doesn't expose it to full current if a flat excite signal occurs... I will try between D5 and the RC filter as that seems to be the only place left I haven't tried...

As ever - thoughts from someone who has some electronics experience welcome :)
 
Invert the control signal at the input of the inverting amp, so that the current-delivery is always "disabled" unless the system providing the control signal is actually working?
 
Invert the control signal at the input of the inverting amp, so that the current-delivery is always "disabled" unless the system providing the control signal is actually working?
Thanks, I tried pulling the input high (and low) but it didn't fix the issue - and anyway there would still be an issue should the mcu hang with the input line explicitly pulled low - so I'd rather have a fix that prevents the issue even if other things go wrong.

To that end I'm going to use a 30mA constant current diode to limit the current the entire torque exciter circuit can pull - that hopefully fixes once and for all. Is in the post, so can try that later in the week.

But that aside, I've actually got something that works! So long as you remember to unplug the sensor between reboots...


The key was putting a low-pass filter on the output from the INA169 current sensor - to turn that into a nicer DC level the ADC could read. I originally used a 16Hz filter which worked fine on the bench - but I thought that would hamper the resolution of the torque sensor, so changed it to 1600Hz and whilst the signal is more noisy now, it still works fine esp with the SADC of the nrf.
 
Last edited:
Back
Top