Hiboy S2 from dumpster to driving, maybe...

Bbbbrass

10 W
Joined
Nov 25, 2022
Messages
80
Location
Charleston, SC
I pulled a stripped scooter from the woods behind a dumpster near my house a couple years ago. It's been sitting while I've been developing skills, gaining knowledge, and finding time. This thread will document me attempting to get the motor working, and then maybe wiring it back up and getting it out on the streets/sidewalks again.
 
Excellent. I can’t tell if that’s a xaiomi m365 or ninebot clone. I have a Macwheel scooter that IS an M365 clone. I didn’t like the way it was configured so I bought this kit. It took a while to find out, but the MINIROBOT app works great with it.

My only concern, with that controller set I linked to, was the battery. I’ve seen batteries with a tail light out be end and discharge, charging, comms at the other. My battery only has discharge, charging, and a 2 pin comm plugs. I connected everything that can with the kit on to my scooter. I thought I would have to get a new battery with the 3 pin comm plugs, but that wasn’t the case. That scooter kit works great with only the discharge (XT60) plug connected.

One thing to note, my battery has an XT60 connection and the clear controller I linked to has an XT30 connector. I bought an adapter and all is well.

Here are some photos of the app in use.

IMG_5129.png

IMG_5127.png

IMG_5128.png
 
Time for a photo/info dump. This has sat for sometime, and was left in the elements for an unknown amount of time. IMG_0213.jpeg

It did have the front wheel on, a brake lever, and a (broken) throttle when I got it, but I don't think I have any pictures of that.
To get into this bad (Hi)boy you will need 3mm & 4mm Allen wrenches, and a some Phillips screwdrivers. If you want to take off the wheel it is a 19MM nut.

The display is under a cover that looks black when it is not powered. It just pops off. IMG_0205.jpegIMG_0204.jpeg

The front decal peels off to show 4MM Allen screws holding on the handlebar.

IMG_0200.jpeg
Wires for the throttle and what I thought was USB but now think was a regen brake lever run in here. The original throttle wiring was crimped butt connectors stuffed in this space (but ripped apart). Throttle wiring is Red, Green, Black. The other 2 wires are Red and White.
The grips have a T-channel so they don't twist off, just pull hard to the edgeIMG_0199.jpeg.IMG_0202.jpeg
 
Last edited:
The "Head" lifts off the upright bar and is totally separate from the handlebars. It is 3MM hex to gain access, then gently lift to mind the internal wiring. IMG_0201.jpegIMG_0197.jpegIMG_0198.jpeg
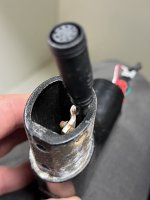
Going from the head to the controller is a 6-color wire inside a black jacket with a barrel connector on one end and a flat pin on the other. It is not a standard WP8 connector, but a smaller one. Also not standard a JST connector going to the controller. The flat pin splits off 2 wires (ocher & white) that I believe are for the charge port to the battery. There is a nice tension piece holding the wire securely.
Charger port wires are (+Red/black- becomes +white/ocher-), Charger port pin is the positive, sleeve is negative.IMG_0193.jpeg

The display lifts out with 3 small Phillips screws. If you lose one, they are M2.5 I discovered...
IMG_0194.jpeg
Wiring for the display is labeled on the PCB, but in case you encounter cut wires somewhere else on the scooter and don't want to open it up...
IMG_0195.jpegDisplay cable to controller pinout
Ocher: Charger -
White: Charger +
Blue: TR
Black: -Negative
Red: +Positive
Green: SW

White connector above display pinoutIMG_0196.jpeg
Red: Throttle 5V+
Green: Throttle
Black: Throttle Ground
White: bluetooth
Red: 5V+ (USB or brake?)
Also 2 LED pads that weren't soldered.
 
Last edited:
Wiring from the head into the controller, and from the controller to the motor was all cut. I discovered some segments of 2-color wires around that were for taillight, LEDs, and headlight. I love using Wago connectors for testing out the wiring to make sure I have continuity first, and then operation second, before I do final soldering or terminal connectors. More on that soon...

So I had the weird little barrel connector going to the non-standard flat pin connector, but the wire was ripped apart in the middle. No worries, since I didn't have the stock controller anyways!

IMG_0215.jpegIMG_0203.jpegIMG_0216.jpeg
I chopped off the connector for the hall sensor from the old extra controller I had laying around. The one complication was due to the rough past treatment of this object one of the wires was no longer in its jacket. I didn't worry about running up to the head, because we need to get this thing working before we worrying about operating it. Connect same colors with a ton of Wago, 3-phase wires are able to still use the barrel connectors they had already on them. Now I can just run the wires out of the frame to the motor!
More Wago...

IMG_0207.jpeg

To fire it up with use the Cycle Analyst connected to the shunt and an independent throttle. Battery is 40V Ryobi (10S).
IMG_0217.jpeg
Yes it's a jumbled mess, but it's just to test operation. This exact wiring setup ran my first e-bike project so I know it should work. Hmmmm, let me recheck all the wire connections, the power switch for the controller, continuity, voltage out of the controller when told to provide power... All correct but nothing moves, what is going on?
 
Time to take the front wheel off and see what is going on with this motor.

IMG_0208.jpeg
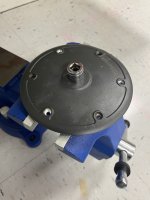
Generic markings don't really find anything on the internet, but confirm it is 36V. 19MM nuts freed and it slides out of the dropouts after a bit of wiggling, man there is some rust on all this hardware.

IMG_0209.jpeg
Trying to open the actual motor and even after a soaking in Kroil, 3 of the screws won't budget and begin stripping no matter what bits or techniques I try. At this point I break out the drill.

IMG_0212.jpeg
Cracking the shell open with a couple of screwdrivers reveals the horror awaiting. Much chemical bonding and reacting has occurred, the bearings are completely seized.

IMG_0211.jpeg
The nice thing about the magnets in this motor is it helps keep all the rust flakes from falling on the floor.

IMG_0210.jpeg

So here we are in present day. I could buy a new motor from Hiboy for $90, including tax and shipping, or just walk away. I can't find cheaper generic motors online, and don't think I would be successful cleaning this up and putting in new bearings, but what do y'all think?
I could also get an original controller from Hiboy for $50 and maybe this thing functions again, but I am inclined to go with a home-brew battery, controller I have, and skip the display entirely for just a voltmeter and phone mount. I will either give this away, or keep it for my kids but I could buy a new one for less than $250. Anyone have leads on a cheap scooter front hub motor, or thoughts on fixing this one?
 
I forgot to add, the screws inside the battery compartment are M4, as are the bottom cover screws. The axel bolts are covered by plastic brackets with red reflectors on them. Peel off the reflector, undo the 4mm Allen screws to release.

I've checked some of the threads on fixing hub motors. I may give it a shot, but since most of those threads are over a decade old my guess is prices are cheap enough most don't bother.
 
Thanks for all the details. This is the same scooter as my macwheel mx1 (aka XIAOMI M365). Nice thing about these scooters is parts are readily available since they are massed produced.
 
Thanks for all the details. This is the same scooter as my macwheel mx1 (aka XIAOMI M365). Nice thing about these scooters is parts are readily available since they are massed produced.
Thanks for the info. I knew all these scooters were basically the same. I was hopefully there would be some cheap options for a wheel, but I don't see anything for an M365 that is cheaper than the $90 option from Hiboy.

Good news is with a 14mm socket, hammer, and vice I popped the bearing out of the front motor cover and it cleaned up and spins pretty well! Bearing is RUMH 6202RS, which seems to be specced for wheelbarrow axels as wells as motors.
 

Attachments

  • IMG_0219.jpeg
    IMG_0219.jpeg
    1.5 MB · Views: 1
  • IMG_0220.jpeg
    IMG_0220.jpeg
    1.3 MB · Views: 1
  • IMG_0218.jpeg
    IMG_0218.jpeg
    1.8 MB · Views: 1
Progress! After checking some videos to make sure I wasn't confused on the assembly, liberal Kroil soaking and a big enough hammer freed the rust-encased stator from the magnet/oxidization hug gripping it so firmly. Now we can actually attempt to clean and repair this.
Oh, the other bearing had a little grinding but spins pretty well.
Referencing these threads to try and get this thing moving.
 

Attachments

  • IMG_0225.jpeg
    IMG_0225.jpeg
    1.8 MB · Views: 7
  • IMG_0223.jpeg
    IMG_0223.jpeg
    1.9 MB · Views: 7
  • IMG_0222.jpeg
    IMG_0222.jpeg
    2.3 MB · Views: 6
  • IMG_0224.jpeg
    IMG_0224.jpeg
    2.2 MB · Views: 7
Oh, some elbow grease and a few curse words then you should be good to go!
Already tried that, no joy. Oh well, some vinegar scrubbing, maybe a sandblast or wire wheel, a few good blasts of compressed air, and we will see what is what.
 
Scotchbrite works pretty good to remove the rust. Once you get the rust off, I'd suggest painting the stator to keep it from rusting again.
 
There was some pretty serious rust and buildup on this. The wire wheel on the bench grinder ended up taking care of the stator pretty well. Going to need to use some more serious chemical persuasion than coke on the rotor, and perhaps also a little wire wheel/dremel action.
 

Attachments

  • IMG_0244.jpeg
    IMG_0244.jpeg
    1.6 MB · Views: 6
  • IMG_0243.jpeg
    IMG_0243.jpeg
    1.8 MB · Views: 6
The magnets on the rotor are plated or coated with some kind of paint. If you go through the coating, be sure to paint it again or the magnets will corrode quickly.
 
Well, I’m not sure I will win this one. I’ve spent a ton of time cleaning, using the dremel, and spraying with DeOxiT, but because the rust dust is magnetic it’s very hard to clean well. New bearings in, the wheel spins freely but there is a clicking sound that is rhythmic and stays no matter the speed. Motor still won’t spin when given power.
 

Attachments

  • IMG_0372.jpeg
    IMG_0372.jpeg
    2.7 MB · Views: 2
  • IMG_0371.jpeg
    IMG_0371.jpeg
    1.5 MB · Views: 2
  • IMG_0370.jpeg
    IMG_0370.jpeg
    1.9 MB · Views: 2
Assuming you already went through the phase wire guessing game, it may be time to purchase a new motor. I’ve seen many M365 hub motors on Aliexpress.

I let my kids use this scooter. After I replaced the controller and display, and using the MiniRobot app, I was able to cap the speed at 10mph and disable cruise control. I kept non-zero start enabled. I put solid honeycomb tires on there so no worry about flats. I take my youngest to a large, empty, parking lot and let them zip around. I’m zipping around in my 2020 Apollo Pro. It’s a blast!
 
but because the rust dust is magnetic it’s very hard to clean well.
Fun little trick you can try, use an iron nail or other small bar of iron(larger pieces of iron have too much attraction) to attract the dust away from the magnets.
The magnets induce a temporary field in the iron, and some of the dust will stick to the iron as you pull it away, clean dust off iron, rinse and repeat.
 
Assuming you already went through the phase wire guessing game, it may be time to purchase a new motor. I’ve seen many M365 hub motors on Aliexpress.

I let my kids use this scooter. After I replaced the controller and display, and using the MiniRobot app, I was able to cap the speed at 10mph and disable cruise control. I kept non-zero start enabled. I put solid honeycomb tires on there so no worry about flats. I take my youngest to a large, empty, parking lot and let them zip around. I’m zipping around in my 2020 Apollo Pro. It’s a blast!
Thanks for the link. I tried the phase wire game, no joy. Cheapest new motor I'm finding is still over $70 once you factor in shipping. I'll keep watching scrap piles for a scooter...
 
Back
Top