
You are using an out of date browser. It may not display this or other websites correctly.
You should upgrade or use an alternative browser.
You should upgrade or use an alternative browser.
Intense M3 + Clyte HT3525 + HD video
- Thread starter Timma2500
- Start date
Timma2500
1 kW
Hey BATFINK,
Yes you are correct, i cut the lower and front part of the frame and just inserted the 3mm box, i didn't re-use the section that was cut out...
You could either do a similar frame build as per the pinkish insert drawing on your thread or just try to widen the frame section you already have.
Personally i'd just cut the existing front section out and insert a new section. That leaves you the freedom to give it whatever shape you wish, whether it be longer and wider etc. If you want to stuff it with 20 - 30ah of lipo, that may be the way to go. With mine, i lengthened it by around 80mm and also widened it to 100mm externally.
You might want to go to around 120mm width and 140-150mm depth (external), this would allow you to use 6s 5ah packs, 2 side by side, 2 x high by maybe 4 or 5 long for a total of 8 or 10 packs (12s 20ah or 25ah).
Don't be worried about a lack of CAD or computer drafting, all you need is a pencil, a ruler, rubber and a large piece of paper or cardboard!
Thats how i've done my last 5 frames (3 for me, 2 for ES members). Its easy, just strip your Aline down to the bare frame, trace the outline onto the paper or cardboard, make your alterations and go from there")
Paul
Yes you are correct, i cut the lower and front part of the frame and just inserted the 3mm box, i didn't re-use the section that was cut out...
You could either do a similar frame build as per the pinkish insert drawing on your thread or just try to widen the frame section you already have.
Personally i'd just cut the existing front section out and insert a new section. That leaves you the freedom to give it whatever shape you wish, whether it be longer and wider etc. If you want to stuff it with 20 - 30ah of lipo, that may be the way to go. With mine, i lengthened it by around 80mm and also widened it to 100mm externally.
You might want to go to around 120mm width and 140-150mm depth (external), this would allow you to use 6s 5ah packs, 2 side by side, 2 x high by maybe 4 or 5 long for a total of 8 or 10 packs (12s 20ah or 25ah).
Don't be worried about a lack of CAD or computer drafting, all you need is a pencil, a ruler, rubber and a large piece of paper or cardboard!
Thats how i've done my last 5 frames (3 for me, 2 for ES members). Its easy, just strip your Aline down to the bare frame, trace the outline onto the paper or cardboard, make your alterations and go from there
Paul
Nice work Paul, I know what is involved in making those harnesses!! and better pics than the ones i took of my balance harness too, have you done the male plug for the charge lead yet? i found i could bend the solder pins together and solder into groups of 3 resulting in the need for only one wire for each cell string, keeps it a bit simpler.
I am quite proud that others are using the solution i arrived at for the series/parrallel conundrum 8) especially as i am a relative noob here.
Just picked up an alloy frame to start my next build, i,m not 100% commited to a design yet but i think it is going to be a single speed ME4201.
Simon.
I am quite proud that others are using the solution i arrived at for the series/parrallel conundrum 8) especially as i am a relative noob here.
Just picked up an alloy frame to start my next build, i,m not 100% commited to a design yet but i think it is going to be a single speed ME4201.
Simon.
BATFINK
10 kW
- Joined
- Aug 7, 2011
- Messages
- 598
Thanks Paul, that has helped me ALOT. I just want to get a really good idea
of what I want the frame to be like before I take it to my friend who is a tig welder
by trade. Seeing bikes like yours is inspirational and I'm hoping I can pull something
Similar together. Thanks again.
of what I want the frame to be like before I take it to my friend who is a tig welder
by trade. Seeing bikes like yours is inspirational and I'm hoping I can pull something
Similar together. Thanks again.
Timma2500
1 kW
Cheers Simon. Yeah they're fairly time consuming aren't they!Tench said:Nice work Paul, I know what is involved in making those harnesses!! and better pics than the ones i took of my balance harness too, have you done the male plug for the charge lead yet? i found i could bend the solder pins together and solder into groups of 3 resulting in the need for only one wire for each cell string, keeps it a bit simpler.
No i haven't got around to doing the male plug yet, i'll keep procrastinating a little longer before i dive into that one... I like the idea of bending the pins and soldering in groups, that should save alot of time and alot of soldering, ta mate!
And you should be proud, its a fine solution to a process many of us find to be a pain in the a$$...Tench said:I am quite proud that others are using the solution i arrived at for the series/parrallel conundrum especially as i am a relative noob here. Just picked up an alloy frame to start my next build, i,m not 100% commited to a design yet but i think it is going to be a single speed ME4201.
Ahem, after stunning everyone with your FSR build with its ultra neat build quality and great ideas, i'd hardly consider you a noob
Any hints as to which frame you'll be basing the next build on? I'd never heard of the ME4201 motors, just googled it and shiiiit, they're capable of some good HP with the right controller...
Too easy mate, i'm glad i could help give ideas. Grab a pencil and paper and start sketching the basic shape of what you want and go from there.BATFINK said:Thanks Paul, that has helped me ALOT. I just want to get a really good ideaof what I want the frame to be like before I take it to my friend who is a tig welderby trade. Seeing bikes like yours is inspirational and I'm hoping I can pull something Similar together. Thanks again.
Just be sure to allow extra space around the batteries to give you plenty of room for wiring, you'll be surprised how much space you'll need to comfortably place it all in there with battery plugs etc. And don't forget to start a thread to show us what you come up with!
Build update:
The pinch bolt torque arms are finished apart from painting. Material is 10mm mild steel with an M6 bolt going through each side to clamp the axle nice n tight.
The torque arms slip into the odd shaped drop-outs and work against them with a single M6 bolt holding the brake side t.arm on using one of the brake calliper bolts.
Weight is 300 grams for the pair.
View attachment 6
 View attachment 4


Jobs left to do: True and tighten the hubmotor spokes / wheel and finish off the wiring. All going well i might be riding it tomorrow arvo
Paul
ROG130
100 W
fab job i am just about to start a big hit fsr frame its all ready to tig weld up but am looking for a bit of help what setting did you use for tigging tig gass settings. and the settings onthe tig welder to weld the alloy on your frame what size tig rod did you use and the size alloy tig rods
this will be a big help in getting me started on the welding thanks roger
this will be a big help in getting me started on the welding thanks roger
Love those torque arms, they are fab! i like to see thought and care being taken over every aspect of a component rather than just making something functional, but i would have used ti 
The new frame is going to be a complete build, all drawn and jigged so i can reproduce it if it turns ok good. I bought a Sarecen dirt jump alloy frame for the bottom bracket and headset tube, it came with some bonus parts, seat post and clamp, head set, handle bar stem, hollow teck bb and a chain device all for £16. But i am not going to give any details about the frame style/design away untill it is finished 8)
The new frame is going to be a complete build, all drawn and jigged so i can reproduce it if it turns ok good. I bought a Sarecen dirt jump alloy frame for the bottom bracket and headset tube, it came with some bonus parts, seat post and clamp, head set, handle bar stem, hollow teck bb and a chain device all for £16. But i am not going to give any details about the frame style/design away untill it is finished 8)
Kepler
10 MW
Excellent job on the torque arms. I am presuming no fancy CNC mils used here, just an angle grinder, drill, and file. Makes the job even more impressive in my opinion. Always look forward to your next post. Inspiring stuff.
And Trench, hurry up and start your new project. Paul will be finished soon and I need another top notch build to follow 8)
And Trench, hurry up and start your new project. Paul will be finished soon and I need another top notch build to follow 8)
Kepler said:Excellent job on the torque arms. I am presuming no fancy CNC mils used here, just an angle grinder, drill, and file. Makes the job even more impressive in my opinion. Always look forward to your next post. Inspiring stuff. 8)
Timma,
how did you make your torque arms? Im very curious bc I have to cut a similar design.
I only have access to an angle grinder, hand drill, and dremel. Do you think torque arms like yours can be made with those tools? If so, what kind of cutting discs should I be looking to get for the angle grinder and the dremel. Special bits for the hand drill?
The thickness of the metal will have to cut through is 20mm thick. Any tips would be great!
sn0wchyld
100 kW
doc007 said:Kepler said:Excellent job on the torque arms. I am presuming no fancy CNC mils used here, just an angle grinder, drill, and file. Makes the job even more impressive in my opinion. Always look forward to your next post. Inspiring stuff. 8)
Just what i was thinking.
Timma,
how did you make your torque arms? Im very curious bc I have to cut a similar design.
I only have access to an angle grinder, hand drill, and dremel. Do you think torque arms like yours can be made with those tools? If so, what kind of cutting discs should I be looking to get for the angle grinder and the dremel. Special bits for the hand drill?
The thickness of the metal will have to cut through is 20mm thick. Any tips would be great!
mate, with those tools you can create whole worlds!
have a look at my torque plates on the norko. they were made with a drill press (though, a hand drill would have been ok), a grinder and a file. well, there was a electric dropsaw in there too, but that was only for some initial large basic cuts, that could have been done with a grinder and a bit more time.
20mm will take a while to shape, mine is 20mm too and even with a aggressive disk in the grinder it takes a while to get anywhere, particually if you're used to cutting small stuff.
just make sure you have a table vice and some heavy leather gloves. the parts you're working on will get damn hot, the vice will help sink away some heat as well as giving you a sturdy clamp to hold it all in, and the gloves, well, they're self explanatory. (you put them on your face
)Timma2500
1 kW
Hi Rodger, for the gas setting, you'd want to be around the 12-14 litres per minute mark. From memory i used 3.2mm welding rods.ROG130 said:fab job i am just about to start a big hit fsr frame its all ready to tig weld up but am looking for a bit of help what setting did you use for tigging tig gass settings. and the settings onthe tig welder to weld the alloy on your frame what size tig rod did you use and the size alloy tig rods
this will be a big help in getting me started on the welding thanks roger
As for power settings, it really depends on material thickness's and joint type etc. You could use anywhere from 80 to 160amps depending on where and what your welding at the time. If your welding the thin bike tubing to say 3mm sheet, maybe start on 80 - 90amps and see how you go. Remember to aim the majority of the gun's heat to the thicker of the two materials.
If you haven't done much or any tig welding before, it will pay you to get some decent practice in 1st so your more confident when it comes to the frame. I found welding the ultra thin bike tube to the 3mm sheet quite hard as the bike tube always wants to blow out.
Yeah i always like to give a bit of extra thought and take a bit of extra time to finish a part nicely too, its good to have pride in your work. Haha, i wish i could have used ti! I got the (certified) mild steel for free so i'm happy lol.Tench said:Love those torque arms, they are fab! i like to see thought and care being taken over every aspect of a component rather than just making something functional, but i would have used ti
Don't keep us in suspense for too long dammit!Tench said:The new frame is going to be a complete build, all drawn and jigged so i can reproduce it if it turns ok good. I bought a Sarecen dirt jump alloy frame for the bottom bracket and headset tube, it came with some bonus parts, seat post and clamp, head set, handle bar stem, hollow teck bb and a chain device all for £16. But i am not going to give any details about the frame style/design away untill it is finished 8)
I can't wait to see what you come up with, it should be worth the wait (no pressure at all! ) That was a great score for 16 quid, makes for a cheap start to the new project! So no hints at all eh?
Ta Kepler. Yep you guessed it, my cheapy drill press, small fine file, 5" grinder with an ultra thin cut-off wheel and an old M6 tap.Kepler said:Excellent job on the torque arms. I am presuming no fancy CNC mils used here, just an angle grinder, drill, and file. Makes the job even more impressive in my opinion. Always look forward to your next post. Inspiring stuff.
I second that, pull your finger out Simon! :lol:Kepler said:And Trench, hurry up and start your new project. Paul will be finished soon and I need another top notch build to follow
Doc007, I drew up the design on paper, scribed the pattern on the steel with a sharpened TIG tungsten then did most of the drilling required.doc007 said:Timma, how did you make your torque arms? Im very curious bc I have to cut a similar design. I only have access to an angle grinder, hand drill, and dremel. Do you think torque arms like yours can be made with those tools? If so, what kind of cutting discs should I be looking to get for the angle grinder and the dremel. Special bits for the hand drill?The thickness of the metal will have to cut through is 20mm thick. Any tips would be great!
Next was to cut out the basic shape with a 5" grinder using a 1mm thick "ultra thin" cut-off wheel. Next was to finish the shape with a medium grit flap wheel on the grinder. Next was marking and drilling the hole for the pinch bolt. Start with the drill bit size required for tapping the thread then go back and drill the no threaded side with a bit that will clear the bolt. Lastly it was just a case of slight sanding with the flap disc to get the torque arms to sit nicely in the dropouts then lightly filing the edges to clean it up.
You'll certainly be able to make your torque arms with the tools you have available, you'll just need patience and care.
Patience while cutting so the cut-off wheel doesn't jam in the 20mm thick material and try to spit the grinder back at you and care to make sure you cut the axle slot nice and square all the way through.
For cutting wheels, i'd suggest using a 1mm ultra thin cut-off wheel to help slice through easily. You'll no doubt chew through them so buy atleast 4 of them.
Apart from that, what SnOwchyld said is also sound advice.
Just please please be very carefull cutting through the steel, 20mm is very thick and the grinder may jam and either stall or at worst, spit back at you.
Good luck and let me know how you get on with it.
Update:
Well i got the bike finished late last Friday night but not without a slight inciddent -
View attachment 4
This is what happens when you try to connect up a harness at 1:30am in the morning after working on a bike since 7am the previous morning lol.
One pair of obliterated bullets later i had some soldering to do to get the bike running for our camping trip the next day (sat morning)....
Which is just what happened. A 3hr drive later we were setting up camp with a few cold ones. The next morning we took off for Mel's 1st ebike ride and my 1st ride on this bike. To say i was impressed is an understatement... Seeing peaks of 5kw on the CA, it pulls like a train compared to the 2000w peak Cyclone i had on my last bike!
Ofcourse these are only peaks and most of the time it seems to hover around the 1 - 2kw mark which helps keep the temp in check. By the end of the ride, the hub was warm but definately not what i'd call hot.
Mel is now hooked on ebikes, she loved the little Mac motor and put it to good use after a shy start to the ride after seeing me wheelying on it before the ride lol.
On the low power setting she managed to pull peaks of 830w. She is so impressed with it she's now going to sell her quad motorbike 'cause she reckons she won't want to ride it after sampling the EV grin! The only downside is I'm now getting hounded to get her BigHit frame finished asap. Its a downside i'm happy to endure!


.JPG")
Overall i'm stoked with the bike, it handles really well, pulls wheelies very easily to clear trail obsticles, the CA isn't too hard to read on the move and the HT isn't too thirsty. Top speed on flat ground with the 2.7" knobby tyres is about 58kph which is plenty for the single track trails i do.
Weight came in at 35kg.
All thats left to do is: implement my copy of Tench's running / charging plug system, add another 5ah of lipo, check the 18fet settings, get some Shimano Saint 4 pot brakes, weld the guard under the BB / controller, get the frame powdercoated and replica factory M3 sticker set applied then just enjoy the ride
Paul
Hyena
10 GW
Nice one mate, I told ya the HT wasn't very thirsty and that a 12 fet would suffice. But nooooo, you listen to these other stooges...
J/K, it's good to have the overheads of the 18 fet, it's not working hard at all with those loads so should last for ever.
Nice KFF too! It gets all of us sooner or later, I got my first case the other night after years of playing with lipo incident free (similar story, after midnight, tired and not paying enough attention)
How'd you go for juice out there in the bush ? Recharge off your car battery or just ride as long as you could on a single charge ? That's one nice bonus with the RC chargers, running off 12v. Though it sucks supreme ass if you inadvertantly flatten your car battery out in the sticks!
Timma2500
1 kW
Yeah its fairly frugal on power, before i set the current limiter in the CA, i couldn't even get it to pull more than 70amps!Hyena said:Nice one mate, I told ya the HT wasn't very thirsty and that a 12 fet would suffice. But nooooo, you listen to these other stooges... J/K, it's good to have the overheads of the 18 fet, it's not working hard at all with those loads so should last for ever.
I'll get some economy figures after a few more rides but it seems pretty good so far.
The 18fet is a bit overkill but as you say, its understressed, should last for ages and is yet to go much over ambient temp
I just saw your KFF effort, not bad but i think i've trumped you there :wink: Its funny how a long day and tiredness can affect concentration, it only takes one quick lapse to get some 4th July fireworks happeningHyena said:Nice KFF too! It gets all of us sooner or later, I got my first case the other night after years of playing with lipo incident free (similar story, after midnight, tired and not paying enough attention)
Nah we only had the one ride... i was tempted to take the charger along but it'd take 2 hours to charge my battery let alone Mel's as well so i'd need to keep the ute running while it charged and i figured our fellow campers wouldn't want to hear a diesel engine fast idle for 3 - 4hrs while their out in the bush trying to chill-out lol.Hyena said:How'd you go for juice out there in the bush ? Recharge off your car battery or just ride as long as you could on a single charge ? That's one nice bonus with the RC chargers, running off 12v. Though it sucks supreme ass if you inadvertantly flatten your car battery out in the sticks!
As it turned out there wasn't anyone near us so we probably could have got away with it!
Haha don't laugh, i did flatten a battery in my old XU-1 Torana about 13yrs ago in the middle of no-where, it was fun push-starting an 1100kg car with triple 45mm Webber carbies...
Paul
sn0wchyld
100 kW
Hyena said:Nice one mate, I told ya the HT wasn't very thirsty and that a 12 fet would suffice. But nooooo, you listen to these other stooges...
J/K, it's good to have the overheads of the 18 fet, it's not working hard at all with those loads so should last for ever.
Nice KFF too! It gets all of us sooner or later, I got my first case the other night after years of playing with lipo incident free (similar story, after midnight, tired and not paying enough attention)
How'd you go for juice out there in the bush ? Recharge off your car battery or just ride as long as you could on a single charge ? That's one nice bonus with the RC chargers, running off 12v. Though it sucks supreme ass if you inadvertantly flatten your car battery out in the sticks!
bah you just need a better charger! get a cellpro, they've got regenerative discharge, so you can charge up your car off your lipo! hehe!
Great to hear the bike's running so well mate! makes me think I might go back to 20s and up the amps a bit with the 12fet. I would too, if I wasn't so keen on getting a mid drive running!
ROG130
100 W
the spokes you used are thay 13g spokes what lenght are thay on front and back and thanks for the tig tips
Timma2500
1 kW
I guess with a quick reconfiguration, i could change the lipo from 20s 10ah to 5s 40ah and start the engine over from it!sn0wchyld said:bah you just need a better charger! get a cellpro, they've got regenerative discharge, so you can charge up your car off your lipo! hehe!
Or get a Cellpro charger!
Cheers mate, yeah i'm happy with it! Why would you go back to 20s - if you reduce the volts can you up the amps on the 12fet?sn0wchyld said:Great to hear the bike's running so well mate! makes me think I might go back to 20s and up the amps a bit with the 12fet. I would too, if I wasn't so keen on getting a mid drive running!
Have you progressed any further than your build thread shows with the mid drive build? After i get Mel's BigHit finished, i'll start on the 80100 / PLE80 / Norco build, can't wait!
Economy wise, i used 7.5ah this arvo for 24kms of very spirited sandy / hilly riding. Riding on actual proper dirt would no doubt return better economy.
So would a more sedate pace with less 5kw wheelies but i can't see that happening for a while
Yep, 13g Sapim spokes from Ebikes.ca on the rear. I can't remember off hand what length they are. Unless you have the exact same rim, you will probably need a different length anyway.ROG130 said:the spokes you used are thay 13g spokes what lenght are thay on front and back and thanks for the tig tips
I used Justin's / Ebikes.ca's spoke calculator to figure out the correct length and it worked out fine, all you need to know is your rim's ERD (Effective Rim Diameter), spoke pattern required and hub flange measurents (if your hub is not in the list). The front wheel i bought pre-built so i'm not sure on it's spoke length either i'm sorry.
Paul
Hyena
10 GW
Heh yeah that doesn't sound fun. When I rebuilt the engine in my old falcon I had it running 12.5:1 compression ratio so it was similarly hard to turn over. And with a big stero I was quickly flattening the battery too often at BBQs!Timma2500 said:Haha don't laugh, i did flatten a battery in my old XU-1 Torana about 13yrs ago in the middle of no-where, it was fun push-starting an 1100kg car with triple 45mm Webber carbies...
I've done that too! My missus left the doors open on her corolla when we were moving into our new house and flattened the battery. I had minimal tools with me but did have an old 4S 5ah lipo pack in my tool box (who doesn't :lolTimma2500 said:I guess with a quick reconfiguration, i could change the lipo from 20s 10ah to 5s 40ah and start the engine over from it!
The voltage was probably a touch high for the other electrics at nearly 16v but I guess it would have quickly sagged under load. I know it jumped the engine quick smart!BATFINK
10 kW
- Joined
- Aug 7, 2011
- Messages
- 598
BATFINK
10 kW
- Joined
- Aug 7, 2011
- Messages
- 598
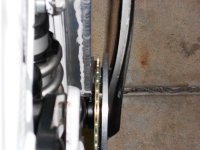
Did you just measure from centre or outside of the bottom bracket to the edge of the chain wheel, i am thinking of installing a SCHLUMPF drive and a single speed 14 tooth chain wheel on the rear of my build, il have to check how much clearance the Schlumpf has from the frame
Timma2500
1 kW
Haha, the poor old starter motor wouldn't have known what hit it!Hyena said:I've done that too! My missus left the doors open on her corolla when we were moving into our new house and flattened the battery. I had minimal tools with me but did have an old 4S 5ah lipo pack in my tool box (who doesn't ) The voltage was probably a touch high for the other electrics at nearly 16v but I guess it would have quickly sagged under load. I know it jumped the engine quick smart!
Quite easily. Before chopping the frame, simply assemble your crank / bottom bracket unit as per normal then using a ruler, measure out from the centre of your frame to the chain wheel with a chain on it. If it measures say 55mm to the edge of the chain, allow a few millimetres clearance and call it 50mm from the centre point of the frame. Double that and you have a max frame insert width of 100mm. You could always widen the frame further up once it clears the crank chain wheel if 100mm is not wide enough.BATFINK said:Im in the final stages of pulling everything together before i send my frame for the chop and welding, i was wondering how you measured for the clearance on your front chain wheel, it looks very tight?
So far so good with the bike, i took it for a 20km sand ride last weekend and had a blast. I kept stopping every now and then to check motor and controller temp and found the controller always cool and the motor getting fairly warm but not overly hot. I do back off for a while after pulling 5kw peaks so this no doubt helps keep its cool
One downside though, my Meanwell has died and i'm now on the hunt for alternative charging options
Has anyone tried those BMS Battery 900w chargers? Any good for charging Lipos? I like the idea of a charger i that can charge a 20s pack without having to break it down to 10s all the time 8)
Paul
Kepler
10 MW
I use BMS chargers for all my bulk charging needs. I have tried quite a few sizes including the 900W version which I use on my 125V Bomber. They work really well on LiPo and I have never had an issue with them in relation to the actual charge. I di have one 400W charger burn out a component though for no specific reason. They replaced it under warranty. I did need to pay the postage though which I could live with. All the hard case chargers are quite easy to adjust the output voltage too just incase you decide to change your cell count.
I like the 900W version as it has a voltage reading that switches to an amp reading also. Best value for money IMO. DoctorBass has an excellent thread on moding a 1200W version which is very similar in construction to the 900W version. Just be aware though that 900W is a peak figure. Expect more like 700W out of the 900W version. Still charges my 1500W/hr Bomber in around 1 1/2 hours though.
I like the 900W version as it has a voltage reading that switches to an amp reading also. Best value for money IMO. DoctorBass has an excellent thread on moding a 1200W version which is very similar in construction to the 900W version. Just be aware though that 900W is a peak figure. Expect more like 700W out of the 900W version. Still charges my 1500W/hr Bomber in around 1 1/2 hours though.
sn0wchyld
100 kW
Kepler said:I use BMS chargers for all my bulk charging needs. I have tried quite a few sizes including the 900W version which I use on my 125V Bomber. They work really well on LiPo and I have never had an issue with them in relation to the actual charge. I di have one 400W charger burn out a component though for no specific reason. They replaced it under warranty. I did need to pay the postage though which I could live with. All the hard case chargers are quite easy to adjust the output voltage too just incase you decide to change your cell count.
I like the 900W version as it has a voltage reading that switches to an amp reading also. Best value for money IMO. DoctorBass has an excellent thread on moding a 1200W version which is very similar in construction to the 900W version. Just be aware though that 900W is a peak figure. Expect more like 700W out of the 900W version. Still charges my 1500W/hr Bomber in around 1 1/2 hours though.
+1 on the 900w chargers. I think the smaller ones are far less reliable... my 240w blew a component for no reason too. havent got it repaired (postage costs not worth it) but my 900w units been going strong almost a year now.
If you think theres' a chance you'll go to 24s in the future then its probably best to order it for 100v charging, as i'm not sure if some of the components will be different between 84v and 100. you can always ask 'em too... they're usually pretty helpfull.
Hyena
10 GW
If it's got an electric motor, I'll overvolt itTimma2500 said:Haha, the poor old starter motor wouldn't have known what hit it!
Yep another +1 (well, +5 actually) on those.Has anyone tried those BMS Battery 900w chargers? Any good for charging Lipos?
Lipo charging is fine. I don't bulk charge at full pack voltage, I use them to parallel charge at higher current (with the voltage set to 4.18v /cell for a slight safety margin) but I'm sure you'll have no dramas with them.
I have the 600w version and have chopped a turnigy watt meter into the top cover to give me a good indication of where it is in the charge cycle. It's highly accurate with lipo, doing cycle tests I can discharge 9.5ah from a 10ah pack and the charger says it's putting 9.6ah back in. That's good enough for me!
As Kepler says the power rating is inflated, either that or they're talking about input power and they're not very efficient (my 600w model only spits out around 480w). Also don't count on the voltage/current display in the 900w model, you don't normally get that until the bigger 1200w model, which is a fair bit larger. The older models may have had it but I'm pretty sure the newer ones don't...
Kepler
10 MW
That's interesting that 900W doesn't have the display anymore. I must have been lucky. Would be a bit annoyed if I bought a second unit expecting the display and not getting it.
Similar threads
- Replies
- 1
- Views
- 1,216
- Replies
- 6
- Views
- 1,864
- Replies
- 18
- Views
- 5,312