jonescg's NEW electric racebike BUILD thread!

It's funny - I was asked to leave metalwork in school because I was just so bad at it. I wasn't much good with electronics or drawing... or anything really. So I became a chemist, then a plant scientist. But with a bit of maturity and some space, I learned a few things and bought a few tools (roughly 13 years ago) and have just kept on trying stuff.
Glad everyone here can learn from it too. That's why I share it. (y)
 
I'm bad at everything, but stuff I have to do anyway, or stuff I like to do, I just keep doing until it's good enough to get the job done. ;)
 
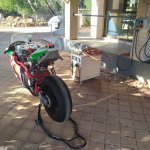
Through the years we were racing, I had two air-cooled chargers set to 350 V and 6 amps (not adjustable) which would charge the battery as two half-packs. This was all we had available at the time, and it worked, but it was clumsy and if one charger stopped working, you had a long day ahead of you.

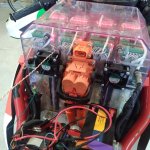
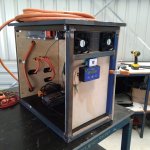
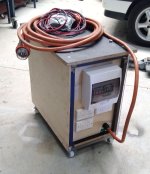
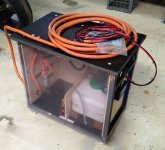
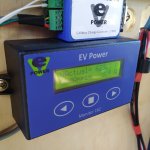
The new single charger is rated to 800 V, fully adjustable y CAN control, and will charge the 12.5 kWh battery in a little under 2 hours from empty. It's far more compact, but it is liquid cooled, and that means more stuff to incorporate into a complete system.

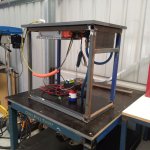
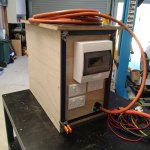
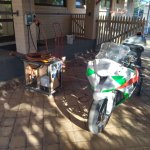
However, as this will be powered from a 5-pin, three-phase socket, we would often use the other two phases for things like tyre warmers, laptops, 12 V auxiliary battery charger, kettles... typical trackside entertainment. So I thought, why not combine the bike's battery charger with the GPO distribution and make a single unit, which also doubles as a coffee table!

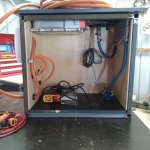
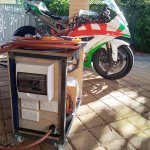
L1 - main charger (32 A RCBO)
L2 - two double GP outlets (16 A RCBO)
L3 - one double GP outlet and all the 12 V stuff - pumps, fans, auxiliary charger etc (16 A RCBO)
 

Attachments

  • 20240103_155854.jpg
    20240103_155854.jpg
    287.7 KB · Views: 16
You know you are seriously slacking (insert joke about broom and sweeping) I have to ask, doesn't that charger get a tish warm?
 
It does, but that's why the liquid coolant pump and radiator is there. I'll just use water, so if it does spill it's no big deal.
 
I'm thinking about putting a clear PVC cover on the last remaining side, mostly just so you can see if coolant is leaking. I'd want to do a neater job though.
 

Attachments

  • Battery charger table.jpg
    Battery charger table.jpg
    270.7 KB · Views: 14
  • Battery charger table2.jpg
    Battery charger table2.jpg
    143.1 KB · Views: 14
  • Battery charger table3.jpg
    Battery charger table3.jpg
    148.3 KB · Views: 14
And it's done. I had thought about using a second Meanwell power supply for the 12 V stuff, but the 350 W 12 V power supply from Hobby king puts out 25 A at 13.8 V, which is enough to charge the auxiliary battery to practically full and run all the 12 V stuff in the box.
Also, the three phase supply provides 7 kW to the main charger (32 A RCBO), four power sockets (20 A RCBO), and a double power socket plus the 12 V power supply inside (16 A RCBO).
Of course I'll have to get a sparky to test and tag it before I get to the racetrack. Because, make-work :)

The charge lead bundle will include the HV DC for the battery, a 12 V supply to top up the auxiliary battery, and an enable line, which will tap into the onboard BMS. If a cell goes above 4.2 V, the enable line is cut and the charge is stopped.
 

Attachments

  • PowerCube complete2.jpg
    PowerCube complete2.jpg
    68.8 KB · Views: 3
  • PowerCube complete.jpg
    PowerCube complete.jpg
    66.4 KB · Views: 3
Nothing special - just happy I got the charger to work on a 32 amp supply. Got a steady 20 A, 12 V supply to charge the auxiliary battery, and an enable line which can be interrupted should the BMS detect a high cell. 7 kW charging means just under 2 hours to full (edited bad math).

I hope to have a BMS master control unit in a few weeks time (it will also be used on the eCRX project). Then we can go racing!
 

Attachments

  • On charge at 7 kW.jpg
    On charge at 7 kW.jpg
    279.5 KB · Views: 12
  • On charge at 7 kW CAN Charge.jpg
    On charge at 7 kW CAN Charge.jpg
    214.5 KB · Views: 14
  • On charge at 7 kW front.jpg
    On charge at 7 kW front.jpg
    163.8 KB · Views: 13
  • On charge at 7 kW rear.jpg
    On charge at 7 kW rear.jpg
    221.8 KB · Views: 13
Last edited:
Hi Chris,

Do you know off-hand what the dimensions of that pack are? And did you place the contactors inside the pack? This is probably all posted somewhere but the thread is too long to go back very far! Well, okay, I'm a bit lazy too. :)
 
Back
Top