Glyn
10 W
- Joined
- Oct 7, 2017
- Messages
- 70
So I recently purchased a bunch of Kelly KBS101X controllers for a six wheel drive mountain climbing wheelchair which I'm building: http://mountainwheelchair.com.
This is a great controller which has many programmable features, however, the instructions in the software have been badly translated into English so I thought I'd create a definitive post to help make sense of it.
Please feel free to add to this and I'll do my best to keep the original post (i.e. this one) updated.
General Information
I've read in places that you need to make sure you disconnect the motors and peripherals etc before running the software, however, I haven't found this to be the case. I've been programming the controllers just fine without disconnecting anything. When you first open the software it does say to "make sure the motor is not running", in which case it makes sense to take heed of this. I'm not sure what would happen though if you had no motor attached, but the throttle was open?
Kelly Controllers Configuration Program...
Please note, the screenshots here have been taken whilst programming a KBS101X controller with software revision V4.6. If you're using a different version of the software then there might be some differences.
I'm very new to the world of e-bikes and this is my first controller, so the information provided below is based on my very limited experience.
Step 1

[1] Forward Switch: Default value is disabled. If enabled, the controller will not accept throttle input unless a "forward switch" is closed.
[2] Foot Switch: Default value is disabled. See "Forward switch" above.
[3] Throttle Sensor Type: Default value is 1-4v. Choose what type of device you want to use for the throttle. See also [x] Joystick in Step 4.
[x] Throttle effective starting/ending: Imagine using a joystick for a controller. If only the slightest movement of the joystick made the motor start turning, it might be difficult to control the vehicle at low speeds. In which case, you might want to ignore the first 10-20% of joystick movement for example. Also, depending the analogue signal from your throttle, you might find that your motor still turns even when you've let go of the throttle, in which case you should increase the effective starting position. Equally, you might turn the throttle all the way, so it was fully open, but the signal sent to the controller might not be registered as fully open. In this case, you'd want to decrease the throttle ending position. The defaults are 20% and 80%, but it's worth noting that this would make only 60% of your throttle travel usable.
[4] Max Motor Current: Use this to limit the current and therefore prevent damage to your motors. This is probably an important one to get right. The user manual says "the max motor current is (The value * peak current of the controller)" but this is wrong. The value is given as a percentage of the controller's max rated current. In this example, the Kelly KBS48101X is a 100amp controller, and the motors I'm using have a max recommended current of 15amps. I would therefore want to set the "Max Motor Current" to 15% but the lowest value the controller will accept is 20% (20 amps). To get this right, you must be absolutely certain of the controller's peak current.
[5] Max Battery Current: Used to limit the current and therefore prevent damage to your batteries. According to this post on another forum, it's a % of the value given in [4] Max Motor Current. So if I have my max motor current set to 20amps, and the Max Battery Current to 50%, then the max current drawn from the batteries will be 10 amps. It's worth mentioning here that the user manual for this refers to a table with with under and over voltage ranges for several batteries. However, I'd ignore that table which for example, suggests at 72v battery will operate from 18v - 90v. Taking a 72v battery down to 18v could lead to permanent damage. I guess you need to know your batteries well and actually, knowing the acceptable voltage range does nothing to help set this parameter. Instead, and I'm new this, I think you probably need to know what is a safe discharge rate for your batteries and set this value accordingly. I'm using 15ah Headway cells which have a max continuous discharge current rating of 5C. 15 * 5 = 75amps. Their max burst discharge is rated at 10C so this is 150amps. Either way, the battery is more than capable of supplying far more current than the motors can handle so in this instance I can be confident leaving this setting at the max value of 50%.
Step 2

[1] Start-up Delay: Kelly recommend using a contactor which is bridged by a precharge resistor to battery +. When you turn on the controller, via the PWR pin, the controller will wait for the time specified here to precharge the capacitors before closing the contactor. Possible values range from 0.5sec - 2sec. Default is 0.5. In my experience, 2 seconds isn't enough. Note, you need to use the blue relay pin [9] to close the contacter for this delay to have any effect.
[2] Hall Sensor Type: Check the manual for your motor.
[x] Control Mode: Choose between Torque, Balanced and Speed mode. According to the manual, "Torque mode gives faster response of the load and good acceleration. Balanced mode brings fast response of the load and wide speed adjusting range. Speed mode brings smooth operation and wide speed adjusting range". I seem remember reading that all this setting does is limit voltage to the motors and it should be set to balanced. I'll have to find where i read that and update accordingly. Factory default is Torque. Update: Found this comment in the FAQ on the Kelly website:
[3] Under Voltage. Prevent your batteries from dropping below a certain voltage. The description in the software is pretty accurate for this.
[4] Over Voltage. Prevent your batteries from charging above a certain voltage when using regenerative breaking. The description in the software is pretty accurate for this.
[x] Throttle Up/Down Rate: I believe this is used to change the sampling frequency for PWM throttles? According to the manual, a lower value means a shorter sampling period and a faster response rate. I guess you could think of this is a throttle delay/precision setting. Lower values mean faster throttle response but with less accuracy, higher values mean slower response but increased accuracy.
Update - you can think of this as throttle response (how responsive you want the throttle to be). Slowing the response rate (increasing the value) slows the acceleration.
[x] Power On High Pedal Disable: If the throttle is open at startup, the controller will throw an error which prevents startup. I'd recommend always having this enabled. For one, it means your vehicle won't accidentally run away when you switch it on, and two... Remember that you can only program the controller if the motors aren't spinning. If something goes wrong, leaving this enabled will always mean that you can re-program your controller.
[6] Releasing Brake High Pedal Disable: If I've understood this correctly, when enabled, the controller will throw an error if you try to accelerate whilst pressing the brakes. Presumably you'd then have to restart the controller to continue operation.
Step 3

[1] Motor top speed. Reduce motor speed by limiting voltage. For example, if the battery voltage is currently at 48v, and you set a value here of 50%, then the motors will receive 24v.
[2] Motor Poles. Drop-down-box is disabled. Description suggests that you need to use CAN BUS to edit this, although I don't think these controllers have a CAN interface.
[3] Half Speed in Reverse. Limit voltage to motors when reversing. Note, this is only available in earlier versions of the software and has since been replaced by the "Motor Top Speed in Reverse" slider at the bottom of the same page.
[4] Boost Function: The boost function and economy function are very similar and both require a resistive potentiometer connected to pin 2 (BRK_AN). I haven't been able to fully understand this, but essentially both functions limit motor current depending on the value of the pot.
[5] Economy Function: See [4] boost function above.
[6] Half Current In Reverse: This is different to "motor top speed in reverse" as it limits motor current instead of voltage.
[7] Noise Reduction: Apparently it reduces motor noise but I'm not sure how it achieves this. If you've got a noisy motor then I'd suggest that enabling this function is probably not the best fix.
[x] ABS: No idea. Haven't been able to find any info on this.
[x] Motor Top Speed in Reverse: See [1] Motor top speed and [3] Half Speed in Reverse above.
Step 4

[1] Regeneration: Enable or disable regenerative breaking. Uses the energy produced by the motor momentum to recharge your batteries when braking or when throttle is released. Can be used to recharge batteries when free-wheeling down a hill. Note, that if you have regenerative breaking enabled, you must have the battery connected when you're pushing the vehicle so that there is somewhere for this energy to go.
[2] Brake Switch: If this option is enabled (as well as the above option) then regeneration will only occur when the throttle is released and the brakes are applied.
[3] Releasing Throttle Starts Regen: This option will use regeneration whenever the throttle is released. For example, free-wheeling down a hill will recharge the batteries whether the breaks are applied or not. Note however, that if this option is enabled, then it will be more difficult to free-wheel. Values range from 0% (off) to 20%. 20% of what though isn't clear.
[x] Regen Current by Brake Switch On: Adjust the amount of current going into the batteries when the brakes are applied. This requires a 0-5v brake lever. Alternatively, you could just add a potentiometer and control how much regen you want on the fly.
[4] Max Regen Current: Obviously limits the regenerative current but no info is available on this.
[5] Brake Sensor Type: I think this is for analogue brakes. Options are No (not used), 0-5v potentiometer, 1-4v hall active throttle.
[x] Brake Sensor Starting point: For analogue brakes. See also [x] Throttle effective starting/ending in Step 1.
[x] Brake Sensor Ending Point: As above.
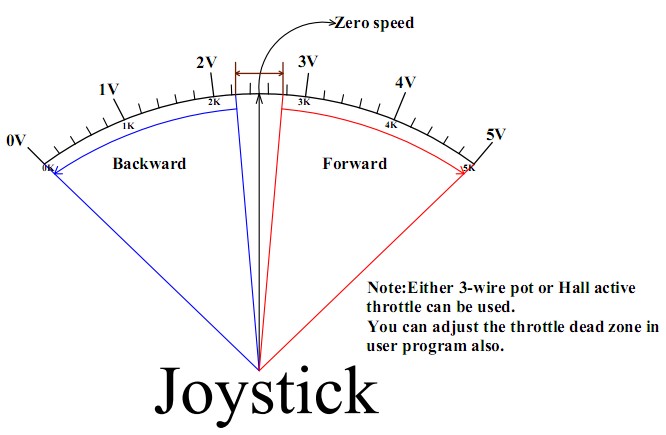
[x] Joystick. I don't think this option is usually available on this model but is something I requested when ordering the controllers. It allows you to use one joystick (or potentiometer) to control both forwards and reverse throttle without having to flip a switch. 0-2.4v is reverse. 2.6-5v is forwards.
[x] Cruise: No info available, presumably cruise control.
Step 5

Sensor Setting:
[1] Motor Temperature Sensor: Select which thermistor is in your motor. According to the manual, it only works with KTY84-130 and KTY83-122 thermistors. Default option is KTY84-130. I haven't tried it yet, but changing the thermistor inside the motor to a KTY84-130 seems like an easy task. Be sure to check the wiring diagram in the user manual if going down this route as it requires a 1k Ohm 0.25w resistor on the 5v line.
*Update* This is a very easy task: https://www.youtube.com/watch?v=HP9M0QUadpc
[x] Controller Stop Output Temperature: Stop the motors when they reach this temperature. I'm not yet sure what a suitable temperature is but it makes sense to check with the motor manufacturer.
[x] Controller Resume Output Temperature: Resume nomral functions when the motors drop to this temperature.
CAN Setting:
[x] I don't think this controller works with CAN and this is therefore redundant.
Smooth Setting:
No information is given for the following settings in software, in the manual, or on the Kelly website...
[x] Auto Identify: Will try to configure the smooth settings for you.
[x] Identify Rev: If enabling the above makes your motor turn the wrong direction, try enabling this.
[x] Smooth:
[x] Inflection Point:
[x] Low Accel:
[x] Low Decel:
[x] High Accel:
[x] High Decel:
This is a great controller which has many programmable features, however, the instructions in the software have been badly translated into English so I thought I'd create a definitive post to help make sense of it.
Please feel free to add to this and I'll do my best to keep the original post (i.e. this one) updated.
General Information
I've read in places that you need to make sure you disconnect the motors and peripherals etc before running the software, however, I haven't found this to be the case. I've been programming the controllers just fine without disconnecting anything. When you first open the software it does say to "make sure the motor is not running", in which case it makes sense to take heed of this. I'm not sure what would happen though if you had no motor attached, but the throttle was open?
Kelly Controllers Configuration Program...
Please note, the screenshots here have been taken whilst programming a KBS101X controller with software revision V4.6. If you're using a different version of the software then there might be some differences.
I'm very new to the world of e-bikes and this is my first controller, so the information provided below is based on my very limited experience.
Step 1
[1] Forward Switch: Default value is disabled. If enabled, the controller will not accept throttle input unless a "forward switch" is closed.
[2] Foot Switch: Default value is disabled. See "Forward switch" above.
[3] Throttle Sensor Type: Default value is 1-4v. Choose what type of device you want to use for the throttle. See also [x] Joystick in Step 4.
- 0-5v: 3 wire resistive potentiometer. I've been successfully using a typical B10K potentiometer as well as the small thumb joysticks that you get for Arduinos and the like.
- 1-4v: I believe this is for hall active twist grip throttles?
- 0-5k: I believe this is for a PWM input? Note, this won't work with an RC receiver as the pulses are different. Edit, this might actually be a 0-5k potentiometer?
[x] Throttle effective starting/ending: Imagine using a joystick for a controller. If only the slightest movement of the joystick made the motor start turning, it might be difficult to control the vehicle at low speeds. In which case, you might want to ignore the first 10-20% of joystick movement for example. Also, depending the analogue signal from your throttle, you might find that your motor still turns even when you've let go of the throttle, in which case you should increase the effective starting position. Equally, you might turn the throttle all the way, so it was fully open, but the signal sent to the controller might not be registered as fully open. In this case, you'd want to decrease the throttle ending position. The defaults are 20% and 80%, but it's worth noting that this would make only 60% of your throttle travel usable.
[4] Max Motor Current: Use this to limit the current and therefore prevent damage to your motors. This is probably an important one to get right. The user manual says "the max motor current is (The value * peak current of the controller)" but this is wrong. The value is given as a percentage of the controller's max rated current. In this example, the Kelly KBS48101X is a 100amp controller, and the motors I'm using have a max recommended current of 15amps. I would therefore want to set the "Max Motor Current" to 15% but the lowest value the controller will accept is 20% (20 amps). To get this right, you must be absolutely certain of the controller's peak current.
[5] Max Battery Current: Used to limit the current and therefore prevent damage to your batteries. According to this post on another forum, it's a % of the value given in [4] Max Motor Current. So if I have my max motor current set to 20amps, and the Max Battery Current to 50%, then the max current drawn from the batteries will be 10 amps. It's worth mentioning here that the user manual for this refers to a table with with under and over voltage ranges for several batteries. However, I'd ignore that table which for example, suggests at 72v battery will operate from 18v - 90v. Taking a 72v battery down to 18v could lead to permanent damage. I guess you need to know your batteries well and actually, knowing the acceptable voltage range does nothing to help set this parameter. Instead, and I'm new this, I think you probably need to know what is a safe discharge rate for your batteries and set this value accordingly. I'm using 15ah Headway cells which have a max continuous discharge current rating of 5C. 15 * 5 = 75amps. Their max burst discharge is rated at 10C so this is 150amps. Either way, the battery is more than capable of supplying far more current than the motors can handle so in this instance I can be confident leaving this setting at the max value of 50%.
Kelly FAQ said:The controller does current multiplication. You can limit the battery current,but still get higher current to the motor at low speed.
Step 2
[1] Start-up Delay: Kelly recommend using a contactor which is bridged by a precharge resistor to battery +. When you turn on the controller, via the PWR pin, the controller will wait for the time specified here to precharge the capacitors before closing the contactor. Possible values range from 0.5sec - 2sec. Default is 0.5. In my experience, 2 seconds isn't enough. Note, you need to use the blue relay pin [9] to close the contacter for this delay to have any effect.
[2] Hall Sensor Type: Check the manual for your motor.
[x] Control Mode: Choose between Torque, Balanced and Speed mode. According to the manual, "Torque mode gives faster response of the load and good acceleration. Balanced mode brings fast response of the load and wide speed adjusting range. Speed mode brings smooth operation and wide speed adjusting range". I seem remember reading that all this setting does is limit voltage to the motors and it should be set to balanced. I'll have to find where i read that and update accordingly. Factory default is Torque. Update: Found this comment in the FAQ on the Kelly website:
Kelly FAQ said:The controller will output voltage to motor proportional to throttle if under speed control mode. It will output current if under torque mode. The balanced mode is between them.
[3] Under Voltage. Prevent your batteries from dropping below a certain voltage. The description in the software is pretty accurate for this.
[4] Over Voltage. Prevent your batteries from charging above a certain voltage when using regenerative breaking. The description in the software is pretty accurate for this.
[x] Throttle Up/Down Rate: I believe this is used to change the sampling frequency for PWM throttles? According to the manual, a lower value means a shorter sampling period and a faster response rate. I guess you could think of this is a throttle delay/precision setting. Lower values mean faster throttle response but with less accuracy, higher values mean slower response but increased accuracy.
Update - you can think of this as throttle response (how responsive you want the throttle to be). Slowing the response rate (increasing the value) slows the acceleration.
[x] Power On High Pedal Disable: If the throttle is open at startup, the controller will throw an error which prevents startup. I'd recommend always having this enabled. For one, it means your vehicle won't accidentally run away when you switch it on, and two... Remember that you can only program the controller if the motors aren't spinning. If something goes wrong, leaving this enabled will always mean that you can re-program your controller.
[6] Releasing Brake High Pedal Disable: If I've understood this correctly, when enabled, the controller will throw an error if you try to accelerate whilst pressing the brakes. Presumably you'd then have to restart the controller to continue operation.
Step 3
[1] Motor top speed. Reduce motor speed by limiting voltage. For example, if the battery voltage is currently at 48v, and you set a value here of 50%, then the motors will receive 24v.
[2] Motor Poles. Drop-down-box is disabled. Description suggests that you need to use CAN BUS to edit this, although I don't think these controllers have a CAN interface.
[3] Half Speed in Reverse. Limit voltage to motors when reversing. Note, this is only available in earlier versions of the software and has since been replaced by the "Motor Top Speed in Reverse" slider at the bottom of the same page.
[4] Boost Function: The boost function and economy function are very similar and both require a resistive potentiometer connected to pin 2 (BRK_AN). I haven't been able to fully understand this, but essentially both functions limit motor current depending on the value of the pot.
[5] Economy Function: See [4] boost function above.
[6] Half Current In Reverse: This is different to "motor top speed in reverse" as it limits motor current instead of voltage.
[7] Noise Reduction: Apparently it reduces motor noise but I'm not sure how it achieves this. If you've got a noisy motor then I'd suggest that enabling this function is probably not the best fix.
[x] ABS: No idea. Haven't been able to find any info on this.
[x] Motor Top Speed in Reverse: See [1] Motor top speed and [3] Half Speed in Reverse above.
Step 4
[1] Regeneration: Enable or disable regenerative breaking. Uses the energy produced by the motor momentum to recharge your batteries when braking or when throttle is released. Can be used to recharge batteries when free-wheeling down a hill. Note, that if you have regenerative breaking enabled, you must have the battery connected when you're pushing the vehicle so that there is somewhere for this energy to go.
[2] Brake Switch: If this option is enabled (as well as the above option) then regeneration will only occur when the throttle is released and the brakes are applied.
[3] Releasing Throttle Starts Regen: This option will use regeneration whenever the throttle is released. For example, free-wheeling down a hill will recharge the batteries whether the breaks are applied or not. Note however, that if this option is enabled, then it will be more difficult to free-wheel. Values range from 0% (off) to 20%. 20% of what though isn't clear.
[x] Regen Current by Brake Switch On: Adjust the amount of current going into the batteries when the brakes are applied. This requires a 0-5v brake lever. Alternatively, you could just add a potentiometer and control how much regen you want on the fly.
[4] Max Regen Current: Obviously limits the regenerative current but no info is available on this.
[5] Brake Sensor Type: I think this is for analogue brakes. Options are No (not used), 0-5v potentiometer, 1-4v hall active throttle.
[x] Brake Sensor Starting point: For analogue brakes. See also [x] Throttle effective starting/ending in Step 1.
[x] Brake Sensor Ending Point: As above.
[x] Joystick. I don't think this option is usually available on this model but is something I requested when ordering the controllers. It allows you to use one joystick (or potentiometer) to control both forwards and reverse throttle without having to flip a switch. 0-2.4v is reverse. 2.6-5v is forwards.
[x] Cruise: No info available, presumably cruise control.
Step 5
Sensor Setting:
[1] Motor Temperature Sensor: Select which thermistor is in your motor. According to the manual, it only works with KTY84-130 and KTY83-122 thermistors. Default option is KTY84-130. I haven't tried it yet, but changing the thermistor inside the motor to a KTY84-130 seems like an easy task. Be sure to check the wiring diagram in the user manual if going down this route as it requires a 1k Ohm 0.25w resistor on the 5v line.
*Update* This is a very easy task: https://www.youtube.com/watch?v=HP9M0QUadpc
[x] Controller Stop Output Temperature: Stop the motors when they reach this temperature. I'm not yet sure what a suitable temperature is but it makes sense to check with the motor manufacturer.
[x] Controller Resume Output Temperature: Resume nomral functions when the motors drop to this temperature.
CAN Setting:
[x] I don't think this controller works with CAN and this is therefore redundant.
Smooth Setting:
No information is given for the following settings in software, in the manual, or on the Kelly website...
[x] Auto Identify: Will try to configure the smooth settings for you.
[x] Identify Rev: If enabling the above makes your motor turn the wrong direction, try enabling this.
[x] Smooth:
[x] Inflection Point:
[x] Low Accel:
[x] Low Decel:
[x] High Accel:
[x] High Decel:
")