Killed 2 bafang SWX02 motors. Yes, two!!!

just a small update while i'm waiting for the slow boat from china to arrive w/ new controller and throttle.

1/ ordered a few hall sensors to perhaps use.

2/ ordered a Jump motor from one of the links amberwolf so kindly provided. total cost to me was only $60, with shipping included. perhaps this is what i should have done from the start.

3/ before placing China order, did have an amazon order in for a sensor/sensorless controller and throttle. got it and decided to see what happened, figuring the amp difference alluded to in previous posts couldn't hurt things as long as i didn't put any weight on the wheel. in any event, after hooking everything up, i got ... nothing, not even a click. obviously, it could be user error on my part. i certainly hope so, but #1 and #2 will hopefully save my bacon should control/throttle swap not do the trick.

come on, china boat!
 
woofnbike said:
3/ before placing China order, did have an amazon order in for a sensor/sensorless controller and throttle. got it and decided to see what happened, figuring the amp difference alluded to in previous posts couldn't hurt things as long as i didn't put any weight on the wheel. in any event, after hooking everything up, i got ... nothing, not even a click. obviously, it could be user error on my part. i certainly hope so, but #1 and #2 will hopefully save my bacon should control/throttle swap not do the trick.

come on, china boat!

What do you mean by hooking everything up? I'm assuming that you turned it on before testing.
 
ha ha very good question!

to the best of my (limited) abilities, i wired together the motor, battery, controller and throttle. tested multiple times with a multimeter and got what i think were appropriate readings. and, yes, i jumped the on/off switch wires for the test.

when i didn't get any positive results, i hooked up the tester and one thing i still don't understand is it's okay that the phase-wire lights all twinkle at once as the wheel is spun, which is the case now, as opposed to sequentially, one after the other, which i believe i read is how it's supposed to be. and, if sequentially, what it means that they aren't doing that.

this controller has learning wires. as per instructions on the 'net, i disconnected battery and motor etc, linked the wires together, then hooked everything back up again and turned the wee beast on. nada.
 
woofnbike said:
ha ha very good question!

to the best of my (limited) abilities, i wired together the motor, battery, controller and throttle. tested multiple times with a multimeter and got what i think were appropriate readings. and, yes, i jumped the on/off switch wires for the test.

when i didn't get any positive results, i hooked up the tester and one thing i still don't understand is it's okay that the phase-wire lights all twinkle at once as the wheel is spun, which is the case now, as opposed to sequentially, one after the other, which i believe i read is how it's supposed to be. and, if sequentially, what it means that they aren't doing that.

this controller has learning wires. as per instructions on the 'net, i disconnected battery and motor etc, linked the wires together, then hooked everything back up again and turned the wee beast on. nada.

How did you test your throttle to make sure it has the correct order of pinouts for the new controller?
 
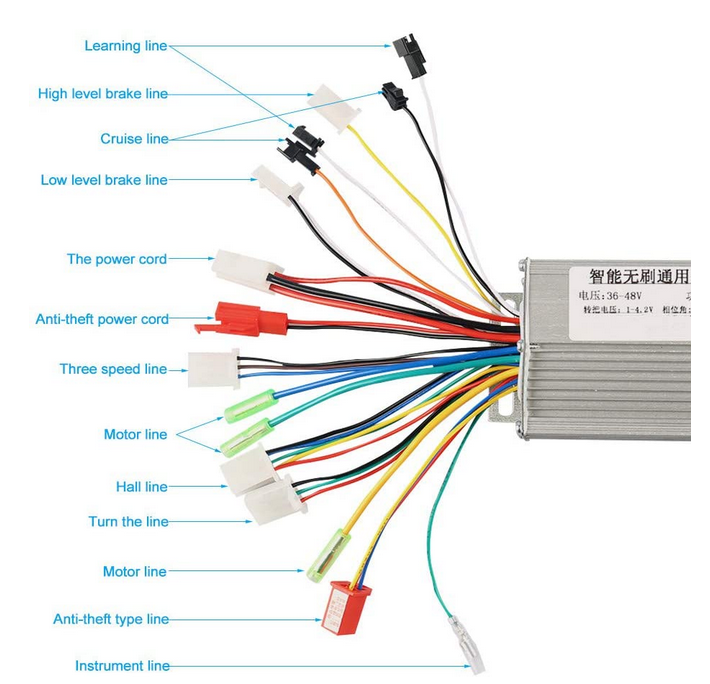
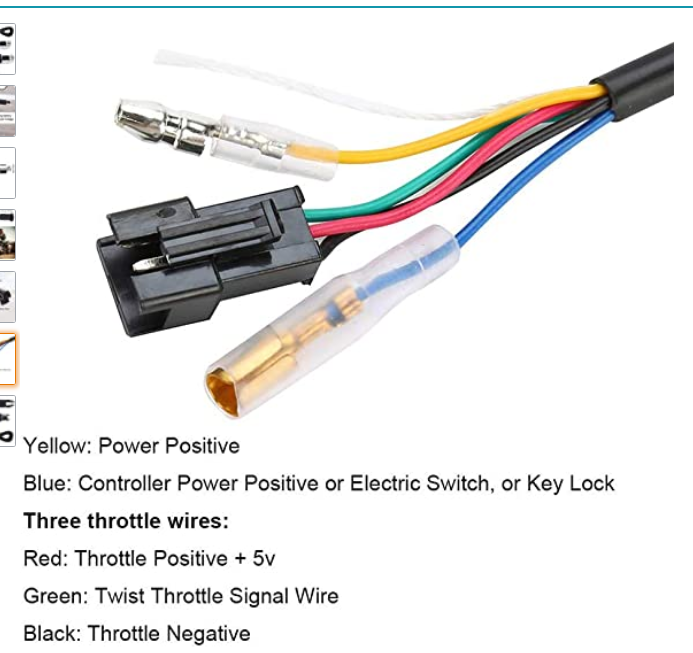
referencing the two photos below:

YXQ1bkG.png


ArAPKeI.png


from throttle to controller:

yellow to the fatter red wire on the 'power cord'
blue to thinner wire on the 'power cord'
(i believe these two form the on/off switch; i have them jumped so i can test without using on/off)
red, green, black to red, green, black on 'turn the wire' after removing everything from their cases so i could match everything up, color to color.

the throttle does light up but the motor ain't getting no juice. is there a way to test the throttle to ensure i have the wiring correct other than by the motor works or it doesn't?

thanks for the help! please continue!
 
woofnbike said:
when i didn't get any positive results, i hooked up the tester and one thing i still don't understand is it's okay that the phase-wire lights all twinkle at once as the wheel is spun, which is the case now, as opposed to sequentially, one after the other, which i believe i read is how it's supposed to be. and, if sequentially, what it means that they aren't doing that.

A geared hub's motor spins so fast relative to wheel motion that you generally can't see the sequence. Even on a DD hub it's very hard to see.
 
woofnbike said:
blue to thinner wire on the 'power cord'
(i believe these two form the on/off switch; i have them jumped so i can test without using on/off)

To find out if the switch works, you can use your multimeter on continuity or 2ohms, and put red lead on switch yellow wire, and black lead on swithc blue wire. WIth swithc off you shoudl get OL, and with on you should get close to zero ohms and/or a beep or tone. If you don't, either the switch isn't wired as they indicate, or it isn't working. (some switches are wired to shut off the 5v to the throttle, rather than teh way you need it to work).

To find out if the controller powers on normally, you can disconnect your motor from it, and hook it up to the tester's controller phase and hall wires, and see what lights up after you manually jumper across the main thick red wire in that three pin connector marked "the power cord", to the thin red wire in it. Check your tester's instructions before doing this.


the throttle does light up but the motor ain't getting no juice. is there a way to test the throttle to ensure i have the wiring correct other than by the motor works or it doesn't?
Your tester should have a throttle wire set on it. If it works it will be able to control the brightness of the Throttle LED on the left side (if it's like the tester I have here).


FWIW, the controller diagram indicates your controller has hall sensor wires, and so it may not be a sensorless controller (especially if it has learning wires, as those are only needed so it can learn the correct phase/hall wire combination so you don't ahve to match them up repeatedly to find the right one).

If it's not sensorless, it probably isn't going to do anything on your motor (it might make odd noises or jerk it around a bit, but probably wont' do anything because it isn't getting any valid hall signals).
 
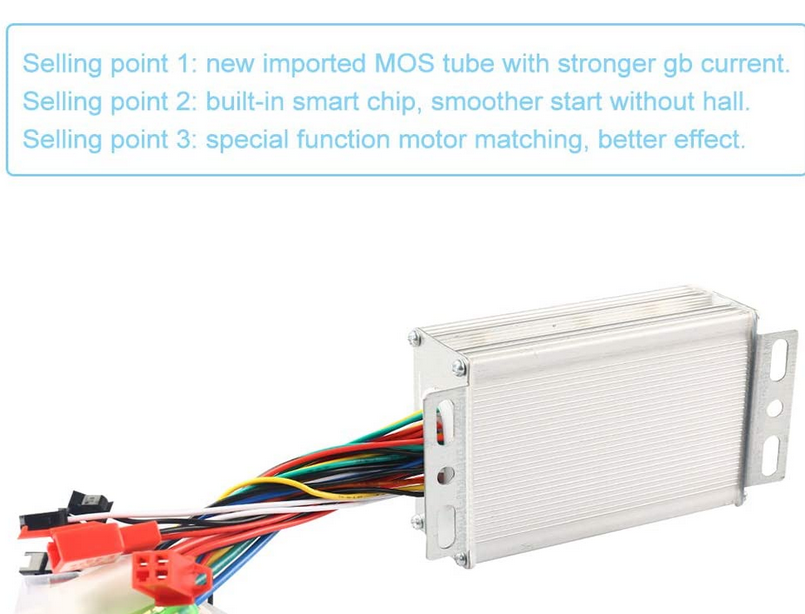
Probably you're right about the sensorless aspect of the controller. When I bought it, the copy said it was dual function but that has since been removed everywhere except in one of the pictures and in the amazon Q&A section.

Thanks for weighing in again. As mentioned, I bought a Jump motor, which ought to arrive midweek. I'll no doubt be back here then, asking about removing the guts of each motor, which will hopefully allow for an easy-peazy swap and ... off i go.

vQC8eWT.png
 
well, the jump motor arrived looking pretty nice, only the thing is, it's attached to its case with hex screws with tiny pins in the center, presumably to keep thieves from using a standard allen wrench to remove the screws. now what do i do, since the pin keeps the allen wrench from fitting inside the hole. i could try to sand em down w a dremel but then i run the risk of sanding away the hex edges. or maybe i need to place yet another damn order w/ amazon but i don't know exactly what i'm looking for or the size. crap.

think the local bike shop would have the right tool for this? i kinda doubt it.

thoughts? suggestions?
 
If the screws aren't torqued down super tight you might be able to use an old bic pen as a makeshift screwdriver. The crystal bics work well for this.

You just need the pen shell, take the ink out. Then you can gently heat the tip of the pen with a lighter until it's somewhat melted. Jam the melted part onto the screw head and hold it there until the plastic cools and sets. It should now be molded to the shape of the screw bit and you can carefully unscrew the security screws.
 
now that's one helluva genius, outside-the-box idea. unfortunately, these things are screwed down mighty tight.

one thing i discovered is that the inner pin can be kinda pried out by using a tiny flathead screwdriver. that gave me enough inner room to use a t15 bit thing. unfortunately, the screw wouldn't budge and i think i halfway stripped it. and this was after giving it a good dose of wd40 and letting it sit. now what????
 
well, i successfully chiseled out those pins, removed the screws, popped the motor out, popped it back into its new home, hooked up the old controller and throttle and and and, wonder of wonders, the damn thing ran speedy as you please. holy cow! can't believe it!

thank you one and all but especially amberwolf for leading me to the Jump motor.

i've got a new sensorfree controller on the way and we shall see how that works with the other motor. and once that's humming, 'l be thanking motomech, once again, for that.

and now i've got a bunch of hall sensors. might try to solder them on the motor that just got replaced.

dang am i happy. and so's the boy. finally he gets another scooterwalk!

pulse-image-1614985491086.jpg
 
Well OK, you got er done, good, but you struggled with those screws unnecessarily the hard way. What you described is known as security hex screws. Bits for those screws are easily found, here is an example that maybe? is convenient to you (no idea where you live):
https://www.homedepot.com/p/Milwaukee-SHOCKWAVE-Impact-Duty-Alloy-Steel-Security-Hex-Screw-Driver-Bit-Set-7-Piece-48-32-4619/302766797
 
thanks, yup, they would have done it, but once i got rid of the first pin, the others took a total of 5 minutes tops, with no trip to the store. can't believe how easily those pins were prized out.
 
Back
Top