
You are using an out of date browser. It may not display this or other websites correctly.
You should upgrade or use an alternative browser.
You should upgrade or use an alternative browser.
Latest road and single track weapon.
- Thread starter Kepler
- Start date
Kepler
10 MW
That is a very interesting bike. I dont think it would help solve the high powered mid drive issues though.
The offering form HPC is amusing. Throw on a chainring adapter and smaller chaining a make out that you have created a high performance version of BBS All 750W BBS02 drives pump out 1100W and do 29mph. And the chain ring adapter they have used is actually going to make the chainline worse over the standard offering. I get it that they are trying to differentiate themselves from the pack with something a bit different though. $850 ouch!!
The offering form HPC is amusing. Throw on a chainring adapter and smaller chaining a make out that you have created a high performance version of BBS
oatnet
1 MW
Zwarst said:Heres a better look at the zerode with a mid-mounted alfine interal hub -
https://www.youtube.com/watch?v=e2KRlsBwa9Q&list=FL3GMsOyeSELEFtbSFBcJUtw
That looks like the layout used by Hanebrink for the electric version of his bike.
-JD
r3volved
100 kW
Ya that looms like a really nice solution. I like the looks of his chain line as he actuated that suspension...
Kepler
10 MW
A quick update on this build. After the failed attempt to convert to CA3 control, the bike has been back to normal commuting duties and covering around 150km a week. Drive has been faultless over the last 1500km and with close to 3500km on the clock, continues to be as quiet as the day I got it.
However, the 15S LiPo battery set-up is not ideal mainly due to it being to higher voltage for the BBS drive. It takes a bit of management to ensure I don't charge over 61.5V and means every time I balance charge it with my RC chargers, I am stuck with a pack at 63V that then needs to be drained down by some other means back to 61.5V to work with the BBS. Also range is a little light on with only 250Whrs usable.
So I decided it was time to get with the strength and give some 18650 cells a go. Ordered some new reclaimed LG 2900ahr cells from this thread http://endless-sphere.com/forums/viewtopic.php?f=31&t=61608 and BMS from EM3ev with the plan to build a 14S 4P setup.
Unfortunately I will need to go down the path of soldering the pack as opposed to spot welding but I have a good high powdered iron and experience soldering batteries from previous projects.
Biggest challenge will be building the enclosure in such a way that it it takes up the least amount of space possible and provides an OEM look to the bike. Also, I want to avoid the need to have any aluminium welding done.
Anyway, here is the design shape I have come up with at this stage. This bike handles great and should be even better with the low mount pack.
Modbikemax
1 kW
The battery box is always the most challenging part of an ebike project. Often a project is spoiled by duct tape and cable ties or an ill fitting padded bag. Your first battery box was elegant I look forward to seeing what you come up with on this new battery.
Samd
10 MW
I've still got the 3d printer Kepler ")
100mm square modules and some glue...
Sideplates out of polyethylene chopping boards?
I've been entertaining another ponoko laser cut case in Italian poplar, plug together Ikea style, quick hit with spray lacquer..
http://samdidgaf.blogspot.com.au/2011/03/custom-laptop-stand-on-ponoko.html?m=1
It would look nice tied into the housing of the bbs somehow like the previous design you developed.
Kepler
10 MW
Thanks for the offer Sam. I think I will need to pack the cells in tight though to fit them into the space..
Plan on using plastic side covers. I have some 5mm black Acrylic sheet which should work quite well.
Plan on using plastic side covers. I have some 5mm black Acrylic sheet which should work quite well.
Kepler
10 MW
Continued working on the design with some modifications to the shape. Looked at both 14S4P and 14S3P configurations to see how they fit.


I think I will stick with the 4P setup for now as it doesn't look too much larger on the bike then the 3P setup.
Next I transferred the design to a cardboard cut-out to see how it would really fit on the bike. Pretty happy with the fit so its time to get serious and build.

I think I will stick with the 4P setup for now as it doesn't look too much larger on the bike then the 3P setup.
Next I transferred the design to a cardboard cut-out to see how it would really fit on the bike. Pretty happy with the fit so its time to get serious and build.
jesset33
100 W
I love this build but I think battery capacity should be more
Brilliant love! Ride that thang
Brilliant love! Ride that thang
Samd
10 MW
Might be of interest Kep.
http://endless-sphere.com/forums/viewtopic.php?f=14&t=60517&start=50
http://endless-sphere.com/forums/viewtopic.php?f=14&t=60517&start=50
Hiya, just an idea, heat up pvc pipe and you can flatten it out, reform, shape it etc.
Can get it in various thicknesses too. Cheap to use if you can find some lying around
+1 to the comment that the battery enclosure is the hardest problem to solve!
Can get it in various thicknesses too. Cheap to use if you can find some lying around
+1 to the comment that the battery enclosure is the hardest problem to solve!
Kepler
10 MW
Thanks for the suggestions.
Decided to use 2mm aluminium bent to the shape I was after and joined the plate using a machined aluminium spacer. Plan is to use 4 of these spaces to attach the side plates too.


I then cut the side plates out of 5mm Acrylic sheet and shaped it fit exactly within the the metal case. These will then be screwed to the aluminium spacers.
Haven't decided how to attach the battery box to the bike as yet. It could simply be attached using the bottle cage screws however I would prefer it to be quick removable for charging purposes.


Decided to use 2mm aluminium bent to the shape I was after and joined the plate using a machined aluminium spacer. Plan is to use 4 of these spaces to attach the side plates too.
I then cut the side plates out of 5mm Acrylic sheet and shaped it fit exactly within the the metal case. These will then be screwed to the aluminium spacers.
Haven't decided how to attach the battery box to the bike as yet. It could simply be attached using the bottle cage screws however I would prefer it to be quick removable for charging purposes.
izeman
1 GW
if you use the bottle mounts and screws through the case you will have to make the wall thicker. the 2mm alu will bend. better to support it with some more mm thick sheet.
Hyena
10 GW
Tidy, inspiring work as always Kepler! I'm curious how you bent the Al so accurately ? Was it a home job or did you take it to a metal worker ?
Kepler
10 MW
Thanks Hyena. The Aluminium is all hand bent at home in my workshop. Got the strip of aluminium cut to exactly 80mm wide from my suppler for $5. I then clamped the aluminium between a wooden block and various sized rods holding the bottom of the rod and block in a vice and the top with a G clamp. The aluminium sat just above the vice jaw so it would clear while bending. From there it was just hand bent around the various sized rods to give me the radius I was after. Surprisingly easy to do.
Kepler
10 MW
izeman said:if you use the bottle mounts and screws through the case you will have to make the wall thicker. the 2mm alu will bend. better to support it with some more mm thick sheet.
That is true. I think if I was to mount off the bottle mount, I would also brace it at the down tube.
Kepler
10 MW
Because these are the cells offered in this thread http://endless-sphere.com/forums/viewtopic.php?f=31&t=61608
The price is good I like to support support my fellow ES members so I figured these we a good starting point for building my first 18650 pack
The price is good I like to support support my fellow ES members so I figured these we a good starting point for building my first 18650 pack
t3sla
10 kW
You'd be crazy not to buy those cells at that price.
oatnet
1 MW
Kepler said:Decided to use 2mm aluminium bent to the shape I was after and joined the plate using a machined aluminium spacer. Plan is to use 4 of these spaces to attach the side plates too.
That is pretty slick Kep, I'll be copying that technique on a Tidalforce IO cruiser, thanks.
-JD
Kepler
10 MW
A bit more progress on the battery case.
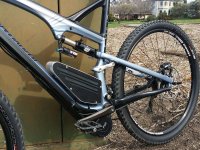
Firstly the mounting system. I wanted this setup to be quick release but super stable and secure. By using countersunk hardened screws on the bottle holder attachment points, a nice solid lip for the battery case slide plate was created.

A slide plate was then fabricated out of 1.2mm Cromo Steel with elongated holes for mating with the bottle holder screws. Makes for a very secure attachment however I still need to come up with second attachment point at the back of the case to secure it the seat tube.
View attachment 5
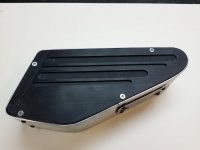
Finished off the side cover attachment posts and installed them into the main frame of the case.

Next job was the side covers. Rough cut them out of 5mm Acetal sheet then finished them off in the mill. Added some simulated vent holes to break up the large surface area and sanded it with wet and dry to give it a nice mat finish to match bike colour scheme.


And finally the completed battery case ready to accept 56 x 18650 cells and 14S BMS. Hope they fit :lol:

Firstly the mounting system. I wanted this setup to be quick release but super stable and secure. By using countersunk hardened screws on the bottle holder attachment points, a nice solid lip for the battery case slide plate was created.
A slide plate was then fabricated out of 1.2mm Cromo Steel with elongated holes for mating with the bottle holder screws. Makes for a very secure attachment however I still need to come up with second attachment point at the back of the case to secure it the seat tube.
View attachment 5
Finished off the side cover attachment posts and installed them into the main frame of the case.
Next job was the side covers. Rough cut them out of 5mm Acetal sheet then finished them off in the mill. Added some simulated vent holes to break up the large surface area and sanded it with wet and dry to give it a nice mat finish to match bike colour scheme.
And finally the completed battery case ready to accept 56 x 18650 cells and 14S BMS. Hope they fit :lol:
Attachments
Kepler
10 MW
tahustvedt
10 kW
Looks great. Integrates really well with the look of the bike.
Almost looks factory made John. Great stuff!
Similar threads
- Replies
- 1
- Views
- 310
- Replies
- 6
- Views
- 1,032
- Replies
- 8
- Views
- 517