Left-Hand Crank Drive, 35 mph, highly versatile build

jcerrona

100 µW
Joined
Feb 12, 2011
Messages
7
First, I'd like to say thanks to everyone in these forums for all the information and great ideas. Until now I've just been a "taker" from this forum, but now I'd like to share my build so that perhaps others can learn from my mistakes and success. Perhaps you have similar goals to mine, and will find this post useful.

Goals
Create an electric bike that:
1. accomplishes my 16+ mile commute in 45 minutes or less without extreme effort (traffic is awful, but I find the un-assisted bike commute too physically draining to do every day). My initial goal was a top speed of 40 miles per hour.
2. assists me in pedaling...I still want to get exercise.
3. looks at least somewhat like an ordinary bike so that it doesn't stand out to much
4. utilizes my bicycle's 27 gears so that it has maximum efficiency and versatility
5. will last several years without replacing major components (i.e. motor, batteries)
6. cost me less than $1000
7. would allow me to experiment with gearing ratios and be very flexible in this regard

Specs
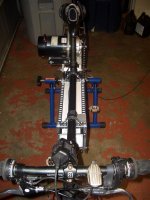
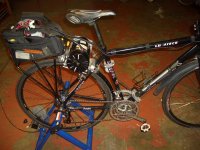
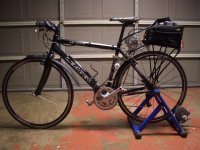
Motor: 36 volt, 600 watt gear-motor, with fan, ~7:1 planetary gear reduction ratio, output shaft max speed 550 RPM
Controller: 36 volt, 650 Watt, 25 amps max, hall effect thumb throttle, power-cut brake lever
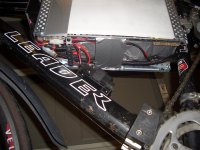
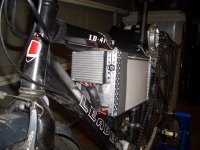
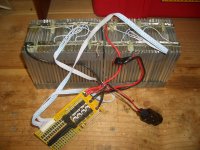
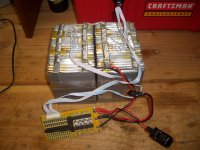
Battery: 36 volt, 20 aH, LiFePo with BMS
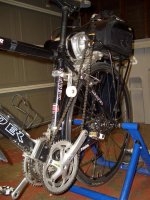
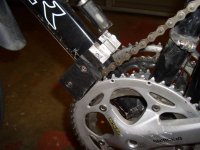
Gearing: 10-tooth sprocket on motor output shaft to 52-tooth chain-ring on left side of bottom bracket. This means that if the motor is running at its max speed, it will force me to have a cadence of 105 RPM. I shoot for a cadence of 80-100 RPM.
Other features: custom chain tensioner, chain guide (to prevent it from falling of left chain-ring)
Vendors: TNC scooters, electricscooterparts, monsterscooterparts, robotmarketplace, Ebay (daoji666@126.com), numerous online bike part stores, Fry’s, McMaster-Carr
My favorite vendor was TNC scooters. They were the most helpful and had the best prices. I should have bought everything from them.

Final Results
Top Speed: 35 mph
Usual cruising speed: 28-30 mph
Total Cost: $916
Total Cost after mistakes: $1200
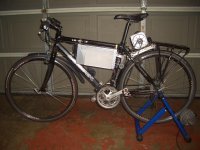
Overall a great commuter vehicle. I can consistently do my commute in 40-45 minutes and now I really look forward to it. The motor utilizes all 28 speeds on my bike so it can take hills just as easily at it takes the flats.
Mistakes/Learnings
The biggest difficulty was mounting the motor to the frame and dealing with frame/mount-bracket flex when under load. My first mounting schemes were woefully under-built and flexed so much that the chain would always fall off the chain-ring. I destroyed a chain and put lots of gouges in various components. Even now, with a better mounting scheme, the frame and everything flexes enough that a chain guide and active chain tensioner are necessary to keep the chain in place. One downside of this design is the length of the chain. It just requires a lot of chain management.
Another issue was figuring out how to mount a bunch of right-handed things on the left side of the bike. I had to buy two sets of clipless pedals since I needed two right-handed pedals. Also, the clipless pedals needed to be symmetric with respect to the cleat since I would in effect be using them backwards. The most cost effective option I found were the cheapest egg-beaters.
The controller got really warm when put inside the rack bag, so I have loosely strapped it on top of the rack bag so that it gets convective forced flow air cooling while I ride. The motor, controller, and BMS only get mildly warm after 45 minutes of full throttle. If it starts to rain, I have a rain cover that goes over everything…not the cleanest option, but it works.
The motor/power-system behind all the gearing can really do some damage. I broke chains, ruined derailleurs, and chewed up sprockets before I got it right.
Another downside of this design is that the back of the bike is very back and top-heavy.
 

Attachments

  • CIMG8236 (Large).JPG
    CIMG8236 (Large).JPG
    274.9 KB · Views: 1,971
  • CIMG8224 (Large).JPG
    CIMG8224 (Large).JPG
    211.6 KB · Views: 511
  • CIMG8222 (Large).JPG
    CIMG8222 (Large).JPG
    185.8 KB · Views: 602
  • CIMG8233 (Large).JPG
    CIMG8233 (Large).JPG
    219.9 KB · Views: 511
It looks good. What specific motor and gearbox is that?

Have you considered fatter tires for a little suspension, with the extra weight of the battery and motor on there? Or are your roads smooth enough to not worry about that? (they aren't, here in Phoenix)

Also, to help with the over-rear-tire weight/balance issues, you might consider splitting the battery pack into two halves, running each in a lower-slung pannier on each side (using either removable bags or fixed boxes, depending on your preference). You'd also get your rear rack back for cargo. ;) Only thing you'd have to severely modify is lengthening the balancing wires on half of the pack, running the BMS in just one of the two halves. If it's like a Ping, with pouches instead of cylindrical cells, the pack itself would need rewrapping tightly in tape to keep the pouches compressed, once split in half. If it's cylindrical, then there's less worry about how tightly wrapped it is except to keep the cells from shifting around and popping tab welds.

Controller could be bolted underneath the motormount if it's thin enough (or the rack if not), and waterproofed at all connectors and wire entrances. Would be cooled some by the air off the tire as well as airflow past it from travel.

FWIW, on CrazyBike2, with a powerchair motor driving thru the gears in a similar way (but via jackshaft), I had similar problems with frame flex and chain derailment, with multiple tacoed chainrings and mangled chains, among other things. After about a year of that I had to retire that drive and after it sat unused for more than half a year I revived it with a hubmotor, though I plan to have another go at the chain drive as soon as I have the time to, with some new ideas and parts I've got.
 
Nice build, man. Not a bad mid drive setup. I myself would go with a mid mounted battery though, yeah that rear has got to be insanely heavy.

I am surprised that you can do all of that under ~$1000. I take it that you made all the aluminum bits yourself?
 
I really like the way the motor mount integrates into the rack mount.

But I agree, the battery could be mounted different. Don't tell me the tail doesn't wag, we know it does. However, you can live with a lot of poor handling on a street bike, compared to dirt trail riding. Can't be any worse than my bike, when loaded with 50 pounds in panneirs and on the rack. It might be possible to mount the battery in the frame. It's hard to believe, but pedaling a bit bowlegged takes seconds to get used to. 5 inches wide battery box is acceptable.

We're nit picking you, so don't take too much offence. This is a really nice homemade chain drive.
 
amberwolf,
Thanks for the comments. The motor is a Chinese electric tricycle model. It's made by Unite Motor, P/N MY1122ZXF. Nothing fancy...you can buy it at electricscooterparts or tncscooters. I forgot to mention that it is brushed. The biggest downside is the open cooling fan...it makes waterproofing very difficult. Also, it's quite heavy at 16 pounds (gearhead+motor).
Regarding the tires, I have ordered slightly larger volume Continental Gatorskin Hardshells. The roads/trails are generally pretty good here in the Bay Area, CA, but yes, the tires shown are not ideal...I would definitely like more cushion and flat protection. Fixing a flat on the rear tire is very difficult with all that weight back there.
If I were to split the battery up I think I'd want to put it in the middle of the frame to move some of the weight forward. I do plan to bolt the controller under the motor someday.
I took a look at your CrazyBike2...lots of creativity...I'm continually amazed. I considered using a powerchair motor like that too. I look forward to seeing future builds.

neptronix,
Thanks, yes I would someday like to split the battery up and mount it in the middle triangle.
I have access to a small machine shop at my work (band saw, mills, CNC, lathe, etc.). This was a huge help...I definitely could not have done this for <$1000 without this resource. I bet that it would cost me at least twice as much if I were to get a shop to make this stuff. I'm not a machinist, so it doesn't look that great, but it works.
The battery (most expensive part) was ordered direct from China (via ebay) and cost <$400 dollars. That also helped keep the price down...we'll see how it performs over a long period.

dogman,
Yes, the tails wags:) It feels like it has a mind of it's own...I think its gravitational field may have pulled in a few orbiting pieces of debris.
I agree with everyone here that a good change would be to move the batteries.
Could you point me to somewhere documenting your various builds?

Once again, thanks for the responses...
Jon
 
jcerrona said:
The motor is a Chinese electric tricycle model. It's made by Unite Motor, P/N MY1122ZXF. Nothing fancy...you can buy it at electricscooterparts or tncscooters. I forgot to mention that it is brushed. The biggest downside is the open cooling fan...it makes waterproofing very difficult. Also, it's quite heavy at 16 pounds (gearhead+motor).
Ah; similar to the powerchair motor/gearbox, then. :) The big difference is the powerchair gearbox is right-angle, and makes mounting the motor a bit easier in some places, for me. ;)

It's possible to build a box around the motor's cooling vent areas that would have a pipe at intake and output with a bend pointing downward for air intake, so that water can't directly run in. If they don't align with the tire, then water can't get splashed into them very easily, either. They just have to be large enough diameter to allow airflow sufficient to cool the motor.

Regarding the tires, I have ordered slightly larger volume Continental Gatorskin Hardshells. The roads/trails are generally pretty good here in the Bay Area, CA, but yes, the tires shown are not ideal...I would definitely like more cushion and flat protection. Fixing a flat on the rear tire is very difficult with all that weight back there.
Oh, yes, that is almost always a problem on either an ebike or a cargo bike (or worse, ones like mine that are both). For that reason I use Slime sealant intended for tubeless tires, with little rubber chunks in it, that tend to block even very large holes from things like roofing nails that tear up stuff bad. But even more importantly, I use the Slime protection strips between the tube and the tire, so that generally nothing ever even reaches the tube (except for sidewall punctures, since the strips can't reach up that high). They do all add weight to the wheels, but not that much and it's offset so much by never ever having to fix a flat by anything other than very occasionally pumping up from one after it's been sealed by the Slime, that I don't care. :)


If I were to split the battery up I think I'd want to put it in the middle of the frame to move some of the weight forward. I do plan to bolt the controller under the motor someday.
Moving to the triangle is the best option, but requires the most modification of the pack. Usually it's really easy to split a pack like yours right down the middle (often they seem to be already made in two halves, individually taped together inside the main tape wrapping), making low-side mounting a snap compared to what you might have to do to adapt that shape to the triangle. If you don't mind the bowlegged pedalling you could just mount the whole cube in there as-is, as long as it clears the cranks. ;) That would be the simplest of all, and fix the weight distribution easily, but I have doubts that it would clear the cranks properly in the spot that it would fit. :(

I took a look at your CrazyBike2...lots of creativity...I'm continually amazed. I considered using a powerchair motor like that too. I look forward to seeing future builds.
As soon as I get enough time for it, I hope to start a new version of CB2 (there's already a thread for it full of ideas
http://endless-sphere.com/forums/viewtopic.php?f=3&t=16920&start=0
but I have to whittle it down to what I will actaully build!).


Yes, the tails wags:) It feels like it has a mind of it's own...I think its gravitational field may have pulled in a few orbiting pieces of debris.
It may be possible to stiffen the rack so this wagging is minimized, and that would also probably reduce the chain alignment issues, since the motor moves when the rack does, right?

But moving the battery off the rack would also probably fix the wag, and is a better long term solution unless the motor mount also needs stiffening.

BTW, you might also look at Eric Peltzer's ebike pages. Though he does not go thru the cranks like yours, his mounting stuff may help.
 
This link takes you to the most recent. All my bikes have been stupid simple hubbies though.

Numerous build threads in the pics section. All start with Dogmans ----- bike. Somewhere in there is a thread of just pics of all them, All dogmans ebikes. but I couldn't spot it.
 
amberwolf, can your powerchair motor run at 36 volts reliably? If so, where did you find it and what is it's power rating and type (brushed/brushless)? I wanted to use a right-angle gearhead, but I didn't find a good combo with a 36 volt, 600+ Watt motor.
I would actually rather move the motor/gearhead to the middle triangle to shorten the chain length and keep the batteries in the back. If I could find a good right-angle gearhead + similar rated motor, that would be great.

Jon
 
jcerrona said:
amberwolf, can your powerchair motor run at 36 volts reliably? If so, where did you find it and what is it's power rating and type (brushed/brushless)? I wanted to use a right-angle gearhead, but I didn't find a good combo with a 36 volt, 600+ Watt motor.
Yes, two different motors ran fine at 36V (designed for 24V), and I don't think I even really had the right gearing ratio to the wheel for them. :) I ran the second one at 48V for a short while, but trashed too many parts from misalignment in so few rides that i stopped using it at all for awhile.

They are both "invacare" motors. One is a two-pole 300/350W motor, and the other a 4-pole 600/650W motor. There aren't actual ratings on either one, but those are educated guesses by the tech that donated them. The 4pole is much better than the 2pole, for torque and total power, but it does eat more power in the process. 4poles have 4 brushholders sticking out, and 2poles have two, usually, making them easy to identify when looking for them by pictures or on scrapped equipment. They don't have fans on them or real ventilation, but they're meant to run direct drive wheels for hours at a time at full speed. :) Gearboxes seem noisy, but not too bad.

If you need specific model info I'll see if I can get it off the labels.

I would actually rather move the motor/gearhead to the middle triangle to shorten the chain length and keep the batteries in the back. If I could find a good right-angle gearhead + similar rated motor, that would be great.
Somewhere I have another 2pole unit with gearbox (I kinda overheated my first one in a derailment, though it still works fine), if you wanted to experiment with it you can PM me to work out cost/shipping/etc. But you can probably find one locally for cheaper if you look hard enough on Craigslist and Freecycle and thrift stores, or make friends with powerchair service centers and the like. :)

The nice thing about most of these powerchair motors is that they are *designed* to be clamped to a tube, making them relatively easy to mount on frames. But can just be bolted to a flat mountng plate, too, like I did with CB2. So you could mount it on the seattube, for instance, verticaly, or possibly on the downtube or maybe under the BB like I did on CB2 (but i have no wheel n the triangle on that BB).

You might want to browse thru my old Electricle blog at http://electricle.blogspot.com for lots and lots of pics and descriptions of various iterations of CB2 and those motors, problems and triumphs I had.
 
I'm thinking of doing something similar with free-wheeling cranks, since I'm lazy and don't want to pedal :mrgreen:
Guys, it is possible to have free-wheeling crank on both sides with off-the shelf parts? I suspect there my be threading problems.
 
amberwolf, thanks for all the info. I will look into those motors/gearhead combos.


blueb0ttle2, I'm not sure of all that you want to do, but the only sources I know of for off-the-shelf free-wheel cranks are here:
1. http://www.cyclone-usa.com/store.php?crn=203
If I could do it again, I would consider buying the 500 watt cyclone kit (http://www.cyclone-usa.com/store.php?crn=199) as well as the battery I have. The setup seems really clean and efficient, and I think it's a good deal...it would have cost me less than my setup.

2. http://www.schlumpf.ch/hp/schlumpf/antriebe_engl.htm
These are really nice, expensive, Swiss-made crank/gearbox/free-wheel combos. You'd have to find a supplier in the US.

I don't think you'll have threading issue with either of these since they are made to do exactly what you are talking about.
 
blueb0ttle2 said:
I'm thinking of doing something similar with free-wheeling cranks, since I'm lazy and don't want to pedal :mrgreen:
Guys, it is possible to have free-wheeling crank on both sides with off-the shelf parts?
I'm not sure if anything is made to do what you want. Sounds like you want to drive the left crank chainring, to drive teh bb that then drives the rigth crank chainrng to then drive the rear wheel.

To do that, without spinning the pedals/cranks, you would have to make either:
-- the cranks connect inside teh BB wiht an axle inside a tube, where the tube is freewheeling around the axle and the tube contains the chainrings,
--or the cranks have freewheels to connect to the axle itself, whihc would have the chainrings on it.

The first would be eaisier to build but it would not fit inside a regular BB, I think, forcign alteration of your bike frame. Or you'd have to make the cranks farther apart to hold the parts needed outside the BB, unless you make your own thin needle bearing races and pawls and such for it all, instead of the typical cartridges or ball bearings.

THe second woudl need custom crank arms that had freewheels inside their mounting points, and then adapters for the chainrings to run the on the BB axle without crank arms/spiders. Probably also need a custom bb axle to fit all that on the ends, wider than usual.
 
Maybe I should just use the cyclone kit :lol: Making a dual front freewheel sounds like a huge hastle, and a far from elegant solution. Both my ebikes are in the middle of repairs/mods, and so I've been trying to think of ways to improve them. Either way, this build is pretty neat, and I was thinking of imitating it on my Ezip, but perhaps that is not so practical in my case.
 
Here's a little update now that I've put 650+ miles on the bike.
I've been riding the bike to work every day, rain or shine.

Biggest Problem: Flats (started out getting one every other day)
Solution: Continental Gator Hardshell 25c tires, tube protectors, extra thick premium tubes

2nd Biggest Problem: Lack of shock absorbtion. Half of the flats I got initially were pinch flats from me hitting things (small pot-holes, rocks, etc.) at much higher speeds than I was used to. The lack of shock absorbing features in the bike limits how fast I can ride in certain conditions. Someday I hope to put this system on a full suspension frame.

With no free-wheels between the motor and the crank, shifting+throttle+pedaling efficiently takes practice...probably similar to learning how to drive stick-shift. At first it was a bit stressful, but now that I've gotten used to it, the bike is really fun to ride.
I did take the bike on a longer ride to see how the battery would perform. After about 25 miles, the power output was noticeably less and I would guess I could only go about 25 mph on the flats.
 
Well I finally got around to taking the advise of some of you e-bike veterans...
I took apart my battery and re-configured it into a shape that fits in the main triangle of my frame.
The bike handles much better now. It takes speed bumps and fast turns much better, and it's not so unwieldy to handle. I think it will also be easier on the rear wheel/tire and on the bike in general.

I put the controller in front to get maximum air cooling and I mounted the BMS under the battery and left the FETs exposed so it too would be cooled by the wind. The BMS was getting very hot inside the rack bag and I was worried that its life would be decreased since it was seeing large amlitude temperature cycles. The BMS is shielded from water splashes by a baffle and the fender.
 

Attachments

  • CIMG8462 (Large).JPG
    CIMG8462 (Large).JPG
    226.3 KB · Views: 510
  • CIMG8461 (Large).JPG
    CIMG8461 (Large).JPG
    226.9 KB · Views: 510
  • CIMG8463 (Large).JPG
    CIMG8463 (Large).JPG
    147.5 KB · Views: 601
  • CIMG8460 (Large).JPG
    CIMG8460 (Large).JPG
    237.6 KB · Views: 510
  • Battery After.JPG
    Battery After.JPG
    267.1 KB · Views: 1,963
  • Battery Before.JPG
    Battery Before.JPG
    239.2 KB · Views: 510
Back
Top