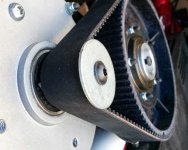
LightningRods mid drive kit

LightningRods said:
jimnasium said:
I'm not too confident that the belt will stay on. Mine keeps wanting to "creep" off when turned. I've tried adjusting the jackshaft angle, and think it's pretty square, but it seems like it would be better if there was some kind of cover piece as in the original GnG kit (see attached photo).

You didn't attach the photo but I know what you're referring to. That guard is meant to keep clothing and body parts out of the belt. It's not meant to keep the belt on and the belt should not rub it.

Do you still have the flange? I'd try reattaching it with epoxy. If you are able get the pulley off I'll repair it for you myself. I fear that once the press on pulleys are pressed on, it's a done deal even without JB Weld.

I'm going to both look for a more secure physical attachment for the flange and reinforce the attachment with epoxy. The belt should not run against the flange constantly but it's still good to have as a 'fence' for the belt.


will these more secure options be able to be executed separately on our end? as far as i understand its part of the motor now.
 
My belt would walk off about 2mm off the large pulley when I made the belt too tight. You may want to back the tension off a tad bit. Keep in mind that all freewheels don't spin true when they are freewheeling. You should adjust the tension when the freewheel position is not the slack position. I hope this makes sense. (-_-!)
 
emaayan said:
will these more secure options be able to be executed separately on our end? as far as i understand its part of the motor now.

I've tried to offer a lot of different solutions to people and I know it gets confusing. Jim has a smooth bore press on pulley that is a retrofit fix for the GNG belt drives. You are ordering a complete kit. That comes with a 12mm keyed output shaft on the motor. The pulley that fits that shaft is externally identical to the GNG one. Internally it has a different bore and is secured by a 4mm square key and the retaining bolt on the end. Those pulleys are easily removed and replaced. Soon I'll have a thread on version of this pulley for the 60V chain drive GNGs.

I used a center punch to add additional bulges to the lip Steve pressed into the pulley to retain the flange. The lip looks sanitary but apparently wasn't enough to hold the flange securely. I also filled the gap between flange and pulley drum with cyanoacrylate adhesive.

flangedimples.jpg
 
so you're saying i shouldn't rum in the same problem he did with the jumping flange?
If that is so then it would be a good idea to seperate theses problems to a different thread. Cause I was starting to get anxious ..
 
Nothing is going to get separated out. It's up to you to control your anxiety. People can and will write anything here.

The mods I've made to the pulley will help it resist mishandling. If enough force is put on the flange it will still come off. I've done a lot of run time on these pulleys and have never had a flange pop off. But I adjusted the belt correctly before running the motor. There should be little to no pressure on the flange when the belt is properly aligned and adjusted.
 
I am looking forward to a progress report on that hack.
The gng bracket is intended to keep stuff out from the underside of the belt, it's not intended to stop the belt from walking away. I really don't think you want *anything* to rub the side of that belt...my gng experience tells me that belt will fail from that flange side, inwards.
Interested to see how it holds.
 
LightningRods said:
You didn't order a chain guard. I gave the early buyers of the complete kits free chain and pulley guards. When you order parts a la carte you get what you order.

I did, and just sent you a PM.
 
I manage a large corporate farm, within this we run literally dozens of Polychains on various equipment, some of it very high-tech vineyard and orchard implements. The one suggestion i would like to make is possibly "relieve" I.E. "dish" the outer edge outward a bit to keep the belt from possibly walking up. This probably won't be an issue with proper tension and alignment.Although this isn't perfect by Engineering standards, it should suffice. Good luck, and Mike is the man that will get results!
 
Mike, for clarity of myself and benefit of others interested, could you list exactly what is included with the BIG BLOCK kit that I ordered so I don't inadvertently expect something I am not supposed to get?

Also, we didn't actually work out the final total beyond the $400 deposit. Could you tell me what the final cost will be?
... I know, we probably should have worked this out before I sent the deposit.... :wink:

Thanks Mike!
 
Mammalian04 said:
Mike, for clarity of myself and benefit of others interested, could you list exactly what is included with the BIG BLOCK kit that I ordered so I don't inadvertently expect something I am not supposed to get?

Also, we didn't actually work out the final total beyond the $400 deposit. Could you tell me what the final cost will be?
... I know, we probably should have worked this out before I sent the deposit.... :wink:

Thanks Mike!

The big block kit is basically the same deal as the small block kit except that the motor is $225 instead of $125. I haven't figured out the difference in cost on the larger brackets. You might be looking at $25 more. All of my kits come complete except for bicycle chainrings, controller/throttle and other controller accessories, and batteries. Your big block kit should be around $925 based on current pricing.

In the case of Jim, he paid extra for belt and chain guards and I failed to record it on his order. I'll be sending him the parts he paid for.
 
jimnasium said:

I'm glad that you found a fix you're happy with. The only problem with using a fender washer instead of a proper flange is that the fender washer is flat and the flange has a curve designed to minimize contact with the belt. If you have your belt adjusted so that it rubs on the fender washer constantly it will wear prematurely. A better solution would be to leave the flange in place and back it up with a large washer. I'm going to try to find the right sized washer to make that work.
 
LightningRods said:
I'm glad that you found a fix you're happy with. The only problem with using a fender washer instead of a proper flange is that the fender washer is flat and the flange has a curve designed to minimize contact with the belt. If you have your belt adjusted so that it rubs on the fender washer constantly it will wear prematurely. A better solution would be to leave the flange in place and back it up with a large washer. I'm going to try to find the right sized washer to make that work.

Actually, that's not a problem. The fender washer sits outside of the existing flange. The original flange provides the curve to gently guide the belt back into place, while the washer provides a mechanical backup to keep BOTH the flange and belt from falling off.

And, yes, I do plan to align the belt as best as I can to keep it from creeping in the first place.

Unfortunately, I'm done for a while. I managed to break the pin on the kart chain tool, so I can't finish the project until I order a new one... I'll get one online.
 
Mike,

New question. I noticed the 2 set screws on the jackshaft near the secondary gear. That little gear is a few millimeters off from the chainring sprocket. Can I move that little gear in/out if I loosen those set screws? Otherwise, I'll have to take apart my chain ring again to insert spacers on the #219 ring, or move the whole BB to the right with an additional spacer.

IMG_20140727_085307.jpg
 
jimnasium said:
Mike,

New question. I noticed the 2 set screws on the jackshaft near the secondary gear. That little gear is a few millimeters off from the chainring sprocket. Can I move that little gear in/out if I loosen those set screws? Otherwise, I'll have to take apart my chain ring again to insert spacers on the #219 ring, or move the whole BB to the right with an additional spacer.

View attachment 1

The secondary driver sprocket has two set screws that secure it to the adapter sleeve inside. You can move the sprocket after loosening those screws. We put dimples in the adapter sleeve to help keep the sprocket in place. You will have to move the sprocket enough to avoid those dimples or the sprocket will slide back into it's original position.

My record of your order shows that you have my tube jackshaft housing. That housing is threaded and can be moved side to side to improve sprocket alignment. That may be a better way to do it.
 
Hi,

http://www.ebikes.ca/news/isis-bb/
ISIS Torque Sensing Bottom Bracket
July 27, 2014 3:02:45 AM PDT
A number of people with modern bikes have been hesitant to add a torque sensing bottom bracket to their ebikes because it meant changing over their cranksets to a square taper model as well.


Well, at least there is one choice for a splined interface. The company NCTE has produced a torque sensor that has the same electrical specifications as the THUN devices, but which uses an ISIS spindle. We've got a 128mm spindle length model in stock for those with ISIS cranks keen to try it out.
 
MitchJi said:
Hi,

http://www.ebikes.ca/news/isis-bb/
ISIS Torque Sensing Bottom Bracket
July 27, 2014 3:02:45 AM PDT
A number of people with modern bikes have been hesitant to add a torque sensing bottom bracket to their ebikes because it meant changing over their cranksets to a square taper model as well.


Well, at least there is one choice for a splined interface. The company NCTE has produced a torque sensor that has the same electrical specifications as the THUN devices, but which uses an ISIS spindle. We've got a 128mm spindle length model in stock for those with ISIS cranks keen to try it out.
Yey But i doubt 128 mm will be long enough for l-r kit
 
ebike11 said:
Anyone take some video of the motor in action yet?? :D

I will as soon as I get everything back together. :wink:

It may not be the most accurate since I'm not using the same BB or the #219 set up on the secondary side.
 
I ran over to Fastenal to get some fender washers and was lucky enough to find some thick ones exactly the same diameter as the aluminum pulley flange. I think we can consider the flange pretty well reinforced now. The fender washer is optional. I'll ship one with every pulley I send out from now on. It's up to you whether you use it or not. The fender washer will protect the flange from damage from most impacts as well. That was a great suggestion, KMB. Thanks!

fenderwasher.jpg


We have all of the parts and hardware in the shop to start making the thread on pulleys for 60V chain drive GNG. If you're tired of all of the noise from the 8mm chain drives the conversion to 25mm GT belt will be available in about a week. You have the option of keeping the GNG sprocket hub and small freewheel in the secondary driver sprocket or converting to a much stronger full size freewheel in the large primary pulley.

"X" denotes kit currently in production.

Completed- Ron R- US
Completed- Eric- US
Completed- Ken F- Canada
Completed- Dennis P- Canada
Completed- David B- UK
Completed- Leif D- US
Completed- Herman L- US
1- Elhanan M- Israel X
2- Dawson J- Canada X
3- Len K- US X
4- James D- Canada X
5- Bryan K- US X
6- Vincent D- Canada X
7- Brian M- US X
8- Jeremy L- US X
9- Andrew F- UK X
10- Tom F- US X
11- Stephen F- Switz
12- Paul D- US
13- Richard K- US
14- Zach J- US
15- Dean M- US
16- Derek M- Canada
17- Tom E- Australia
18- Nathan B- Canada
19- Fabrice V- France
20- John B- Florida, US
21- Seven H- US
22- Jason S- US

Early production at the introductory price is closed. When I get the queue cleaned up to about 30 days lead time I'm going to take a hard look at the time and materials invested in producing the kits and price them accordingly. I apologize for the wait while we sorted out our production process. You early kit adopters got a great price on your kits. Thanks for your patience and your support!
 
I'M NEXT!!! I'M NEXT!!!I'M NEXT!!! I'M NEXT!!! :D :lol:
 
Does anyone know what size the bottom bracket on a Trek Fuel EX7 2008 model will be?
I'm off to look at one tomorrow morning, could be the right frame for my L/R kit.

EDIT: From googling I believe it has a Shimano M532 external bottom bracket with hollotech crank??? Whatever that means.
 
emaayan said:
I'M NEXT!!! I'M NEXT!!!I'M NEXT!!! I'M NEXT!!! :D :lol:

Yes my patient and long suffering friend. It is finally your turn. :D
 
Back
Top