
You are using an out of date browser. It may not display this or other websites correctly.
You should upgrade or use an alternative browser.
You should upgrade or use an alternative browser.
My custom sprag bearing freewheel sprocket
- Thread starter Barncat
- Start date
Had a bit of a setback after about 30 miles of testing. Broke a chunk of the inner bearing race. Not a huge surprise... I cut corners on the prototype since I no longer have a vertical mill. Just filed a flat on the inner hub, which ultimately allowed enough movement of the plain flat key to create a ramp effect- and a high stress area on the weakest part of the race. Geometric stress concentration, sharp corner, thin material. I know better.
Everything disassembled nicely. Fabricated a special T shaped key from a grade 8 bolt head on the lathe and with offhand grinding. Drilled a .250" hole in the flat on the hub, pressed in the key. Forgot to take a pic of that, but result is visible in one of the pics. New key cannot move and has over 4000lb shear strength. For a variety of reasons this inner keyway design is rather complex. Also tack welded a lathe made clip to retain the bearing as opposed to the peening attempt first time. The obvious solution is a groove and retaining ring but I cut the hub a 1/16 or so too short originally...
It's all reassembled and back on bike. Will test to destruction. Turns out it's not a torque problem with the #25 bearing, but thin races.
As mentioned a couple posts ago, a CSK30PP is a better choice- thicker races, even higher torque. Getting started on upgrade...
Attachments


Last edited:
Update: I broke the yellow bearing outer race 300 yds from the house a couple weeks ago. Combination of too much set screw pressure and crappy bearing. Ordered a couple more of the brown shielded units, installed one with just a snugged set screw and loctite, and it's got another 40 miles on it and looking good so far. Very chilly and wet here in Tampa area lately so not much riding...
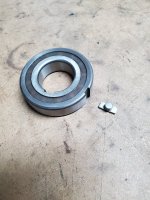
Pictured below is a beefier CSK30PP bearing and the parts I've made over the last 2 days. The inner hub is again a gutted freewheel core TIG welded to a lathe turned bushing with another custom made post mount key. Made a retaining ring out of a washer which will be tack welded on final assembly.
The outer hub was turned and faced from a short length of 2.625" steel tube, with the sprocket very carefully located and welded. The smaller sprocket ID relative to the hub creates a locating lip. Tomorrow I'll make another post mount key that locks the outer hub to bearing when pressed in with no set screw required, and TIG tack some sort of hub retainer on assembly.
Attachments


Last edited:
Fabricated the key for the outer race as per the inner race key. I've never seen this particular design solution before, but I assume it already exists... it of course requires only drilling a simple hole in a mating hub rather than machining a slot, doesn't weaken the hub as much, and they are by definition trapped and cannot pivot after the bearing is pressed in place.
Unit is done. Just deciding whether to tack the circular bent piece of welding rod in place as a retainer clip. Too cold to ride anyway. There's several inches of snow up in the FL panhandle.
Unit is done. Just deciding whether to tack the circular bent piece of welding rod in place as a retainer clip. Too cold to ride anyway. There's several inches of snow up in the FL panhandle.
Attachments


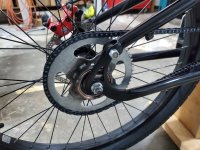
Installed the #30 bearing unit on my Hyper build. Pulling the prior freewheel off the hub required 3 minutes of propane torch, then twisting the entire wheel CCW on the 4 tooth puller clamped in a large bench vise...
Put 15 miles on it around town. Works great thus far, will see... this is the ultimate in power transmission for a high cogging motor chain drive, and the silent rolling is way aesthetically preferable to a loud buzz freewheel- with far less drag.
Put 15 miles on it around town. Works great thus far, will see... this is the ultimate in power transmission for a high cogging motor chain drive, and the silent rolling is way aesthetically preferable to a loud buzz freewheel- with far less drag.
Attachments

Elias lector
1 W
I had done something much like this with coaster brake hubs with my first build. After getting past my inability to center the sprockets it worked great and held up to the torture I dished out to the point that I ripped the spokes out of the rims on 2 different occasions, that was let's say interesting. It was completely silent and coasted forever.
Attachments

Chalo
100 TW
But when they engage, it's more positive and less violent than pawls because they're compressing and not colliding. Coaster brakes are still among the most ingenious and best engineered bicycle parts, over 125 years later.Glad you survived that carnage, but coaster brake hubs have even more drive engagement lash than freewheels.
"Zero lash" is an inaccurate exaggeration, because without some lash you don't get engagement and disengagement.
Chalo
100 TW
My point is that you can't have zero lash, because rotational windup is what engages the clutch elements, and unwinding is what releases them. In that way it is like a coaster brake hub.Nothing I said was inaccurate. My new mechanism is superior to freewheels, and certainly coaster hubs for my application.
pottsf
10 µW
Forget silent coasting - what I'm looking for is ZERO LASH. Amazingly, there seems to be nothing out there like that, even for DIY. No big torque requirement - this for a pedaled tricycle (1.375" jackshaft). Freewheel lash BUGS ME.Been pondering this problem sporadically for a couple years and finally arrived at a feasible solution. Spent the last couple weeks building this prototype. I usually don't post an invention prior to some testing, but this will work, it's just a matter of durability of the two keyway interfaces...
Advantages: INSTANT silent smooth engagement, and silent low drag coasting.
Even good quality freewheels have 3 degrees of backlash- which usually creates an annoying thwack to take up slack when twisting the throttle, plus the pawls buzz loudly when coasting which I don't like.
I began with several pieces of steel stock lying around, and a gutted cheap threaded freewheel. This design will screw on to any conventional 1.375 x 24 wheel hub. The star of the show is a CSK25PP sprag (one way) bearing capable of transmitting 63 lbft of torque that has two keyways.
The mechanism has an inner and outer hub. The inner hub was turned and bored 1" stock TIG welded to a machined heavy 3/4" washer welded to the threaded core of an old freewheel. I held good concentricity with various tricks... it's either that or spend hours making chips from very heavy bar stock. Flanged parts are problematic.
The outer hub was bored to fit the bearing with an outer lip left for location and an inner lip to locate the sprocket for welding. I used to own two milling machines but sold them due to various moves, so keyway and key work was PITA manual... the only reason this will transmit power is the two keys. Welded on a set screw assembly as pictured. Welding the sprocket to hub was a mistake as the hub ID shrank and distorted slightly but I managed to save it. As with any prototype a couple changes would be made next time.
It'll be a while before I can road test as this goes on my Mongoose Blackcomb build which is getting a new motor and new 20s Barncat battery.
Then you've hit the jackpot with this thread, assuming you can replicate my design. Effectively zero lash, and the coasting has less drag than a buzz box freewheel.
I did snap the outer race on the brown shield #25 bearing described above after 80 or so miles unfortunately... I had another brand new one so swapped it in to my original prototype for now. It failed exactly as the yellow bearing did at the stress concentrating keyway corner. Interestingly, since the bearing is a light press fit into the outer sprocket housing, it still functioned normally for the ride home. Bottom line- the CSK25PP outer race cannot handle the loading because the steel is not thick enough. The sprags never slipped. My second prototype with the larger CSK30PP is performing well. I'm refining the build process to make a third unit to retire the original.
I would note btw that a trained, or very heavy, cyclist can exert quite a bit of torque on drive components.
Attachments

Last edited:
As promised, working away at another unit with the heavier #30 bearing.
The raw stock is pictured, and I bought an inexpensive single speed freewheel for its core with the male threaded adapter shown that's intended to be used on a shaft or go kart axle. For my purposes it's an excellent mandrel to chuck into the lathe to turn the inner hub concentrically post- welding. There is no good way to cut the tricky 1.375" x 24 female threads, hence the welded assembly.
Also shown is a safe accurate setup for cutoff of the 2-5/8" od steel tube. You don't want to offhand any sizeable round stock on a vertical bandsaw. Contrary to the label that's been modded to cut metal. Page 5 of my Barncat battery thread shows more detail...
Will TIG the sprocket to outer hub, and finish up 2 keys and retainers tomorrow.
Attachments


Last edited:


Similar threads

- Replies
- 25
- Views
- 6,629
- Replies
- 14
- Views
- 4,257
- Replies
- 4
- Views
- 1,694
- Replies
- 30
- Views
- 6,146
- Replies
- 35
- Views
- 24,335