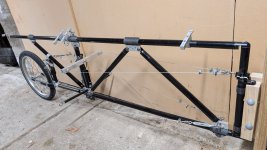
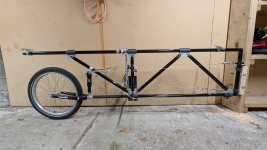
My "Mark 2" solar trailer

Looks like @solarEbike has done some efficiency measurements of the CTK-EV-300 but I can't find his results.
Yeah, sorry about that. I put a ton of effort into testing the CTK-EV-300 vs the Genasun, created a bunch of spreadsheets, edited video footage and then got busy with work and dropped the ball on posting my results. As I recall, they performed almost identically in steady-state conditions but the Genasun did better in rapidly changing conditions, such as riding in and out of tree shading. My estimate was 2% more watt-hours over the course of a multi-day tour with a mix of shaded/unshaded riding.

The potted option on the Genasun is a real benefit for ultra long tours in extreme conditions but the price point is unattractive. They used to offer an option where you can send your unit back to them to change the output voltage for a fee, only available on the unpotted versions. I did it once when I switched from 48V to 36V. Not sure if that's still available. It would be nice if they allowed the user to set the voltage but I can see how this is an edge case and is not worth it for them to add buttons and a display. Also, potting it yourself is not that difficult. I've done it myself, even managed to keep the programming headers exposed after potting.

IMG_1633.jpeg

The Elejoy MPPT sold by Grin Tech (and available elsewhere) is better value for your money and offers reasonable water protection. I would mount it with the wire glands facing down in a location where it doesn't see direct rain or sun. If you ride in very wet conditions, I would open the cover and add silicone around the door and wire entry points for added protection.
 
(everything is so expensive here in NZ - take whatever you'd pay in the US and double it as a good rule of thumb for the cost in NZ).
I hear you. When I tried to replace my US-made Therm-a-rest mattress halfway between Sydney and Perth last year, the price was just about double what I paid back home. When I tried to order a replacement handlebar for the recumbent, I was quoted $600 shipping on a $60 part from Germany.

As for dealing with US vendors who refuse to ship to NZ, have you looked into using a remailing service? I met a guy in Western Australia who told me he built several bikes for less than what they would cost locally by ordering most of the components from the US using a US-based remailing service. The US vendor sends the part to a US address and they forward it on to you. My guess is that it's only cost effective for smaller, high-value items that you can't get any other way.
 
Oh crap look at that. I had no idea. Didn't have those back in my day of 2017. So yes, that'll help to some degree. "Enough?" Don't know. But obviously some.
Another thought I had overnight - why not just add a key to the connector faces? i.e. mill a slot, say 3mm deep and 6mm wide, into the faces of the relevant connectors. Then press in a piece of, say, 6x6mm key steel, with some retaining compound to hold it if needed. I couldn't mill the slots, but I assume a local machine shop could mill the slots for me if needed (easy enough to call them and confirm). The connectors are round so may not be trivial to clamp in place for accurate milling, but hopefully the machinist will have some clever clamps to hold it accurately. I like this option because I can defer the decision until after building the thing - I don't need to solve a problem proactively that may not actually be a problem.

My shortcoming is that I have a good qualitative sense for these things, but not a good quantitative sense. So my stuff always ends up stiff and strong as hell, sure, but also heavy as sin. As I edge into the solar world, this will probably give me problems.

To start, though, you can ask DragonPlate about their return policy, just to know it.

Then, I'd suggest attempting a smaller model, like based on their 1/2" pultruded stuff, just to mess about with the technology and feel it in your hands.

(Just know that I don't take this advice very well myself, because it calls to question my omniscience and Big Brain Ability to "get everything right" the first time. Learning requires humility, and sometimes I come up short there. Sad but true.)
Yes I do "think" think that torsion-wobble will still be a problem, but also, I'd never have believed that @solarEbike's contraption would last a week, but homeboy's out there riding from Vancouver to Disney World and shizznit In Real Life. So there's my credibility for you.

Let me say this:

I got the amazing privilege of working with some of the biggest aerospace composite brains of the 1990's, and they had this line: "If something's worth doing then it's worth doing shitty." Meaning that they held their intuition -- for the as-yet-untried anyway -- in very low regard, so they looked for cheap and fast ways to mock-up their ideas, even if that meant cardboard tubes, construction paper and dental floss. Homeboys were getting paid millions to do stuff, but first, before blowing the big bucks, they were throwing cardboard and paper airplanes around a garage and crashing them into the pop machine. Once again, their humility in this regard just shocked me, this insecure nerd fresh out of engineering school.

So any kind of way that you can mock this up, like with wooden dowels or whatnot, will pay off handsomely. You could make joint pieces with a 3D printer (Prusa3D or whatever). You can get a free illegal copy of Solidworks off of [REDACTED], or be a Boy Scout and use Sketchup or whatever, learn it from the included tutorials, and use it to make up the .STL files that the printer will make for you. I did that for a much less-ambitious project years ago, before finding the confidence to let go of that Carbon Fiber Money, and it came out great.

I'll tell you this: Trying out your ideas cheaply really frees up the ambition, because you're less afraid of goofing up Your One and Only Chance at This. Like Arnold Swartzenegger in his prime asking out ugly girls. What they hell, just try them all, who cares.
I guess that's what's difficult about a project like this - it needs to be strong enough, and no stronger - beefing it up needlessly adds weight, but one of the main goals of this project is to reduce weight. Like you say, the solution to that uncertainty is to test it out! It definitely sounds like there's a consensus that I should make a model/mockup/prototype of this before doing any bonding. I guess I'm a little reluctant because I'm excited to get the final product built and in service, but a mockup will definitely reduce risk of failure, so okaaayyyy, I'll make a prototype before committing any costly CF tubes. I'll put some thoughts in a subsequent post on how I might make a prototype (but I'm imagining inexpensive 1" ID aluminium tube + adhesives less-strong than 2216 epoxy that I can cleanly remove). I've got Fusion360 and a friend with a 3D printer, so I could probably get some light-duty plastic parts made if needed.

DragonPlate does allow returns within 30 days, subject to a 15% restocking fee, and not for any custom stuff etc (all very reasonable terms imo). The idea to buy stuff, play with it, and return it, won't really work for me though I think. Getting the things from the US to NZ and back within 30 days would be a very tight turnaround, and the freight costs/sales tax/restocking fee would be an expensive exercise. I'm also fairly committed to the 1" modular connector system at this point tbh - I've got a bunch of connectors already and the return window has well passed. May as well try to build something with them. If it's a total failure, then I could make another attempt with the 0.5" pultruded system in future.

Damn you're sharp. Yes, I'm thinking of a 12-foot "spine" made of the 60-60-60 triangle truss, out of the 1/2" carbon stuff, like ~12" on a side. Maybe the pultruded stuff, or maybe the more-expensive wrapped-cloth stuff from China, for a little more impact resistance.

And then low-tech steel bits to attach it to the bike, and to the wheel fork.

So the top edge of the 60-60-60 truss would be the "fulcrum line" of the tilting panels, yes.
Sounds good. I'm sure it could be made strong enough. I'd be very interested to hear how the weight and cost compares to my use of the 1" connector system - guessing you'll need more connectors than me, but the 1/2" truss connectors are cheaper and probably a bit lighter. My design requires about 1.25kg of connectors costing ~USD840 (including a 2oz kit of 2216 epoxy, wow that stuff is expensive!).

As for strengthening the panels themselves, man I don't know. @solarEbike is out there doing his own sandwiches. Great. There's also the store-bought stuff from Rock West that costs more than the damn panels do.

And then maybe I could give each panel an "under-spine" of its own, and have a wooden or carbon fiber stick under the panel's "hard point" grommets. I just don't know.

In fact, I'm not even sold yet on actively tipping the panels at all. I want to "clobber" it by using 3x 170-watt 48"x26" panels and saying "forget it". But if I'm actually in Namibia somewhere, and running low on water, and the sun is low, and it'll be dark soon, and I have 40 miles left to go before the next hostel, I'll be hating myself for not trying the active-tilting trick back when I had a bathroom and air conditioning.
Yeah, supporting the panels under every cell (at least) is very important for cell longevity but adds a lot of weight/complexity. Coming up with a good design for that is harder than for the main structure of the trailer imo. I spent a lot of time trying to find a way to support a semi-flexible panel that wasn't too heavy, but gave up and forked out the money for some LightLeaf panels. They're much better than anything I could build. I considered using Solbian 118Q panels (same 6x6 SunPower cell arrangement as my LightLeaf panels) with aluminium strips under each row of cells and an aluminium extrusion frame supporting the whole thing, but it was going to be heavier and just as costly as the LightLeaf panels. I've got 12*3mm aluminium strips under each row of cells on my "Mark 1" trailer, and imo it's just barely sufficient at supporting the cells - there's some visible flex in those strips when I rotate the panels or point them into the wind.

@solarEbike has done a lot of modelling work to compare automatic single-axis sun tracking vs manual tracking (i.e. stop the bike and rotate panels yourself occasionally) vs fixed horizontal panels. Strong conclusion was that the equipment needed for automatic single-axis tracking adds just as much weight as the equivalent number of extra solar cells would add (i.e. the number of cells needed to gain the same benefit that the tracking gains), yet automatic tracking is far more complex. So just adding more panel and forgetting about automated tracking is a very reasonable decision. I'm only doing tracking to reduce trailer size (for transport) and because it's a cool toy (yes, I'm a nerd).

Fwiw, 3x 170W 48"x26" panels will result in a very large trailer - even bigger than my "Mark 1" trailer. It'll be a pain around town, but no problem on highway shoulders. 510W is a lot - you'll have to cover some serious miles per day (or cruise at high speed) to use all of that. I'd suggest trying 2x 170W first (i.e. design your truss so it could be extended with another panel later?) to see if that's sufficient.

OK well not to insult your intelligence, but let me hit you from the peanut gallery a bit:

1: You can always use a bigger battery(s).

2: For motor-overheating on inclines, you could try a geared motor, or a Grin Tech hub motor with that "Statorade" goop in it that helps to cool the motor down. All-Axle Hub Motor - Grin Products - Product Info

2A: In fact, mess around with their Simulator tool and see if you agree with its predictions. Motor Simulator - Tools

3: You can motorize your bike's fork also, and thus have two motors working for you.

No offense taken :)

1. A bigger battery doesn't really solve the problem - it just delays it. Assuming that during daylight hours, solar power available > motor power consumed, the battery will eventually get full no matter how large it is. Then you're back to the same problem - some solar power going unused because the battery is full. A bigger battery could help with the problem somewhat e.g. you could ride further during dark hours or in bad weather, then have additional headroom when the sun comes out again. But I've got a fairly big battery already (14S7P with LG HG2 cells, a bit over 1000Wh) and it's still a problem. Batteries are heavy and bulky too, so there's downsides to having a large battery.

2/2A/3. Yes, I love the motor simulator! I've got a GMAC geared hub motor, so it's a bit better on climbs than a DD like the All-Axle, but a 12% incline with the 180kg-190kg estimated weight of my rig on the last tour is asking a lot of any single motor. I think I can get total weight down to more like 145kg with the "Mark 2" trailer and some improvements to me/my gear. Even though that's only a 20-25% weight reduction, the simulator says the overheating problem will be improved by far more than 20-25% (more like 100-150% increase in time to overheat). I've also improved the low gearing on my bike for improved hill climbing ability.

Tbh, a second motor would probably be an easier/cheaper solution than all this weight reduction effort. If I was going to add a second motor, I'd probably add a BBS02b in current throttle mode, with a throttle mapping set such that it only kicks in when I'm at high throttle. Advantage of a BBS02b instead of a front hub motor would be that I'd avoid the additional wiring mess - a front hub would need an external controller that'd need to be mounted somewhere, while the BBS02b has an integrated controller (would just need a cable to the battery and a throttle cable to my CAv3). If the weight reduction effort doesn't solve the problem fully, I'll add a second motor. It just seems like an ugly solution though, if you know what I mean? Throwing power at the problem instead of improving energy efficiency.
 
Last edited:
I'm enjoying the quality of the discussion here. Hoping this can serve as a guide for others going forward.
Yes, it's very productive! I should have posted my Fusion360 model weeks ago, it seems to have prompted a fair bit of discussion.

Interesting. I hadn't really considered adding internally. Finding something with the right OD for an optimal bond line and enough 45° layers might be a tall order? I wouldn't rule it out as an option but if we're considering modifying tubes you already bought, I think I like adding one or two layers on the outside more as it's more effective on the larger diameter, assuming your CF connectors will still fit. I understand you're not keen to get into doing a wet layup by hand but I could give you guidance.
I think I could cope with adding a layer or two of 45° braid to the OD of an existing tube (though yeah, it'd be all new for me!). Exterior would be stronger too of course, since the diameter would be larger. The reason I'm not so keen on it is because the exterior mounting brackets are designed for use on 1" ID tube with 1/16" wall thickness, so 28.6mm OD. The closest tubes I can get locally are 29mm OD. I figured I'd already have to sand a little material out of the inside of the exterior mounting brackets to get them to fit with a proper bond line. If I add another layer or two of CF fabric (particularly if my non-expert hand layup results in more resin left behind than necessary), I'm worried that I'll then have to sand the exterior brackets so much that their strength will be undermined. Perhaps I could instead sand the OD of the tube to make it fit, and hope the extra braid layers would conform into that slight depression on the tube? I'd probably need to sand enough on the OD of the tube that I'd damage the outer-most fabric layer, but I guess I have plenty of bending resistance with the truss arrangement to live with that.

My supplier of tubes do have 25mm OD options (i.e. for an internal fit), and they can do non-standard fibre directions. I'm guessing they fabricate most tubes to order anyway. That'd leave 0.2mm on each side for a bond line, about 8 mil - a bit higher than ideal for max shear strength according to the 3M 2216 datasheet, but still well under the 17-25mil recommended for max peel strength.

I'm not convinced that joint (8) is going to be a problem. It's the corner of a triangle and it's not subject to vertical torsion (6) because it's collinear with the Bob yoke's vertical axis. There will be some horizontal twisting force (7) but the faces of your current (non-locking) connectors are oriented to resist that force.

View attachment 337583

I've been trying to simulate the twisting forces on this trailer in my head for the last couple of days and I don't feel confident that I can reliably predict what's going to happen. At one point, I was pretty sure that the bottom horizontal tube (1) and connector (2) were going to see the most twisting so I was going to suggest maybe replacing tube (1) with DragonPlate's Axially Optimized tube which has "Braided ±60 and UD [unidirectional] 0" ply orientation. But now I'm thinking those forces may be distributed through the whole truss frame and your entire design may be totally fine as is without any changes.

I like the idea of building a scale model. Maybe out of PVC plumbing pipe and fittings for all the 90° corners? 3D print the 45° connectors by scaling the models you already have here in Fusion 360? Simply constructing the model and seeing how it handles when you twist it in your hands will tell you a lot.

Yeah, it definitely sounds like there's a consensus that building a mockup/prototype model is a good idea - to figure out which joints may need attention. If it turns out to be necessary, I think I could get a slot milled into each face of joint (8) and use a piece of key steel to resist twisting there.

Hmm, so a 6m length of 25mm PVC pipe (not sure if that's ID or OD!) is a little over 100NZD. The same length of 25.4mm ID aluminium with 1.35mm wall thickness is only 60NZD from my local aluminium supplier. So I think I can do better than PVC - I could use aluminium and bond my existing DragonPlate connectors into the aluminium tube with some relatively-easy-to-remove adhesive. I'm imagining a silicone adhesive, which I can then remove from the DragonPlate connectors with a silicone remover solvent gel. If that's too weak and the connectors pull out before I can learn anything, I could cut some slots 50mm down the length of the aluminium with a hacksaw and hose clamp the tube ends to the connectors.
The challenge will be in attaching the exterior mounting brackets - I don't think I'd want to bond those as they have a rough surface on the interior which will be hard to clean up (and I don't know if that silicone remover solvent will attack the resin used in the layup). But perhaps I can get a tight enough fit with a few layers of tape over the aluminium tube (to increase its OD to fit the exterior bracket) and then clamp the brackets onto the tube (with the supplied fasteners or woodworking clamps if needed). If not, I do have a friend with a 3D printer so I could probably design/make some plastic clamps that'd take the truss connectors in the same location. Thoughts?

For the final version, I have some thoughts.

Lower the solar panels. They seem to be higher than needed? Every inch you can go lower will improve trailer handling. Cut the clearance for suspension travel to the minimum required and check that the fully tilted panel is at least 4 inches above ground when the suspension bottoms out.

Yeah, I think you're right. I set the height to be equal to my rear rack, and then set the length so that I'd have a 1:1 ratio between the height of my head above the panels and the horizontal distance from my head to the panels (for self-shading avoidance). It's quite high as a result though - 770mm above ground according to my CAD model. I could easily lower it by 40mm or so, but more than that will require some more in-depth work (which I'll do if necessary!). How high is your trailer above the ground?

It looks like you're planning on attaching the actuator mounting plate (4) with adhesive? All good, but I would add a couple of fasteners through the flat Al and CF plates to prevent creep.
Yes, sorry that was just me being lazy and not adding the holes/fasteners in the CAD model. I'll definitely pop some bolts through the Al plate into the CF tangent mount. The tangent mount will be bonded to the tube with 2216 epoxy.

The suspension pivot joint (3) might be tricky? Are you planning to use the stock DragonPlate connectors and tighten them just right so they can still move but don't have too much play? There's probably enough meat there to make it work if the tolerances are tight. At the very least you'll need a longer bolt so you can add a lock nut.
Yes, again, my apologies for misleading you with the CAD model. I need to put some work into it so that it's more accurate. My plan for that pivot joint is to use a shoulder screw with 1/4-20 thread (i.e. into the existing thread) and shoulder 5/16" diameter. The shoulder length will be long enough so that the female clevis connector faces aren't clamped to the male clevis when the screw is tightened. I'll need to drill out the non-threaded face on the female clevis connector to 5/16", and I'll drill out the male clevis to larger than that (1/2" iirc) to insert a bushing, which I can source from my local bearing shop.

I would hold off on bonding plate (5) to tube (1) until you're done testing the trailer with loads. Use dummy solar panel substitutes during testing so you know how it handles with the weight on top. I used plywood.
Sure. The idea being that if there's a catastrophic failure, I haven't wasted a costly plate? I'll be able to get some scrap 9mm thick plywood to be a fake solar panel, good idea.

The 3M 2216 epoxy is very good for this application. I've used it extensively to bond CF tubing to Al connectors and never had a bond failure. It remains flexible when cured, which is critical for surviving thermal cycling. The microspheres are not optional when mating two smooth surfaces because they assure optimal bond line distance but maybe they're not as critical on your connectors with all those grooves. The Rock West tutorial is better than the DragonPlate tutorial. The 2216 datasheet is also worth a read. The surface cleaning steps are critical to a good bond. I like cutting up a paper towel into smaller pieces and using one to wipe with IPA, second one to dry, then repeat again with two fresh pieces of paper towel, never re-using the paper. Never touch the cleaned surface with ungloved hands.
Sounds good. Oh yeah, that Rock West tutorial is definitely better than the DragonPlate one. I'd seen the DragonPlate one already and it seems straightforward enough. I'm very pedantic when doing painting surface prep and I'm sure I'll be the same here - don't want to waste any costly connectors!

Your connector screws will tend to loosen due to thermal cycling and road vibrations. Use medium strength thread locker. Check all screws regularly. Carry an extra screw. Stop and check the trailer as soon as you hear new, unfamiliar rattling noises or you will spend hours backtracking for a lost screw (ask me how I know). If you strip the aluminum threads, you can always drill out and tap the original 1/4-20 hole to 5/16" or 8 mm. In fact, you might consider doing this proactively to get more clamping force on the most troublesome connector(s)? If you've never done this before, it's easier than you think and only requires reasonably priced hand tools. Use lubricant.
Yeah I'll carry a little tube of blue Loctite (the medium strength one). The DragonPlate connector threads are stainless steel inserts, not just threads tapped directly into the aluminium connector, so it should be fairly robust. I'll drill them out and tap a bigger thread if needed though - it'd also be quite nice to change them to metric threads! Much easier to get metric screws/bolts/tools around here.
 
Last edited:
Another thought I had overnight - why not just add a key to the connector faces? i.e. mill a slot, say 3mm deep and 6mm wide, into the faces of the relevant connectors.
I do believe that this same "keying" function is served by that DragonPlate connector style that you already discovered, with that jagged circular pattern in it. That plus some LocTite and you're way past what I was dumbly attempting by just over-tightening the screw until I pulled out the threaded insert. (What a meathead.)

Like you say, the solution to that uncertainty is to test it out! It definitely sounds like there's a consensus that I should make a model/mockup/prototype of this before doing any bonding. I guess I'm a little reluctant because I'm excited to get the final product built and in service, but a mockup will definitely reduce risk of failure, so okaaayyyy.
Do your thing your way, for sure. I'm just "projecting" here. If you have confidence that your design is good, then what the hell. But if you find yourself just not quite up and doing it, then that would suggest some low-dollar experimentation and fooling around is called for.

but gave up and forked out the money for some LightLeaf panels. They're much better than anything I could build. I considered using Solbian 118Q panels (same 6x6 SunPower cell arrangement as my LightLeaf panels) with aluminium strips under each row of cells and an aluminium extrusion frame supporting the whole thing, but it was going to be heavier and just as costly as the LightLeaf panels.
Hey thank you for the hookup on these LightLeaf's. These are very nice. Some numbers:

LightLeaf 150W 52"x23": ~20 nameplate watts/pound
Custom Marine Products "Semi-Rigid - Monocrystaline" 170W 48"x26": ~11 nameplate watts/pound
Custom Marine Products "Semi-Rigid - Monocrystaline - Light" 170W 48"x26": ~13 nameplate watts/pound

Well freaking well! How you like that? What I'm "seeing" here is that these nerdy Canucks are taking the kind of super-fancy composites work that @solarEbike did by hand, and have applied some tooling and automation to it so as to then sell them to people for less than $10,000 per panel. And good for them.

(It's that armored edge around the perimeter of each LightLeaf panel that's really getting my attention.)

Yo @solarEbike: What do you say to these numbers?

@solarEbike has done a lot of modelling work to compare automatic single-axis sun tracking vs manual tracking (i.e. stop the bike and rotate panels yourself occasionally) vs fixed horizontal panels. Strong conclusion was that the equipment needed for automatic single-axis tracking adds just as much weight as the equivalent number of extra solar cells would add (i.e. the number of cells needed to gain the same benefit that the tracking gains), yet automatic tracking is far more complex. So just adding more panel and forgetting about automated tracking is a very reasonable decision. I'm only doing tracking to reduce trailer size (for transport) and because it's a cool toy (yes, I'm a nerd).
Well it's like this. 3x 48"x26" panels come together to make something 12 feet long x ~2.2 feet wide, which given turning circles and the width of my handlebars, is about the biggest rectangle of anything that I'm believing I can cram/drag/cajole through the physical world.

For goofing around town, the trailer would have to come off, no doubt.

So since that's already maxxing out panel size, any more power would have to come from tilting it also. But just ~20% more? Sheesh man that's not a lot for all the work it would take. Whether I'm doing light sensing like @solarEbike, or "just" calculating the optimum tilt angle from GPS position, compass heading and time of day (easy stuff to type into a web forum, but surely still hard to pull off IRL), yeeks man, do I really believe in my own engineering that much?


Fwiw, 3x 170W 48"x26" panels will result in a very large trailer - even bigger than my "Mark 1" trailer. It'll be a pain around town, but no problem on highway shoulders. 510W is a lot - you'll have to cover some serious miles per day (or cruise at high speed) to use all of that. I'd suggest trying 2x 170W first (i.e. design your truss so it could be extended with another panel later?) to see if that's sufficient.
Well for now I'm just playing "train set" in my head, and gunning for an attention-seeking round-the-world show-off trip, so it "has to be" all 3x 48"-long panels, if only for show. (The only way I can even conceive of shipping this across an ocean would be to rent out a 20-foot shipping container, and wait for it on the other side.)

See I'm not thinking about watts per se, but watt-hours per day. (3) x (170 watts nameplate) x (3.5 watt-hours per nameplate watt per day) = 1800 watt-hours/day. 1800 watt-hours/day / (40 watt-hours per mile) = ~45 miles/day for this big bulky monstrosity = ~70 km/day, if I'm not able to pedal much, and I'm getting ready to be old here.

Mind you I'm also thinking of using 3x (36V x 24 Amp-hour) batteries = 2600 watt hours of battery, or 1.5 days of solar, or an additional ~50-60 miles if I start the day charged up. (30 freaking pounds of batteries, man.)

100 miles/day sounds like a lot, but it's not really. There will be some stretches of South America, and Africa, where I'll really want that 100 miles.

So you can see where I'm at head-space-wise. I'm trying to go Battlestar Galactica with this thing. Mid-drive through a Rohloff so I can still struggle up 15%-17% mountains without burning stuff out, etc. That's the mental game I'm playing.

If the weight reduction effort doesn't solve the problem fully, I'll add a second motor. It just seems like an ugly solution though, if you know what I mean? Throwing power at the problem instead of improving energy efficiency.
Well shucks man, whatever floats your boat. I'm just curious as to what would happen if you started with the Mark 1 trailer that you already have right now, and "simply" bulked-up the bike with a front motor (and/or powered the trailer wheels?) and a bigger battery.

The devil on your shoulder asks:
Could it actually be shown that that would be functionally superior to what you're trying for here with the Mark 2?
 
Last edited:
If it turns out to be necessary, I think I could get a slot milled into each face of joint (8) and use a piece of key steel to resist twisting there.
Or just drill a small hole through both connector halves, perpendicular to the mating faces, and hammer in a spring pin or threaded hole with M3/M4 screw if you need it to be removable?

Hmm, so a 6m length of 25mm PVC pipe (not sure if that's ID or OD!) is a little over 100NZD. The same length of 25.4mm ID aluminium with 1.35mm wall thickness is only 60NZD from my local aluminium supplier.
It's been a few years since I bought PVC plumbing parts for a project and I remember it being stupid cheap compared to alternatives. For 60NZD, aluminum is definitely the way to go. Full scale prototype using the real connectors? And you can actually test ride it, verify suspension geometry, validate your linear actuator mounting location, etc.? That is a win in my book.

I'm terrified of silicone getting anywhere near critical bonding surfaces. The solvent will soften cured silicone enough that you can mechanically scrape most of it off but you're not going to get all of it out of all the pores and surface imperfections unless you commit to some serious sanding. I would try slitting the Al tubes, throw on one or two hose clamps and maybe add a strategically placed spring pin if the hose clamps don't provide enough hold.

Yeah, I think you're right. I set the height to be equal to my rear rack, and then set the length so that I'd have a 1:1 ratio between the height of my head above the panels and the horizontal distance from my head to the panels (for self-shading avoidance). It's quite high as a result though - 770mm above ground according to my CAD model. I could easily lower it by 40mm or so, but more than that will require some more in-depth work (which I'll do if necessary!). How high is your trailer above the ground?
Mine is 665mm from the cells to the ground according to my Fusion 360 model. Reality is probably ±20mm depending on tire selection and suspension configuration. I'm guessing you got that 1:1 target from me. Anything close to that ratio is fine. My intent was attempt to quantify the effect of shading and suggest a reasonable compromise between the two extremes I was seeing among other builders where some decided "overhead roof is the one true way" and some were putting solar panels on upright bikes where the panel was practically touching their butt.

Sure. The idea being that if there's a catastrophic failure, I haven't wasted a costly plate? I'll be able to get some scrap 9mm thick plywood to be a fake solar panel, good idea.
I was thinking to leave the option of reinforcing/replacing tube (1) if road tests indicate it's needed. Once it's bonded, making changes becomes a bigger hassle. I matched my plywood panels to the weight of my solar panels to test trailer handling and the ability of the motorized mechanism to handle loads under static and dynamic conditions.

The DragonPlate connector threads are stainless steel inserts, not just threads tapped directly into the aluminium connector, so it should be fairly robust. I'll drill them out and tap a bigger thread if needed though - it'd also be quite nice to change them to metric threads!
Well, that would explain why the threads are all shiny while the rest of the connector is black anodized. Makes sense. I didn't see the stainless mentioned in the specs and assumed they weren't doing inserts at that price point. I hate machining stainless, so many broken drills and taps...
 
LightLeaf 150W 52"x23": ~20 nameplate watts/pound
Custom Marine Products "Semi-Rigid - Monocrystaline" 170W 48"x26": ~11 nameplate watts/pound
Custom Marine Products "Semi-Rigid - Monocrystaline - Light" 170W 48"x26": ~13 nameplate watts/pound
The LightLeaf panels appear to be rigid enough and strong enough to survive on a bike trailer with just two mounting points near the centerline. Both types of CMP panels appear to be designed for mounting on a solid surface as evidenced by their installation photos and instructions, not to mention the floppiness seen in the 3rd video at the top of this page. Take a look at how much aluminum they bolted to the panel for their proposed pole mounted solution. I think it could be done with less added aluminum but you're still looking at more than double the weight per watt.
Screenshot 2023-08-08 at 3.35.21 PM.png
 
Okay, so after spending several hours in Fusion 360, I've updated the model to lower the panels. I managed to get the panel height above ground (assuming panels are parallel to the ground), down from ~775mm to 690mm. I achieved that by reducing the distance between the top and bottom booms by 45mm, and by flipping the fork so that the wheel now sits ~40mm higher (the fork has a 40mm rake; I also changed the shock mounting so that the panels aren't rotated forward/backward as a result).

Ground clearance, with the shock fully compressed and panels fully rotated, is 143mm:
full_rotation_shock_compressed.png
Leaves a little room for a fender if needed. I didn't reduce the top-bottom boom distance any further as it'd cause the actuator lower mount point to hit the rear-most bracing tube.

Thanks for the advice everyone. I'm conscious I have a bunch of comments to reply to in this thread, but it'll have to wait until tomorrow. Family duties and all :)
 
Last edited:
Yeah, sorry about that. I put a ton of effort into testing the CTK-EV-300 vs the Genasun, created a bunch of spreadsheets, edited video footage and then got busy with work and dropped the ball on posting my results. As I recall, they performed almost identically in steady-state conditions but the Genasun did better in rapidly changing conditions, such as riding in and out of tree shading. My estimate was 2% more watt-hours over the course of a multi-day tour with a mix of shaded/unshaded riding.
No worries, you don't owe us anything :) Interesting results though. I'd have expected the Genasun to be a little better steady-state too, figured they'd have better MOSFETs than the CTK-EV-300. I guess the additional cost still gets you a very robust, well-engineered unit with excellent MPPT tracking, so it could be justified on a long tour.

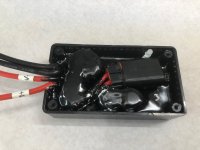
The potted option on the Genasun is a real benefit for ultra long tours in extreme conditions but the price point is unattractive. They used to offer an option where you can send your unit back to them to change the output voltage for a fee, only available on the unpotted versions. I did it once when I switched from 48V to 36V. Not sure if that's still available. It would be nice if they allowed the user to set the voltage but I can see how this is an edge case and is not worth it for them to add buttons and a display. Also, potting it yourself is not that difficult. I've done it myself, even managed to keep the programming headers exposed after potting.

The Elejoy MPPT sold by Grin Tech (and available elsewhere) is better value for your money and offers reasonable water protection. I would mount it with the wire glands facing down in a location where it doesn't see direct rain or sun. If you ride in very wet conditions, I would open the cover and add silicone around the door and wire entry points for added protection.
Yeah the Elejoy seems like great value, and you can get it even cheaper than Grin if on a particularly tight budget (though I got mine from Grin when I was making another order anyway, good to support them).
I like that I can set the Elejoy to 4.1V/cell (or even lower) for battery longevity and to keep some headroom for regen. Have you had problems with your Genasun controllers where you couldn't regen when you wanted to, or is that rare enough to be a non-issue?
 
How necessary do you feel it is to use a suspension on the trailer? I ask because the overall weight of this is rather low - I do see you intend to carry cargo on the forward platform. The placement of that and the low weight suggests the suspension will likely have a rather soft compression characteristic? I suppose the big benefit is eliminating bounce or hard shock applied to the panels or components. I have no experience with that style of trailer pivot/attachment - but I assume the whole trailer and yoke can pivot up and down around the axle attachment point?
 
Yo @solarEbike, a question about winds:

I understand that out on your test rides, there have been instances where cross-wind was a real and genuine problem for you.

Was that wind from nature, or passing vehicles, or both?
 
I hear you. When I tried to replace my US-made Therm-a-rest mattress halfway between Sydney and Perth last year, the price was just about double what I paid back home. When I tried to order a replacement handlebar for the recumbent, I was quoted $600 shipping on a $60 part from Germany.

As for dealing with US vendors who refuse to ship to NZ, have you looked into using a remailing service? I met a guy in Western Australia who told me he built several bikes for less than what they would cost locally by ordering most of the components from the US using a US-based remailing service. The US vendor sends the part to a US address and they forward it on to you. My guess is that it's only cost effective for smaller, high-value items that you can't get any other way.

Yeah I've used MyUS.com quite a bit for having things shipped to NZ, but the cost does still add up. They add a bunch of fees to each parcel that you might not know about if you only look at the "shipping calculator" section. Still, they often end up significantly cheaper than many US-based vendors' international shipping rates, so it's a useful service. They'll take dangerous goods too, which not many remailing/retail freight forwarders will. I once had two 14s5p EM3EV batteries shipped to NZ via MyUS.com -the cost was very high (1000USD iirc) but they did a good job and you just can't get quality batteries like that in NZ.

It's been a few years since I bought PVC plumbing parts for a project and I remember it being stupid cheap compared to alternatives. For 60NZD, aluminum is definitely the way to go. Full scale prototype using the real connectors? And you can actually test ride it, verify suspension geometry, validate your linear actuator mounting location, etc.? That is a win in my book.
I suspect the manufacturing cost of PVC plumbing tubes would be less than aluminium, but our building/construction supplies market basically consists of one large company that's often accused of monopolistic practices. Plumbing supplies are very costly for some reason ...
I'm terrified of silicone getting anywhere near critical bonding surfaces. The solvent will soften cured silicone enough that you can mechanically scrape most of it off but you're not going to get all of it out of all the pores and surface imperfections unless you commit to some serious sanding. I would try slitting the Al tubes, throw on one or two hose clamps and maybe add a strategically placed spring pin if the hose clamps don't provide enough hold.
Roger, no silicone. I've ended up slitting the tubes, making some wooden plugs to insert into the ID of the connectors (so that they don't compress inwards when clamped), and hose clamping the tubes to the connectors. Works great. Still trying to solve some problems with the shock wobbling in its mounts, but it all fits together nicely.
 
How necessary do you feel it is to use a suspension on the trailer? I ask because the overall weight of this is rather low - I do see you intend to carry cargo on the forward platform. The placement of that and the low weight suggests the suspension will likely have a rather soft compression characteristic? I suppose the big benefit is eliminating bounce or hard shock applied to the panels or components. I have no experience with that style of trailer pivot/attachment - but I assume the whole trailer and yoke can pivot up and down around the axle attachment point?
Maybe I'd get away with a rigid attachment and a nice wide tyre on the trailer, I'm not sure. It was easy enough to include the suspension in the design though, it's not very heavy/costly, and my chosen air shock has a negative pressure chamber for light-load applications. So I'm hopeful it'll be worth having. Yes, the idea is to improve handling and reduce peak forces applied to the panels (to try and reduce oscillations/wobbling that must be resisted with stiffer/heavier tubes). I could replace it with a rigid tube easily enough if it turns out to be unnecessary.

The actuator control computer (I'm still working on designing it atm when I find the time) will have an accelerometer, fairly capable μC, and SD card for data logging. So perhaps I should do some analysis on the shock's impulse response once the computer is in place - drop the wheel from a fixed height a bunch of times with varying shock rebound/preload settings and tyre pressures, then put a rigid tube in place of the shock and try again. That's going to be a while away though.
 
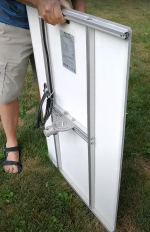
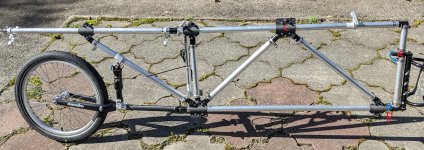
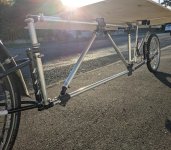
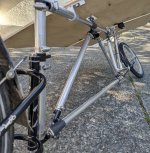
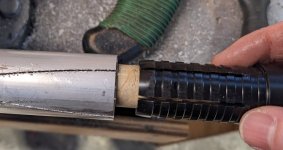
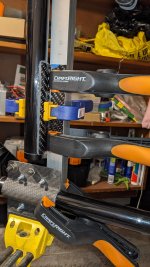
I've finally found some time today to work on this prototype. I've built a full-sized prototype as discussed above, using 25.4mm ID * 1.35mm wall thickness aluminium tube with 4 slits roughly cut on each end with a hacksaw. I made some timber plugs to insert into the DragonPlate connectors and then used hose clamps to clamp the tube to the connector (the timber plugs ought to improve the clamping force on the connector). I used 9mm plywood cut to the same dimensions as the real solar panels, and a simple U-bolt + 3mm aluminium plate arrangement to mount the lower end of the linear actuator. Everything else is the "real" components - linear actuator, yoke, panel mounts, shock, shock mounts etc. I haven't finished designing the actuator driver/computer, so the actuator isn't working yet - it's just there to hold the panels in position.

When I attach it to my bike and lean the bike sharply from one side to the other, the trailer visibly oscillates side to side maybe twice. When I ride it on pavement, it handles well - 100% rideable. When riding, if I sharply turn the handlebars to try and induce some oscillation, I can't feel any oscillation in the bars and the trailer doesn't seem to visibly oscillate as much as it does when stationary. So this was all very promising. Then I threw it into a tight u-turn at 20km/h over a manhole cover, and a bunch of things twisted and moved. I've labelled the joints that twisted in one of the pics.

Joint B twisted between the tube and the connector - hose clamp wasn't tight enough and wasn't in the ideal position. I'm not worried about this one, because the connector will be bonded to the tube eventually. Joint C twisted between the CF mounting plate and the tube, which is hard to prevent as it's just clamped on with some M4 screws. Again, I'm not concerned about this because it'll be bonded to the tube eventually.
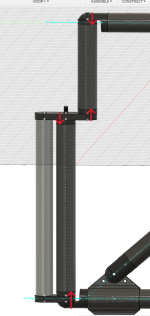
Joint A is more concerning. One of the connectors has a threaded stud, which threads into the other connector, clamping the flat link piece in the process (which makes the attachment point for the yoke). This joint relies on friction between the aluminium faces to not twist, but I can't really get a tool on it to tighten it - I can only hold the tubes in my hands and thread them together. I guess I could get some vice grips on it but I won't be carrying vice grips on tour. I'm thinking I can improve this joint by moving the upper tube back a bit (see diagram), then using a nut/screw to tighten each tube to the flat link piece. Then drill+tap M4 holes in the joints and insert an M4 screw so it can't rotate (red arrows on the diagram). It will look a bit weird, but doesn't require any more connectors and only needs one CF tube shortened by ~32mm (I can cope with that!). Any alternative suggestions are welcome though!
 

Attachments

  • new_joint_a.png
    new_joint_a.png
    313.8 KB · Views: 8
  • PXL_20230909_021814814_cropped.jpg
    PXL_20230909_021814814_cropped.jpg
    2.3 MB · Views: 11
  • PXL_20230909_050548376_cropped.jpg
    PXL_20230909_050548376_cropped.jpg
    4 MB · Views: 9
  • PXL_20230909_015142178_cropped.jpg
    PXL_20230909_015142178_cropped.jpg
    2.7 MB · Views: 9
  • PXL_20230810_053439138.jpg
    PXL_20230810_053439138.jpg
    360.3 KB · Views: 8
  • PXL_20230810_053359232_cropped.jpg
    PXL_20230810_053359232_cropped.jpg
    477.9 KB · Views: 8
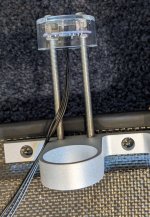
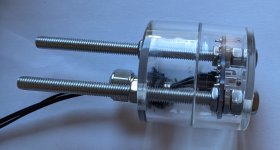
I've also made some progress on the light sensors - I actually designed and assembled these a couple months ago, but hadn't got around to posting. They consist of a PCB with a small STM32 μC, 4 OP950 photodiodes 90° apart (chosen because they have a viewing angle close to 90° and reverse light current such that I can avoid them saturating in full sunlight) and simple UART output. The firmware treats the sensor readings as vectors in a polar coordinate system, adds them together, and the angle of the resulting vector is our estimate of where the strongest light source is. It also estimates the difference in light intensity between the current position and the strongest light source. The idea is to use this information as an error term in the controller implemented on the linear actuator driver board (which I haven't finished designing yet).
These photodiodes have huge variation in reverse light current between each unit - 8-18μA at 1mW/cm² light intensity (full sunlight is ~100mW/cm², so we can expect 0.8-1.8mA in full sunlight). If two sensors have the same reading, we will conclude the sun is halfway between the sensors - but that doesn't work if one sensor is twice as sensitive as the other! So to calibrate the sensors, I've been using my head torch held up against the sensors as a consistent light source - gives an output about 1/2 of full range, and the lens on the torch means I can hold it at a consistent distance to each sensor. Then the less-sensitive sensors are scaled up proportionately in software to match the value seen from the most-sensitive sensor. I'm sure it's not a perfect calibration, but now the sensors match each other to within ~1% when before it was ~30%.
The PCBs are mounted in clear acrylic end caps intended for 32mm pipe. They'll be clamped together with a seal, then attached to one of the panel mounts (which have M5 tapped holes on them at the appropriate spacing). Unfortunately the end caps are slightly too large to fit - they make contact with the top boom tube. That'll teach me for being lazy and not entering them into Fusion360 - it'd have been very obvious in Fusion360 that there's not enough clearance. So I'll have to do another, smaller, board revision. Drat.
 

Attachments

  • PXL_20230808_032418576_cropped.jpg
    PXL_20230808_032418576_cropped.jpg
    777.7 KB · Views: 8
  • PXL_20230808_031636765_cropped.jpg
    PXL_20230808_031636765_cropped.jpg
    406.4 KB · Views: 8
Last edited:
Back
Top