New enthusiast with some questions on getting a first bike.

You want it in tight, as tight as you can get it, as long as it is flush and can be removed in the event of a flat. I vote for the mallet route.
A dremel should be fine, but don't take too much off!
 
I think the reason that it's so tight is because the fork isn't quite wide enough for the hub. I have to bend the fork out just a little bit in order to seat the axle into the dropouts. It's not a bend bend though, just a little bit of push so that it will fit. So I may just go ahead and mallot it in then. I'm also wondering about something else. On the Clyte hub, there is a red arrow, obviously stating which way the motor spins. With the freewheel on, the whell can only go on one way. However, the arrow is pointing towards the back of the bike instead of the front. Is that right?
 
I will have to doublecheck tomorrow, but I"m pretty sure that the arrow points to the rear when it is below the axle. I have the bike upside down in pieces in my garage on the floor. My brother's kids will be gone tomorrow, so I'll have a better opportunity to dig in some more. Gonna work on putting the batteries together if the bike shop isn't open. Not sure if it's open on Sundays or not. Highly doubtful since it's not a "hoppin" business around here.

Was able to sneak into the garage. The arrow points to the rear of the bike when it's under the axle, so it's right. So all I need to do then is take the wheel into my bike shop here and have them true it for me. Should make for some interesting conversation when they ask me why my wheel weighs like 20lbs. lol.
 
Tell them it's an electric drum brake.
 
If they quote me a ridiculous price, I'm just going to buy a spoke wrench, one with all the different sizes in it, and do it myself. I watched some youtube videos, and it looks easy. Probably would be better to true it on my own bike anyways, than have it done on a bench stand. Although, I took the back brake assembly completely apart, and can't use it as a reference now. :(
 
The most I've paid locally to have a wheel built with the parts I supplied is $40 ... besides, that stock wheel and spoke set is probably of fairly low quality.

Get a better wheel and spoke set from justin at ebikes.ca
 
They should be reasonable. Wheel truing is a very, very common tune-up procedure. They should be able to do it blindfolded for an hour's labor.

Of course, if you decide to true it yourself, read up on it from the great Sheldon Brown. http://sheldonbrown.com/wheelbuild.html#tensioning
 
kbarrett said:
The most I've paid locally to have a wheel built with the parts I supplied is $40 ... besides, that stock wheel and spoke set is probably of fairly low quality.

Get a better wheel and spoke set from justin at ebikes.ca

Ahead of you there. I ordered the whole wheel/hub setup from Ebikes.ca. It came untrued. The box was heavily beat up, and the wheel was kind of loose in it. Wasn't too happy 'bout that.
 
Problems already. I want to work on doing the battery packs today. I can't even get past getting the case off of the first pack. lol.
I took the screws out, cut the label, and then pried at it....

IMG_2957.jpg


I got one side off without breaking it, but I can't get the other side to budge. The ribbon cables are now exposed so I'm afraid to apply too much force as I dont' want to shear the cables on accident. Are there any videos or step by steps on how to crack these open without a whole lot of hassle? Any special tools I should be using to pry them apart?

Nevermind. Figure out how to crack them. Now I just gotta figure out how to run the wires outof the cases.
 
Ok,
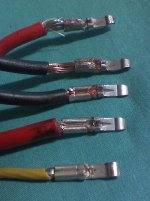
New problem. I can't get the Anderson Power poles to cooperate. I cannot get the metal tab to slide into the plastic boxes once I have the wire soldered to the metal power tab. I don't have the extra $50 bucks right now either to get the crimper that is specially designed for these.
 
Poke them in with an electrician's screwdriver. You should get a click just as they go home.

They won't go in properly if there is a blob of solder on the outside of the tube in the wrong place, or if the wire is soldered so as to come out at the wrong angle. Also check you have the orientation right, its easy to get it wrong the first time.

Nick
 
Squeeze em a bit with a set of vice grips. Make sure the metal tab is against the metal spring inside. Get an awl and use excessive force.

These things are fairly cheap ... consider ordering another handful of connectors and retrying.

Search the forum ... there is a thread here on crimping these suckers ... it's where I learned to stop messing them up.

I didn't read carefully enough ... it didn't get through my head that you had bought from justin. Yea, having a local do a pothole repair would probably be simpler and cheaper than re-shipping and hoping the gorillas don't find the replacement.
 
Ok, got my first pack done. Five more to go...

Positive Terminal...
IMG_2959.jpg


Negative Terminal...
IMG_2961.jpg


Final product with Andersons. I will post some picks of how I soldered everything next battery.

IMG_2966.jpg


Gonna use some putty epoxy to fill the excess gaps in the holes around the wires.
Five more to go. Guh...
 
I bought the 10 gauge like you suggested. I just finished up my battery setup. Two sets of 3 packs in series, and those two sets in Parallel. Here's some pics.

IMG_2972.jpg


IMG_2974.jpg


I do have a question though. I don't know how to test the Amps to make sure I have six. I know how to use the DCV on the voltimeter, but nothing else. lol. And I'm so proud of myself. I finished it without killing myself or arcing once. Now I'm going to take some J-B Stik weld, putty epoxy, and fill in the holes on the cases where the new wires are exposed a bit, then I'll probaby seal that up a bit with some silicone adhesive.
Taking my wheel to the bike shop first thing tomorrow morning so they can true it up. With a bit of luck and smooth operation, I should have my bike all together by tomorrow night, just in time for a test ride. :D Can't wait!! Hardest part is over.
 
The only good way to test amperage is to put a meter on it and a load, and see how many watts you have to draw to get the battery down to your desired low voltage cutoff.

A Watts Up meter will do for counting the Amp-hours. The load can be anything .... a toaster or a waffle iron?

Or do it the way I did. Put it on a bike with a Cycle-Analyst, and run it around your town until you reach your low voltage limit.

Write down the number of Amp-Hours used, turn your battery off, and drag yerself home the hard way.
 
Yup, your voltage looks right. Sometimes it'll be as high as 87.0V hot off the chargers.

I'd recommend testing it on a bike with the CA. ~77.7v means you should be done, but you have a little wiggle room left. 76V means turn that controller off, period, and pedal. The chargers will complain a little when discharged that low, and you'll get the single blinking light for the first 10min of the charging cycle. Go any lower and the voltage drops off very, very fast. If a cell hits zero, it's dead.

Of course, I'm talking about the resting voltage, when your hand is off the throttle. You'll see something like 8v of sag under load, which is normal.

You'll actually see 5.2Ah to 5.8Ah, depending on how hard you ride. If you're hitting your low voltage cutoff before 5Ah, something's wrong.

What is the maximum current of the controller? Is it a 50A one? The cells are good for 10C continuous, 15C for short periods. That's plenty of headroom for a 50a controller, and you can increase that current limit a bit without harming the batteries, if you decide you want to.

At the end of a hard ride you might find the batts are a little warm. This'll be normal. If they're hot, or if some packs are hotter than others, something is wrong. A bad connection somewhere in there could cause problems. I would make sure to test that both strings of three are really connected in parallel before putting it on a bike. Make sure each set of three individually is at the expected voltage.

These cells are happy about being charged in parallel, and they will self-balance if in parallel. After sitting wired like in your picture, each set of three will be at exactly the same voltage. If for some reason you can't normally charge a pack, you can put it in parallel with another at a similar state of charge (connect the Andersons, red to red, black to black) and put the good one on the charger. As the charger tries to charge the pack hooked to it, the second pack will leech as the first increases in voltage, and both will finish charging in about twice the time. Or if you only have one charger, you can connect all the Andersons in parallel and put one of them on the charger. It'll charge all six in about six hours. Though, there's a good chance the charger will have to be disconnected and reconnected every hour or so, since it'll give you the "damaged battery" indicator if the pack's voltage doesn't rise fast enough. No worries, this is just the smart charger being mildly smart with you. :)

Oh, and be careful getting on the bike the first time. An x5 at 84v with 50a will have crazy torque, and (with the rider sitting upright, motor in the back, and the batteries sitting above the rear wheel) it will try to wheelie and throw you off the back if you're at a stop and then hammer the throttle. I've found that this happens more often in front of cute girls. :oops:

I'd recommend doing a shake-down at 56v for the first test ride. Run just four packs the first time, partially to to avoid the above the first time, and because you'll want to make sure everything's secure and that your donor bike is fine. Then add the other two packs. :twisted:
 
Hey Laz,

The controller I got for the motor is the 36-72V 48A Start Immediate Digital Controller (IRFB4110
Mosfets). I hope that's the right one.

So as for the batteries, I have 3 chargers and 6 batteries. I can put the two batteries in parallel and by attaching just one battery to the charger, it will actually charge both in twice the normal time? So if I put two on each charger, then they'd all be fully charged in two hours? That is awesome. I can't wait to get this thing going.
 
GREAT advice from Izarus -- Wow = helpful high tec experienced advice! -- this is the best of what forums are for!!

Did you get your Andersons together? As soon as you can afford the crimper -- It is soooo heavenly to be able to pop on a connector wtihout soldering. I just have a bag full of 30 and 45A Andersons and it is such a relief to be able to put one on in a jiffy. Plus the crimp is a significantly superior joint.
 
Thanks Nimbizz. I try. I mean, if I convinced him to go with the Milwaukee packs in the first place, I really should share what I can from my experiences with them.

Well, the thing with putting them in parallel to charge like that is that doing so charges the packs through the BMS of one, and not through the other. The second, "leeching" pack won't have its cells balanced. Slight differences in each cell mean that over discharges each cell can end up in a slightly different state of charge. Normally we're talking in the tens of milivolts, but over time and under strenuous use this can be a problem. You need those cells balanced once in a while. It's technically best to do it after every single discharge, but you're fine doing it every few cycles, or less.

But, it works. Yesterday, I charged all my packs in parallel with one charger. That's the cells from 12 packs, though they were 80% charged anyway. It's convenient, since one of my subpacks is being cranky.

If you alternated, so that each pack is actually on the charger every other time, you won't have any problems.

As for the controller, yep. That's the best factory Crystalyte unit made. The only better units are either modified or expensive Kelly units. (I say that very broadly... Don't take me to task on that. :p )

If you find that you don't have enough power, you can increase the current limit on the controller. Of course, I'm almost completely sure that your setup as it is now will blow you away, but power can be addictive to some. :mrgreen:
 
Yep, got the Andersons going finally. Figured out an easy way using two different sets of pliers, and then adding a bit of solder. I had to force a couple of them pretty hard, but oh well.
hahaha Laz, yep, power can be addictive, but I think I'll stick with what I have and live, rather than try to kill myself by adding more to this setup. That time will come when I get the $8,000 together to get one of these....

http://electricmotorsport.com/store/ems_electric_motorcycle_gpr-s.php

And thank you all once again for your help on this project, it's been greatly appreciated. I will have more to post tomorrow. Hopefully then can true up my wheel and I can get it on the bike and then start rigging everything up. As for now, I'm off to bed.

:D
 
Also, the crimper... it's just amazing, the difference. I couldn't solder them right, so I ended up using pliers to fake the crimping before getting a real crimper. The difference is absolutely astounding.

0415080304.jpg

The difference is really huge.

Also... that motorcycle looks nice. Veery nice. I'd love one of those in a few years... You know, in 3-5 years, after getting married... The future wife wants a motorcycle in that timeframe anyway, so... :mrgreen:

You could build one with similar specs for half that price, but it would sure be a project. A sportsbike frame, an Etek, 200lbs of lithium... It would be worth it to get a production bike, it seems, if your idea of fun is riding it, not building it.

Another thought: You need a fuse between the battery and the controller. That way, if something happens in the controller that shorts the batteries, the fuse will blow, protecting those expensive lithiums. I use a pair of inline fuse holders from RadioShack, in parallel, since there aren't blade fuses rated above 40a. That way, I can use different pairs, to blow at anything I want, from 10a to 80a. At the moment I'm using two 30a fuses, which will blow if the batteries provide over 60 amps for more than a second or two.
 
Laz,

Yeah, I put 2 40a blade fuses inline with the batteries. I did it after I took that last batch of pictures. They were from http://www.powerex.com too.
I just got back from the bike shop this morning, and they are going to true up my wheel for $15. Here's the suck part of it....TWO DAYS because they are so backed up. They're the only bike shop in town, and everyone around here rides bikes. But alas, I guess that's better than two weeks. So looks like no more fun building til Wednesday. And they'd better be nice to my wheel. The one guy in there was somewhat of a grouch-ass.

And wow, that crimper does do a nice job. Maybe later on I'll pick one up. Not sure though, $50 is high for a semi-quasi pair of pliers. lol
 
$50 is high for a semi-quasi pair of pliers.

...that can only do one thing.

Granted it's pretty well-built. I'll never need to replace it, that's for sure. It was worth it for me because I was rebuilding everything, and it took me far too much work to make such poor crimps.
 
Back
Top