Post Your Excellent Building Tricks Here

Beagle123

10 kW
Joined
May 2, 2007
Messages
620
Location
Los Angeles
I was thinking that we all have our own little building supplies and tricks we use to and it would be good to share them.

So here are a few of mine:

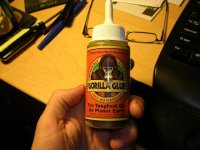
1) Gorilla Glue -- If you haven't tried this, I'd suggest having it around. This stuff is amazing. It will glue wood, metal, ceramic, fabric etc. It foams-up as it dries so only use a little. When its dry its like super hard plastic. I beleive their claim of "strongest glue on planet earth."


Attachments

  • DSCN0386.JPG
    DSCN0386.JPG
    49.7 KB · Views: 3,508
2) Epoxy Putty -- This stuff is a solution waiting for a problem. Recently I was trying to attach my speedometer sensor to my forks but the forks were about 1/2 inch too far away from the spokes of the wheel. (see pic below.) The putty is the gray blob.

Epoxy Putty is the perfect solution for these types of problems. You just break off a chunk of the tube, and knead it together to mix part A with part B, and work it into place like play-dough. It dries rock-hard, and you can paint it. It will also stick almost like glue when it dries.

Positioning my sensor without using this putty would have been very difficult.

I love this stuff so much that I want to build a whole bike out of it.


Attachments

  • DSCN0387.JPG
    DSCN0387.JPG
    29.6 KB · Views: 3,502
  • DSCN0382.JPG
    DSCN0382.JPG
    47.2 KB · Views: 3,502
3) Velcro -- I found "Industrial Strngth" velcro to be very useful when attaching my batteries to my scooter. I spent several hours trying to figure out how to strap-down my batteriies using steel straps, or a battery box. Nothing was satasfactory. I finally decided to tape the three batteries together, and apply velcro to the bottoms of them.

I added velcro bands to add addtional weight to hold the batteried down, pressing them even more firmly into the velcro.

These velcoro bans are just an elastic belt with velcro on the ends. They're made to hold extension cords/tools together in your shop.

I even velcroed my controller to the fromt of the batteries.

I'm very happy with my 100% velcro solution. I didn't have to weld anything, and the whole thing weighs about 1 oz. Also, if I ever need to remove batteries (or the controller), I can just rip-it-off.

I know you guys have a bunch of hacks/tricks. Any you'd like to share?


Attachments

  • DSCN0384.JPG
    DSCN0384.JPG
    49.1 KB · Views: 3,500
Can the velcro actually hold heavy (10-lb) lead-acid batteries together and keep them together even over bumps at speed? If so, that's awesome, but it sounds too good to be true.

Where'd you buy the stuff?
 
Tip:

When using air-cured adhesives like gorilla or liquid-nails, pulling your freshly glued pieces apart, then pushing them back together, admits small air pockets to the glue for faster curing.

8)
 
On the equally useful, "not so excellent techniques to avoid" list: trying to bake a large mass of glue to accelerate the drying. Trying to strengthen the hollow aluminum, I baked glue inside my back rack's main tube. 8 oz of glue exploded all over the inside of my oven. :oops:
 
xyster said:
On the equally useful, "not so excellent techniques to avoid" list: trying to bake a large mass of glue to accelerate the drying. Trying to strengthen the hollow aluminum, I baked glue inside my back rack's main tube. 8 oz of glue exploded all over the inside of my oven. :oops:

Now that made me laugh! :lol:

Probably cause I've had my share of similar experiences.

"Good judgement comes from experience, experience comes from poor judgement."

Greg
 
CGameProgrammer said:
Can the velcro actually hold heavy (10-lb) lead-acid batteries together and keep them together even over bumps at speed? If so, that's awesome, but it sounds too good to be true.

Where'd you buy the stuff?


You can get all this stuff at Home Depot. The epoxy putty is in plumbing (I think).

The weight of the batteries actually helps keep them in place. When velcro is smashed together like that it holds very well. Now it is possible to move the batteries because there is built in flex, but that's a good thing too because it absorbs shock. The batteries are taped together using Gorilla tape, then the whole unit is velcroed down.

Also, they sell a wider strap at home deopt. Its about twice as wide as this one. If I wanted more holding power, I could upgrade.


TylerDurden, I've heard that pulling the pieces apart helps too. I think that's a good idea. I think it works with liquid nails too.


Here's a great hack:

I was struggling to figure out the best way to power my headlights and taillights, and had the options of buying a dc/dc converter to convert to 12v to run normal lights, or solder together a bunch of LEDs to make a bank off lights that work at 36v.

Here is the discussion about this topic:
http://endless-sphere.com/forums/viewtopic.php?t=991&postdays=0&postorder=asc&start=0

ep suggested that I run a 36v system with leds (thanks eP):

<img src="http://www.superbrightleds.com/store/html/images/1142-w19.jpg">


And fetcher suggested this site: (thanks fetcher)
http://www.superbrightleds.com/cgi-bin/store/commerce.cgi?product=OTHER

Keep in mind that these are 24v lights that should immediately burn out if run at 36v. But being the optimist that I am, I just plugged them in and they worked!

I've been using them for a few weeks without problem.

So, if you need to run headlights/taillights on a 36v system, just get these 24v bulbs. For some reason, they work. If you have a 48v system, I bet you can put two in series.

Update:

I thought I should add that the light pictured above isn't a very bright headlight. The normal 12v, 22 watt headlight is much brighter. But it gives enough light to easily be seen by cars.


I had to spread the rear dropouts by 20mm. to fit my 20in.Brushed Clyte into the bike frame.I found that a "turnbuckle" (thanks for the name of it Lock) used in reverse did the job quite nicely.I attached two small notched pieces of plywood on either end to prevent the eyelets from spinning.It spread the dropouts nice and evenly. I ended up spreading it to 30mm. as to compensate for the steel's memory.

Eric
 

Attachments

  • 7930860.jpg
    7930860.jpg
    2.7 KB · Views: 3,383
Your avatar is creeping me out!
7298794514664456ade559.jpg
 

That's a good trick. I used 2 wood clamps to spread the back end of my moped. It's made of very thick reinforced steel, so I had to use two clamps, tightening one, then the other to get enough pressure.
 

Attachments

  • DSCN0388.JPG
    DSCN0388.JPG
    43.3 KB · Views: 3,366
Gorilla glue cures faster if you put water on it. Also, even though it foams up it only has good adhesion when there are no gaps in between what you are gluing together. The foam is not a gap a filling adhesive.

My favorite glue these days is Cyanoacrylate (CA or super glue). I use one from a company called Fastcap. I didn't make my ebike but I do make furniture. Anytime I have a small fix, like a corner piece chips out, this stuff works great. I used it today. With the activator it works in 10 seconds. I don't want to be waiting a whole minute or two for my glue to dry :)
I've used it for plastic stuff too. I've found you usu. need to scratch up the surface a little to get a good bond.
 
Check me if I'm wrong, but I think that glue is excellent on non-porous surfaces.
 
Park Tool has a section on bike repair:

http://www.parktool.com/repair/


It's a pretty good reference, precise & fairly complete. Of course, being a tool selling company, if you followed all their advice you'd probably need a whole bunch of tools just to install a tire, something like gloves, apron, safety glasses, hardhat, wrenches, tire levers, tire lube or glue, truing stand, hand cleaner, spoke wrench, etc, etc. Well you know how it is.
 
How to make perfect battery connectors.

1) buy normal 10 awg ring termainals and remove the plastic insulator. See pic 1.

2) put heat shrink over wires.

3) Cut lengths of #10 wire to fit exactly. Crimp on ends.

4) Heat over stove for a few seconds. (The guy at the store told me to get a heat gun. haha)

They look good to me. I wish I could cover the whole terminal with heat shrink though.

I know most of you know this already, but I just started this, so hopefully others will appreciate this as much as I do.
 

Attachments

  • DSCN0399.JPG
    DSCN0399.JPG
    70.6 KB · Views: 2,601
  • DSCN0394.JPG
    DSCN0394.JPG
    46.3 KB · Views: 2,601
  • DSCN0393.JPG
    DSCN0393.JPG
    41.5 KB · Views: 2,601
  • DSCN0392.JPG
    DSCN0392.JPG
    41.2 KB · Views: 2,601
  • DSCN0391.JPG
    DSCN0391.JPG
    46.8 KB · Views: 2,602
Two things: you can buy the ring terminals naked, they are a bit less expensive but cheap enough either way and the easiest way to do the shrink wrap is with a lighter, a bic works just fine.

For about nine years I used a 36 volt golf cart as my primary transportation within my community ('till the HOA showed their ass) and became very familiar with building battery connectors. With the golf cart I would use 4 gauge but the technique is the same.

Once everything is prepared put a little flux on the wire prior to crimping and after it's crimped heat very carefully with a small torch while holding some solder over the end of the wire. It won't take but a couple of seconds for the solder to melt into the connection. Once it cools slide your heat shrink up and use the lighter, not the torch to shrink it.

With the SLA's it not necessary to spray the anti corrosion stuff on the connections but it doesn't hurt either.

My smallest torch is too big for ten gauge wire but my largest soldering iron heats it in less than a minute. A soldered connection can take a lot of weather and a lot of abuse.

Mike
 
I like to solder them too. Sometimes I use 'old' wire that's been around a long time and it develops an oxide layer that makes it hard to solder. Paste flux helps tremendously. Otherwise, exactly like Beagle shows is a good way to do it.

You can color code your wires by using colored heat shrink. This is especially handy when you've used the same wire for everything.
 
I came up with an ultra-lazy insulation method last night: use a hot-melt glue gun to completely envelope the battery terminals with plastic. Of course this is best for connections you don't plan on undoing... the glue is very easy to melt again but you'd have to be careful not to let melted plastic get over the exposed terminal and interfere with new electrical connections. But it's waterproof, won't move, and it's clear so you can see the connections underneath.

That ring-connector idea is a nice alternative for solder-tards like myself. Is there any appreciable difference in efficiency between soldered connections and unsoldered? Like Beagle's implementation involved a solderless crimped connection between wire and ring, then another unsoldered connection between the ring and the battery terminal.
 
Good ideas. I should have known you guys would find a way to improve upon perfection.
 
The primary advantage to a soldered connection is resistance to corrosion which is a big deal where I live. The ICW is literally in my backyard (a waterway from Maine to FL and is saltwater) and the Atlantic Ocean is about 500 yards from my front door, I hear the ocean when I pick up my paper in the morning.

A crimped connection is generally adequate, there are a gazillion of them on my boat but soldered is better. There is a little hatch about 12" X 12" in the center of the boats windshield and it's electrically controlled so I can open it to try and catch a breeze underway. It's exposed to all kinds of salt air and occasional salt water. The primary connection was crimped and failed in the first year. Due to impossible access I couldn't solder it but I did put new connectors on it and covered the whole thing in shrink wrap and that has been working fine for over two years. Non soldered connections on my golf cart however had failed in as little as six months from corrosion but I never tried shrink wrapping them.

After the episode where my 5304 tried to kill me by refusing to shut down in a rainstorm I went over all the factory connectors and wound up replacing two and taping all the rest, even the plugs at the controller. The salt air was having an effect after only a month or so.

There may not be any corrosion in Canada, only snow. And hockey.

Mike
 
mvadventure said:
There may not be any corrosion in Canada, only snow. And hockey.

Mike

Based on pictures of Mathurin's bike, I'd say corrosion is a serious problem there. They like to throw salt in the snow. Even if you live in the desert, lead-acid batteries tend to develop corrosion around the terminals over time.
 
Back
Top