RadRunner Plus Rebuild

2024-05-13 15.35.37.jpg

All better; and double checked the L/R several times :)

Grin emailed out that preorder FatAllAxle motors are ready to start being built, so I put in the full order for that. Can't wait.

Once the new motor is settled, I'll consider it completed from the parts perspective. Then it'll be time to put in that final push of effort to route wires, trim them to decent lengths, route the rear brake line (then bleed it), and get rid of some of the zipties, etc. Convert all the wago connections I've got going into actual plugs, instead, etc, etc. Just remove a lot of the "temporary" that's present in the build currently.
 
All Axle 45mm Arrived!

Removing the stock rad motor; easy peasy.

2024-06-25 11.44.50.jpg 2024-06-25 12.04.48.jpg

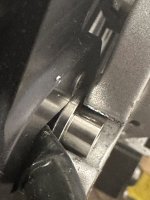
Got it all installed and found out that when they say "170mm drop outs" they, really, really mean it. The usual rule of thumb is that you can get away with some wiggle room on hub motor dropouts with spacers and what not. However, with this through-axle design that employs a quick release adapter set, that 5mm really matters.

What you can see here is the wheel in place, snugged up to the gearset side -- and the rotor side hardly touches the frame at all, because the RR+ has a 175mm dropout width.

2024-06-25 13.11.30.jpg 2024-06-25 13.11.39.jpg

I can hear y'all madly typing, "just bend it!" -- but that's a LOT of bend to handle, and the QR skewer is not the right place to put such a load on. I'd much rather have the QR adapter just be the right size. So, a little bit of caliper work, modeling, and 3d printing gets me...

2024-06-25 20_21_23-Window.png2024-06-25 19.00.06.jpg

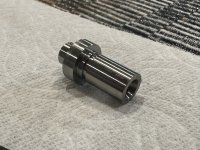
An excellent fit (the other side is flush as well). Just remodeled the adapter. Obviously, I'm not going to ride this as such, so I'll likely have to send this off to be lathe'd somewhere since I don't have the tools/know-how to make it out of metal.

My other large hurdle with this is the torque arm mounting plate -- its colliding with a wire mount and the kickstand. Not entirely sure how I'm going to tackle that problem yet.

2024-06-25 19.06.41.jpg

Fun Fact: The stock motor/wheel combo is 12.8lbs, the AA45 motor/wheel is 15.4lbs. Considering the AA is going to have no issue pushing 2-3,000 watts over the stocks 1,000, I'm excited to get it up and running.
 
I think you should delete the cranks because they're a farce.

If you disagree, do a decent length round trip with power on the outbound leg, but unplug the battery for the return trip, and do it by pedals alone. If that doesn't work, delete the pedals out of respect for people who actually use them.
 
I imagine threadlocker might help with this ( will be a bitch to get off, but whatever! )
 
My other large hurdle with this is the torque arm mounting plate -- its colliding with a wire mount and the kickstand. Not entirely sure how I'm going to tackle that problem yet.
Looks minimal enough that some careful grinding with an angle grinder or dremel could relieve enough material for a good fit.
 
Looks minimal enough that some careful grinding with an angle grinder or dremel could relieve enough material for a good fit.
It does sorta look like that, but I'm loathe to grind away at the frame quite yet. Might try to make a plate that bolts to the kickstand and sweeps back to provide a bolt hole for the torque arm.
 
2024-07-19 09.01.02.jpg
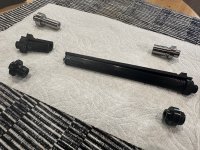
Originals, prototype/fitment 3d printed version (long boy for funsies), and at the top, titanium milled finished version.

Glamor shots:

2024-07-19 09.01.29.jpg 2024-07-19 09.01.15.jpg

Fitment is 98% excellent.

2024-07-19 09.06.07.jpg 2024-07-19 09.05.45.jpg

The missing 2% is that the o-ring channel I modeled in is not deep enough, so they rings collide with the ID of the bore instead of making a nice friction fit. They aren't critical, though, as it's not a seal but more of a "hold the QR adapter in place" kind of device. Just left them off.

Now the wheel fits in perfectly with no need to bend the frame.

I expect the torque arm capture plate thing will be here sometime this week.
 
Sadly, this build is out of action still -- the all axle, after I could finally mount it properly, was issuing some hall errors in the phaserunner app. And, under load, would exhibit a "clonking" problem where it would jerk heavily at points during rotation.

I took the time to wire up an L10 adapter to connect it to a spare Sabvoton 7245 to make sure it wasn't just the phaserunner, and with just holding the tire by hand, I could get the controller to fault when rolling the accelerator. I could also get it fault by applying sudden high twist on the throttle.

Both myself and Grin figured something was wrong with the halls, possibly the cable, so I did what I could by trimming off the cable, inspecting for any shorts/faults/nicks, etc and could find nothing. And even when connecting to the wires almost entirely at the entrance to the axle, I still got the same faulty behaviors.

I strongly suspect I got a lemon, so the motor and wheel has been sent back to Grin for evaluation and repair.

Normally, I would tackle this (it's just hall sensors, right?) except that the all axle requires you to unlace the wheel to open it. I, honestly, didn't know this when purchasing the motor and, until it was in my hands, it didn't dawn on me. I kinda get the rationale -- by making it like this, they likely made it easier to manufacture or made it weigh less. And, as a DD motor, it's unlikely you really need to get in there for years and years (depending on usage, environment, etc). So I can sorta forgive the design, but I got nailed needing to get into the guts before I ever even got it on the road, so it hurts more.

Hoping to hear back in the next week or two with the prognosis.

Side note: I couldn't even get it to run reliably in sensorless mode either -- which adds some real mystery to whatever is going on with it.
 
Ah you also got an all axle with bad halls i see :/

Instead of dicking with it, i decided to just use VESC sensorless and accept some lower startup torque.
Mine runs fine in sensorless mode on a phaserunner or VESC.
Having to unlace the motor also is the main reason i don't want to repair the halls.

Curious to see what was wrong with yours.
 
Any update on what happened?
Mine runs fine but seems to have developed a clunking sound at high speeds.

Another poster says it's a short in the phase windings.
Expect stator replacement.
 

Jump to 7m in if you just want to see the behavior; the rest is just showing the install, a working other motor, the setup, and later on replicating the issue in sensorless mode.

Who else was running into something like this? I've missed that post...
 
This thread is similar.
Thanks, and yeah, that's pretty close in behavior to what I'm seeing, except mine isn't doing it constantly. That guy seems like he had a complete, constant short on the phases. Mine seems to be intermittent -- like only under some positions/placements/whatever a winding is shorting, but other times it's ok.

I suspect the fix is much the same, a core replacement.
 
Grin has me in the queue for a replacement motor; should be ready in the next week or two.

Meanwhile, I'm going to embark on a rewire/wirecleanup of the bike and try to get it all internally routed. As such, I wanted to spend some time revisiting my wiring diagram and make it more accurate to reality. I've included things like plugs from the Phaserunner "ending" in the ebox and the massive 12v/72v "busbars" I ended up having to actually implement (rows of 5 lever wagos). I also had left some things out like the Erider PAS bracket.

Edit: updated diagram, added the negative ground mount for the frame (helps the erider not send out garbage noise) and added the PR programming plug (I leave it installed and just roll up the USB cable into the rear pouch)
 
Last edited:
After a par-for-course delivery from DHL (drove right past my house with me outside, dropped off the package a mile away at an address that has nothing in common with mine; then I had to go knock on a stranger's house to ask for it...) I finally have a new motor/wheel to mount up.

So far, bench testing shows none of the issue I had previously encountered.

While I was waiting, I got my act together and rewired the bike and did the work to pass all the cables through the body of the bike. Only one left...a hydraulic brake line -- ugh. After that, though, I still need to get it flipped back up, cleaned up the last few bits of loose wires, and then I'll be able to get it out on the road and see how it performs.

Sadly, one of my batteries bit the dust... well, the BMS did (daly "smart" bms, 40A 20s), I suspect. First sign of failure was finding the pack discharged shockingly low (like, 2-2.5v per group). Second, after slowly and successfully bringing it back to a healthy voltage, the voltage will fail when under even minor (lights) load -- it'll read, like, 11v for a few seconds, peter out, and then read nothing. I'm 99% certain it's just a dead bms, so I'll get a replacement in there at some point. ("Why not replace it with a 'better' unit!?" you might ask. I've had every brand of BMS fail on me at some point or another, so while ymmv, I don't have any qualms about just replacing a busted unit.) Until then, I've just turned down the amp draw and will run a single battery.
 
goodnews.jpg

The new motor is working as expected, huzzah!

Test ride was pretty uneventful (which is great), the motor was able to pull me out of the underground garage up the steep incline without any issue at all. It's got the typical DD/FOC/ASI slow start, but once you're in the 10mph+ range it's got some real pep in it's step if you jam on the throttle. Dead, dead silent motor, love it so much. Combined with the speedster tires, it's basically all just wind and gear cog noise.

I don't know why, but bleeding hydraulic brakes is my absolute kryptonite. I can't explain why... tutorial after another and I still fail every time. Since I use regen on the motor 99% of the time anyway, I decided to cut my oily-slick losses and just go back to some cable pull brakes. They'll work fine.

Hit a CA top speed of about 41mph, but GPS reports it as 39. I suspect I need to tune the tire diameter a bit, but it's close enough for me. The PR is configured to peak at 3,000 watts, which I saw a few times while pushing that top speed. I suspect I could push it a bit further, but that's starting to get close to the max recommendation for the L10 harness. I don't think I need it anyway, though, as this is hitting all the power, acceleration, and top speed needs I have.


The only thing that's not working, so far, is that the motor temps aren't making it from the PR to the CA. I can read them on the PR suite, but the CA show's zero's. It's not a huge problem, since the temp rollback happens in the PR and not the CA, but it'd be nice to have the info show up. I'm sure it's a small config flag I've missed somewhere.
 
Some of those last finishing touches; added the flatout to hopefully plug up whatever the small leak in the rear tire is at (of course, also did the front tire).

I spent a few hours iterating over an XT60 plug holder. Previously this charging port was just kinda jammed into the bottom controller-tray/wire-mess area and I'd worry about it popping out and jamming up into the chain or something with live voltage.

This design utilizes a super long m5 bolt where a center kick stand would be (if RRP supported it, ugh!) and just has a small routing channel along with a (if I say so myself) clever dove tail side-together joint holding it all in place. Took quite a few tries to get it right, including the final version in which I modeled the entire XT60 plug itself, but I've got one that does require hot-glue/sealant and yet holds the plug securely in place while plugging in and out.

2024-10-04 16_24_30-Window.png2024-10-04 16_25_36-Window.png

The "failures":

IMG_1544.jpg

The end result:

IMG_1546.jpgIMG_1547.jpgIMG_1548.jpg

I suppose I could reprint it in black, but this will do fine for now.
 
Nice to hear you're up and running with a new motor. I've been so busy i haven't sent mine back yet.

I've ran my 27mm wide all axle at 40A batt/110A phase and it had some pretty nice acceleration, but yeah, laggy and inefficient at lowere speeds. At this point you are losing a notable amount of power to heat in the wire and connectors though. When i get mine back i'm going to do the typical 12ga wire upgrade with 4mm bullets and deliver the power through a VESC.

Any idea how thick those wires are on the 45mm?
 
Last edited:
Any idea how thick those wires are on the 45mm?
No different than the non-fat; it's still the same L10 connector ultimately. It'd require a motor open and replacement to likely REALLY take advantage of this motor, I suspect. Or much higher volts so you can stick with the wire gauge it's got now. Either way, not something I'll be tackling any time soon.
 
Back
Top