
GiantEV
100 W
Are you planning to use the same front forks for both bikes?
I'm guessing your wife's bike will get a shorter rear shock than your bike?
I'm guessing your wife's bike will get a shorter rear shock than your bike?


") Good work.
Good work.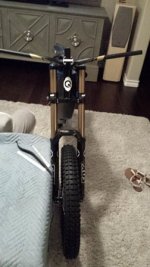


Holmes Hobbies is owned by the part owner of Voltriders, John Holmes. John took a break from lacing but he might be back at it under Holmes Hobbies. They are slow but everyone says they do the best eBike work if you are central or eastern US.BCTECH said:Voltriders.com has closed down, do you have any recommendation for Rim Drill and Spoke Lacing ?
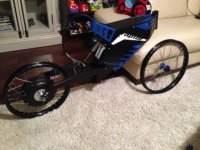
Offroader said:Could you attach the motorcycle footpegs and take a side view of the bike.
Mammalian04 said:COMPONENTS
This is where I will build my list of proposed components and the anticipated vendor (after the "-"). Confirmed component selection will be in BLUE.
Component Group A
Motor:
*- $595 - Cromotor V3 rear hub motor - Zombiess (greyborgusa.com)
Controller, BMS, and Charge Coil:
*- $800 - Adaptto MaxE with display
*- $105 - Adaptto MaxE BMS
*- $50 - MaxE charging coil
*- $35 - Shipping Cost from Russia
Batteries:
*- $1404 shipped for 16 packs - HobbyKing Zippy LiFePo4 4s2p 8400mah 30c - 8 packs in each bike for 16s4p in each bike
Custom Harness :$435 total ugh...
*- $80 - 4 series 2 parallel custom harness - Icecube
*- $180 - 6 series 3 parallel custom harness - Icecube
*- $30 ($15 each) precharge - Icecube
*- $24 ($12 each) 250a circuit breakers - Icecube
*- $41 Misc. connector and wire charges (XT150, 8awg controller wire, 10awg battery wire, 5.5mm bullet connectors, etc)- Icecube
*- $79.84 - 16 2x Parallel JST splitters (HK out of stock) - Icecube
*- $165 - Server Power Supply - Mean Well RSP-1500-48 - Vetco.com
- Samsung 25R - 20s13P - Five 4s13p wired in series
- Battery assembly kit (fuse for 25r high discharge) - Circuit
- $330 new / $? used - Eaton EPR48-3G Rectifier Power Supply - (900W 48Vdc 208/240 Vac Input 550W At 120Vac Input)
Component Group B
Front Wheel 1:
- $110 - 19x1.4 Motorcycle Wheel - Prowheel Racing
- $? - 13g spokes - Voltriders.com
- $55 - Spoke Lacing - Voltriders.com
Front Wheel 2:
- $140 - 19x1.85 Motorcycle Wheel - Prowheel Racing
- $? - 13g spokes - Voltriders.com
- $55 - Spoke Lacing - Voltriders.com
Rear Wheel 1:
- $110 - 19x1.4 TTR - Prowheel Racing
- $108 - 8g spokes - BuchananSpokes.com
- $136 - Rim Drill and Spoke Lacing - Voltriders.com
Rear Wheel 2:
- $140 - 19x1.85 - Prowheel Racing
- $108 - 8g spokes - BuchananSpokes.com
- $136 - Rim Drill and Spoke Lacing - Voltriders.com
Front Tire:
- Shinko 19x2.75 SR241 - MotorcycleSuperstore.com
Rear Tire:
- Shinko 19x2.75 SR241 - MotorcycleSuperstore.com
- Shinko 17x3.00 SR241 - MotorcycleSuperstore.com
Tubes and Rim Strips:
- Bike Master Tube 19x2.75 - MotorcycleSuperstore.com
- Bike Master Tube 17x3.00 - MotorcycleSuperstore.com
- Rim Strip 19" - MotorcycleSuperstore.com
- Rim Strip 17" - MotorcycleSuperstore.com
Brake Calipers and MCs:
- $540 ($269 Each) - Magura MT7 4 Piston (Right hand for front brake but lever can be reversed) - Amazon - Phat Tire
- $330 ($165 Each) - Magura MT5 4 Piston (Left hand for rear brake) - Amazon - Xtreme Bike & Sport or Cycle Progression(local shop)
- $460 ($230 Each) - Avid Code (4 Piston) - Price Point / $455 on Pinkbike with 200mm/200mm F/R disks
- $245 ($122.50 Each) - Avid Code R (4 Piston) - Chain Reaction Cycles / $355 on Pinkbike with adaptors and any size disks
Brake Switch x2 for each bike:
- Reed Switch
OR
- $29 - Magura Hydraulic Pressure Switch - LINK
- eBike.ca throttle with button - eBike.ca
Brake Discs:
- Front Disk - 203mm - Cycle Progression
- Rear Disk - 203mm - Cycle Progression
Brake Pads & Oil:
- mineral oil or dot5 (dependent upon brake options) - Cycle Progression
- Organic or Sintered brake pads (dependent upon brake options) - Cycle Progression
Frame:
- Raptor - Qulbix
Seat:
- Regular Seat?
Component Group C
Rear Shock:
Bike 1 - 10.5 X 3.5
- $? - Fox DHX RC4 Kashima - Pinkbike.com (used take-off)
- $558 - Cane Creek DBCoil - JensenUSA.com
Bike 2 - 9.5x3.0
- $110 used + rebuild cost - Fox Van RC - pikbike.com
- $ - Fox Float X CTD w/ Trail Adjust -
- $550 - Cane Creek DBAir CS - AEBike.com
Forks:
- $999 - 2014 FOX 40 FLOAT 27.5 RC2 - jensonusa.com
- $555 - DNM USD-8 with dual brake disk mount - Zombiess - (greyborgusa.com - Out of Stock Indefinitely)
- $425 used (stem cut?) - Rockshox Boxxer - ES forum
- $ - Marzocchi 888
- $1350 - 2015 FOX 40 FLOAT 26 FIT RC2 Kashima - pinkbike.com
- $900 - Manitou Dorado Expert (air spring) - pinkbike.com
Head Set - 44mm headset internal diameter (1 1/8" headset):
- Bike 1: Cane Creek 40 - Cycle Progression
- Bike 2: Hope Headset - Cycle Progression
Stem: Tall enough to mount bicycle seat bar for Ethan
- Bike 1: ???
- Bike 2: Hope Top Crown - Cycle Progression
Bars / Grips:
- Bike 1: $30 -
- Bike 2: $30 -
Brake Levers: Not Used
- $? - eBrake - ilia
Front Hub:
- $89 - Hope Pro 2 EVO 36h - Front Hub - Chain Reaction Cycles
- OUT OF STOCK EVERYWHERE (grr....) - $75 - DNM Dual Disk Hub - Voltriders.com
Crankset:
-
Pedals:
- $55 - Shimano Saint MX80 Pedals - Chain
Throttle:
- ebikes.ca throttle with momentary switch
- ebay throttle with on/off switch
Component Group D
Charging Port:
- MaxE Charging port for 5v USB (iphone, iPod, etc)
Headlight:
- ebay headlight
Mudguards:
-
Rear light:
-
Horn/Bell:
-
Switches and Labels:
- Power Setting (Low, Medium, High) - on Adaptto MaxE display
- Lights - High, Low, Off) - ?
- Rear Lights - On/Off - ?
- Controller Key - On/Off - ?
- Regen - On/Off - ?
- Horn / Bell - ?
GPS Tracker:
-
Paint:
- Upgraded Swingarm paint to match white frame - qulbix
- LineX - Texas Truck and Trailer
Wiring:
- $9 - Charge Port - NLT4MP-BAG - Rated to 40A - 50% Duty Cycle - AlliedElec.com
- $0.85 - Charge Port Gasket - SCNLT
- $2.38 - Charge Port Cap - SCL
- $6.79 - Charge Plug - SPEAKON NL4FRX - Rated to 40A - 50% Duty Cycle - Alliedelec.com
cwah said:Are you going to make a 10 000usd bike? Lol
Offroader said:Mammalian, can you do me a big favor.
Could you attach the motorcycle footpegs and take a side view of the bike.
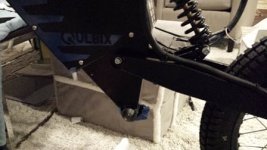
Offroader said:Mammalian04, is there any particular reason you decided to get the swing arm painted white and not leave it black?
Do you think the bike would look better with a black swingarm instead of the white?
Could you take a picture of your white bike and post it. Maybe a 2nd shot from the side/rear to show the frame sticker colors below the shock on the frame. I am curious how the bike looks with the white swingarm.
Thanks a lot!.
Offroader said:Thanks, I'm still trying to get ideas for my coloring. I'm not sure if I want to go full orange.
Damn that's really nice.
I didn't know Qulbix made the raptor sticker in black. I would probably have gotten it in blue, as the seat mount is blue.
Did you have Qulbix paint the motorcycle seat in blue for you?


