Replacing Hub motor trouble.

Joined
Apr 25, 2023
Messages
29
Location
So cal
I hope you guys can help me, I'm lost. I have a heavily customized cruiser ebike and the last item I'm addressing has gone very wrong.

The short story.
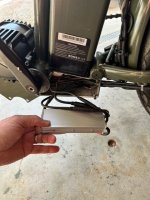
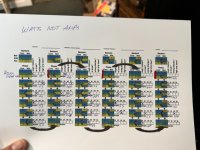
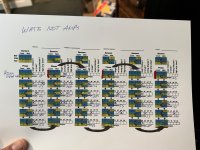
I needed to get a lower gear sprocket on the rear hub so I bought a Cassette style bafang motor with a cassette sprocket mount. Now that it's mounted and connected it's not running right. It has very low power and it chugs when below 7mph. I'm told my original motor was not a bafang as I thought. I'm hoping its that wiring colors are different than bafang codes are. The bike is a Kasen but I can't find any identifying info on the original motor. I don't mind replacing the controller if needed just so I know if it's the right one.
P.S. the two motors have different style screw lock connectors. I had to hard wire them still leaving the complete connector on the new motor. Cutting the quick connector off the controller side.
P.S. Both motors are a match power wise. 1000w. 48v

The longer story.
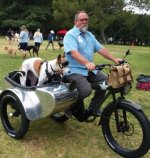
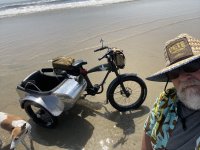
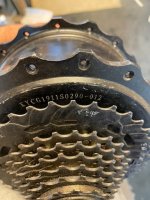
I bought the cruiser ebike and planned to add custom paint & home built sidecar to it. Styling it after WWll Indian motorcycle. But the final weight with the dog and my fat ass it could not climb the hills to get to my house. So I added a 1000w bafang mid-drive. A completely separate drive system. Left side of handlebars are the mid drive controls the right side has the hub drive. It's fast and capable now. The problem that put me where I am now is the chain. I kept breaking them. The offset between low gear and the 32T chainring mounted to the mid drive was too much. Jumping chain and braking links a lot. So I bought a Luna 42T offset chainring and needed to get at least a 42 T low gear rear sprocket. I bought a replacement hub motor with Cassette style sprocket connector. Cassette style gears have far better tooth selections. Now its much smoother shifting and running but I'm getting almost no power out of the hub motor.
 

Attachments

  • Lily 5.JPG
    Lily 5.JPG
    120.6 KB · Views: 22
It looks as though the hall sensor and phase wire combinations are different on your new hub motor. There are 36 possible combinations and only three of them will make the motor run properly.

I will try to find a test sheet that you can download. If you follow the sequence you should soon be able to find one of the three combinations that will make your motor run properly.
 
Here it is. Go carefully with the throttle when you are doing the testing because some of the incorrect combinations will draw a lot of current if you whack the throttle wide open. Your motor should only be running at a couple of amps at full throttle unloaded with the correct combination.

D354198A-5BE8-4B57-8DD9-32245A04FF33.png
 
Last edited:
I think your bike and my bike may benefit from the following accessory.

 
Here it is. Go carefully with the throttle when you are doing the testing because some of the incorrect combinations will draw a lot of current if you whack the throttle wide open. Your motor should only be running at a couple of amps at full throttle unloaded with the correct combination.

View attachment 333349
Thanks this is a huge help.
The problem is that even now with the wheel up (no load) it appears to run fine. You can't tell its low power and chatters under load. So it has to be ridden with each test.
Also I'm not clear how this works, What is "cont. and mot." Controller/motor?
My screen only shows watts not amps. what is the max watts when testing? Its a 48V system.
 
I think your bike and my bike may benefit from the following accessory.

I agree on the holster. I like to ride the Strand on the beach. A water gun would be more appropriate. Im still trying to comeuppance with something to fill the space where the motor would be on a real bike.
 
My screen only shows watts not amps. what is the max watts when testing? Its a 48V system.
Watts is Volts x Amps, so you divide the watts you see by the volts you see at that time to get amps.

Alternately you can use a typical multimeter, most of which can measure up to at least 10A DC, in series with either of the battery to controller wires (not both), to directly measure amps (A).

You should see 2-3A typically, for a good phase/hall combo, even at full throttle with no load.

When you do these tests, you want to use only a tiny amount of throttle, unloaded (wheel off ground), because it's possible to blow up the controller with the wrong combo under enough load or enough throttle.


Normally a phase/hall combo problem will show up whether there is a load or not. If it doesn't, it might indicate that's not what's wrong.

In this case (if none of the combos "works"), then:

When you are testing on a ride, do you have both motor systems powered on? If so, and the non-problem system is also running, it could be dragging the voltage down on the battery enough to cause the problem system's controller to attempt to protect the battery by lowering it's current (A) draw, which means it doesn't provide much torque.

Alternately, the non-problem system may simply be providing enough power that the problem system doesn't need to provide any more than it does for the throttle input vs riding conditions and system parts / gearing / wheel size / motor winding, etc.

Here is a better pic of the space I need to fill. below the "tank' above the mid-drive. I considered the plate you have but I keep thinking there is a better idea.
My SB Cruiser trike has removable panels covering the "triangle", and the lighting relay's DC-DC converter, light switching relays, wiring, fuses, etc are all installed in that section.

There are some cruiser builds from several to many years ago here on ES that show the fake engines they filled the triangles with, if that interests you. There's a more recent ongoing thread about a cab-style quad that has a fake engine in it.

.
 
Last edited:
Oh I’m so sorry about David Crosby, he looked like a real character. I hope I haven’t upset anyone by posting his photograph. If so then please let me know and I will remove it.

As Amberwolf said. You can do the tests without an ammeter if you monitor the watts on your display. You should only be pulling around 150 watts maximum with the wheel unloaded and the correct phase/hall combination.

“What is "cont. and mot." Controller/motor”?
Cont. simply means the wire going to the controller and mot. means the wire going to the motor. They are labelled in the test sheet to make sure you don’t get all of the wires mixed up when you are swapping them about for each test.

You won’t need to do a road test when working through the sheet because there are only three combinations that will work properly. If you still find there is a problem after the tests, then your problem lays elsewhere.

Chopping and changing controller connectors is standard practice when modifying e-bikes. Out of interest what make and model is your controller?

I used the space in the frame for my battery. As you are running two motors you may benefit from having a separate battery for each motor. Also as you have a sidecar, battery space isn’t a problem for you because you have the luxury of being able to fit a good size battery in the sidecar if you wish and still have plenty of room for your dog.

5335F0C3-8910-4D50-A0DA-6CFF68E12A3F.jpeg
 
Last edited:
Oh I’m so sorry about David Crosby, he looked like a real character. I hope I haven’t upset anyone by posting his photograph. If so then please let me know and I will remove it.

As Amberwolf said. You can do the tests without an ammeter if you monitor the watts on your display. You should only be pulling around 150 watts maximum with the wheel unloaded and the correct phase/hall combination.

“What is "cont. and mot." Controller/motor”?
Cont. simply means the wire going to the controller and mot. means the wire going to the motor. They are labelled in the test sheet to make sure you don’t get all of the wires mixed up when you are swapping them about for each test.

You won’t need to do a road test when working through the sheet because there are only three combinations that will work properly. If you still find there is a problem after the tests, then your problem lays elsewhere.

Chopping and changing controller connectors is standard practice when modifying e-bikes. Out of interest what make and model is your controller?

I used the space in the frame for my battery. As you are running two motors you may benefit from having a separate battery for each motor. Also as you have a sidecar, battery space isn’t a problem for you because you have the luxury of being able to fit a good size battery in the sidecar if you wish and still have plenty of room for your dog.

View attachment 333369
Here is my original motor and controller. Both are without a brand listed. Its off a Kasen bike. I posted the motor incase someone recognizes the brand. That might help with wiring schematic. All you guys are a huge help. Electrics is my weakest skillset. Kasen in Ontario, Ca are ghosting me when I ask such brand questions.
 

Attachments

  • IMG_3839.jpeg
    IMG_3839.jpeg
    123.8 KB · Views: 14
  • IMG_3768.jpeg
    IMG_3768.jpeg
    71.5 KB · Views: 14
  • Unknown.jpeg
    Unknown.jpeg
    65.8 KB · Views: 14
Watts is Volts x Amps, so you divide the watts you see by the volts you see at that time to get amps.

Alternately you can use a typical multimeter, most of which can measure up to at least 10A DC, in series with either of the battery to controller wires (not both), to directly measure amps (A).

You should see 2-3A typically, for a good phase/hall combo, even at full throttle with no load.

When you do these tests, you want to use only a tiny amount of throttle, unloaded (wheel off ground), because it's possible to blow up the controller with the wrong combo under enough load or enough throttle.


Normally a phase/hall combo problem will show up whether there is a load or not. If it doesn't, it might indicate that's not what's wrong.

In this case (if none of the combos "works"), then:

When you are testing on a ride, do you have both motor systems powered on? If so, and the non-problem system is also running, it could be dragging the voltage down on the battery enough to cause the problem system's controller to attempt to protect the battery by lowering it's current (A) draw, which means it doesn't provide much torque.

Alternately, the non-problem system may simply be providing enough power that the problem system doesn't need to provide any more than it does for the throttle input vs riding conditions and system parts / gearing / wheel size / motor winding, etc.


My SB Cruiser trike has removable panels covering the "triangle", and the lighting relay's DC-DC converter, light switching relays, wiring, fuses, etc are all installed in that section.

There are some cruiser builds from several to many years ago here on ES that show the fake engines they filled the triangles with, if that interests you. There's a more recent ongoing thread about a cab-style quad that has a fake engine in it.

.
I'm running 2 complete separate drive systems. Inc 2 batteries that I can swap if I need to. I've broken the chain and once the cheap factory dealer. I still had the hub to get me home. The handlebars are crowded, left is mid-drive / right is hub. Basically I use the mid drive or both to take off or hill climb. The hub only to cruse on the flats. The batteries seem to wear at similar rates. My setup is so heavy it takes a lot of power to get home. Original bike with hub 80LB / sidecar 40lb / mid drive & battery 35lb / dog 60 lb and I'm another 260 lb = 475Lbs with a 9 deg hill climb home. When it was all running I do the hill at 14mph, mid-drive alone 6 mph. All running on flats 28mph, It's a little sketchy with a sidecar. It's very stable on soft sand.
 
Opening up the motor may reveal who the manufacturer is. Here is a photograph of my Bafang SWX02 motor. The model number is printed on the halls pcb.

Similarly, opening up the controller may reveal the model number on the pcb.

A71EBCFE-61B2-4F53-9F97-EAE9CCF5832A.jpeg
 
Here it is. Go carefully with the throttle when you are doing the testing because some of the incorrect combinations will draw a lot of current if you whack the throttle wide open. Your motor should only be running at a couple of amps at full throttle unloaded with the correct combination.

View attachment 333349
I did the test but not the top SENSOR row. I followed the big arrows. Perhaps I should have gone to the top above the big arrows? Let me know.
The ones that run smooth and use low watts are marked with red.
Notice all the combos that seem to work are the same order B-G-Y ,this is what I started with. And under load was very low power and stutters until you get to about 7 mph. With no load its smooth and responsive with low watts.
 

Attachments

  • IMG_3841.jpeg
    IMG_3841.jpeg
    133.2 KB · Views: 10
Last edited:
Well done. That was a successful test and you have found the 3 combinations that work out of the possible 36. One of the 3 is supposed to better than the other 2, but I’m not so sure about that theory. I think any of the 3 good ones is fine,

You have to remember that pulling away from a standstill is the highest torque condition and you are trying to move a lot of mass off the line, so maybe your battery is struggling to supply enough energy to get all of that mass moving.

You can check this by monitoring both the voltage and wattage on your display when you try to get the thing moving. It is possible that the voltage is sagging to below the low voltage cut off point set by both the controller and your battery management system (BMS) at pull away because of a very high current demand that your battery can’t supply

You will notice your controller under voltage protection is labelled as 41 volts plus or minus 1 volt, so if your battery voltage sags to less than this value then the controller will cut off until the battery voltage recovers. The BMS also does the same thing to protect the cells.

This would explain your stuttering at pull away. The required torque will drop off when you reach a higher speed and the stuttering stops at 7 mph.

One thing to try is to start out in the lowest gear and help the motor to get going by peddling to see if the stuttering stops. Or if you don’t fancy that idea then use both motors to get the bike off the line.

Another thing to bear in mind is that your mid drive motor doesn‘t like full torque off the line either, so it’s important to start in a low gear. The nylon gears in both motors are too fragile for continuous maximum torque from a standstill.

You may find out by experimenting that your mid drive is better for pulling away from a standstill in a low gear and hill climbing and your hub drive is better for cruising.

You could fit a bigger 35 Amp controller for the hub drive, but you really need a battery that is capable of delivering 40 amps to keep on the safe side and a bigger controller probably won’t fit in the current location.

Also Kasen may have set a lower current limit in the controller and locked you out so you can’t increase the maximum current to 100%. The only way to combat this is to replace it with an aftermarket controller and display that you can configure yourself.
Thanks again for your help. Id be lost without this info. One thing that is hard to see in the pic of my results. The 3 winning configurations are actually the same configuration. Each row going left to right are the same settings! All BGY in that order. The only reason all of them in the top row didn't win was because I noticed the duplication and skipped while testing.
What about the very top row labeled sensors? I skipped those because the big arrow directed.
I will ride and check the voltage and watts. My battery is 48V 17AH
Thanks again.
 

Attachments

  • IMG_3841.jpg
    IMG_3841.jpg
    1.1 MB · Views: 6
Those last four that you have left blank are where the motor wires stay the same, but you swap the halls only. You can do all of them if you like and then you will have a complete record. But most people stop as soon as they find the first one that runs the motor smoothly. Your dilemma is the stuttering at the start, so you need to understand what’s causing that.
 
That was a successful test and you have found the 3 combinations that work out of the possible 36. One of the 3 is supposed to better than the other 2, but I’m not so sure about that theory. I think any of the 3 good ones is fine,
All three working combinations are identical. The only difference is that when drawn out on paper, they are shifted by one color. If you draw any of these in a circle (like they are in a motor) you'll see that every one of the three is just the rotated version of the other two. ;)

If you ever have a system where the three working combinations are not identical in behavior, something in the motor or controller is not working and/or built completely correctly, such as a hall being installed slightly offset in position (timing) vs the other two, etc.

If you ever have a system where the three working combinations are not identical color combinations but just rotated around a circle, there is something physically different about that motor design, and or defective or weirdly programmed about the controller.
 
And under load was very low power and stutters until you get to about 7 mph. With no load its smooth and responsive with low watts.

Several things that cause this.

The usual is that under load it is drawing more current than the battery can handle, so the battery voltage drops so much that either controller stops trying to drive the motor or battery turns off output, voltage then rises back up, controller reengages or battery turns on, and the process repeats rapidly causing stuttering. If it's the battery, the system will actually power off, so if you have a display for that controller it will turn off when the battery does, or at least flicker. If it's the controller, it may give no indication unless there is a display that shows you error conditions and it actually generates an error (they don't all).

Another common one in geared hubmotors is a slipping clutch. It slips, grabs, slips, grabs, and feels stuttery. In this event the motor runs continuously (though in pulses of power as the load grabs and releases), unlke the previous votlage drop scenario where the mtoro will actually stop and start, so it will sound different.

A third common issue is a hall sensor signal issue. With no load there is typically no signal fault, but under load a poor connection between hall sensor and controller can allow induced currents in the hall wires from the phase wires to corrupt the signals the controller receives so it can't correctly detect rotor position and send the right motor phase signals at the right times. This doesn't have any obvious indications that it is the problem, unless the connection problem is visibly obvious in some way.

A similar condition with phase wire connection problems can work under no load or minimal load, but above some point causes so much interference with the phase signal to the motor that the motor doesn't smoothly run. This usually causes heating of the poor connection that can lead to visible connection deformation or damage until the connection fails entirely.


Does the controller have any settings for number of poles? If so, that usually needs to be correct for your motor for it to correctly detect motor speed and perform any limiting it is designed to do (whether or not you have any control over that limiting).

If it's a geared motor, that number is usually the number of rotor magnets (or pairs of magnets) multiplied by the gear ratio (often about 5:1). If it's a DD motor, there's no multiplier, and is often 23 or 46.
 
Those last four that you have left blank are where the motor wires stay the same, but you swap the halls only. You can do all of them if you like and then you will have a complete record. But most people stop as soon as they find the first one that runs the motor smoothly. Your dilemma is the stuttering at the start, so you need to understand what’s causing that.
AGS & amberwolf Thank you for taking time to help me. I can't say how grateful I am. Ive put a lot of effort in trying to find a shop or supplier that has knowledge as you guys do. But only getting a polite "Not interested, good luck". A couple shops even finished the blowoff with "Want to buy a new bike?" So thanks for helping me.
That said I'm still very confused. My mind just gets tangled up when I try to understand anything electronics. So I'm thinking if I can show you exactly what's happening when I run it it will narrow what the possibilities are. I'm thinking filming the amount of shutter and the display info on how the watts jump around, volts and speed. Do you think that will help narrow possibilities? Or sense I'm struggling to understanding the electronics, I should start firing a parts cannon at the problem.
Several things that cause this.

The usual is that under load it is drawing more current than the battery can handle, so the battery voltage drops so much that either controller stops trying to drive the motor or battery turns off output, voltage then rises back up, controller reengages or battery turns on, and the process repeats rapidly causing stuttering. If it's the battery, the system will actually power off, so if you have a display for that controller it will turn off when the battery does, or at least flicker. If it's the controller, it may give no indication unless there is a display that shows you error conditions and it actually generates an error (they don't all).

Another common one in geared hubmotors is a slipping clutch. It slips, grabs, slips, grabs, and feels stuttery. In this event the motor runs continuously (though in pulses of power as the load grabs and releases), unlke the previous votlage drop scenario where the mtoro will actually stop and start, so it will sound different.

A third common issue is a hall sensor signal issue. With no load there is typically no signal fault, but under load a poor connection between hall sensor and controller can allow induced currents in the hall wires from the phase wires to corrupt the signals the controller receives so it can't correctly detect rotor position and send the right motor phase signals at the right times. This doesn't have any obvious indications that it is the problem, unless the connection problem is visibly obvious in some way.

A similar condition with phase wire connection problems can work under no load or minimal load, but above some point causes so much interference with the phase signal to the motor that the motor doesn't smoothly run. This usually causes heating of the poor connection that can lead to visible connection deformation or damage until the connection fails entirely.


Does the controller have any settings for number of poles? If so, that usually needs to be correct for your motor for it to correctly detect motor speed and perform any limiting it is designed to do (whether or not you have any control over that limiting).

If it's a geared motor, that number is usually the number of rotor magnets (or pairs of magnets) multiplied by the gear ratio (often about 5:1). If it's a DD motor, there's no multiplier, and is often 23 or 46.
amberwolf & AGS
Thank you for taking time to help me. I can't say how grateful I am. I've put a lot of effort in trying to find a shop or supplier that has knowledge as you guys do. But only getting a polite "Not interested, good luck". A couple shops even finished the blowoff with "Want to buy a new bike?" So thanks for helping me.
That said I'm still very confused. I spent my working career designing and fabricating hundreds of one off products but I've always found electronics to be too much like Wiserdry to understand. So I'm thinking if I can show you exactly what's happening when I run the bike it will narrow what the possibilities are. I'm thinking I'll film the amount of shutter and what the display info shows on how the watts jump up & down, volts and speed values. Do you think that will help narrow possibilities? Or sense I'm struggling to understanding the electronics, I should start firing a parts cannon at the problem.
 
Have you monitored your battery voltage to see if it keeps sagging to below the cut off threshold at start up?

Amberwolf also made a very good point regarding your display settings, so I’ll have a stab at trying to expand on this. But don’t go out and panic buy a new controller and display just yet.

Your new motor has 6 speed sensing magnets and 20 motor magnets, also a 5:1 gear ratio. These are important things to know in order to configure the display so your controller works with the motor efficiently. I have no idea what gear ratio your old motor has and how many magnets, but it may be different on all 3 counts to your new motor. This means that your controller may not be optimally configured for the Bafang motor.

I have a feeling that you are locked out of being able to configure your existing controller via the display because it will have been configured by Kasen and the display password protected to prevent you messing with the settings. Kasen are very unlikely to provide you with the password, so you can forget about that route.

I have attached a video of what these settings mean on a KT controller, because I think you will end up replacing your existing controller and display. A KT controller/display combination works very well with the Bafang motor. It’s also not too expensive. Other controllers also work well and are configured in a similar way, (same same but different).

Area 13 / Bolton do some very good instructional videos for dummies like you and me, so we can understand how these e-bikes work. Grin also do extremely good videos that I find really interesting.

So the main thing I want to highlight are the P1 and P2 settings in the video, 4 minutes 40 seconds in. All of the other P and C settings and basic settings are fairly straightforward.

For P1, he talks about gear ratio and magnets, so in the case of your motor P1 is the number of motor magnets multiplied by the gear ratio and this is 20 X 5 = 100

For P2, he talks about the number of speed sensing magnets and in your case this is 6

Your motor will run if P1 and P2 aren’t set up correctly, but it won’t run efficiently and it maybe the cause of your current problem at start up. Although I can’t guarantee that, so please don’t blame me if you buy a new controller and it still doesn’t cure your problem. Check your battery voltage sag first.

Also please note that it’s not P1, P2 on all controllers/displays, some need to be configured in a different way, (same same but different). But they usually need to have some value entered that correlates to number of magnets and gear ratio to run at an optimum level.


Last edited:
Have you monitored your battery voltage to see if it keeps sagging to below the cut off threshold at start up?
Amberwolf also made a very good point regarding your controller settings, so I’ll have a stab at trying to expand on this. But don’t go out and panic buy a new controller just yet.

Your new motor has 6 speed sensing magnets and 20 motor magnets, also a 5:1 gear ratio. These are important things to know in order to configure the controller so it works with the motor efficiently. I have no idea what gear ratio your old motor has and how many magnets, but it may be different on all 3 counts to your new motor. This means that your controller may not be optimally configured for the Bafang motor.

I have a feeling that you are locked out of being able to configure you existing controller because it will have been configured by Kasen and password protected to prevent you messing with the configuration settings. Kasen are very unlikely to provide you with the password, so you can forget about that route.

I have attached a video of what these settings do on a KT controller, because I think you will end up replacing your existing controller and display. A KT controller works very well with the Bafang motor. It’s also not too expensive. Other controllers also work well and are configured in a similar way, (same same but different).

Area 13 / Bolton do some very good instructional videos for dummies like you and me, so we can understand how these e-bikes work. Grin also do extremely good videos that I find really interesting.

So the main thing I want to highlight are the P1 and P2 settings in the video, 4 minutes 40 seconds in. All of the other P and C settings and basic settings are fairly straightforward.

For P1, he talks about gear ratio and magnets, so in the case of your motor P1 is the number of motor magnets multiplied by the gear ratio and this is 20 X 5 = 100

For P2, he talks about the number of speed sensing magnets and in your case this is 6

Your motor will run if P1 and P2 aren’t set up correctly, but it won’t run efficiently and it maybe the cause of your current problem at start up. Although I can’t guarantee that, so please don’t blame me if you buy a new controller and it still doesn’t cure your problem. Check your battery voltage sag first.

Also please note that it’s not P1, P2 on all controllers, some need to be configured in a different way, (same same but different). But they usually need to have some value entered that correlates to number of magnets and gear ratio to run efficiently.


1- 48V battery but Fully charged its 52V and stays steady no sag. It didn't ever sag even as it drops in volts over a long ride when I had a working motor. I does slowly lower on long battery depleting rides.
2- I have the programming cable that works with my bbshd mid drive. I could not change the Hub with it. Kasen was one of the "Not interested, Good luck" guys.
3- About configuring the controller, I was wondering if that is a thing. That's why I was thinking to buy the correct replacement with matching connectors to the motor.
4- Video. Is that programing software stored in the screen device or in the controller?
5- KT controller. Will I have to splice it to the motor? If so will the wire colors match or would I have to figure that out?

Lastly when I ride using the new hub motor the watts jump around between 1300ish watts down to 50ish. Then bouncing back and forth not displaying anything much in between. Changing about every 4-6 sec. while riding 3-7 mph. On flat road that about the max speed it can go.
 
Taking your last point first. At 1300 watts you should be going 30 mph without the side car with your new motor. Less of course with the side car, but I would expect more than 3 -7 mph on the flat, and the Watts shouldn’t be bouncing around all over the shop. This is worrying. What is your top speed with the wheel unloaded? I would expect it to be approaching 40 mph and under 200 watts steady with the wheel in the air.

1. Battery not sagging means it’s not running out of current under load, so that’s good.
2. Your BBSHD programming cable won’t work on your hub drive controller.
3. If you don’t want to change your controller, you could replace your display with a new unlocked one. What is the make of your current display?
4. I’m not sure about that one. I think it flashes the controller, but someone else needs to answer that question.
5. If you change your controller you will probably have more splicing to do. They are all same same but different.
 
Last edited:
Back
Top