Schwinn chopper ebike buildup questions

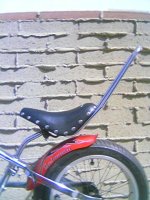
I went with a front 5303 mainly becuase it was easyer.To mount the hub on the big fat rear rim I think you need to drill the spoke holes bigger with custum size spokes. I have seen it done, I have some pictures of rear wheel mounted hub motors. I had a 48 volt(overvolted) wilderness motor before with no torqe arm and it was fine. One of the things I didnt finish on the upgraded 5303 was the tourqe arms. It was working great for me becuase I knew not to slam on the throtle. Long story short, I was finishing up my bike before I had surgery and took it to the bike shop for some extra help with a few odds and ends and to install the front disk brake. They told me it would take a few days. I went back 2 days later cuz I was going in for surgrery early. I wanted to ride my new dream electric bike that I had finished building, becuase I would be recovering for awhile. I went back, to find that all the kids that worked in the shop loved my bike and couldnt belive how fast it went. They didnt have time to fix the brakes but the had time to take turns in the parking lot riding my bike. So I take it home and the baterys are almost dead, and the front drop outs are rounded out from them juicen the throttle with no tourqe arms. A day or 2 later my daugter and I went to take one more big rode trip on the bike, and it never worked agian. I bought a new controller because I thought I fried it, but no luck. Its Probly wires in the hub shorted or something. Anyways thats my sad story to my sleeping spoiler as she lays resting. A shop in Newport beach where I bought the bike at help install the 2nd seat. My daughter was 3 when she rode on the back and the bike was fine, we zoomed around town like nothen. Shes now 5, Im not sure how it would hold up now. The seat is mounted on a rack, but the rack is mounted to the frame were the rear fender bolts on. It would be stronger to mount something to the axle in like a big U around the fender. When I had 48 volts this thing was fun now i stuffed in the box 6 heavy sla batterys to make 72v. Now with all these big hunkn batterys It went 40 mph. With the springer front end and the springs on my seat it rides so smooth. I cant remember the range, but it would take me and my daughter any where in my town and back so it was ok. Thank you for all the compliments on my bike! There were alot of pianfull hours into it(right before neck surgery). Luckly I had some help. My brothers freind has a race truck and built the battery box and threw a bunch of my parts in with is truck parts to get them powder coated black. Someday I would like to finish it. Its still needs, lipos, blinkers, talillights hooked up, and of course tourqe arms. Well I hope that answers a few of your questions, sorry for the rant on my sob story. Here is a pic in its current state in the garage.
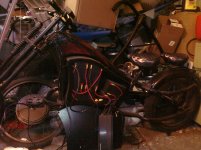
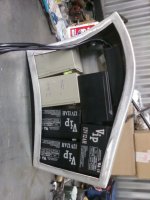
 

Attachments

  • sad bike.jpg
    sad bike.jpg
    346.5 KB · Views: 4,217
That's no rant, just a slice of life to me. I would have told the shop keeper he owed me a new set of dropouts, a new hub, and the controller too, if it was toast. I was thinking of replaceing my front dropouts with steel so they would be stronger.
http://visforvoltage.org/vehicle/spoiled-spoiler/7417 this thread is why I chose a rear wheel hub instead. I'm gonna sort out a drawing for new dropouts for the Spoiler, and get a set made in steel. If they are cheap, I'll send ya a set. You might be able to get a replacement springer front end from ChoppersUS.com. Nowadays you can get a complete rear 20 inch 9C with a high speed wind that will go pretty quick for a couple hundred bucks. Of course then you still have to send it to JRH at Holmes Hobbies to get a fat rim laced on. http://holmeshobbies.com/home.php is his website. For premade dropouts that might work, http://www.choppersus.com/store/product/465/Rocker-Dropouts-Cross-CP-Pair/ You might post a seperate thread asking for help with repairing your X5 hub. There are lots of guys here who could do it. You ought to ask your brothers friend how much he wants to repeat the build on that battery box. I could use one, if it's not too much, and there are at least two other guys that might be interested. I know TC wanted one like that a while ago. I'm gonna drop him a line and see how he's doin. Can you tell me if your battery box was metal or fiberglass? Thanks again for the great story on you bike anyways Ryan.
Brian L.
 
I was looking threw some pictures and I saw some you might like to see. The battery box is all metal. Im not sure how much or if they would make another box. I will ask him, I asked another time for someone else, and he wasnt very intrested. Mabey, like you said if there is a couple of people, then mabey he would. I did find one picture of the battery box before it was powdercoated, Ill post it. Oh yeah, I was thinking, you would have less extra room of play if you put the multiple speed freewheel on it, I think I have a pic
 

Attachments

  • back rim.jpg
    back rim.jpg
    80.7 KB · Views: 4,205
Here is some more pictures of the battery box. The last picture isnt mine, but simaler idea.
 

Attachments

  • 266281842821.jpg
    266281842821.jpg
    197.8 KB · Views: 4,205
  • box filled1.jpg
    box filled1.jpg
    227.1 KB · Views: 4,205
  • crank clearance1.jpg
    crank clearance1.jpg
    223.1 KB · Views: 4,205
  • my%20ride[1].JPG
    my%20ride[1].JPG
    92.2 KB · Views: 1,529
One thing I did whith my OCC stingray to make it more comefy for an adult is put a laidback seat post with shims. You can use a regular seat or I used my original seat by cutining it off the seat post on having someone weld a regular seat fastner thing on it. It makes a huge differance. Your not all cramped on some little kid bike.
 

Attachments

  • 39909406341.jpg
    39909406341.jpg
    71.7 KB · Views: 4,185
Thank you so much for the pics Ryan, I really enjoy looking at them. Yesterday I posted on TC's thread, and if I don't hear from him in a few days, I'll PM him to get a response. It's not like I expected to hear a yes. I know how hard custom work is to repeat. I have a design that will look good, and fit my needs, it just isn't built yet.

SpoilerBat2.jpg


The rear hubs I have aren't fully set up yet, but you are right about the room on the Spoiler pic I posted. Once the Tourqe arms are mounted, brake rotor and caliper alignment takes place, chain length adjustment, and final alighment are finished, I can move on to the batteries. The modified chain tensioners are on now, and look to be working great. I have one on each bike, on the non wire side, and even without tightening the axle nut, I can move the bike any way I want with no axle rotation. They are thick though, with them on, I can't use the Nordlock washers I bought from Shinybally. Mabye later when I upgrade the hall wire connectors I will be able to get them on the wire side. I found out when I removed them after test fitting them, that they really do have holding power. They made a metalic snap sound repeatedly, and required a little extra effort to loosen them. I'm sold on them now, if you have fasteners that refuse to stay tight, USE NORDLOCKS!
For anyone looking to add them to a build, Shinyballs has them for sale in the merchandise for sale area here. Nice seat bar on the OCC bikr. I'm only 5'6 so there's no trouble for me to ride one of those. I was quite surprised to find out how solid they are. Except for the spokes they are tough bikes. I weigh 210 so I worry about weak spokes and rims, like the ones they put on these bikes. Holmes Hobbies is the cure for weak wheels though. I just haven't found the funds to send him work or I would have had a wider rim on the Spoiler by now. Cheers!

Brian L.
 
Hi Chopper guy's,

I don't know whats up with the forums or my emails? Iv'e subscribed to this thread but no longer get any emails informing me of updated posts. Thanks for letting me know in my thread Brian :wink:

Yes indeedy, thats the very bike/battery box I saved pictures of a while back, I think they were from the Schwinn bikeforums. The pics I have saved are kinda small and dont show much detail. At first I thought the batt box mybe made out of some form of plastic sheeting, I now know its metal. Thanks for posting those nice BIG clear pictures of your bike and batt box ryan, thought its sad to hear its garaged up, hope you get it fixed and enjoy riding it again soon.
One thing I cant see on any of your pictures is how the batt box is held in place?

Spoiler Weight carrying Alert.
At the moment my spoiler is stripped down slightly as I moved my motor to under the seat position - I can just squeeze it in avoiding hitting the peddel side chian.
Last week I spotted a dumped kiddies electric bike/scooter on a footpath about 20 yards from my house. I took it home and stripped out the motor/throttle etc. I also noticed it had a nice little chain tensioned, so I had that as well.
I made up a wooden template for my motor to sit on. After everything was bolted down I turned my backwheel by hand and found there was something wrong somewhere? Something was catching/binding. The chain tensioner was working great but when turning the wheel the chain went from tight to slack to tight again? I finally traced the problem ------ My spindal is bent :cry: 
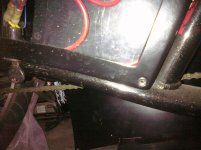
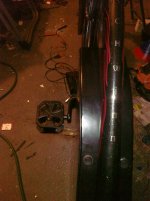
Im now thinking the cause of this bent spindal is carrying those heavy lead acid batterys plus my fat butt.

Im think ryan should now check his rear spinal as I see he was carrying SLA batterys in his batt box plus him and his daughter.


Nice to see things coming along on your build(s)Brian :wink: Now that the weather is picking up a bit ( we had a sunny day last week ) I can get my bike outside and start work on it again.

I'll need to update my spoiler thread on what was planned / whats been happening. BTW -- Im now riding lipos, lighter faster bike. As the spoiler is stripped down im using the 2 lipos on my Powabyke at the moment.

POWABYKE.
http://motorbicycling.com/f9/powabyke-mark-1-classic-17215.html

Regards
Tom
 
Hello Tom, it's nice to know the sun hasn't forgotten the UK! I'm glad you finally got some juice to go with the bling. :D Those are some interesting pics on that thread. I thought you would like to see Ryans bike again! 8) I'm quite hopeful about this coming summer. If all goes well, the Spoiler should turn out quite nicely! I have had my own reservations about the Spoiler framset. Mine seems to have a bit of bendiness to it when entering driveways and such. I always figured it was the spokes. Well, either way, that's why I bought the OCC bikes. One way or the other I will have a nice bike. The way you wrote it, the gear itself, not the frame seems to be bent. If say the frame was off, the issue would be constant, not related to rotation which is the case with bent wheels or gears. That's how I figured it, but I must admit that looked like a heavy assembly on the back there. I look forward to your final diagnosis, as any limitations that might result in catastrophic failure ought to be well documented. Happy ST PADY's DAY! :mrgreen:
Brian L.
 
Thanks, Dazarooney, I'm quite happy with the way it's going too. The really cool part is, it's not even halfway done yet! My only regret is not keeping my Powershot camera for macro shots. However in the absence of children of my own, a niece's interest in photography got the better of me. I'll suffer that, til I get a better one. The old stormchaser DXG 3.0 MP still has a few shots left in her. Hope to hear from ya again! :D
Brian L.
 
Hey Tom and Brian, my box is bolted on by 4 screws. If you look reel close on the first picture of my bike you can see 1 going into to the water bottle spot(actually you sea a ruber gromet). The other couple look just like the water bottle screw holes. There is also one on top you might be able to see, and one on the bottom. I think he used the same type as the origanl water bottle holder screw mount. There is allso a screw on an stock L bracket in the back that bolts to the chain gaurd. There is probably a few different ways, but thats the one we chose becuase you cant really tell how its botlted on, it just looks like its supost to be there. Its allso the same way the side panel bolts on. Nice and clean and flush all around. Its sturdy and dosnt move. The allen key screws on the side panel are countersunk to allmost flush. The inside is 4 3/8 inches, the cranks on the left side have an 1/2 inch clearance from hitting the box. My charger fits in the box with the plug and cord sticking out the back of the box velcroed to the seat post. Makes it nice for charging on the go. Ps. Did you see the picture of the occ stingray box somebody made in picture my%20ride[1].JPG . Here is a picture of the screw hole for the side panel.
 

Attachments

  • side panel mount.jpg
    side panel mount.jpg
    320.8 KB · Views: 4,470
Ok Ryan, thanks for the pics on the box, I'm SOLD. Here's a few pics of the left front dropout on the Spoiler. As you may know they used plastic washers to facilitate movement of the forks. These go between the fork flanges and the dropout casting. They look like they could stand some grease, but mine had none. I will post measurements as soon as they are finished. For those who aren't aware, the black casting is aluminum, and should never be used for a hub motor without some kind of tourqe arm. I am looking into a replacement option made of steel. This may require stiffer springs, but would be worth it in terms of reliability. Please note the milled down ears for the brake caliper. That is to the inside or wheel side of the dropout. Also note the slightly rounded top end of the Dropout. This is for the special washers that retain the wheel in position while the axle nuts are loose. This is another reason why tourqe arms are mandatory on both sides of the front end on these bikes. I will post pics of the washers next time. I forgot to shoot them, and now the camera batteries need a refill. Enjoy!

Spoilerdropout.jpg


And a layout of the parts.

Spoilerdropout1.jpg


Brian L.
 
Closeup of axle washer for front wheel on Spoiler. OCC bikes have the same washer setup on the front. Except for Cameron's XL, which I suspect is an illegal alien in disguise! :shock:

Measure2.jpg


Pic of layout with revision, the casting is 1/4 inch thick aluminum, and the ears for the brake caliper are milled down to 1/8 inch.

Measure.jpg


Finally rough draft of preliminary measurements. I will post in paint when I figure out how to draw a believable curved line.


Measure1.jpg


Brian L.
 
I'm sure those choppers are gonna be and look bad ass when youre done...

I'll post a link to my chopper..

Now mind you, that I have no skills whatsoever in making things look "pretty", I have no ingenuity, nor money anymore to make it look as good as 99% of the other eChoppers out there, but it's my baby, and she'll do 20mph for at least 80 miles..
If you have any suggestions, or questions, please feel free..

Here is the YouTube link...

http://www.youtube.com/watch?v=17M9Yuvs0lU&feature=youtube_gdata_player
 
Welcome to ES Sangesf! Thanks for posting about your two wheel drive Echopper. :shock: I was gonna say two wheel drive entertainment center, but I didn't want to offend you. That bike must weigh a hundred pounds! If I didn't know how sturdy the OCC bikes are, I might have been worried about the load. I'm really impressed with the blinkers, I have a switch, but am not sure yet how to set them up. Same for the brake light I want. That bike is very rare, and shows a lot of skill on your part. NICE JOB MAN! That's motivational, Chopper Porn even! :mrgreen: You gotta get a decent still cam and post a few pics here for the folks to enjoy. Prefferably outdoor ones. I don't think I could carry that monster down the stairs! :oops: Now for Ryan, the layup is done for the Spoiler fork dropouts. Done in Paint as usual, and I will get some feedback from the shop next Friday. You may copy it and see if you can get it done cheaper there.

FRSPOILERTP.jpg


Brian L.
 
Yeah, that was my bike build area in the middle of the night..

Once I get it looking a little bit "prittier" I'll take a new video.
I'm waiting on a diamond plate aluminum box in place of that file folder box for the rear 36v batt, sub, amp, rear light, directionals and 12v 35ah SLA for the accessories..

I bought that switch clutch on eBay for like $10.
It has a place for a light, horn, and directionals..
It was easy for me, since I have that huge 12v SLA[26lbs] which I'm changing over to a 12v 20ah Lifepo4 which will cut down the weight by about 20lbs!
The way I used the relay was easy...
First off, main power NEGATIVE lead is terminated in the rear and front and is always connected (always on). Negative is connected to ALL accessories.
Main power (POSITIVE lead - always on) goes directly to the relay. Then out of the relay it goes to that switch clutch....
there are three wires on the switch clutch for the L/R.. Main lead in and Left and Right out..
Always on positive goes into main switch lead...
Left out positive goes to left blinker positive (which is also run to the rear Left blinker positive)
Same for Right out positive.

The red switch on the rear batt box takes main pos from 12v battery and runs to "remote" (pos) wires on the sub and radio (that way, I'm not pulling any power for the sub, when I'm not listening to the radio.

What you also didn't see was the CB radio, satellite radio and PA speaker I usually have hooked up.
Also missing is the 55w front headlight, in place of that you saw the LEDs.

The other thing is I also need to hook up is the key switch to the rear controller.
Once the key(s) are switched to off, within 10sec if I hit the cruise button it sets the alarm. Once alarm(s) are set, if the bike is moved an inch, the alarm goes off and it locks the wheels (actually adds a HUGE amount of resistance).

The controllers I'm using have (sensored or sensorless mode), cruise control, regenerative braking, alarm and reverse (of all things).

The bike with EVERYTHING in it...
Bike (just frame) is 65lbs, rear and front motors add about 18lbs each, 12v 35ah SLA is 26lbs, 2-36v 20ah batts weigh about 18lbs each, and all the other miscellaneous stuff weighs another 10lbs or so and finally me at 170lbs, for a grand total of...
About 350lbs!
I still get 80miles distance traveling at an avg speed of 20mph..
If I remove the SLA battery (or replace it with a 12v lifepo4) and cruise at 18mph, I can (and have) reached just a tad bit over 110+ miles.
Next step is to replace the two 36v 20ah batts with 12-90ah Thunderskys which SHOULD at least double my range...
The ultimate goal is a 250mile capable ebike..
Best out of all of this, in Florida it's still considered a bicycle, because it's limited to 20mph, has operable pedals, pure electric, etc etc.
 
Wow, controllers with alarm, satelite radio, and CB. Back in the day, we had a healthy CB comunity here. I fantasize about that kind of range. We have way too many hills here. Nice bike man, I would love to see a pic of it in the sun! Happy rideing!
Brian L.
 
Its gone all quite on this end? I hope the builds still going strong.

On my end, im waiting for nice sunny days to see if this solar panel of mine will keep that deep cycle battery topped up. I did manage to charge up 2 lipos with my setup but when I went to recharge them afterwards it was slooow! I think the deep cycle batt was running low.

Today I got a new chain to go with the left-hand free wheel I bought the other week. I took the left-hand nut/cyclinder? off an old bottom bracket and screwed my freewheel onto it but the hole is to big to sit on my motor spindal. I'll have to get a couple of small plates welded on either end or get something like this made up...

Freewheel Adapter (from Ypedals site... http://www.ypedal.com/RC/RC.htm)

fw3.JPG


I also still have to file out the 2 sprockets that I bought from Sosauty at xmas time...
Sosauty;s thread.... http://endless-sphere.com/forums/viewtopic.php?f=28&t=22908&start=0
Schwinn3.jpg


Sadly the Tophat adapter I bought along with the sprockets from sosauty wont fit over my rear hub, and I cant turn it or file it down as i'd end up with 2 rings!!? So im also going to have to make a plate up with disc brake holes.

Once all that is done, I will bolt the plate to the sprocket and then screw the plate on in place of the rear disc brake, chain up and were off :D
If the tophat adapter (big silver disc on wheel in picture above) would have fitted I would have been able to attach a disc rotar and still have a rear brake.

The reason my build is so slow is money! being out of work means all my money is taken up with bills - electric/gas/phone etc. I can only buy little bits at a time ie - newchain this week, freewheel a couple of weeks ago. I keep telling my mate .... If I have any money left in my pocket at the end of the week it mean some poor buggers not been paid :mrgreen:

Regards
Tom
 
Hello TC, sorry for being so quiet. Yes this build is still going on. Plans are in place for a significant update this week. I have the same reason as you for the slow progress. For today, the good news is, that after being bounced back and forth by folks wanting it, the 9C 2805, 26 inch nondisk front hub sold today! :shock: 8) Thanks Neobeam, it seems that the hub likes the east coast air better. :roll: That's where it came from, and tomorrow, that's where it will be going. :cry: I miss it already, my first frock going away for good. :( And the best looking one too. With any luck, I will have new info by the end of the week or thereabouts. Till then, keep your claws sharp, your fur dry, and the world will turn baby! Thanks for the interest, you're top shelf arrounf here! :mrgreen:
Brian L.
 
Time for an update. Both bikes have had something done to them, [besides being drooled on!] :D Due to an unqualified, and some have said SICK fondness for the SOA bikes, with their bikini cafe fairings, I have decided to add one to the Spoiler. :shock:

cafe.jpg


And side.

cafe1.jpg


You can find them here.

http://cgi.ebay.com/ebaymotors/Viper-Motorcycle-UNIVERSAL-HEADLIGHT-FAIRING-Cafe-Racer-_W0QQcmdZViewItemQQhashZitem3367061414QQitemZ220771783700QQptZMotorcyclesQ5fPartsQ5fAccessories

Those with sharp eyes will note that the stock handlebars with a 5 inch rise have been swapped with a set of drag bars off the Stripper. Sorry Topcat and Jim. I know you will hate me for that one. :shock: The Stripper can be ridden without hitting my wrists with my knees now.

cafe2.jpg


No news yet on the tourqe arms, the shop hasn't gotten to them yet. :roll: I hope Ryan hasn't forgotten my request for a box, as the cash will be on hand for the next Tuesday! :mrgreen: That's it for now, happy rideing all.
Brian L.
 
Final fitment of the fairing as seen below was done with a hacksaw and file. I tried to align it without cutting anything, but the springer forks, and their associated angle are too much. First I cut the bottom center section off the fairing to allow it to fit closer to the bars, and low enough to not impede vision. That helped, but wasn't enough to stop interference. Then I cut the ears off to prevent them from hitting the frame, when the bars are turned fully.

fairing1.jpg


This allowed proper position of the fairing, without any binding, but I had to bend both sets of brackets to get it right. A vise and a rag did the trick there. Three full days of work, and a pound of plastic later, it finally looks right! 8)

fairing.jpg


Main headlight and fairing brackets I used. Very nice parts, with good finish, shipped quick, and fit the small forks perfectly. I had to bend them to a 90 degree half way out, and use the large hole neareas the small end, to get the fairing located where I wanted it.

http://cgi.ebay.com/ebaymotors/New-pair-EMGO-fork-ears-cafe-fairing-headlight-mount-C-_W0QQcmdZViewItemQQhashZitem3f096e10bcQQitemZ270741147836QQptZMotorcyclesQ5fPartsQ5fAccessories

I looked all over the web for emgo fairing assembly instructions, and got snippets from several sites. Nobody I found, had a detailed assembly sequence, let alone with pics. I guess they figure it's a cheap part, so why worry. A few tips I will offer, just for you guys. Mount the lower body first. Be prepared to add hardware such as fasteners to facilitate placement, and rigidity. The kit I got was fairly complete, but could have been better with fastener upgrades. Install the windshield screws starting with the center one first. Then work your way out to the ends. Us a rubber washer under the screw head on the outside of the windshield. Then use a flat metal washer with the nut, on the inside. The instructions say to tighten the screw from the outside with a screwdriver for final tightening. I found that a socket on the inner nut turned by hand worked better for me, without getting so tight that it cracked the plastic. I guess you are supposed to use the extra set of rubber washers between the fairing and the windshield, but I didn't. I'll save them for later. Happy Cinco De Mayo all!
Brian L.
 
Well thanks for asking, I'm sure I can try harder. What would you like to see over? I am limited by my budget and equipment available. My cam is a DXG 3.0 negapixel cheapo from about eight years ago. However I do have lights I can use to enhance things a bit. So, if you would be so kind as to let me know what you want done over, I will try it. Thanks for looking.
Brian L.
 
Yo Sangesf, I broke out the big halogen Power Light, and tried again. This is as good as it gets for now, I used all three lights I have on these pics. :shock: I really need a better camera, before indoor shooting will work well. Well, enough escuses, :oops: The best three out of twenty. 8)

BrightCafe-1.jpg


BrightCafe2.jpg


BrightCafe1.jpg


What's a Power Light? :idea:

Powerlight.jpg


I hope that helps man. :mrgreen:
Brian L.
 
Back
Top