SIKK Fat Bike 49cc/MXUS 3000W Build

On another note I got my 3 - 1 farad 25v computer grade capacitors in the mail today for my 600w capacitive discharge spot welder I'm building to make batteries out of those used laptop cells.
Here is a link to the thread where I'm talking about this. http://endless-sphere.com/forums/viewtopic.php?f=2&t=66466
I'm going to jump ship and work on this now because I'm tired of not having any powered bike to get around. Since this is my only mode of transportation. (or the bus)
 
Just a good advice to help, With the use pf the DP420 or 460, the optimal bondline is 7 mil thick for the epoxy. with that you get 4800psi shear strengh when fully cured :wink:

You can use very small shim to keep the right thickness.

What hapenned to you happen usually when people clamp them with too much force and all the epoxy goes out.. ( the roughness is not enough to keep the best bondline thickness)

Doc
 
Yah that's what I figured about the thickness.

Thanks a bunch for the tip on using shims!

That will make doing it a lot more idiot proof! :lol:


(the roughness is not enough to keep the best bondline thickness)
Not quite sure what you mean by this though.
Are you talking about how rough I sanded or still about how I squeezed it too much?

Diggles
 
Round two on epoxying the TA's
Yesterday I re glued the TA back on and had the bike right in the heat stream from my garage heater.
This time I used some little strips of plastic for shims. They were 1mm thick but when I squeezed the caliper it went to 0mm.
So I just used them and squeezed the crap out of them.
20150216_181005.jpg
View attachment 2
Then since the garage was warm and I don't like leaving the heater going unattended, I started working on the battery boxes for the front forks.
I got this aluminum tail gate cover from a guy for 10 bucks.
So with a whizzy wheel blade in a drill I cut the peace's out. (took forever)
Then when I went to braze them I noticed the plastic film smoking, bubbling and turning black.
So then I put an abrasion wheel, that you use for removing paint and rust from cars, in my drill and clamped the drill in the vice, and locked it on and went to town removing the film. (took forever)
Finally started brazing again and then ran out of oxygen after three welds.
I was using mapp oxygen. I think im going to try propane because the little oxygen tanks don't last long at all.
I'll need to get a propane torch though.
View attachment 1
20150217_033402.jpg
 
Then today when I went to pound the roll pin in the right side, the TA popped off again :evil:
I was ponding from the outside in again. On the other side I went from the inside and had no problem.
I looked at the TA that popped off and there was a uniform layer on it. It was prob closer to .5mm though.
7 mil is ~.18 mm.
So after debating with myself for a while I decided to just weld it.
I don't have a device to measure down to 7mil and the only thing I know I can buy that's 7 mil is poly.
I didn't want to go buy poly and I dreaded the thought of doing it again.
So I mounted the wheel in the frame tightened the nut's TIGHT tight and installed the right side roll pin.
Then practiced arc welding on an old wheel barrow.
Then I went to tack some welds on the bike.
I got one little tack done and it looked like crap! (I'm not so pretty good at welding :oops: )
But just then the neighbor chick popped in and said her bf's buddy was a welder and he could probably do it for me.
And I got to thinking I know a couple dude's who weld for a living, so I'll just have someone ells do it for me.
But for now IF I get it running before someone can weld it, I'm confident that it will be fine with the roll pins in there and the nuts tight.
20150217_211503.jpg

So then I decided to mess with the phase wires on the MXUS.
The protective layer had been sliced through by the C clip from me messing with it so much.
So I figured at the bare minimum I had to re shrink wrap that part.
I popped the cover off. (first time ever doing any of this)
Pealed the outside layer back.
I couldn't see any bare copper.
Then I did something stupid.
I tried pushing the wires through the axle from the outside in.
The axle is razer sharp there and it sliced a bit of insulation off the tepm wire and nicked the green hall.
So then I cut the phase wires pulled them out one at a time and cut the hall wires 1&1/2 foot from the outside of the axle and pulled them though to the inside of the axle.
I'll just shrink wrap them and leave the first 4 inches in the motor.
I'm glad I did this though because two of the phase wires had little nicks in them right where that snap ring was.
I got 10AWG military spec PTFE coming from teslanv so hopefully I can squeeze them through there.
If I can't I will settle for 12 AWG of the same stuff from teslan. Since the stock one's equivalate to about 13AWG this will still be an upgrade and my motor is only 15x4 strands anyway so the 12 AWG should be adequate.
I will be dremeling the axle a bit though too, just to smooth out the sharp edges.
20150217_214728.jpg
20150218_001755.jpg
20150218_040958.jpg
20150218_041223.jpg
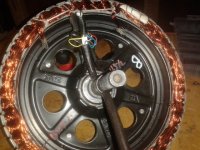
I did notice the same thing Ed noticed on his V1.
The laminations were kind of spaced a bit on one side like they are coming apart or something.
And they were a bit rusty. :(

yah that hole side is like that all the way around. (the brake side)
Do I have anything to worry about? It's not like a lamination is going to go flying when in use right?
Prob just little less efficiency.
 
Well got a buddy coming over to weld the TA within the next couple days.
Got the 10AWG military spec PTFE today.
This is some really nice wire. Vary easy to bend and a strong but thin insulation.
Didn't measure it but looks like twice the size of the stock wires.
20150219_235247.jpg
I used a diamond die grinder bit to smooth out the sharp edges on the axle.
View attachment 2
20150219_235941.jpg
Managed to muscle the 10AWG through the hole but it's a very tight fit!
20150219_235350.jpg
I'm not going to try and shrink wrap the halls to the 10AWG's and pull the bundle through.
It's just not going to work. I can tell.
But :?: Has anybody ever shaved just a little bit more material from the inside of the hole?
Is it possible to do this without compromising too much of the axle strength?
Just a thought. As of right now. I'm just going to wait for the 12AWG and run that an inch and a half out the axle then solder the 10 AWG to it from there. Neptronix does this and he sais it's %90 as effective as replacing the hole wire. Makes sense.
Plus I'm still upgrading a little bit from the windings to the 10AWG so mine should be like %95. :lol:
C clip will not be going back on! :evil:
 
diggler said:
I'm not going to try and shrink wrap the halls to the 10AWG's and pull the bundle through.
It's just not going to work. I can tell.

Can work if you change the halls for 32AWG PFTE wire. I've managed to do that with a 9C 2807 hub motor and the same 10AWG PFTE wire you have.
 
Dangit dangit dangit!
Just after I got the bundle though the axle I noticed one of the wires broke clean off one of the hall sensors!
Then I noticed one on the middle hall broke too.
Any body know where I can buy these hall sensors for this V1 MXUS 3000?
View attachment 2
Things started out good.
Desoldered the remaining phase wire's and separated the strands.
20150223_154654.jpg
bundle through the axle. 12AWG
 

Attachments

  • 20150223_183539.jpg
    20150223_183539.jpg
    84 KB · Views: 3,421
Ordered 10 halls today.
Plenty extra for boo boo's and I might use some for brake switches.
Can use them for motor control and for light switches.
 
It's been a while since I updated...
Got the motor working to day and dang this thing is fast!
I got it up to 42 mph verified by a free app.
I really thought I'd be able to go 50 mph but 42 is definitely fast enough.
This was on 120%. On 100% it went 38mph. On 50% it went 22-23mph perfect! And on 35% it went 15mph also right on.
Motor got hot enough where I couldn't leave my hand on it for longer then 10 seconds but controller was barely warm.
This was pretty much constant full throttle then breaking with regen.
This was all on the settings teslanv set on the controller for me.

He set it for 24s lipo4 cause that's what I thought I was going to do initially.
So I have to do a little tweaking.
I'm going to set the low voltage right.
Set it for slip charge.
And tweak the battery and phase amps a little.
:?: questions:
How many battery amps can the 18fet Infineon put out?
How many phase amps is recommended?
I upgraded phase wires to 12awg to just outside the axle then 10awg from there to the controller.

Btw the gas engine works great with the mxus motor! :mrgreen:
I just ordered the CA v3 with the pot attachment yesterday so I'll keep you guy posted on how much regen I can make with the gas engine.
 
Nice! Glad to see it running. You had a few battles along the way so congrats on working the bugs out. Glad to hear its fast. You see why a few of us suspected you would ditch the gas motor?

I would like to see a back to back test comparing
Fuel economy with gas only
Watt hours per mile electric only with gas motor mounted
Watt hours per mile electric only without gas motor mounted
Combined hybrid fuel economy and watt hours per mile with regen load on gasser

With the ca you will have everything you need to do that test. Be careful not to overcharge your pack when doing regen with the gas motor. Thats a pretty powerful "charger"!

It would be good to have an example of this hybrid concept to settle the often frustrating arguments that spring up around this topic. Is rare to see a homebrew gas electric hybrid.
 
I wish I could be using it right now!
I'm on a 2&1/2 hr bus ride to go 18.6 miles! :roll:
But with the gas engine on it I'm not going to risk getting arrested. :lol:
I only got 21,135mah from 3.55v to 4.15v 18s lipo anyway so it probably wouldn't make the round trip.
This is where the gas would come in handy.
Soon I will be adding the 16ah stars in parallel.
That should do it. :mrgreen:
 
Nice! Glad to see it running. You had a few battles along the way so congrats on working the bugs out. Glad to hear its fast. You see why a few of us suspected you would ditch the gas motor?
Thanks, yah I'm really happy to have it running finally. I had one more set back I didn't post up here too.
I had replaced two of the halls but couldn't get the third one out so I left it and sure enough the first time I went to try it. chug.
replaced the final one and away she go's.

And yah I already really want to ditch the gasser so I can ride this thing without being super paranoid. :roll:
This was the first time I road it since I got pulled over I went a block off the bike trail to the gas station for some treats and when I left I crossed a cop on my way back to the trail. I just put it in 15mph mode and barely throttled while peddling. I didn't have the gas running but it is still there to see in plane sight.
Also to see what affect ditching it will have on max speed and efficiency.
I would like to see a back to back test comparing
Fuel economy with gas only
Watt hours per mile electric only with gas motor mounted
Watt hours per mile electric only without gas motor mounted
Combined hybrid fuel economy and watt hours per mile with regen load on gasser
Yes me too!
Unfortunately I didn't get any mileage data when I had it pure gas. :oops:
And now even if I take the batteries off with the 20+lb motor on there chugging away even with the controller turned off, that will surely make it consume more fuel. Not to mention a suitable place to test it and not get arrested! :lol:
An out door 1/4 mile circle track would be Ideal! I suppose I could scout out one close by and even ask the school if I can use it.
After all it's in the name of science! :)
Then it wouldn't be that hard to take the motor and batteries off and swap wheels.
I'd have to get another tire and tube though.
The controller and wiring ect. wouldn't weigh enough to skew the results, I wouldn't think.
So yah I'd say it's doable and it should be done.

The only trick part is that last one. "Combined hybrid fuel economy and watt hours per mile with regen load on gasser"
A proper test would be to use the mxus and drain the batteries to a safe level then use the hole tank of gas then go as far as possible on the batteries again. All while trying to keep a perfect 20mph. (Witch might be hard on a track made for running)
Also there is a lot of variables: (this is what you were talking about when you mentioned the prius algorithm)

;Setting slip mode or not. (I think slip mode would be better but just stating it anyway)

;Using the electric to accelerate to 5,10,15 or full 20mph then letting the gas either go the rest of the way to 20 or hold it there.

;Or another Idea would be to set the cruise on the electric to 15-19mph then power the gas up to 20. (IDK if this is how the cruise works, meaning if your going faster than what the cruise is set for, will the controller increase regen accordingly?)

;I would have to do multiple test using multiple methods to see which one produces the most range.

;Then there's testing to do as far as stops go. Like stopping every 1/8th mile,1/4,1/2,1 or not at all. This I would think would have a big affect because of regen and other factors.

;Then the wind might change in the middle of a test and ploowy there go's all the accuracy out the window :roll:

The best test would probably be real world situations over a long period of time and averaging them out.
Although I fear there is even more variables involved there. :roll:
I guess we will never know complete accuracy unless someone does this that has a dyno in a room where they can run a gas engine.

But I will give it my best shot! :lol:
 
With the ca you will have everything you need to do that test. Be careful not to overcharge your pack when doing regen with the gas motor. Thats a pretty powerful "charger"!
Cool I hope so!
This is the first time I've even had regen and I'm lovvin it! Still need to hook up the rear brake though :lol:

It would be good to have an example of this hybrid concept to settle the often frustrating arguments that spring up around this topic. Is rare to see a homebrew gas electric hybrid.

Thank you.
To me this is the holy grail of powered bicycles. All the fun of the electric bike with no range anxiety.
And I can still go 30mph with the gas maybe more with high performance upgrades.
The 80cc two strokes with a jack shaft usually hit at least 50.
 
been playing with programing my controller and the CA.
I couldn't get my damb laptop to recognize the controller cable at first because it win 8.1.
Finally got the right driver to work and reprogrammed the controller.
The High and the low voltage wasn't set right.
I turned on slip mode but I'm not sure if I like it.
When I tried using it with the just the gas the slip would grab hard then let go then grab then let go.
Not sure if this was because I was bouncing around the 15mph or whatever when the regen quits but I don't think so and any way it grabs too much for me to be able to use the gas with it on. and I need to keep regen brake set to strong to actually stop the big tires.
But I can pretty much charge the battery this way pretty fast too. I don't want to try and go too fast with the gas because I'm worried about damaging the mxus freewheel mount. Because the regen force gets stronger when the wheel is spinning faster.

Also at first I just plugged in the ca 6wire to the controller and it was acting all funny because I didn't wire the controls threw the ca.
So since all the plugs on the ca were different to the controls I had to make adapters and stuffs to wire it up.
And got the temp hooked up too. This is set to 130c from grin. Should I lower that temp or is that okay to get up to?
I went for a rid tonight and I'm not sure if the shunt is calibrated right but I got 108 amps max on the ca! :shock:
Throttle is set on pass though right now I'm thinking of setting it on amps mode and trying that out.

IDK I got a lot more tuning and building battery boxes and figuring out bulk charging before I can do any real data collecting but I keep ya up to date.
I really need a bulk charger. :lol:
 

Attachments

  • 20150312_000054.jpg
    20150312_000054.jpg
    70.4 KB · Views: 3,215
  • 20150312_000109.jpg
    20150312_000109.jpg
    79.7 KB · Views: 3,215
Okay I was riding it today and I hit a bump.
And right after that the temp started climbing fast!
Also at around 15mph the motor feels rough, there's a vibration coming from it. It seems to not be running true inside.
Also there are a bunch of spokes loose. Is this the problem?
Or is there something not true inside the motor?

Good thing I had the thermal limiting, otherwise I would have smoked the motor for sure.
I did see 150 deg c though. Did I already smoke it somewhat? It seems to run fine but heats up quick.

Also good thing I had the gas engine to get me the two miles back home.
 
You have to keep an eye on spoke tension after you build your own wheel. There is some stretch and setting that needs to be done correctly. My first wheel came loose after 3 rides but it was built with no experience and no tension gauge. I wasnt surprised when it needed a re tension.

If you hit a large enough bump you may have damaged the motor. Perhaps you knocked a hall out of position and the timing is off making it run hot. You should definetely pull a cover and investigate. Hope its something minor. Seems like you would feel a lot of drag if you damaged it seriously.
 
yah there is a lot of drag.
Thanks for the advice.
I brought it to a bike shop to have it tensioned.
I guess I'll try and retighten myself. IDK if they will charge again.
Here is a video.
It feels mechanical.
But why would that make it so hot?
[youtube]http://www.youtube.com/watch?v=QMrK_uapG6Y[/youtube]
 

Attachments

  • 20150316_213302.mp4
    11.5 MB
http://www.youtube.com/watch?v=QMrK_uapG6Y
there we go
 
That sounds bad. Electrical noise can be pretty loud so maybe its a hall sensor problem but thats being really optimistic. Sounds mechanical like its bound up. Maybe a magnet broke loose or the magnet ring was bent out of round. Really hard to tell until you open it up. I would think even a bad bearing would resonate through the side cover and make some noise.

Mechanical drag or an electrical issue could both make it hot.
 
Yeah, I agree. Open it up and inspect for signs of physical damage first. Check phases and halls for signs of damage. Also check the resistance of the phase wires to see if they are all the same. They should be around 0.112 Ohms.
Here is a quick video I did on how to check the phase resistance.
[youtube]0cLtTDuRCKo[/youtube]
 
okay thanks for the help guys.
I don't have the I charger so I'll probably just use a 3s lipo with a resistor or a light bulb. I'll have to look for that equation.
So it's not just cause about 1/3 of the spokes are loose eh?
 
Back
Top