SIKK Fat Bike 49cc/MXUS 3000W Build

also ordered this today
http://www.ebay.com/itm/400721444538?_trksid=p2059210.m2749.l2649&ssPageName=STRK%3AMEBIDX%3AIT
Hopefully it all lines up so I can get rolling again.
They didn't have any parts or complete skyhawks available unless I ordered another motor or mounting kit to go with it.
 
I copied this over.
I'm getting ready to just buy.
My biggest question is should I get bike or moped nipples?
I'm not too worried about the washers, even though they are probably too big.
If I don't get any input I'm just going to get the washers and the bike spoke nipples. After all this is going on a bike rim.


Re: USA Group Buy for MXUS 3000W Hub Motor $200 + Shipping

Postby diggler » Sat Jan 03, 2015 1:57 am

I seen you just went with flat brass washers.
What do you guy's think of these ones?
http://www.centuryspring.com/Store/item ... CDM-103205
The ID translates to 3.2mm. Is this too big?
With these spokes?
http://holmeshobbies.com/Sapim-Stainles ... pokes.html
Should I go 12g standard or 12g moped nipples?
With this rim.
http://www.niagaracycle.com/categories/ ... -36h-black
I want to get this wheel build done asap now that the gasser's gearbox went on the fritz today.
See build.
viewtopic.php?f=6&t=65638
diggler 10 W
10 W Posts: 80Joined: Tue Mar 25, 2014 12:12 amLocation: Twin Cities, Minnesota, USA
 
hmmm just noticed the links didn't copy over here they are again.
http://www.centuryspring.com/Store/item_detail.php?StockNumber=CDM-103205
http://holmeshobbies.com/Sapim-Stainless-Custom-Spokes.html
http://www.niagaracycle.com/categories/weinmann-dhl101-alloy-rim-26-x-4-0-36h-black
 
okay I just ordered the standard spoke nipples
and I actually found the same washers wesnewell used.
http://www.amazon.com/Brass-Washer-Plain-Finish-Metric/dp/B009OK2FTQ/ref=sr_1_2?s=industrial&ie=UTF8&qid=1420410011&sr=1-2&keywords=m2.5+brass+washer
Now I play the waiting game.
This will give me time to capacity test my 3s grade B lipo's and make either a 15s batt for my commuter or a 18s for this bike while I wait for the 6s 16ah to get off backorder.
 
Well got the old B grade's off the commuter. Parallel balance charged em then started cutting one by one. Put 12Awg bullet connectors on em. Individually balance charged each one one more time, just incase there was some funny business goin on parallel charging. Then they'll sit for a week at least to see if they self discharge. Then capacity testing. O and did some surgery on one. I had one that had an open cell and one with some fried balance wires so I took the wires of the now 2s battery and put them on the one that is still usable. These were from my earlier oppses. :oops:
20150104_212449.jpg
 

Attachments

  • 20150102_003431.jpg
    20150102_003431.jpg
    67.5 KB · Views: 3,119
  • 20150104_212614.jpg
    20150104_212614.jpg
    76.4 KB · Views: 3,119
  • 20150104_212832.jpg
    20150104_212832.jpg
    75 KB · Views: 3,119
  • 20150104_213013.jpg
    20150104_213013.jpg
    70.7 KB · Views: 3,119
  • 20150104_213549.jpg
    20150104_213549.jpg
    71.8 KB · Views: 3,119
  • 20150105_005308.jpg
    20150105_005308.jpg
    45.3 KB · Views: 3,119
  • 20150105_013050.jpg
    20150105_013050.jpg
    50.1 KB · Views: 3,119
  • 20150105_170349.jpg
    20150105_170349.jpg
    46.9 KB · Views: 3,119
  • 20150105_230921.jpg
    20150105_230921.jpg
    50 KB · Views: 3,119
been workin on those used laptop batteries n waiting on parts..(and 28hrs strait snow removal)
View attachment 2
20150106_151220.jpg
Got a new belt drive transmission, but people on motorbikes.org say it's for a different engine with a tapered output shaft not a 5/8 stait keyed shaft like I got.
Here it is. I'ma try it. If it don't work then I'll have to get another one or the other engine. :oops:
http://www.ebay.com/itm/400721444538?_trksid=p2059210.m2749.l2649&ssPageName=STRK%3AMEBIDX%3AIT
Just got the rim and rack today. Got the spokes a couple days ago... I'll need to paint the rim red.
20150112_134020.jpg
Just waiting still on washers, then I'll have to lace, mount, capacity test the grad B's, build a balanced pack then I can go for a test ride! :mrgreen:
 
Finally got done capacity testing all the cells that didn't bleed down too much yesterday. They had been sitting from a 4.15 charge for over 8 months! :shock: If they were below 4.07v I basically call that a fail on the bleed test. I'll use those for something. I gotta bunch of pairs from 4+hrs all the way down to basically nothing, or five minutes. I was thinking I was going to use snaths supper B.A. way of building a battery out of these cells, (See thread.http://endless-sphere.com/forums/viewtopic.php?f=14&t=57810) because I think I will still have to constantly be swapping cells due to the wide variety I got.
But I got this circuit board already made up from a brother in church for a spot welder and he said it only needs a power supply, capacitor and prob a switch. (I still need to pay him for it, he gave me it like 8 months ago :oops: )
And I'm not sure I will be able to get all the tabs off the cells and this may create problems regarding proper contact on all cells with snath's compression type battery pack. I wander if there is a thicker foam one could use that will still have the qualities needed to make his pack work? Or maybe layering it?

Any way here is the spot welder I'll prob just do this since I already have moast of it and I will learn something building it and it's supper cool!
20150119_202458.jpg
 
So now that the capacity testing is pretty much over. I had time to focus on the SIKK bike today. I needed to fix my peddle bike first though cause I fell on it braking my finger and tweeking the peddle a couple day's ago, so today I went to ride it and the peddle fell off. The crank was completely stripped so I put the old crank set from the SiKK bike on it. Now the iron horse is only a 8 speed instead of 24 but it ok. (this will be my mid drive when that time comes) :mrgreen:

The first thing I wanted to address on the SIKK bike was the broken transmission. I started pulling the cover off and the first thing I noticed was the gearbox seamed kinda loose. :?: Then when I got the cover off I was surprised to see that all the gears were looking good! Then I saw what the problem was. One of the bolts rattled loose and must have wedged it self in between one of the gears and the case. I was very exited to see all I had to do was replace a bolt instead of a tranny. I wish I would've opened this up a week ago when I broke it! :roll:
20150119_151502.jpg
20150119_150416.jpg
So peddled to the hardware store got all new bolts. (I was surprised that they were standard, I thought this was from china) Went ahead and cleaned it up and regreased everything with white lithium assembly lube. (I was surprised by how dirty the oil was after only 20-30 hrs!) Put LOTS of blue Loctite on the bolts this time instead of just a dab which I usually do, and did do last time. :evil:
20150119_181702.jpg
20150119_181721.jpg
Bolted it up with Loctite couldn't use any of the new bolts I got except for in the inside because the case was in the way. Then JB Welded the crack in the outside cover where the bolt hit it and cracked it open. (went for the hair drier but it didn't work, hopefully the jb will still cure, it's the 24hrs stuff, so in this cold it'll be like 48hrs)
20150119_184205.jpg
Went ahead and filled the box with oil. It calls for 3/4-1&1/2 oz. of "machine oil" last time I put 1 oz. of engine oil this time I put 1 & 1/2. There is always some left over in the shot glass and the funnel and last time it didn't look like very much at all. But too little is better than too much. :)

Now that all this gas bike stuff is done for now I can focus on the MXUS install. Next will be painting and drilling the holes for the spokes in the rim. Then I think I'll mount the rear rack. Washers for the spokes come sometime this week.
 
painted, drilled holes in rim and test fitted hub a couple day's ago.
I just snugged the spokes a bit. I didn't have washers yet. They came today.
I dished the rim to the left, thinking this is what is needed to get the free wheel all the way over to the right.
Might still have to get a free wheel spacer though.
going to test fit it in dropouts tonight. Need to see where I can mount the doc's TA and how everything will line up.
Thinking I will mount one TA on the inside left and one on the outside right. But Axle prob isn't long enough for any TA on the outside.
I'd be nice to have Linukas's cooling kit installed because the axle is a little bit longer.http://endless-sphere.com/forums/viewtopic.php?f=2&t=65954&start=25 Long enough to fit a 3/8" TA on the outside of my drop outs, IDK?
Here it is. I just tried to copy wesnewell's lacing. This my first time lacing. Does anything look off?
The only thing permanent is the holes drilled into the rim. I just put the spokes in the hub and free handed the drilling of the holes. :)
20150120_163958.jpg
20150120_164027.jpg
20150120_164507.jpg
20150120_164516.jpg
20150120_175013.jpg
I just placed all the spokes againt the rim to see where everything was going to line up. At this point is when I just got done drilling the first hole and threaded the nipple on a couple turns then got scared and sat down and googled howl to lace a bike rim. After I read that for about a half hour I regained my courage and proceeded.
20150120_205636.jpg
20150120_215048.jpg
View attachment 4
20150120_220818.jpg
20150120_221426.jpg
View attachment 1
20150120_234746.jpg
 
Well I went to the bike shop today and got the free wheel removal tool, but I could not get the free wheel loose!
Probably because I've been running around with the gas engine for two months.
Every time I shift I let off the throttle, shift, then try to ease back on the throttle, but it usually snaps anyway.
Occasionally I get a perfectly smooth shift by letting off the throttle just enough to keep the chain spinning slightly slower than the wheel and then shift. When this happens I usually have to look down at the gears because I cant even tell if it shifted.

Anyway, I'm just going to buy a new free wheel tomorrow (or today I should say) or when ever I can.
Which isn't ideal because the chain is already worn to the freewheel but o well.

Just from setting the mxus in the dropouts tonight with the doc's TA clamped on the inside, and measuring the width of the freewheel, it looks pretty close with the axle centered. But I would have to center the hub. I'll have to try it again when I get the freewheel on the hub to see how everything really lines up. I'll try out different dropout reinforcement positions till everything jives. I'd really like to have two reinforcements on this build because of the motor/controller combo I'm going with this time, but maybe one would be enough. Maybe I can get a grin tec one for the outside of the right dropout. Any thoughts?
 
Got the new freewheel and the only one they had comes with a granny gear on it! Which I like! :D
Put the washers on the spokes and centered the rim on the hub the other night.
I found out that I can't dish because the axle isn't long enough for the wide dropouts.
Now I'm trying to get the freewheel lined up so I can still use all the gears.
Right now it looks like I can only use the bottom 4 gears, but what I really need is the first 4 or 5 gears.
I ordered this. http://www.ebikekit.com/kit-components/small-parts/freewheels/freewheel-spacer-for-1-speed/
Hopefully it all will fit with a Doc's TA on the right inside. Might have to get a 5 speed or just not use a TA on the right side.
While I wait for the spacer I'm going to upgrade the phase wires from the stock 2.5mm^2 (13 awg) to 4mm^2 (11 awg).
Or I will use 10 awg and strip the insulation off the wires where they go through the axle and use heat shrink there instead to get the big 10 awg wires to squeeze though the stock axle.
Also while I wait I'm going to put some red pin stripes on the fenders. 8)
Here are some pics on how everything is lining up so far...
 

Attachments

  • 20150124_160757.jpg
    20150124_160757.jpg
    62.5 KB · Views: 2,903
  • 20150124_160805.jpg
    20150124_160805.jpg
    64.4 KB · Views: 2,903
  • 20150124_160908.jpg
    20150124_160908.jpg
    57.1 KB · Views: 2,903
  • 20150124_160921.jpg
    20150124_160921.jpg
    35.9 KB · Views: 2,903
  • 20150124_161003.jpg
    20150124_161003.jpg
    51.5 KB · Views: 2,903
Looks like you are making some good progress mocking things up. You may want to try out the motor first before pulling new phase wires. Thats a giant hassle unless you absolutely need to. The stock wires are pretty capable.
 
Yah I'm not sure if I really have to. I wasn't going to originally. I do have a 18 fet Infineon going with it. I think this is a 65 amp controller. I was going to run 120 phase amps with these stock phase wires. This motor is a 4 turn V1.
 
Well played with the rack yesterday got it mounted but might change things a bit later.
Then just quickly threw the bags I got for it on there and yep must have looked too much like a motorcycle because I got pulled over on my way home. I was a c hair away from going down town! I insisted it is considered a gas peddle assist but he was like "it's got a motor on it, it's a motor vehicle!" Luckily I heard on the radio there was some dude running from the cops in the neighborhood so he let me go and said push it home and he better not catch me on it again. I was ready to hang in the towel on all this motorized bike stuff. I looked at the law and sure enough in Minnesota if its up to 50cc it's considered a moped not a gas peddle assist. You need to have a license or a permit, (I don't have a license right now) need to be 15, have to have a title, and liability insurance. But you can go on the road like a moped or on the shoulder and you can go 30mph.

Luckily the e bike laws were revised in 2012. I guess they did consider them like they consider gas bikes. But they are considered electric peddle assist right now. No license required, no title, no insurance, still have to be 15, can go on side walks but have to give right away to peds, max 1000w motor and 20mph, have to stay as far to the right on the road as possible unless your turning left, and you must smile and wave at every cop you see.

No laws on hybrids yet. :lol:

Here is some pics. I just put the original wheel back on while I'm waiting for the spacer.
20150127_100146.jpg
20150127_100205.jpg
20150127_100216.jpg

I will still go ahead with this build just to see how it works but will probably unload the gas engine and mount the 4 speed momentary switch under the seat and have a setting for 20mph. :twisted:

I'll just have to test ride it with the gas and electric north of where I live so I don't run in to that same cop. :lol:
 
Hahahahaha I'm good now. I'm just going to get my cruiser going again right now with those laptop cells, 60V controller, 3 speed switch, 1000w 9c. I'm not sure what wind the 9c is. I had 60v (15s lipo) going though the stock 48v controller at one point and it went 35mph. At 48v (12s lipo) it went 23.5 mph. I have a 60v 1000w-1200w 15 4410fet controller (http://www.aliexpress.com/snapshot/6430482652.html?orderId=652779934924060) sitting in my room right now with L/M/H switch set at the standard 50%/100%/120%.

I also finally got all the details ironed out and got the original 60v controller I wanted coming with 15 4110's and a CA plug! It will have the L/M/H switch set at 35%/50%/100%. I figured 35% will be 15mph for when I'm taking strolles around the lake by my house on the path with lots of people on it. Then 50% for ~20mph cop worry free commuting, and 100% for 35mph when I'm running late and no one's looking. :mrgreen:
It'll be nice to have regen for 35mph too because cantilever brakes for that speed just isn't a good idea without regen.

I wonder what the 120% throttle will do on the 4410 controller?

But yah I'm going to get that cruiser goin with those laptop cells and the SIKK bike with lipo.
I already got the 6s 16ah 10c bricks from HK and all these 20c 3s grade b lipos still sitting here self drain testing till I get to them to capacity test em. Once I do that I'll make a 72v out of the grade b then cycle the 6s packs. What does everybody recommend? Cycleing them 5 times to brake them in on the charger right? What do you do like 1c when doing brake in?

Anyway when I get both those 72v packs built and mounted. Do I need to have a diode when paralleling them.
I'm still going to mount them the way I was planning. One brick on each leg of the front fork and one in the handle bar type bag (but bag will be mounted to head tube), and the grade b pack in the rear saddle bags.

Once I test it out with the gas motor in it, I will remove the gasser and mount all the batteries in the HUGE triangle. I'll probably keep the wider 8.5" crank on there as well. (I don't really see myself peddling with this bike :wink: )

Of course it wont be legal with the 3000w mxus but I'll have one of the 4 speed settings on the Infineon set to 20mph and I don't foresee any cops being savvy enough to know that the motor is bigger than 1000w. But I'm having second thoughts about ordering two 1500w leaf motors for this bike. I'm pretty sure a cop seeing two motors on the bike will be thinking "that looks like more than 1000w."

IDK I really want to try these leaf motors out though! http://endless-sphere.com/forums/viewtopic.php?f=3&t=65793
Look towards the end of the thread there is a motor spec sheet. And if you read the thread you'll see they will upgrade the phase wires for free. And you can get it mounted in any style rim with any wind you want, all the way down to 3 turn! All at 90% efficient! :shock:
 
Great build!

subscribed!
 
Would you happen to know if the seat-tube mounted jackshaft is sold by itself, or only as part of a full gasser kit?
I know where your going with this and it has crossed my mind more then once. Mid Drive :mrgreen:
All I would have to do is mount the motor on the engine plate and BOOM DONE.
I got the 4 stroke shift kit. It comes with everything except the motor and transmission. http://www.sickbikeparts.com/catalog/product_info.php?cPath=21&products_id=110
I just had to modify the crank for the 100mm BB. So I cut it in half and inserted a pipe over the two halves then drilled and roll pinned.
The nice thing about the 4 stroke kit is that it comes with an engine mount plate. (the one that came with the engine was at least 5lbs heavier)
They do sell everything that comes with that kit (except for the engine mount plate) peace by peace. Just look on there site.
I got the HD front freewheel too. I guess the one that comes with the kit sometimes only last a month.

Great build!

subscribed!
Thanks Doc!
Too bad I'll have to remove all the gas stuff. But I will make sure to give it a proper test ride first! :twisted:
I'm literally one part (I hope) away from being able to use the gas and mxus at the same time! I'll keep ya'll posted.
Right now I'm focusing on my commuter so I can at least have one powered bike.
Can you or anybody help me get my spot welder goin? http://endless-sphere.com/forums/viewtopic.php?f=2&t=66466

sickbikeparts has a jackshaft, expensive!
Yep pretty much. the jack shaft kit, HD freewheel and freewheel lube cost more than the engine kit. Which was $250. And they didn't even give me stainless U bolts! There not even galvanized. They rusted in about two days in this salt belt I live in.
 
O and Doc do you think it's absolutely necessary to use both of your TA for the MXUS V1 4 turn with 72V and 18 fet Infineon set to 120 phase amps?
 
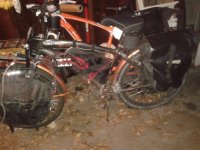
Some up dates on the bike.
I got some galvanized bands with rubber on them for mounting the rack to the seat stay. Some industrial ones the neighbor stole from work. (gotta love neighbors like that)
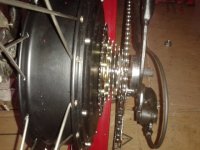
Got the free wheel spacer but with the 7 speed there wasn't room left for the doc's TA.
Then I noticed the wheel wasn't centered very well. I measured it and was over to the left a bit.
Then I measured the stock one and it was over to the right a little bit.
So I relaced the rim again for the third time this time to the right, and measured it and it was just about perfect.
Today I went to the bike shop and got a 5 speed freewheel.
Mocked it up and with the axle centered there is the slightest bit of space between the freewheel and the TA.
So pretty much perfect! And the freewheel 1st gear is actually out further than stock so I will have a better chain line and the chain wont be so close the tire.
It just dawned on me tonight though that I need a spacer to keep the freewheel from squishing against the TA when I tighten the axle nut.
So I measured the hub with the three washers that came with the hub with the tab on them, you know, the tab that's supposed to go in the drop out. And they stick out just a bit wider than the freewheel so once I grind the tabs off and sand them down so they fit inside the freewheel, I should be able to clamp down on them and keep space in between the freewheel and the TA.
Then I just need a lock nut for the left side and I should be good to go.
I'll just have to get the rim trued up and mount the Torque arms.
Last time I just used one TA and I JB welded it because the dropouts were aluminum, then I drilled and roll pinned for good measure.
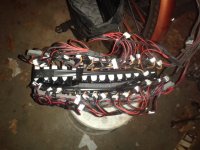
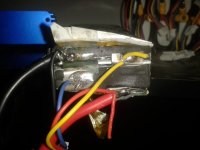
But this time I think I'm going to try welding them. I have an ark welder that I really should get some use out of and I'm getting kind of impatient. But we'll see I like how clean the epoxy looks and I still need to mount the controller, switches, ect and mount, and wire the batteries. I'm still capacity testing the grade b batteries too. I wish I had the un a9 or un a6plus or the bc168. I think that was actually the real problem anyway. My charger just couldn't balance the pack because there was way too many paralleled (56 :lol: ) and even now with just one at a time they don't come out perfectly balanced. I really should get a dynamic balance charger or a battery medic to get these damb things balance! Then I have to cycle the 6s 16Ah bricks. These are the nicest batteries I've ever bought and I want to be nice to them. :)
 
More fun with the bike today...
Finally got time to work on it.
So I got every thing figured out.
I ground down one of the washers to fit inside the free wheel. Then used a brass sleeve I found at the hardware store to go inside the free wheel and over the axle. I had to cut it to fit. Works great! I had every thing in there and the axle nut TIGHT tight and the sleeve did not crush and there was a nice bit of space between the TA and the freewheel. Then used the two other thick lock washers on the left side and the thin one as well.
So now I got it where I can use both the TA and I can still get all the gears! (had to go from a 7 speed to a five speed though)
The epoxy for the TA is curing right now!

The only thing I'm worried about now it the freewheel mount snapping off when I'm using the gas engine. :shock:
I was a little nervous about it now I'm more than just a little worried about it after watching this hour long video last night.
http://www.youtube.com/watch?feature=player_embedded&v=gwlbAJLzI_w
I hope the MXUS is strong enough to handle me test riding it with the gas engine once or twice and not have the freewheel mount snap off!
I did get some alloy brazing rods for when I build the aluminum diamond plate battery boxes. I could beef this aria up a bit.

Anyway here's some pics of what I'm talking about.
20150208_163452.jpg
20150208_163516.jpg
20150208_163539.jpg
20150208_165011.jpg
20150208_165428.jpg
20150208_164914.jpg
20150208_165447.jpg
20150208_182844.jpg
View attachment 6
View attachment 5
20150208_193617.jpg
20150208_193650.jpg
20150208_193800.jpg
20150208_194832.jpg
You might be thinking "O no! He flip flopped the TA and glued them to the wrong side!
No I actually did this on purpose so I can use the left TA for hooking up my trailer.
I did this on the last one because I was only using one TA and I wanted as much surface aria as I could get so I used the right TA on the outside left of the Hollandia. Then whan I bought a trailer for a little under $100 bucks at wally world I was dismayed because the mount is supposed to go on the axle but the hub motor axle are too big. But then just by chance the derailleur hole that's already threaded is a perfect fit! It just needs the right size bolt. After having a grocery cart so loaded down that it was had to push and pulling it all home with it all hooked to one TA that was just epoxied. I have all the faith in the world it the epoxy.
 

Attachments

  • 20150208_194907.jpg
    20150208_194907.jpg
    60.3 KB · Views: 2,704
The bags I had on there don't fit the lipo I already got very well because they are not wide enough.
I popped into harbor freight the other day cause I was in the neighbor hood and picked up some cases for $10 each.
When I drilled into the first one I realized they were made from Masonite.
I was afraid the 15lbs of batteries would rip the washers right through the Masonite on a bump.
So I got a thin sheet of aluminum and bigger washers.
Mounted them today.
Aside from not being water proof, I think they'll work. I think I'll calk and clear coat them once summer comes. (I'll do all my painting then)
For the most part it's temporary because I will be mounting all the batteries in the triangle when I take the gas motor out.
But I want to easily be able to put the gas back in and go gas/electric again after I jump through all the legal hoops.
 

Attachments

  • 20150209_214840.jpg
    20150209_214840.jpg
    56.4 KB · Views: 2,675
  • 20150209_214856.jpg
    20150209_214856.jpg
    54.8 KB · Views: 2,675
  • 20150209_215027.jpg
    20150209_215027.jpg
    34.1 KB · Views: 2,675
I have all the faith in the world it the epoxy.
What's that nasty taste in my mouth? O must be my foot! :shock:
I had a bit of time to work on the bike yesterday before I had to go do snow removal and the double kick stand arrived.
So I put that on, then removed the little bars I had for the rack mount, then I started putting the roll pins in the TA.
I had to drill from the inside in order to make sure the hole stayed lined up with the TA.
So I used a right angle die grinder with a 1/4" bit cause that's the biggest bit that fit in the chuck then used the 5/16 to finish it up on the outside with the drill.
Then I went to hammer the roll pin in from the outside and the TA popped off! :oops:
I don't know why this one didn't hold when I did this on the Hollandia it worked great and is still holing today!
The couple variables I can think of are:
It was colder. (I used heaters but last time it was summer and I used a hair drier)
I clamped it too tight squeezing too much epoxy out. (I think last time I just held it in place for like four hours or clamped it slightly with vice grips)
I hammered through the frame first. ( The last time the TA was on the outside of the frame so the roll pin went through the TA first, but I held a 3lb maul on the other side for a backer and if the epoxy was holding properly this shouldn't matter)
20150210_200132.jpg
20150210_200053.jpg
20150210_200302.jpg
O well live and learn.
I haven't had time to try the other side yet, but if it doesn't pop off when I pound the roll pin through I'm calling that side good!
If the right side holds when I install the roll pin I'll probably try the epoxy on the left side again. If it doesn't I'll weld them.
This time I'll heat the garage, use the little buddy heater under it, then the neighbor chicks hair dryer she said I could use. :lol:
And I'll just hold it in place for a while. I think I clamped it too soon because the buddy heater was too hot for me to hold it there for very long.
If it still doesn't hold then I'll weld it.
 
Back
Top