small diameter cable crimper? Shortening throttle

BATFINK

10 kW
Joined
Aug 7, 2011
Messages
598
Well I've just spent about an hour doing a job i know i could have done in 5 minutes with the right tools,

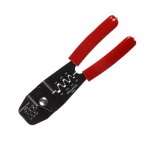
I had to shorten my throttle cable as there was too much cable and after i cut it i had to crimp back on the little metal connectors, it was a total nightmare as my crimper tool didn't go small enough for these wires,

anybody know what gauge or size of crimp tool i need when working with these small connectors?

so frustrated any help appreciated.
 

Attachments

  • photo.JPG
    photo.JPG
    41.5 KB · Views: 1,658
  • photo copy.JPG
    photo copy.JPG
    52.4 KB · Views: 1,658
anybody have any tips for crimping, i believe this was the worst and most time consuming bike job so far, absolutely flabbergasted
 
Those connectors are to be soldered.
You need only longnose pliers to close the lips over the wire insulation.
 
This is a picture of the connectors i am using, they plastic connector is identical to the one on my throttle and the lithe copper clips inside look pretty much identical to the ones i removed from my throttle when shortening,

http://www.ebay.co.uk/itm/6-Way-Electrical-Connector-2-8mm-ALL-TYPES-AVAILABLE-/180363992879?pt=UK_CarsParts_Vehicles_CarParts_SM&hash=item29fe881f2f#ht_1839wt_1043

Is supplied with everything to make 1 complete 6 way connection
Terminal size is 2.8mm
Will accept cable diameter of up to 2.0mm

In the kit

1 X Male Housing
1 X Female Housing
6 X Male Terminal
6 X Female Terminal


Am i using the correct plastic connector housing but possibly copper clips whose base is too large?

either way the crimps at the NUMBER 1 setting just wouldn't seal them tight enough, where am i going wrong?
 
I did add a little solder as there was no way the clips would stay on the wire on such thin throttle wires. I might have to cut next time but just looking to get the best possible connections. So there are no tools to do such a job neatly?

Also my soldering iron was like 20watts and i was holding it on the solder for what seemed like an age before the solder would melt. whats the best soldering iron to get?
 
A temperature controlled 45w would get the job done in style. For the larger stuff I use a 120w solder gun. Another thing that might make it easier is to use a large solder tip. The extra mass will help hold it's temp longer when applied to the wires. Hopefully useful advice from a novice like myself. :)
 
Thanks guys i definitely need to invest in a decent Soldering Iron, il use that 20 watt one for shrinking heat shrink.
 
I had nothing but trouble with the stock plugs on most of the e-bike stuff so now just cut them off first thing and replace them all as soon as I receive the new item whatever it may be. I use small barrels soldered for the halls they take up little room in the cable. I use 3.5 and larger barrels for the phase wires once again small and stealthy and with a little heat shrink they are waterproof as well. Andersons are good for the battery connections as they need to be disconnected more often always use the 45A terminals and the tri crimp tool so there are never any problems. I use the 30A Anderson terminals for the 12A charger and never use the 15A terminals. Lots of vibration water dirt ect, out there just waiting to screw things up. If it's done right it does not happen.
Don't ferget you can strip extra wire and fold it over once or twice to make it fit in the larger terminals tighter.

plugtypes.jpg
 
Thanks Bio,
great tips :)

My crimp tool has a marking for "1" but even that wasn't tight enough i see there are some on ebay rated from 0.5 to 1mm

http://www.ebay.co.uk/itm/Draper-Electrical-Terminal-Ratchet-Crimping-Tool-35574-/130671675654?pt=UK_Hand_Tools_Equipment&hash=item1e6ca38906#ht_500wt_809
 
I have swiched over to using Molex connectors, most electronic part store sell them along with the PROPER crimp tool. You can also buy a kit that has several connectors 2 - 10 pin, the crimping tool and removal tool included, I use .093 size as shown Digikey sells them
 

Attachments

  • crimp tool.jpg
    crimp tool.jpg
    20 KB · Views: 1,636
  • 2 pin.jpg
    2 pin.jpg
    7.1 KB · Views: 1,636
  • molex4.jpg
    molex4.jpg
    26 KB · Views: 1,636
Just connect the throttle directly with no plug and end the crappy connector nightmare. 1 minute to cut and reconnect if needed. Or buy the real crimper that curls around the edges of the crimp. Mac tools has the best crimper I have found. Soldering to the connector would work too. I do automotive wiring almost 5 days a week and have switched away from solder because it causes brittle wires and causes the technician to breath solder smoke.
I do use a little walgreens fan to pull the smoke away but I gravitate towards high quality crimps for speed and reliability.
seamless barrel crimps are great for wire to wire connections.
 
If you want to keep the stock connectors I recommend getting a hot glue gun and applying glue to the backside to seal it up and some silicone grease on the inside. Works well enough for me. I've riden in the rain without any problems to the connectors but I lack a crimp tool and do spend alot of extra time doing it my way as opposed to just hard wiring the connectors. :oops:
 
I own an AMP crimper that crimps connectors for 26g up to 22g wire.

...only cost about $300 in 1977 and worth every dime I paid. -still works fine after many (many many) 1000s of crimps.
However for what you did, I would just twist the wires together and shrink'em ... did that today to extend a throttle wire :lol:
...took a couple of minutes
ymmv
 
BATFINK said:
anybody have any tips for crimping, i believe this was the worst and most time consuming bike job so far, absolutely flabbergasted
Your crimping tool has dies in it for crimping ring connectors, etc not tiny electronic connectors. Wrong tool -it will just squash the connector.

You need a crimper like the Molex crimper pictured by bionix1954. Each connector manufacturer has their own special twist, but a crimper like this will work on 95% of available connectors. If you look closely you will see the little double arc on one die face that curls in the open edges of the connector. Crimp once for the bare wire. Crimp again for the insulation. I have a couple of these with the same style dies but with different thicknesses to take care of connectors with longer or shorter crimp regions but between the two, I've yet to find a connector that can't be crimped nicely.

I usually hit them with a spot of solder, but that's because I'm paranoid... If your iron isn't powerful enough to do this almost instantly, don't bother - you'll just melt insulation and wick solder up the wire making it inflexible and prone to breakage where the wicking stops. A solid crimp is 'gas tight' and shouldn't really need solder. If you wish, you can smoosh a dab of Permatex Dielectric Grease on the crimp and contact face as you assemble the connector (messy, but) and your solder-free connection will probably outlive you.

crimp%20tool.jpg
 
Back
Top