The SB Cruiser : Amberwolf's 2WD Heavy Cargo Trike & Dog Carrier

Last week, on bulk trash dump/pickup, someone left a LaZBoy recliner that had a cat peed seat out in the alley behind my house. But while most of it was unsalvageable, not all of it had pee on it; for instance the foldout footrest did not, and it is very well padded. It's also almost as wide as my seatbox, only shy about a couple inches or less on each side.

It should work quite a bit better than the old office/computer chair seat I've been using, which isnt' flat on the bottom and rocks back and forth as I ride. This might turn out to have been helpful in shock absorption, so I may end up putting it back, but I'll try the "bench seat" with the ex-footrest first.

The only issue with mounting it is that if placed square on the cover, it will cover up the lock. So I'll have to mount it forward an inch or so from the rear of the cover to clear the lock.


I've also gotten started removing the old BigDog blue canopy cover, and replacing it with the brown water resistant vinyl cover, though I'm still working out how it will attach. Probably rivets along the bottom of the canopy frame.


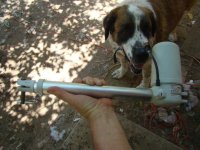
also, the lazyboy chair had some linear actuators in it, 24vdc, which I saved, but I dunno what I'll do with them. At one time I wanted to use something like that to lower/raise low-speed "training wheels" on Crazybike2, like AussieJester did on his bike, so that when I slowed enough to be unstable they'd lower down automaticaly, or I could do it with a button press, and they'd raise when above that unstable speed, so I wouldn't have to put my feet down to teh ground, could keep both on the pedals. Then it would actually be possible to pedal the bike if motor system failed, because I'd be able to gear it down real low like the SB Cruiser is now.


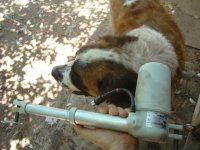
I thought of several whimsical things to do with them on SB Cruiser, inclduing a retractable canopy or a dumptruck cargo bed, etc. But nothing practical. ;)
 

Attachments

  • dsc06389.jpg
    dsc06389.jpg
    52.2 KB · Views: 3,538
  • dsc06390.jpg
    dsc06390.jpg
    37.6 KB · Views: 3,538
  • dsc06391.jpg
    dsc06391.jpg
    37.4 KB · Views: 3,538
  • dsc06392.jpg
    dsc06392.jpg
    49 KB · Views: 3,538
  • dsc06393.jpg
    dsc06393.jpg
    36.2 KB · Views: 3,538
Also, right after my time off, I got more dog food on clearance, hauled home with SB Cruiser in one load of almost 200lbs; the "truck bed" worked great for the purpose as it only required one strap (probably could've gotten away with none), around the bed signs/tailgate, and I put one around the bags on top for good measure, just in case.
 

Attachments

  • dsc06379.jpg
    dsc06379.jpg
    37.5 KB · Views: 3,500
  • dsc06381.jpg
    dsc06381.jpg
    31.4 KB · Views: 3,500
  • dsc06383.jpg
    dsc06383.jpg
    49.8 KB · Views: 3,500
  • dsc06380.jpg
    dsc06380.jpg
    39.4 KB · Views: 3,500
I got the new canopy cover installed; I pop-riveted it to the frame as the quickest solution, though I wanted to install snaps to be able to remove it, I realized I probably wouldn't ever do that unless I was replacing it anyway.
dsc06398.jpg
dsc06399.jpg

dsc06395.jpg

dsc06397.jpg

The rear flap I think I am going to put a "window" in, once I find my thin plastic sheets. I'll just poprivet that to the vinyl, though I think I'll cut and fold the edges of the vinyl so they dont' fray. Not really any need for a sealant, since it's at the back, and the front and sides are open anyway. ;)


Only reason to even put a window in it is to see out the back but still be able to pull a shade down if the sun is behind me down far enough to be heating the back of my head.

I still have to insulate the inside of the back flap, since it is both a lot darker than the blue cover, and transmits heat thru much better than the blue cover did.


I started the mounting process for the seat cushion, enough to use it for a test ride to pickup more clearance dog food.
dsc06406.jpg

Under $40 bought me another 115lbs of dog food plus 30lbs of cat food. (the small 15lb bag of the dog food orignally cost more than my whole total).
dsc06407.jpg
dsc06394.jpg


It's not mounted evenly left-right because I messed up when drilling the first hole, as I'd marked it wrong due to the hinge in the front on the left side. I'll prbably fix that before I do the right side mounting.
dsc06405.jpg


But it feels fine on the roads--it's actually more comfortable than the thicker curved chair seat was, at least for my short work commute. Best part is it doesn't wiggle back and forth like the chair seat did; it's as stable as the whole trike under me.

I have an idea for a mount for the seat back that would use an L-bracket from the new seat cushion's bottom, up to the back of the seat back. I'd make the height of the back adjustable via slots for the moutning bolts. I think I have the necessary steel for it from another old chair, but I have to locate it. (maybe someday I'd like a month off while it's good weather, in the 70s F, so I could sort and file my stuff :lol:)

This will solve a few issues, such as having to push the presently-mounted-from-above seatback out of the way to open the lid of the seatbox, and being unable to do so when the dog crate or other large cargo is secured in the cargo bed, etc.


Another issue resolution tested today was a new front wheel:
dsc06400.jpg

The old one was off a Mongoose Basher, which while the frame was heavy thick steel, and probably strong, but the wheel itself is flexy (side to side) as it is both a narrow rim and a narrow hub (disc) and dished to the right because of the disc. Because it's not laterally stiff, then whenever the steering is turned enough to cause the wheel to be significantly at an angle to the ground, it pushes outward on the lower edge of the rim enough to push the upper edge of the rim into the brake pad on the other side, dragging it a lot. So in turns, regardless of speed, even when pushing the trike around, it slows down a lot. (and squeals loudly).
dsc06401.jpg

The new one is actually a lot older, and probably singlewall (by Femco), but it's wider, and the hub is standard so the spokes are wider-set at the base, making for better triangulation and a laterally-stiffer wheel.

I can feel a significant difference between them; the new one is much better, stiffer in sideloading/turns, and it doesn't drag the brake pads on the rim when I"m turning like the old one did. (if it does, it isn't enough to notice so far).


However, the latter might be because the rim is not actually made for braking; it does work but it isn't machined. It's not quite as good at braking as the Mongoose Basher rim was, even after truing within less than half a millimeter and readjusting the pads a few different ways. I tried cleaning htem, but that didn't work either. I don't know if the machining would make a difference or not. I have a new set of cheap Avid pads to try, but I set them down when looking for something else and don't remember where...so when I find them I'll try them out.

dsc06402.jpg

I do have a machined wide rim I can use (by Sun rims, a Mammoth Fat), which is presently on an IGH; it was the left wheel of Delta Tripper. Unfortunately the IGH's locknut width is more than several mm too wide to fit in the alloy suspension fork's dropouts, or I'd just use it as-is as a front wheel. I might be able to take the locknuts off temporarily to get it to fit in the dropouts long enough to test the braking ability of the Sun rim...but I should probably look up the disassembly diagram for the IGH before I try that, in case taking them off could allow the guts to come loose. ;)


However, the IGH's flange diameter is almost the same as the other hub's flange diameter, and the rims appear to be similar ERDs, so I can probably use the spokes from either wheel to lace the Sun rim into the regular front bike hub.
dsc06404.jpg


I'll try the new pads first, before I spend a couple hours or more unlacing two perfectly good wheels and relacing one back up for an experiment that may not even work.
 
New Avid pads are actually worse than the old Koolstop Salmon. I can squeeze with both hands on the brake lever as hard as I possibly can, and still easily pedal the trike (I can feel a slight bit of friction, but nothing significant; I can actually push the trike forward or backward with my feet on the ground despite full grip on the brake lever). There is virtually no braking action when riding around the block trying to slow down from several MPH.

The Koolstop at least make it hard to pedal forward, but it's still possible. There is some braking action, but it takes many times the length of the trike to slow down from 20MPH, even squeezing the lever as hard as I can with my right hand.


I've tried adjusting the pads in a number of ways, with various levels of effect on braking, but nothing better than the above results. This includes trying the wide/narrow cup washers in both possible positions.


I am nearly certain that a small part of the problem is with the brake bosses, because they are not welded to the fork, but rather to a U that is clamped and bolted to the fork, and I think that the U is flexing despite the brake arch brace that's bolted to the front of the bosses (and the fork itself at the top of the arch), so they shouldn't twist during braking (but probably are).

The reason I think this is part of the the problem is that before I swapped forks from the cheap steel fork (with factory-welded-on bosses) to this sligthly better alloy fork (with my clamped-on bosses), braking was pretty good, though still insufficient.


I am certain that the rim's braking surface itself is part of the problem, too. (because it is not machined, perhaps?) I get a little better braking with the narrow-rimmed wheel I'd been using on it than with the wider rimmed one that's on there now. Not nearly enough, but still better. The only differences I know of between them are:
--one is narrow, doublewalled, and machined
--the other is wide, singlewalled, and not machined
Narrow/wide shouldn't make a difference, but machined might, and singlewalled could potentially be flexier on teh rim edges than the doublewall (though I can't see any flex it doesn't mean it isn't happening).


At present the plan is to make a whole new brake boss arch to clamp to the fork, one that is shaped to fit snugly against the curved fork face, and to be stiff on it's own (thick steel plates welded together, most likely, but have to see what I've got to make it from). Then *also* still use the brake stiffener arch in front of it on the bosses.

Instead of hose clamps to secure it to the fork, it'll use a custom-shaped clamp that will bolt to the brake-boss-arch's backside around the fork leg.


Since the above will take a while to make, requiring a fair bit of hand cutting, then grinding and hand filing, and fitting to the fork to ensure the fit is as perfect I can make it, I'm going to take apart the two wheels to build one wide-rimmed one that will have a hub that does fit the fork, and retest the braking with it.

Hopefully this will help enough to make braking at least usable, if not good.


Ideally, I'd like to get my front brake to be able to skid the front wheel under max braking, but I can't recall any of my brake setups that have been able to do that on CrazyBike2, Delta Tripper, or SB Cruiser.

I'd also like to get rear brakes installed (other than the electric braking in the motors), as I have enough parts to do it, I think--just have ot get them all in one place and have the time to weld parts on and set things up. Mostly they'd be backups and/or extra braking power for when I'm hauiling heavy loads or the dogs, but I'd rather have (for the first time) more braking power than I can use than have insufficient braking....
 
Though the problem shouldn't be related to the brake handle, since the whole system worked before changing fork and wheel, I went ahead and tried the adjustments on the Avid lever, which basically allow it to be a long pull or a short pull lever, and the range in between.

The only difference that makes is that changing it from where I had it means the lever hits the bars before I get braking force. So it's not the lever.

Just for grins I also moved the cable over to the crappy ebrake lever I use for my brake light switch, with similar results--the Avid lever is working fine; it's just the braking system itself that is not.


The crappy disc brakes I tried before are just about as useful as the present setup (meaning, they're not), so that's not an option (plus using the disc-brake dished wheel means I get the same warpable front wheel in side loading/turns, which I don't want).

I suppose if I was desperate I could install my dual-cable lever, reinstall the disc wheel and crappy disc brakes, and adjust the lever so it pulls both of the brakes hard at the same time, so I get back almost as much braking as I used to have. But that's work/time wasted on a half-measure, so not much point.


I also considered using the dual-cable lever to run *two* cables to the rim brake, to eliminate cable-stretch, but I think that if cable stretch were really causing the problem, I'd be having the brake lever hit the bars before max braking occured, and that doesnt' happen--I have plenty of space between bar and lever at that point, and cannot squeeze hard enough even with both hands to get lever any closer to bars.


I know the rim brakes *can* do what I want...I just have to figure out all of the things that are wrong and fix them.

So far that seems to be:

--rim's braking surface
--pad pressure on rim / angle of pressure (stiffness of bosses)


So I'll take care of the braking surface issue by getting that Sun Mammoth Fat onto a front hub that will fit in the forks. After that, I'll deal with the much more complex issue of custom making a brake boss arch that will properly fit/clamp onto the fork.
 
If you don't want to spend like four or five bucks to get a commodity brake booster, at least it's easy to make one. The last custom one I made, I used .100" thick aluminum plate, poked three overlapping holes in it with a hole saw on a milling machine, and shaped the outside perimeter with a shear a belt sander, and a file. It fitted on my boss's cyclocross bike much better than a booster sized for MTBs.
View attachment 1
IMG_20170518_163231.jpg
 
Thanks!

The 3 overlapping hole method should make it easier to make other boosters (like for the rear brakes when I get around to that, as a normal sized one won't fit around the moped tires I've got on there, or for another idea later in this post). I don't have a milling machine, but I can rig something up that should do it, that will still be easier than manually cutting the center shape out.

For this set of problematic brakes, I already have a brake booster on there; it's just not sufficient, probably because the brake boss arch itself is only clamped and bolted to the fork, rather than welded to it (cuz the arch is steel and the fork is aluminum), and twisting is occuring at the back of the bosses instead? The arch itself is pretty crappy steel, hollow-backed, which I fillet-welded some cross-support into here and there. More info in a moment.


I have wanted to test having dual front rim brakes for a while, and now I might as well. I know there is a risk that mounting a second set of rim brakes behind the fork could lockup the wheel (self-energizing?) but with this trike that will just cause a front wheel skid, not an endover, as the rear is very heavy.

I dug out another crappy old "suspension" fork, which I'm gonna cut the boss arch from, and use it to create another clamped-on arch to try the above. Even if it doesnt' work it's not as much time wasted as I would with some of the other work I thought about in previous posts.


Back to the other:

This is how it was on the old fork, which had a welded-on brake boss arch:
file.php


And this is the new fork as it was on Crazybike2 (though it's painted red now), and has the green brake arch from the above pic on it, and there is welding and grinding done to the back of the brake boss arch to make it closely fit the curves of the fork:
file.php


file.php


details of the reinforcements:
https://endless-sphere.com/forums/viewtopic.php?f=2&t=12500&p=962938&hilit=brake+clamp+fork+CrazyBike2#p965698
file.php


file.php


file.php
 
I just managed to get the "back front" brakes made up and installed, though they are just a preliminary version.

They make some difference...but even these won't lockup the wheel, even together with the "front front" brakes.

Basically I'm back to about the braking power I had before swapping out the fork/wheel. :roll:

I'll have pics later; no time ATM before I go to work.


Next up will be delacing the two wheels and lacing them back up into the one wheel with the front hub from one and the Mammoth rim from the other, to get a known-good braking surface on the rim itself, sticking with the wide rim.


I'm tempted to design some new brakes that have their pivots above the tire, and the arms sticking down below that to the pads on the rim, with extensions above the pivots that are pushed apart (rather than pulled together) to force the pads onto the rims. I'd have to figure out a scissor mechanism to do that part from a cable pull, but there are probably already brakes out there designed similarly that I could work from.

The only real reason for it is that it might simplify the boss mount and booster into a straight bar across, rather than a horseshoe. If it's made as a clamp-on unit, it could be setup pretty far above the rim to make room for large tires--so I could use it on my rear wheels too.

I'd have to be either making or modifying new brake arms for regular rim brakes anyway, for those rear wheels, to clear the large tires. (disc isn't an option at all on the right side due to no hub mounts or space to add them, and there's no space on the left side's frame though the hub has the mounts). Not that rear brakes should be necessary with the electric braking back there, but it'd be good to have should I either have a really heavy load or the electrics fail. And could be used as parking brakes too.
 
Brakes are at least usable at this point, but having to use two sets of them on the front wheel just to get partial braking is...yuck.

If they'd skid the wheel, that'd be different--then my limitation would be traction--but at this point I don't even have my good stickier tire on there, just an old tire that I'd been using on the trailer (along with the wheel it's on), so if traction were the limitation, I could increase that to get better braking.

I haven't made the rear-front's brake's booster yet, so that might change things, but probably not much, if any, because the bosses don't need to be pulled together against braking force like they do on the front-front brakes. Instead they are already forced together by the braking force itself.

Thankfully the force is insufficient to lock the brakes against the rim, jamming them "on".

I haven't tried swapping the pads, either, though that's in the plan (since the Avid pads don't grab as well as the Koolstop on the front front, it stands to reason the Koolstop would work better on the back-front, too).

Some pics of the braking monstrosity. The red arch is the front front, and the white is the back front. The last pic is the remains of the crappy fork the white arch came from
 

Attachments

  • dsc06408.jpg
    dsc06408.jpg
    55.3 KB · Views: 3,434
  • dsc06411.jpg
    dsc06411.jpg
    51.6 KB · Views: 3,434
  • dsc06412.jpg
    dsc06412.jpg
    59.4 KB · Views: 3,434
Man, that sure looks like it would brake the heck out of your front wheel. Worth noting that work telescopic forks, there's no intrinsic torsional rigidity to the fork legs themselves, and only the arch and booster can support the brake studs.

The most brutally effective brakes I have in my fleet of bikes are front brakes I put on a suspension fork, with a decently rigid arch in front and in back of the brake. The pivots are big-- 1/2 inch-- and both arches are beefy, with 1/8" thickness throughout, but there's no disputing the results. Note that the arches are joined at the top.

red_brake.JPG
I made a lighter version for a friend of mine who was setting up a trials bike. That one used a Marinovative Cheap Trick brake boxed in by 1/8" thick flat aluminum arches front and back. He reported that it had the requisite trials style stop-or-go braking. I made a similar setup for another friend for his city bike with Onza cantilever brakes.

For hole sawing the interior of the booster, it's useful to drill three holes in it as I did, screw down with those to a wooden block, and use the block to guide the hole saw pilot drill. You can even pre-drill the block and pilot the hole saw with a smooth dowel for extra steadiness.
 
Chalo said:
Man, that sure looks like it would brake the heck out of your front wheel.
I expected it to not only brake enough to skid, but that I might have troulbe with it locking up the wheel due to the rear set of pads being forced against the rim by rotation--but neither happens. :/

I've systematically gone thru all the adjustments again on both sets of pads and levers, with no increase in braking power. Several ways make it worse to the point of ineffectivness, but nothing makes them really grab.

The levers are adjustable Avid ones, which have a knob to change the amount of lever travel vs cable pull; they're setup for the most cable pull for least travel ATM, which gives the most braking power.


I moved the brake booster to the back-front brakes, which made the braking worse, so I moved it back, getting the same results as before.

Before moving it back I tried the koolstop pads in back and avid in front, which made it a little better, but not as good as it needs to be, no better than before. I swapped the pads back, so it's now back to teh same configuration as in the pics.


Worth noting that work telescopic forks, there's no intrinsic torsional rigidity to the fork legs themselves, and only the arch and booster can support the brake studs.
I know; that's a part of why I would like to make a clamp-on set of arches that really grip the legs. I was considering notching the legs along the thickest part of them, where the original arch (which has no studs or mount points) begins to rise out of their tops, to give a surface that would mate with ridges on the clamps to further inhibit rotation.

This alloy fork appears to be ridgid enough, though the clamped-on brake boss arches apparently are not. I might be welding up a backplate to the existing stamped-metal arches, to see how that affects things.

I've had some really crappy suspension forks that I could watch the stud bolts angle inward at the front as I pushed the heavy bike (CrazyBike2) forward with the brakes locked.

FWIW, with a hubmotor in there, like on CrazyBike2, the forks seem stiffer in torsion/rotation of legs, than they do with a regular bike wheel / axle in there. I wonder if that's actuallly true or just an illusion. I guess I can test the theory easily enough with the wheel off CB2 (though it's a narrower rim with an actual machined braking surface, so for comparison I'd need to also test with a bike wheel with similar rim/surface).


The most brutally effective brakes I have in my fleet of bikes are front brakes I put on a suspension fork, with a decently rigid arch in front and in back of the brake. The pivots are big-- 1/2 inch-- and both arches are beefy, with 1/8" thickness throughout, but there's no disputing the results. Note that the arches are joined at the top.
That looks about as heavy duty as what I'd been imagining making out of steel here (because I have steelworking tools but not really aluminum ones, or aluminum itself in the necessary shapes/sizes).


For hole sawing the interior of the booster, it's useful to drill three holes in it as I did, screw down with those to a wooden block, and use the block to guide the hole saw pilot drill. You can even pre-drill the block and pilot the hole saw with a smooth dowel for extra steadiness.
Thanks--that sounds easier than what I was thinking of. :)
 
Front brake works now. :)
dsc06415 - copy.jpg

Yesterday I spent the hot part of the afternoon, and much of the night, inside unlacing the two wheels (one front and one rear) and combining the front's hub with the rear's rim.

First I easily unlaced the Mammoth rim from the rear IGH, then bound that rim to the front hub's rim, so I could swap the spokes over withotu really unlacing anything, as teh hub and rim sizes would allow a direct replacement.


Had a number of problems with corrosion-stuck nipples on the front's spokes, some of which had to be ground off at the head and then filed away and "crushed" off the spoke threads to remove them (as letting them sit with PB blaster or oil didnt' help).


Eventually I got the rim swapped over, though when tensioning the nipples/spokes I ran into some problems due to that corrosion, which I thought I'd cleaned off but not well enough I guess. Or the threads were just plain damaged from it.

I wanted to test the brakes first before bothering with perfecting the wheel, so I just trued it up and moved the tire/tube over from the disc wheel I'd previously used on the trike before all this mess (as it has the best traction and other qualities).


dsc06416.jpg

View attachment 3

dsc06419.jpg


Since the Mammoth rim is a tad narrower than the Femco poor-braking-surface rim, I had to adjust the cable length between brake arms a bit, and then readjust the pads due to the rim angle (Femco had a slight outward angle while the Mammoth is vertical/flat).

With teh Avid pads in back-front, and Koolstop in front-front, I did several test runs around the local block at various speeds up to 20MPH.

Braking with only the back-front, I can easily skid the front wheel at any speed. :)

Braking wtih only teh front-front, I get good braking, but can't skid the wheel. Braking there is back to about what it was before all this other stuff.

I'm considering to swapping which lever controls whcih brake, so the back-front one is the first one I can reach. If I do, it'll actually be more difficult to fully squeeze the lever for the front-front brake that doesn't skid the wheel, but easier to put full pressure on the one that does skid, so maybe that's a bad idea.


Anyway, I've now got great braking, to the point I will want to consider ways to increase traction on the front wheel. ;)

Now I need to go back and fix up the wheel's tensioning, and retrue it.


Then I'll see about loading up the trike with weight forward of the rear axle and see if I can get it to the point where it takes both brakes to skid the wheel; find the limits so I know what they are ahead of time.


I also remembered where I'd put that old Manitou Skareb fork with the broken dropouts, so I pulled it out and pondered a bit, about the old idea of removing what's left of the dropouts and making a steel tube with new dropouts (probably clamping for use with hubmotors) to secure over the fork legs.

dsc06420.jpg

dsc06421.jpg


I'm only thinking about it right now because it's a good suspension fork (albeit with an air leak so it has to be aired up every ride), and it has rim brake bosses built in. So it could replace the present fork that doesnt' have them built in, and probably fix the front-front braking problem (though I'd probably still need the booster arch). (then I wouldn't need the back-front brakes clamped onto it, but I might put them on anyway as backups).
 
The brakes have continued to work well the last couple days for my work commute, including with another load of dog food (4 30lb bags plsu some cans, so over 120lbs extra in the bed).

As an experiment, I put that first in front of the rear axle, and did various stop tests, and then behind the axle and redid the tests.

When the load is in front of the axle, I can still skid the front wheel with the back-front brake, but have to squeeze harder. The front-front brake still doesn't have enough power to do that even with both hands on it's lever.

WIth the load behind the axle, The front-front doesnt' quite skid the front wheel, but it feels different. The back-front skids it easier, which was expected, as there's less weight on the front wheel.

I also retried the in-front-of-axle tests with the front tire pressure down from 40psi to 30psi, and I can still skid the back-front brake but takes all the pressure I can put with one hand on the lever.


Still pondering the best way to make tubes and dropouts for the Manitou fork, and see if it makes a difference to the braking issue (while still providing good suspension in front).
 
Some pics of the handlebar setup, by request.

Rider POV.
View attachment 4
Left side has mirror sticking out from teh top of the bar bend. Outboard of that is the left rear motor's thumb throttle, which I push downward under the bar for acceleration. Outboard of that is the ebrake lever that engages the rear electric braking for both motors. Outboard of that is the brake lever that engages the brake light.

Center of bars over stem, on left is a thermometer, presently just measuring air temperature (always nice to know just how hot the air is as it peels my skin off ;) ). On right (clamped to tiller) is the Cycle Analyst v2.3. It makes a great eyeglasses holder in addition to it's other features.

Over on the rightside of the bars, the righthand mirror is clamped to the curve there. Outboard of that is the thumb throttle for the right rear motor, which I push downward under the bar for acceleration. Outboard of that is the front-front brake handle, and outboard of that is the rear-front brake handle; these are for the front mechanical rim brakes.

This is the side/top of those levers
dsc06426.jpg
The one on the left of the pic is the front-front, then the rear-front on the right of the pic. Below is a front view:
dsc06429.jpg


This is the side-top of the brake levers on the left handlebar.
View attachment 2
The "top' one is the ebrake lever for the rear motors. It has an internal return spring. The one with teh rubber bands on it is the brake light lever; I use them because the lever has no internal spring, and I havent' yet added an external one, so without the rubber bands the lever wouldn't fully retract and the brake light would stay on. I have to replace them every week or so (more often in summer), but at present it's an easier and quicker solution than rigging a spring (and the bands are free from work each week as we toss out packaging from things shipped to us).

Front view of the levers and of the front of the left mirror, showing the built-in turn signal.
dsc06428.jpg
 
Lost a link in the main (long) chain tonight on teh way home.

I don't really pedal much, but I keep it in the highest IGH gear and the lowest front triple gear, so that I can help start the trike from a stop just a bit quicker, and/or get it going that first inch so the motors know which way to spin when they get confused.

Tonight I gave it a pedal boost and heard a TING! then a rattle and as I crossed Dunlap. Was pretty sure it was just the chain so I kept going, but stopped pedalling as soon as the snap happened so it wouldn't unravel and fall in the road (where traffic would prevent me from going back to get it).

I pulled over and stopped once I'd crossed Dunlap, and found a "male" link missing; no damage to those on either side, so I guess it just snapped and fell off while the chain was dragging as I crossed the street. Perhaps I can go back in the daytime to see if it's there, for potential failure analysis.

I carry extra chain links with me, and my tool, but since I didn't acutally need the chain/pedals for the rest of the ride home, I pulled the chain up and left it in the seatbox for the rest of the ride home, and will deal with the fixing tomorrow.


I'll do that along with another fix: The turn signal switch suddenly became intermittent yesterday on teh way to work; it's the cheap junk switch included with the Fusin 1000w geared hub kit I reviewed. Most likely it was designed to switch low-current tiny LED turn signals (those didn't come with the kit, just the headlight and taillight), rather than the larger automotive incandescents I'm using. So I suspect the extra heat from the current has over time degraded the plastic center pivot, and it's finally broken.

Might be able to fix the switch, but will probably have to replace it. I have a number of 3 position switches I can use, a rocker with center off is probably the best option if I have a small enough one to fit inside the housing.


Brakes still working ok; haven't done any of the mods/etc I discussed above.

Been getting about 48wh/mile lately, significantly lower than previously (50-60), not sure what the difference causing the drop is, as it's all the same as before, except for the brakes. Since they weren't rubbing while riding, that shouldn't be it, though.

So I wonder about what problem went away to lower the wh/mile. :/
 
amberwolf said:
[...]
Been getting about 48wh/mile lately, significantly lower than previously (50-60), not sure what the difference causing the drop is, as it's all the same as before, except for the brakes. Since they weren't rubbing while riding, that shouldn't be it, though.

So I wonder about what problem went away to lower the wh/mile. :/

In general terms, that's very easy: Rolling Resistance and power train internal losses. These are the only two areas that could have that effect in this situation, I think. Any changes in bearings used, their lubrication, tires, their inflation? Any changes in the power / drive system - different battery, altered wiring, altered controller or its settings, altered mechanical power transmission system?

Or, there is one other "cause" - possibly it's not real but instead a "measurement error."
 
Since the same device, settings, wiring, etc., is all being used, in the same way as previously, then unless there is an intermittent connection issue with the shunt to the CA itself, it's unlikely to be a measurement error. Always possible, of course.


However, it's also possible that there is a small, unnoticeable to me, difference in breezes, which would also make a difference to the efficiency, though I don't expect it should change an average over several days.

Wind resistance of the trike is slightly different, though I don't know if it's greater or lesser, because of the change from the fuzzy floppy canopy covering to a stiffer vinyl covering.

Since most of my power usage on these commutes comes from the frequent complete stops and starts, I suspect neither breezes nor aero of the trike is the cause of the difference.


Front bearings are different because the front hub is different. Previous testing (unloaded, off ground, spindown test) appeared to be little enough resistance that it shouldn't make that much difference. Loaded results could be different, of course.


The tires are the same, and at the same inflation pressure as before, though the front one has been removed and reinstalled on the new rim, which is wider than the old one by a bit, so it's shape is less round and more flat. That should *increase* rolling resistance for the same pressure, right? With a larger contact patch?


Front/rear weight balance is different, slightly more to the rear, because of the slightly taller front fork. But I'd actually expect that to increase the rolling resistance, if anything, because of more weight on the stickier, softer, less-inflated tires in the rear.


Power train is unchanged, from battery to wiring to controllers to hubmotors to wheels to tires, so that shouldn't be a contributor.

Power train *usage* should be the same; I have well-established riding techniques on the same route at the same times of day, and while traffic varies a bit, on average it's all the same.


So there are quite a few variables; I don't know which (or which combination) is actually the root cause.


But...at least it's *more* efficient than it was, rather than less. ;)
 
"The tires are the same, and at the same inflation pressure as before, though the front one has been removed and reinstalled on the new rim, which is wider than the old one by a bit, so it's shape is less round and more flat. That should *increase* rolling resistance for the same pressure, right? With a larger contact patch?"

Yes, probably so.

"Front/rear weight balance is different, slightly more to the rear, because of the slightly taller front fork. But I'd actually expect that to increase the rolling resistance, if anything, because of more weight on the stickier, softer, less-inflated tires in the rear."

Yes, I agree with that, too.

...Having unexplained increase in efficiency is a great problem to have! :lol:

My bet; if it's real, it's those bearings.
 
amberwolf said:
[...]the front one has been removed and reinstalled on the new rim, which is wider than the old one by a bit, so it's shape is less round and more flat. That should *increase* rolling resistance for the same bypressure, right? With a larger contact patch?

I would not expect so. Rolling resistance from rubber hysteresis is more a function of how much the rubber is being distorted, less so how much rubber is in play. Intra-contact-patch scrub is a wild card factor, and might be more significant for a trike than for a bike, which is what I'm more familiar with.

The gross size of the contact patch is usually a function of tire pressure and applied weight, mostly independent of other factors. Pressure variation within the contact patch is unrelated, and I think tends to have more effect on rolling resistance.

Jobst Brandt's rolling resistance tests (valid only for straight line performance) showed less RR from wider tires at the same pressure, which I expect is analogous to​ your flattened contact patch.
 
Chalo said:
Jobst Brandt's rolling resistance tests (valid only for straight line performance) showed less RR from wider tires at the same pressure, which I expect is analogous to​ your flattened contact patch.

THAT is counter-intuitive - thank you for posting that nugget! :)
 
Definitely not what I expected. :oops:

But it would make more sense for the wh/mile change to be in the tire than the bearings, as that much energy lost in the old bearings might be expected to show up as a wear or heat problem I might notice, and I'd also expect it to keep the wheel from free-spinning very well in offground tests.

I know that tire pressure makes a big difference to my wh/mile, as when it's low (especially on the front wheel, for whatever reason) wh/mile increases significantly, vs most of the other variable factors besides lots of wind, in my commutes.

In the past, I've tested out a range of pressures from below tire-recommended lower limit to the tire's max, to see what effect it had on braking and steering in different conditions, and saw the wh/mile differences vary so much it was eye-opening.

At present, with this tire (CST City), I run 40PSI in dry conditions (almost all of the time), and about 30PSI while it's raining (for better contact for braking, especially in turns). I haven't redone the testing with the wider rim; I suspect I could use a higher pressure now, or not lower it during rain, and get the same handling as before. Have to wait a few months for some rain to find out, assuming I even remember by then. ;)


The weather has been too hot (105-109F, and still in the high 90s when I get home around 10-1030pm) to do any work on the trike; I'm going to have to setup an old window A/C unit in the shed so I can pull it inside and work there, if stuff comes up that I really need to get done. Also have to insulate the shed more, but have to do that while runnign the A/C in it, cuz it can get 120-140F inside with the doors shut if there's no breeze outside, and 110-120F with the doors open with a breeze. :/
 
"The weather has been too hot (105-109F, and still in the high 90s when I get home around 10-1030pm) to do any work on the trike; I'm going to have to setup an old window A/C unit in the shed so I can pull it inside and work there, if stuff comes up that I really need to get done. Also have to insulate the shed more, but have to do that while runnign the A/C in it, cuz it can get 120-140F inside with the doors shut if there's no breeze outside, and 110-120F with the doors open with a breeze. :/"

Oh gosh, I'd move! I can't handle either that kind of heat, or much cold.

Happily, for our more colder-climate friends, I found there is a battery cell for you:

https://na.industrial.panasonic.com/sites/default/pidsa/files/ncr18650f.pdf

Notice in the charts they talk about -20C operation! Brrrr! Not Me! But, possible. And, also note that you'll probably have to add a cell to your pack to pump it up in those conditions due to voltage loss - maybe two! :) All possible, but probably not with much vendor support.
 
RTIII said:
Oh gosh, I'd move! I can't handle either that kind of heat, or much cold.
I've been here since 1985, so I'm used to it (though as I get older it's harder to handle for very long). Not that I *like* the heat, but as they say, "at least it's a dry heat". :lol: (most of the year) That does make a big difference--when I lived in north Texas, between DFW and Red River, the humidity would be high *and* it would be nearly as hot as it is here. :/

I am pretty attached to the little place I have here; wish I owned it instead of renting (have asked about buying it but the landlord never even acknowledged I asked, much less answered).


Happily, for our more colder-climate friends, I found there is a battery cell for you:
https://na.industrial.panasonic.com/sites/default/pidsa/files/ncr18650f.pdf
Notice in the charts they talk about -20C operation! Brrrr! Not Me! But, possible. And, also note that you'll probably have to add a cell to your pack to pump it up in those conditions due to voltage loss - maybe two! :) All possible, but probably not with much vendor support.
Thanks, but those cells can only do 2C (around 5A) continuous discharge, you'd need to parallel a lot of them (at least 16p, preferably more to give a buffer against age/etc.) to get the kind of currents I'd need (presently 60-80A for startup from a stop up to cruising, and around 15A or so for cruising at just under 20MPH.

Once I get the bigger controllers built, it'll probably double (or more) that startup current, since I would like to accelerate a lot quicker from a stop, especially while hauling cargo and/or the dogs, so traffic behind me at a light doesn't see me as an obstacle but rather as a (slower) part of traffic that is at least *trying* to stay out of their way. ;) Though the startup current wouldn't last nearly as long then as it does now, of course.


I'll stick to my EIG NMC 20Ah cells
http://www.eigbattery.com/_eng/developer/m_product_data_set/download.asp?file_nm=EIG_NCM_C020_Data-sheet_APR2016.PDF
Even better thermal range: -30C operation if you need it, up to +55C. ;) 5C (100A) continuous, 10C (200A) burst (<10 seconds). <3mohm Ri.

I use them on the trike in 14s2p for extra range (they can easily handle the current demands in 1p). I use a 14s1p on the bike; it's survived the heat here for a few years now, kept in a 50cal ammocan in the frame of the bike.

The trike's pack is too big for an ammocan so I keep it in the seatbox right now. I'm still working out a design to "flatten it out" so it can go under the trike's cargo deck in a 4-cell-thick built-in pack.

That not only frees up the seatbox for cargo/etc, but also lowers the COG and spreads that weight across the rear/center, ratehr than concentrating it on the right center (which helps in right turns to enable them being tighter, but not in left turns). Also means that should I need extra range I can use both sides of the seatbox for two more packs of the same capacity. Not a frequent occurence, but occasionally I need to go all the way across the valley.
 
Interestingly, the wh/mile has dropped again, for the last two days, down to 43wh/mile average for each trip.

Odd. :?


Separately, last night on the way home, the right rear tire began to deflate much more quickly than usual. I suspect I ran over something new to poke a hole in it, rather than an expansion of the existing leak, but havent' gotten to check yet.


Normally (since running over that chunk of debris a few months back) it's been leaking very slowly over a few days, so that around halfway thru my workweek I have to re-air it up as it's down to around 20PSI (from 35), if I don't air it up every ride (usually I do, sometimes I forget or don't have time before leaving for work, or it's just too hot outside to care).

In this case, I'd just aired it up that day, and it seemed fine when I left work, but not more than 1/4 mile in I could feel it was beginning to leak enough to affect the feel of the ride. By a mile in it was significant. As I turned the last corner, a few dozen yards from home, it thumped as it went over the valve so I stopped right there and aired it up just enough (15psi) to get to the house and thru the yard to park it; the little bitty electric pump I carry now takes a few minutes to do even that much (but much better for me than a hand pump).


Then I aired it up fully to 35PSI with the bigger self-contained SLA-powered pump I keep at home, which only takes about a minute from completley empty, maybe 30 seconds from where I started.

It appeared to still be aired up (didn't do a pressure check) an hour later when I was finished feeding the dogs and making my dinner.

Today, though, when I was getting ready for work, it was down to nearly flat.

Since I'd forgotten to check it and see if I could patch it in the morning, I didn't have time to do it by then. Instead I ended up just squirting some Slime in there (whcih I don't normally use anymore), reinflating it, and spinning it for a bit, then heading off to work...but with the self-contained SLA powered air pump in the cargo bed, just in case. ;)

By the time I got to work, it seemed to still be about the same as when I left home. By the time I left work to go home, it also seemed about the same.

So I guess we'll see how it works out over the next several days, and I should get myself a couple of new tubes, so I can both replace this one and have a spare (and then keep this one as a "just in case" spare).
 
Amberwolf,

don't forget that it could possibly have a valve leak. They sell, and I keep on one wheel MOST of the time, a valve tool for tightening or removing shrader valves that serves also as a cap, so you have it handy at all times... When a leak is first suspected, my first step is to gently tighten the valve on that tire - often the leak goes away!

You may very well have a puncture, and you may very well have a valve leak; one does not preclude the other! :D

rtiii
 
Back
Top