With Teddy's help

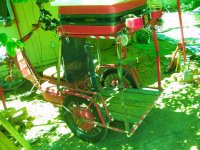
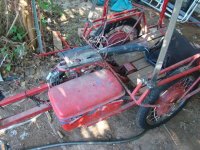
I got a bit of the mechanical stuff done to the trike yesterday and today, mostly moving the seat forward about 5 inches, and replacing the one-piece cranks with 3piece cranks in a BB forward of the old by about that same amount, and down a bit; also adding a 3-speed IGH as jackshaft in the pedal drivetrain.
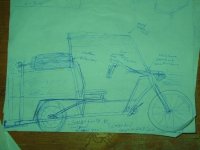
First up was moving the seat. This was first to move center of mass forward, to help with traction on front wheel (for eventually adding a motor up there too, as well as braking and steering), and to give me more cargo area. It was also so that I could just add the new BB in front of the frame, at least during testing, before modifying the frame in case stuff didn't work out as expected.
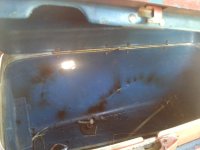
This is where it was before:


and this is where it was to be moved to:


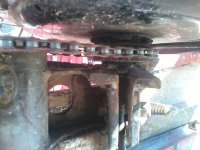
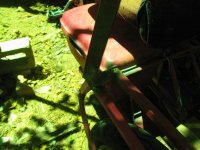
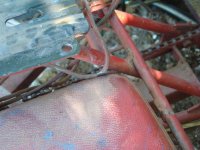
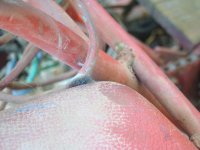
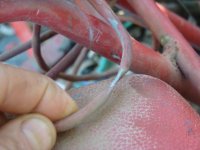
It was *almost* straightforward, cutting the seat's support plate welds to the frame, sliding it forward, and rewelding. But I also needed to "lower" the front edge of the seat a bit, because the frame goes up at a slight angle, which would make the seat higher than it was before, and I don't need that. The only "easy" way to fix it was to cut the frame where it curves either side of the tube that supports the front of the seat, then cut some of that tube off at the top, then bend the frame down a bit and reweld it to that tube. Then weld the seat support plate back to that frame.
So now it is like this:


and I had to move the handlebars forward a bit, but I didn't move them as far as I did the seat, to try out a closer position for a while.

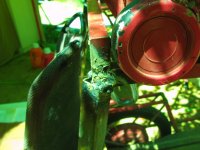
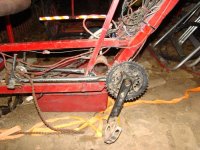
Adding the BB...was a process. :/
At first I was just going to take the cranks out of the old shell

cut just a BB shell off a junk frame, and weld it directly to the front flat side of the "downtube". But I also wanted to add the IGH as jackshaft, to get a low and high gear (especially the low). So I decided for the moment to combine the two, as right now would be easy to do so simply by not just taking the BB shell off the frame, but to take the BB shell, chainstays, and rear dropouts all as one piece.

Since the big square tubing I have as the "downtube" is wider than the space between the stays at the BB, I cut a section from their inside area that would let me put the BB almost up against it (I couldn't get the angle grinder in there far enough to actually get right up to the BB).

Then I slid it back over the triek frame and put the IGH into the dropouts, tighteing the nuts to squeeze the stays together to hold the unit over the "mixte-ish" vertical supports near the front of the trike frame, till I had it all aligned and could tack weld it.

I used small chainrings on a swaged-together steel crank at first, because I really only wanted the smallest chainring on it, and I didn't have anything else with that small a ring handy.
By this time, Teddy and Yogi had given up on me, and were waiting in the kitchen for noms.


So that was it for Thursday. Friday I continued, though:
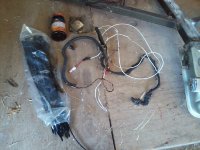
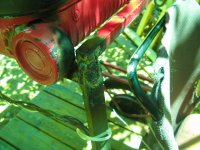
After tackwelding and verifying chainlines ought to be good enough, I dug out my box of old freewheel clusters,

and took one apart for the 20-tooth sprocket, like this one but with a smaller center hole

to match the sprocket already on the IGH and the ones on the rest of the drivetrain (on the input and output of the trike's rear jackshaft).

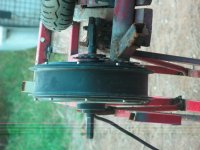
 View attachment 13

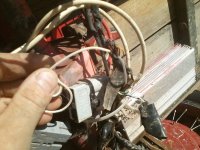
The IGH is a Shimano 333, probably the worst of the ones I have, but the only one I could easily find (I already had it out for the Raine Trike project that is presently on hold). I do know where a Sturmy Archer AW is, still in a 27" wheel, but I don't know where I put the shifter for it, and it doesn't have the shifter pull chain/etc attached to it, so I wouldn't easily be able to come up with something to shift it. The SHimano still has it's shifter rod on there, and it works by pushing, using a lever built into it, so all I have to do is make something to pull up on it in 3 steps to make it shift like it should. Not all that hard--I can probalby use an old friction shifter to do this, with it's cable clamped to the shifter pull rod.
View attachment 1

I would've used a sprocket with less teeth (so the gearing would end up even lower, as this is the output of the IGH to the system), but unfortunately anything smaller than 20 teeth would not let the chain clear the flange of the IGH (whcih is where I would have to mount the sprocket).
I chose a sprocket that was almost exactly the same inner diameter as the outer diameter of the IGH's body just to the right of the spoke flange. I only had to grind off the 3 "bumps" used to engage it with the freewheel body, and lightly file the inside circumference to take just the surface off, and it would tightly wiggle on the IGH body (wiht the IGH's actual input sprocket removed temporarily).
Then I used a mechanical pencil to mark where all the spoke holes would be on the sprocket. I can't drill thru the sprocket; it's too hard for my bits (especially the tiny ones I'd have to use for this), but I can cut slots that line up with the sprocket holes, and since the ID of the sprocket fits the IGH so tightly, it won't wiggle around out of round.
I only have 6 nuts for the screws that are small enough to go thru the spoke holes in teh flange (though I have at least a dozen of the screws, all of this saved off of something I took apart for pieces ages ago). So I only cut 6 slots; if I have troulbe with it in use during testing I'll cut more slots and figure out what to use to secure it. (other than welding, which I would rather not do).
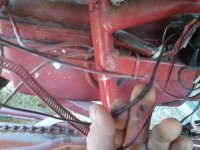
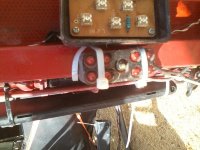
Remounted the IGH, and shortened the original chain from the rear end to the cranks so it now fits the IGH. Tension there is adjusted by moving the IGH forward in the dropouts a bit; was almost perfect at the most rearward position (just luck, not planning). Chain also clears both under and over the frame with the IGH where it is, which is also more luck than planning.

 View attachment 9
I had a chain I was going to use for the front, but it is a multi-gear chain, and is too narrow to fit over the IGH's input sprocket.

So I used the remainder of the chain from the above step, plus another small length leftover from when I first put this together a year and a half ago, and made one just long enough to use with a derailer and all three chainrings of the cranks, to let me try an experiment.
Once I had all the chains on, I dug out a basic derailer, and installed that at the IGH, to keep the input sprocket and chain aligned and to to take up the slack of the pedal chain. This will allow me to experiment with the front sprocket size by manually moving it from ring to ring, to find the best balance of pedal without power vs doing more than ghost pedalling while motoring along, or even just end up leaving it this way, to be able to switch between them as needed.


I beefed up the tack welds, so they would hold up to pedal torque, and took it out for a test ride around hte yard. I found I could not start pedalling at all in the "overdrive" gear (rod pushed in partway), even on the smallest front chainring. In the underdrive gear of the IGH, (rod pushed in farthest), I could start pedalling relatively easily, though it still hurt to get started, it didnt' hurt that bad to keep going around the yard, in smallest front chainring.
To see what effect the Shimano Biopace rings I prefer would have, I swapped them in.


(I also had to change out the cartridge BB I tried first, because it has a really bad bearing that allwos it to wiggle around a lot; I went with the older style with bearings in cages instead, pulled off the Diamondback Coil frame from Mdd0127 that I used to test the Fusin geared kit with). The Biopace are larger rings by several teeth, but I hoped teh differnet shape would help enough to make up for that.
It didn't, exactly, but it did help even though they are not being used at the angle they were designed for (sinc I am not standing over them, but am seated behind them, it changes the way they work). To really work correctly and help the most, I would need to somehow rotate the chainrings around the crank spider. I don't reall have a good idea on how I could do that with what I have around here, not easily.
Another issue is that ATM the BB is too far down and forward, so I can't really push all the way down without sitting on the edge of the seat.
But still, first mission accomplished: to let me pedal the trike around without power if I have to. Previously I could sort of do this, with extreme effort, for short lengths, and the one time I *had* to pedal home a couple miles I almost killed myself with the pain and effort, and that was only half the distance I was going to have to go if I hadn't been able to recharge at that point. It still wont' be easy, but it will be possible.
I still need an even lower gear, which I can get by going back to the small chainrings on the steel crank, but I'd like an even lower gear than that.
So....what I *could* do is to use a larger input gear on the IGH, by bolting a larger sprocket onto the existing one. (or weld onto it, if I have to). I went ahead and bolted a 28t onto the 20t, using four 1/4-20 bolts, but I'm not sure how it will hold up, as it's only the bolt tension keeping it in-round. Can't test it till tomorrow, because it's 1am and I can't use the grinder to cut off the excess bolt length that interferes with the chainstay and dropout.
But I'm most of the way there.
Once I'm done with the testing phase, I'll be cutting the BB off the chainstays, and moving it from the front of the frame into the space where the old one was, but above and forward of it. I might have to notch the main "downtube" to install it, but I'll avoid that if I can.
The IGH won't have any support then, so before I do that I need to bend the seatstay stubs I left on there and add a bit more (turned out kinda short) so they will be welded to the "toptube" above the IGH, and then add tubes at teh bottom rear of the dropouts to connect to the "downtube" below the IGH. Then I can remove the former chainstays. It may not be a sstrong horizontally this way, so it might require design changes later once it's tested in actual use...but I don't expect to ahve to put a lot of pedal torque thru it very often; it's really only a backup...albeit a complex one.
I also considered adding a front derailer, but there's no easy way to mount one; I'd have to weld in a tube to clamp it to, or weld it to the frame itself, or make a bracket, etc.


Further changes will include:
--extending the cargo rack to meet the back of the seat again, and moving the "trunk" forward with it.
--moving the forward rack supports so they don't connect to the fenders, but rather to the frame below the seat, which will be extended outward to line up with the outer rear frame, and forward to almost meet the front edge of the seat again.
--extending the cargo bed area forward as well.
--putting the battery box(es) behind the seat to either side, about where they were but turned lengthwise, behind the accessory/tool/etc boxes. The one on the left side will be joined by a similar one on the right, which unfortunately is too tall to be mounted upright unless I move the frame down. I might be able to do that, though, and I'll do it on both sides if I do.

--I considered moving the whole cargo bed down, but the "axle" will still cut thru it at the original height, unless I totally cut apart and rebuild the frame, so that's not likely to happen anytime soon.
--reweld the bolts for the trailer hitch frame on there, more forward than they are now, as I don't need it to stick out as far backward for a kennel/crate since that can go more forward now, too, with the seat moved.
The one thing I'm not sure about yet is cutting away the angled down/rearward "seatstays" that presently connect the seat area with the rear frame, and probably give significant stiffness to the system. Once I move the forward rack supports, they may not be needed anymore, though, so we'll see. If I don't cut them away, then I still cant' use most of the forward cargo deck area for big stuff (like dog crates), just the areas to eithe rside and above them, which defeats a good part of why i am doing this.
Decisions...decisions....