Turnigy HXT Powered Custom Cruiser Worklog

Update

Good mate Noeeeel...came by this morning picked me and the 10 inch "V" Pulley
up to take to his workplace (Modified Vehicle Systems) to turn it down on the Metal Lathe.

As always, pictures of the whole process were taken for your
viewing pleasure-->

10in_V-Pulley_Converted_to%20_flat_pulley.jpg


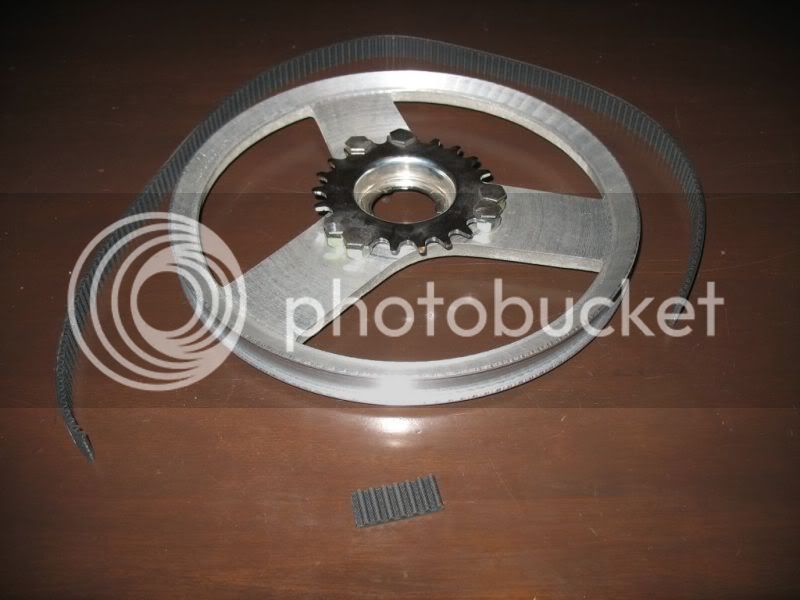
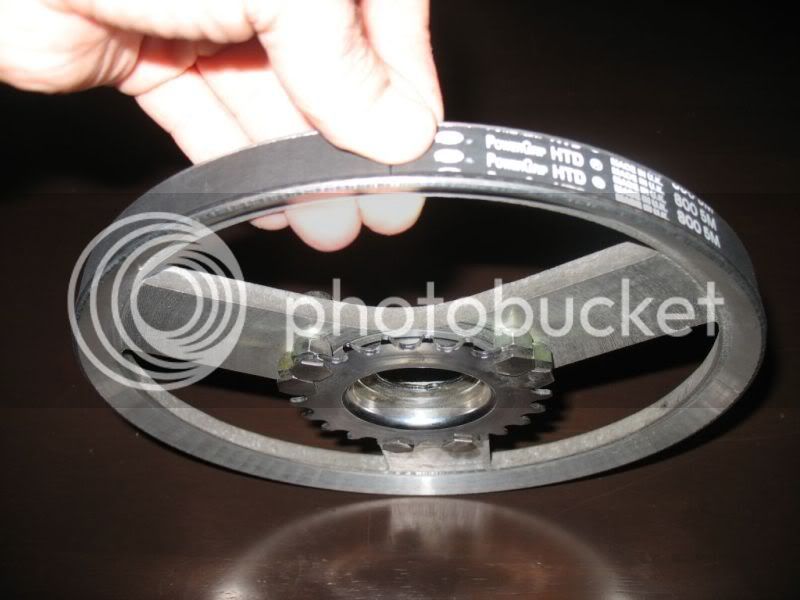
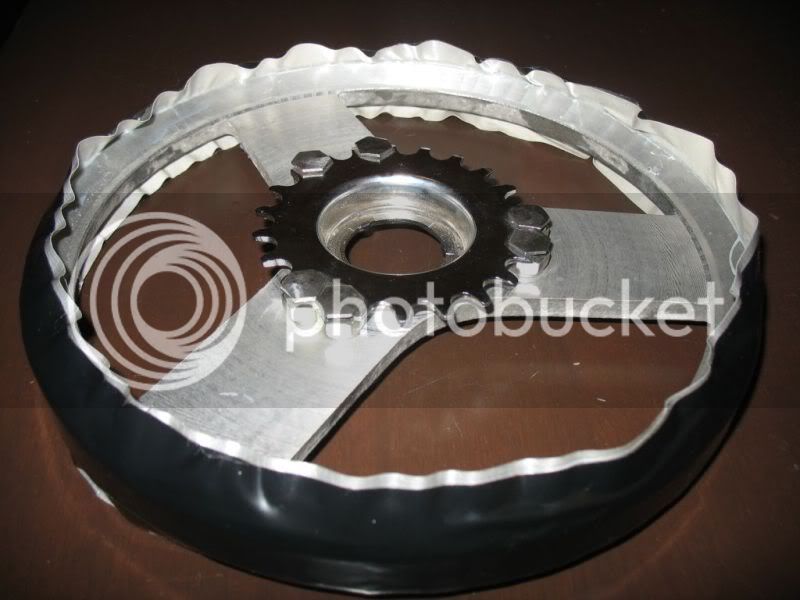
Pictures a pretty self explanatory i think? the sides were first removed, before a 15.5mm 'flat'
surface was created for the belt, the center was then turned to allow fitting of the 3speed hub
sprocket (see below pics of Matt's completed pulley)

Extremely pleased how the pulley has turned out, HUGE thanks
to Noel for his time and to the boss of MVS for the use of the workshop/Lathe.

As mentioned in the work log before epoxy teeth will now be added to the pulley in the
same manner as Matt (1000watt) has done on his 10in Pulley i.e-->

pulley7.jpg


pulley8.jpg


pulley9.jpg


pulley10.jpg


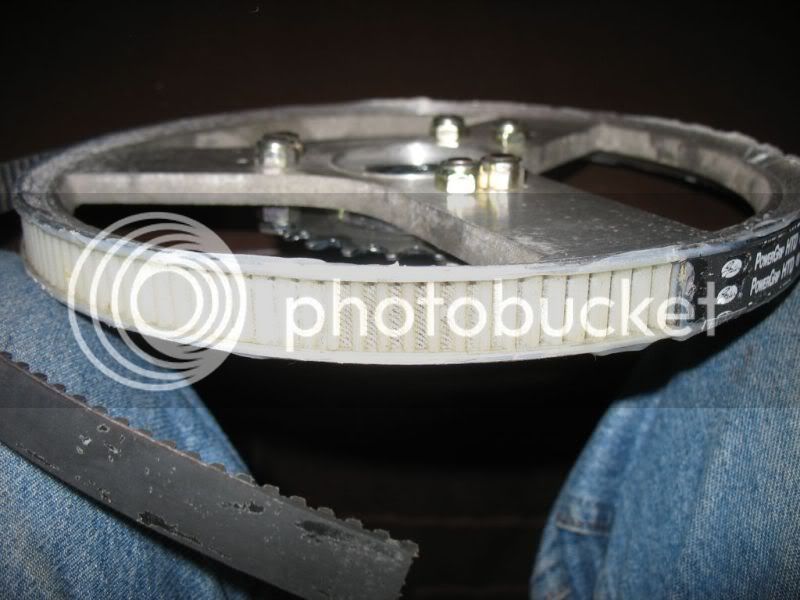
I shall borrow Matts 'cut' belt... if the pulley needs additional material
removed so as the belt teeth spacing is accurate this isn't a problem, bulk of the
turning has already been completed another 0.5mm can be taken off the circumference
if need be....

Back soon folks :)

KiM

p.s i will be financial enough to buy theExtra Wide Sturmey Archer 3 speed hub from ChoppersUS this week i have decided to do this straight
up rather than use a trike hub initially, this will cause some delays in the progress but i figure do it now or
it might not be done at all down the track as ill be having to much fun riding it about LoL..
 
Kim! That is sooooo badass! Awesome job on that pulley! Super super super good job! I'm throughly impressed!
 
AussieJester said:
I have altered the springer tube to lower the front ride height and im
rapt with the way the bike sits now, less "chopper" more "pro-stock/cruiser" look to it
I like it, that's exactly the look I'm going for on mine :)

Nice work on the pulley. The things you can achieve with cool toys!
Has Matt had any trouble with the epoxy on his ? It seems like it'd be under a fair bit of stress
 
liveforphysics said:
Kim! That is sooooo badass! Awesome job on that pulley! Super super super good job! I'm throughly impressed!

THANKs Luke!! I know your not a huge fan of the "chopper" look and although i don't mind choppers i wanted to get away from that on this bike and go for a "cruiser" / "pro-stock" look and hoinestly i have thought on occasion what you would think of the design!! ... Hopefully the lower front height & extended length will add to the bikes higher speed stability...thanks again for the kind words mate ;)

Hyena said:
I like it, that's exactly the look I'm going for on mine :)

hehe thought you might mate :: wink :: How about if i added a bar like thus to it-->

Hyena_concept_frame.jpg

Be even more like the pic of the frame your thinking about wouldn't it :)

Hyena said:
Nice work on the pulley. The things you can achieve with cool toys!
Has Matt had any trouble with the epoxy on his ? It seems like it'd be under a fair bit of stress

Thanks bud...and Oooh yes certainly does...as to the epoxy ..after many many kilometres on it Matt reports it is as good as the day he did it! I am actually tempted to try it with the 15mm wide belt WITHOUT the teeth, when Matt tried it without teeth it did slip BUT that was with a 10mm wide belt he hadnt taken delivery of the 15mm belt he now uses and never tried it prior to adding the teeth...I spoke to Matt this morning actually let him know how the pulley turned out.

KiM

Edit: OH...hehe Luke...i think you would like the owners of Modified Vehicle Systems "toy" too-->

Noels_Boss_Foooord_Matt.jpg

760HP AT the BACKWHEELs...has an under bonnet blower on it :) Spent close to 60k on the motor thus far...yeah yeah i know Luke your V8 killer Civic would keep it "honest" on the 1/4 mile hehee...Still a nice car though IMO...
 
I'd wait for the toothed belt personally. Aside from it probably being a bugger of a job to get the epoxy back off to redo it, if it happened to pack it in while you're out and about it would leave you stranded. It's a PITA at the best of times, but you don't have the luxury of being able to pedal or push it home.


Not to spam your thread, but I'm thinking something along these lines for my frame
(photochopped from one of your earlier progress pics)

ajmod1.jpg


Yes folks, I'll be the next proud rider of an AussieJester(tm) custom frame.
I'm having it built with a special stick holder. The stick will be used to fight off the hordes of woman that chase after me while riding it :lol:


AussieJester said:
760HP AT the BACKWHEELs...has an under bonnet blower on it :)

Nice, my other ride is a 250rwkw XR6 turbo. Not quite a "10 second car" but 12.9 ain't too shabby for a comfy cruiser :)
 
Oh yes the 15mm belt is the toothed variety was simply going to try it prior to epoxy teeth being added. The belt used to apply the teeth is one Matt bought specifically to cut in half to apply the teeth so the belt to be used wont be affected either way...TGH though, Ill end up with the teeth on it either way :)

That frame looks niiiiice mate, looks pretty straight forward to build too shouldnt be an issue at all ;)

LOL@ stick holder funny guy hehehe

KiM
 
Hyena said:
Aside from it probably being a bugger of a job to get the epoxy back off to redo
Very unlikely to be a problem with the teeth, I have done over 1000km with mine.
The drive load is shared by many teeth all the time.
If there was a problem however or the teeth wear out, they can be machined off in 2 mins with a lathe, or a wire brush on an angle grinder will make short work off them.
AussieJester said:
I am actually tempted to try it with the 15mm wide belt WITHOUT the teeth, when Matt tried it without teeth it did slip BUT that was with a 10mm wide belt
Hi Kim, FYI it was a 9mm belt originally, I just wanted to let people know that there was absolutely no grip without the teeth and I am confident that the wider belt won't help, the teeth are necessary, IMO.
Cheers,
Matt.
 
1000w said:
Hi Kim, FYI it was a 9mm belt originally, I just wanted to let people know that there was absolutely no grip without the teeth and I am confident that the wider belt won't help....

With a polished metal surface, perhaps. My experiments using 5mm pitch belt on a 260mm dia. rubber tired pulley gave a similar torque capability to a 16t toothed pulley. I don't think it's the way to go, for other reasons, but it's not completely useless as a simple solution........

I like your method for moulding the teeth, Matt :D
 
AussieJester said:
liveforphysics said:
Kim! That is sooooo badass! Awesome job on that pulley! Super super super good job! I'm throughly impressed!

THANKs Luke!! I know your not a huge fan of the "chopper" look and although i don't mind choppers i wanted to get away from that on this bike and go for a "cruiser" / "pro-stock" look and hoinestly i have thought on occasion what you would think of the design!! ... Hopefully the lower front height & extended length will add to the bikes higher speed stability...thanks again for the kind words mate ;)

hehe thought you might mate :: wink :: How about if i added a bar like thus to it-->

KiM

Edit: OH...hehe Luke...i think you would like the owners of Modified Vehicle Systems "toy" too-->


760HP AT the BACKWHEELs...has an under bonnet blower on it :) Spent close to 60k on the motor thus far...yeah yeah i know Luke your V8 killer Civic would keep it "honest" on the 1/4 mile hehee...Still a nice car though IMO...
I do like the new design much better, as form follows function in my eyes, and this setup appears it will perform so much better.

760rwhp in a 3500lbs car? That would be a pleasure to make tremble and fall under my civic. :)
Just for his own dramatic effect, I would let him disconnect my visible nitrous stage, so when he lost, he would feel that he lost to a NA 4 cylinder civic. :)
 
I don't wana thread jack too badly... but I know everybody likes to watch racing :) This is the team I race with, and this was the last BOTI event, which was a blast, dispite me messing up and not placing :( At least I didn't put the car into the wall :) For the folks that think E-bikes are expensive, you might not even want to watch this video. lol Roughly $450,000USD dumped between the 10 civics in our crew. lol

[youtube]YqxFnszaIK4[/youtube]
 
WOOOT!! Cheers for the video Luke sorry to hear you missed out on a placing though next time buddy :) ..I'm off to the Drags on the 21st for the Metro Fest meet, includes....Street Machines, hot rods, Drag Racing, Show- n-Shine a some classic speedway thrown in to the mix (Speedway track RIGHT next to the drag strip)... We have an AWESOME complex here Luke think you would be impressed by the layout all the Americans we get over here running compliment it...REALLY looking forward to the season :)

KiM...
 
If I ever make it to Aussieland, which I would like to do sometime, I will make a point to go to the track with you KiM :)
 
NICE!! That sprocket turned out tits! How many teeth did you end up with? Can you explain the epoxy process a little more, or at least a link to Matt's build for this? Since it was so easy, I would have been interested to know how bad it slips at your power rating while it was bare metal. Oh well, if it's as easy as it looks who cares. Either way I'm very impressed and can't wait to see Matts drive on there. The chopper is turning out great man. I'm glad you went with that springer fork, you make it look so easy, I'm sure Hyana's build will come together fairly quickly.
 
etard said:
can't wait to see Matts drive on there.

You wont haqve to wait long now buddy because ITS HEEEERE!!!!! Courier just dropped it off i havent even opened the box yet im so excited i had to tell someone, HOW FAST 7 days exactly from Matts door to mine !!!! Be back with pics when my heart rate calms down enough to open the box...

EDIT:


Ok opened everything ABSOLUTELY outstanding CNC work on the drive Matt :) The actuator fits perfect on lower tube :) heres some pics-->

IMG_3130.jpg


VERY well packed Matt!!!

IMG_3131.jpg


IMG_3132.jpg


I'm off to swap about the drive and mount the motor OH hahaha i didnt have the right size allen key for the damn bolts can you beliiiieve it, 30 seconds with the angle grinder and an old allen key rectified that though LoL


EDIT 2:

IMG_3133.jpg


IMG_3134.jpg


KiM

p.s Also like to thank Fechter for the throttle interface, will make things soooo much easier to connect up and hopefully less likely to blow the HV110 straight away haha cheers mate ;)
 
Looks good!

There were no motor mounting screws in the package and I did not want to delay the shipment by waiting till I picked some up. So, I shipped it as-is.

I will look for that pulley you mentioned.

You will notice the very thin flange that was left in the motor pulley after it was opened up so far. That is why I drilled an tapped two set screw holes between pulley teeth. They disapear between the teeth when tightened down.

Anyway, I am glad that actuator will work. I have had that thing for over 5 years since I took it out of my SPL car. :wink:

Matt
 
Yes im rapt with the drive Matt simply superb :) No probs
about the motor mounting screws i have some here :)

The set screws in the pulley is excellent i didn't notice they actually have grub screws in them soz bout that Matt, i should of turned the light on haha.. Definitely check the motor box for the pulley you will also find 4 grub screw's in the bag with it Matt (1000watt) gave me two extras to use on it 2 small 2 slightly larger. As mentioned in pm if you wouldn't mind tapping the two holes in it like you did with the one you sent that would be fantastic!

Thanks again buddy...

KiM
 
I wonder who'll be spending all day in the garage today!

Nice acquisitions AJ, recumpence certainly does tidy work.
I like the quiet stealth of a hub motor, but the whine of a screaming outrunner is very cool as well!
I don't think you'll be fooling lycras for long as you blast past!
 
Hyena said:
I wonder who'll be spending all day in the garage today!

Update

I wish! Spent a few hours though and made a good start on mounting the reduction drive
unfortunately it is after closer inspection a tad too large to mount on the seat tube
but i had allowed for this hence the "stretched" rear end :: wink::

First i need to make a mount to bolt the redcution drive to using the 4 provided mounting
holes on the drive itself, this is how i have decided to go about it-->

reduction_drive_mount_series_pic1.jpg


(yes the threaded shaft on the motor will be lopped off so nothing will be protruding outside of the frame :) )

I think the pictures are pretty self explanatory? The metal rule's in the last pics will obviously be replaced
by tubing, the drive will be sideways adjustable to allow for correct belt alignment.. VERY
happy with how it fits neatly into the space in front of the front wheel, looks too good for the rest
of the bike though, needs some colour on the frame to pretty it up some hahaa

Back tomorrow with a fully mounted reduction drive and motor :)

KiM
 
Nice work on that bracket, Kim.

What size/thickness was the square tube which you started with?
 
Kim,

I just thought about something,

You may have too much power for your final drive belt. You will definately need an idler to get maximum wrap around that small pulley. The motor to jackshaft belt should be fine. :wink:


Grinhill,

I just got your main pulley.

Your drive (and other parts) will be finished up very soon and shipped. :D

Matt
 
EDIT: you snuck a post in there when i was writing mine Matt hahaa...yes i will be haing an idler
wheel very close to the pulley Matt, had thought this might be the case, will use the
same setup that Matt(1000watt) used on his cruiser-->


matts_tensioner.JPG


..Here's a quick photochop of how i intend to have it-->

photo_chop_tensioner-idler_wheel.jpg


Edit 2: I had a comment on RatRod bikes by a confused member he thought i was using the frames bottom bracket as part of the electric drive line , this isn't the case, i have drawn a quick diagram to clarify the driveline hope this clears it up for anyone confused-->

driveline%20setup.jpg


I have already purchased the left hand threaded freewheel it was posted yesterday from the UK $AU20including freight :)

Speaking of (other Matt (1000watt) ) damn confusing having the two Matts...henceforth we can have Matt S and Matt P i think LoL Coincidently you both look very similar too each other too!! same build same lack of hair hehee...Matt P was up yesterday to checkout your drive unit too Matt S he was VERY impressed i think hes coming around if mine works well he will scrap this silly idea of his to go with a hub motor on his MTB build coming up hehe :: fingers Crossed:: He also bought his RC heli up to show me, was pretty windy in the arvo though personally i wouldnt have tried flying it in the wind but Matt hovered it around very well, looks very slick with the Huges scale size body too IMHO...here's a quick clip of it in action out the front of my house, this is where i used to take my chopper off from Matt R then over the powerlines and do circuits above the trees, MagPies (birds here) used to chase it was funny as hell tll they got withing 10 foot and CRAPPED themselves they are VERY territorial bird they swoop humans that walk near there nesting tree-->

[youtube]CBb06tECHRc[/youtube]

Cheers for the input Matt S always appreciated :)

Cheers GTAdmin :)

Grinhill said:
What size/thickness was the square tube which you started with?

the the square tube has a wall thickness of 2mm matey, i plan to also have a
square "mounting" plate welded to the base of this making it 4mm all up with 2mm sides, i
think this will be more than adequate seeing the bracket is bolted top and
bottom and only 40mm in height, can't see it flexing IF it does, ill simply brace it internally...

Cheers fellas...

KiM
 
Kim, just a thought relating to the idler pulley:

Over on my GH2 thread, liveforphysics recommended that the belt should run direct from the small drive pulley to the large wheel pulley, with the idler on the return leg, putting slightly less strain on the idler & belt.

I'm not sure how much difference that would make to performance or reliability.
 
Back
Top