Turnigy HXT Powered Custom Cruiser Worklog

Hi kim

Looking good mate and i thought you were building a woody :D . I have been thinking about your stabilizers, i have come up with a idea that when they are up they will sit tight to the frame when they are down they wil splay out giveing stability and ajustable for uneven surface's. If i get time tomorrow i will draw it and email it to you. Hopefully i will get the gas for my welder tomorrow and get started with my build again.

Paul
 
THANKYOU for your very generous offer Matt but i would at least like to make some payment towards them, few dollars for a beer at least! The 4in in would be perfect Matt thats what i was going to use. Do you happen to have the switch for them (no problem at all if you dont just thought i would ask, if not ill order one this week)
Thankyou also for the offer of compnents at cost i will be taking you up on these and had planned to regardless, after thinking about Lukes comments when i asked if his Turnigy Sentilon was forsale i thought i would wait till i have the $$$ for one of your ESC now rather than later as i had mentioned to you previously...So yes buddy, i will be getting everything required to get this puppy running from your good self, as i said to Luke also, i MUSH prefer paying a Endless Sphere member helping them out (or member of other forums im on for that matter) than sending money to a company i have no interest with. Thanks again Matt i very much appreciate your offer.

Paul...D Thankyou also for your support, i actually have been discussing in PM with another member mwkeefer who has also generously offered his ideas/design he is also working on a stabilizer device that is suitable for uneven ground..oh haha (i dont usually like posting things said in PM as they are private but i think this will be ok with mwkeeper as it made me giggle..will remove at your say so buddy... -->

I keep fighting the natural inclination of beefing which would have your bike looking like something out of a B sci fi movie or maybe an old MadMax.


^^ dont fight it buddy DONT FIGHT IT hehehe...MAD MAX FTW hehee

With another great mind offering their assistance we will have THE BEST stabiliser design ever...If i get time tis evening after i have finished updating the worklogs on the forums they are on i will see if i can clean up my design sketches and up them so you see the direction i was taking...My designs are K.I.S.S (keep it simple stupid) i figure that less is more in terms of reliability in my designs.
The faired recumbent fellas will be watching closely with what we come up with i suspect :: wink ::

Thanks again fellas for the offers and support it is very much appreciated...I'll be heading out shortly to resume work on the bike 7am here breakfast first and im into it...

Back with updates at days end

KiM
 
I do not have switched for the actuators. But, they have built in limit switches. So, you can just run them to the end of their travel and they stop without straining the motors. The quality seems top notch.

Also, I can ship your controller and throttle before you pay me. It is no big thing. I do have a work back-log, though. But, once your order is done, I can ship it without any need for payment right away.

Matt
 
recumpence said:
I do not have switched for the actuators. But, they have built in limit switches. So, you can just run them to the end of their travel and they stop without straining the motors. The quality seems top notch.

Also, I can ship your controller and throttle before you pay me. It is no big thing. I do have a work back-log, though. But, once your order is done, I can ship it without any need for payment right away.

Matt


Matt thankyou so much for that i am forever grateful and i assure you, you will be paid in full before any other purchases are made from anyone else. The actuator sounds PERFECT Matt thanks again for that, like it or not there will be an extra few bucks in your paypal for it too, if you dont drink beer buy the missus some flowers or chocolates im sure she has to put up with alot of lonely hours without you when your in your basement helping all of us get rc motors on our bikes! Thanks to MRs Recumpence for her continued patience too :)

KiM
 
Update

Sorry fellas but i didn't get quite as much accomplished today as i thought i would yesterday, i have
spent ~4 hours in the workshop but started feeling sickly in the stomach around lunch time
due to having a couple of Jacks and Cola last night and nothing too eat i think, when i blew
a small hole (first one in as long as i can remember) when welding up the last of the frame
i new it was time to call it a day.

I did get the front half of the frame fab completed though, I reshaped the front down tube more to match the
drawing and less like my trike frame, i like it ALOT better than the 'pointy' front it had yesterday, i will also
now be able to mount the front bottom bracket almost directly on the front down tube, i stuck one
in position with masking tape before i came in and the pedal clearance is excellent! Thankyou again to
Al.Fisherman on MotoredBikes.com for taking the time to answer my question on bottom bracket
height in prompt time appreciate your time buddy :) With the bottom bracket Mounted on the inner front tube now
the bikes pedals will be 4inches from the ground making the bracket ~10in from lowest
point to the ground, AMPLE clearance i think...

As always pics of the mornings activities-->

Frame_fab_series_pic2.jpg


The frame is completely welded now she came up beautiful im very happy with the look now i am also
considering adding another horizontal tube about 1/4 of the way up the frame, this will be the level
the front bottom bracket it at, below this tube the mechanism for the stabilisers could be mounted
and then enclosed with aluminium sheet.

All opinions and suggestions welcome fellas, i shall get myself a good feed and a sleep (was up most of the night couldn't sleep)
and be bright and enthusiastic tomorrow to finish the frame off...

KiM
 
UPdate

I failed to reach my objective of completing the rear end for the frame, unfortunately
the drop-outs used my last grinding disk AND cuttoff disk i thought i had extras
but alas i found out i didnt..Lack of $$$ till pay day tomorrow for replacement
forced me to call it a day as i need gthe disks to notch the tubing :: sigh :: always
something sent to test my patience LoL Anywayz...i DID finish the rear drop-outs
heres how i went about it-->

Frame_fab_Droputs_series_pic2.jpg


Where is Other Doc anyone seen him? I always remember his "chewed by beavers" comment whenever i look at pics of steel i have cut that day LoL funny man that Other Doc hehehe


The drop-outs were cut from 5mm thick mild steel, prolly thicker than some of
you would use for your custom rides but seeing this rear end will have ALOT
of stress put on it i tend to go overkill Last thing i need is the frame to fail when im hooting down the
road at 60km/hr LoL

Shall get to Bunnings (local Hardware chain in Australia) tomorrow morning
and get stuck into the tubing for the frame in the afternoon..

Back same time same channel with update tomorrow HOPEFULLY with a frame that looks complete LoL

KiM
 
Thankyou Paull i look forward to seeing the design you have come up with, doesnt need to be a fancy sketch i can re-draw it if you wish before posting it in the forum, let me know either way buddy. Keep in mind the actuator Mr R has kindly donated has a range of ~4in we will need to travel around ~8in from bottom bar on the frame to the ground.

Back later off to Bunnings for some disk...

KiM
 
John in CR said:
Jester,

Have you looked at the "landing gear" on the Monotracer? http://www.monotracer.com/ . It looks like there's could even offer some protection if you laid the thing down on its side.

John

No i hadn't cheers for the link John...Those wheels sticking out woul hit the ground in the avent of an accident wouldnt they would think the price of those fairing it would be a godsend if it saved it it to any degree from a fall! I know a motobike fairing is worth a MINT, drop a bike off its stand and your forking out big bickies let alone sliding one down the road :-S :: touch wood :: this wont happen too me ....again anywayz LoL

I just got back from Bunnings picked up a grinding disk and a couple of cuttoff disk they were on special 2 bucks each WOOT.. i have upped this worklog on 3 additional forums now not including ES-->

RatRod Bikes 309 Views
Australian Electric Vehicle Froum 505 views
Motoredbikes.com 190 views <--worklog being removed

OCAU (my trikes got 17 668 views to date so there should be some interest and hopefully a few customers for Mr R come from the crusier worklog now upped on OCAU )

(i cleared this with Matt he is fine with the build being posted on additional forums out side of ES)

I will include YouTube video to help promote the reduction drives best i can also Matt ;) ....


Matt Recumpence has received full payment(pending transfer) for the reduction drive i will be using on this build and has so generously donated the linear actuators AND the HV110 ESC free of charge for this build the man never stops giving to this community does he!! I have also organised a throttle interface with built in current limiting feature from Head Honcho on Endless Sphere one Mr Fechter , these are custom design unit buy Fechter allowing full "plug and play" of throttle and esc also includes BEC to power ESC. All that remains component wise is BATTERIES...these will be purchased as later date. initially 4x 22v 5000mah Turnigy packs will be run in parallel and series for 44v 10ah pack....this will be upgraded again in near future (soon as funds allow) to 44v 20ah ie. another 4 packs. The total weight of the 4 packs equals ONE 12v 20ah SLA! Don't worry Methy i WIL NOT BE USING POWER SUPPLY TO CHARGE ENTIRE PACK at once LoL..ill stick with what i know ie. Hyperion charger charging packs in parallel. ::preparing to go FULL GangSTa stutus:: LOL

Well i have many people wishing to see this build progress so im getting my ass out to the workshop thankyou all for your support and extreme generosity's...back lil later with an update on the afternoons proceedings.

KiM
 
Update

Bit of a late one today the rear of the frame is progressing
along nicely but boy am i knackered, long days take it out
of this ole timer haha.... I had to redo my work several
times this afternoon until i was satisfied...i think the
neighbours might have also picked up a few new swear
words, wasn't easy sailing by a long shot i just wasn't
on my game today, in the end though, it all came together
and im rapt rapt with the look...here's what i have for you
all this evening anywayz-->

Frame_fab_series_pic3a.jpg


The rear dropouts are fully welded inside , ill get some
close up MACROs tomorrow in the daylight, you cant
see the welds i run a double fillet weld adn hit it with the
flap disk it looks nice IMHO... I have also shown in the
last two pics WHY i have opted to mount the upper rear
tubing in front of the "seat tube" doing so leaves adequate
area for the "mini shock" that will suspend the seat and save
my kidneys ;) The tubing IS NOT welded to the frame
at all, i want to complete the lower tubing tomorrow
prior to welding. The gap between the rear drop-outs is
180mm the 3 speed i intend using for "everyday cruising"
is 175mm from lock nut to lock nut. I intend to rip a
rear wheel off my trike tomorrow (has 20x4.25 rims/tires
and slot it into the rear end to make 100% sure there's
adequate clearance, i know there is but i'm HANGIN
to see how she looks with a fat 4inch 20 on the ass
end haha......ok I'm out please if you have any
suggestions or question feel free to fire away...

KiM
 
( did this vid specially for Other Doc to show how accurate/true/straight the extended
shaft ended up, no beavers chewing metal in this workshop Other Doc hehehe...:: looks about ::: where is Other Doc )

Hey! I resemble that remark! Hi AJ!
otherDoc
 
Hey Jester! I'm watchin'! I know you got a water jet cutter hiding off camera! Right?
otherDoc
 
Looking good KiM!

-Luke
 
Cheers guyz ...hahaha Doc...I wish all angle grinder and air grinder buddy ;-P

WHooPs...came to check in this morning and last night update was still sitting in the draft stage seems i hit save instead of submit after i had finished writing it :-S so here tiz now ...soz about that fellas-->


Update

In a bit of a rush have a few buds dropping in this evening after work for drinks, so i wont ramble on suffice to say
i completed the a s s end of the frame today, it is 95% fully welded towards end of day my trigger in the welder hand piece
is sticking, will fix this tomorrow and complete the welds on the frame..pics of afternoons work-->

Frame_fab_series_pic3b.jpg


I'm very happy with the way it has turned out, only welds not fully completed are the underside of the tubing, topsides all fully welded..

I shall move on to the suspension mechanism for the seat next...more soon

KiM
 
G'day Fellas...

I am about to head out to the workshop to continue work on the project and realised i am missing a vital
measurement.

I wish to get the seat mounted today so i would like a good idea of the distance i need to get from the bottom bracket
to the seat itself. I was hoping one of the members here could measure their ride and possibly state their height also.

The measurement taken from the top of the bottom bracket (the tube your crank is in) to the top of the seat will suffice.(see below diagram if in doubt)

At this stage im unable to sit on the frame and see what sort of distance i need to be mounting the seat and bottom bracket at, im not stable the bikes not stable will end up in a heap on the floor if i try...Thanks in advance

KiM
 

Attachments

  • 207.jpg
    207.jpg
    159.2 KB · Views: 1,019
I'm 5ft 8" and ballpark 24" is the measurement with seat slightly set low by cyclist standards. Supposed to be set so knee is slightly bent at the bottom of the stroke.

Crank forward may have an impact on this, if you can set it with a range of 24" to 28" you should be pretty good.
 
Ypedal said:
I'm 5ft 8" and ballpark 24" is the measurement with seat slightly set low by cyclist standards. Supposed to be set so knee is slightly bent at the bottom of the stroke.

Crank forward may have an impact on this, if you can set it with a range of 24" to 28" you should be pretty good.

THANKYOU YPedal
your a champ, i been out there trying to guesstimate i came up with ~600mm which is ~23in so ill make adjustment and split the difference at 26in :) I don't have the luxury of being able to alter seat height as per "standard" bicycle as the seat is "hard mounted" to the frames top tube so need to get it right first time or it will be alot of grinding drilling re-welding to alter it ...Thanks again matey :)

KiM
 
CrazyBike2's distance is about 26", and I'm about 5'7" with 36" from the bottom of my foot to the pivot point in my hip. Since the motor does most of the hard startup crank, it's not exactly the ideal distance, giving me a bit more bend in my knee during pedalling than there should be, but I can push back hard in the seat mesh to straighten my legs fully if I must, to get torque for hills and such.
 
Update

Thanks again YPedal Man and amberwolf the info has been noted frame
measured and marked ready for seat mounting and bottom bracket placement...I
went out ready to get to the seatpan/suspension setup then realised i still hadn't
added the gusset for lower frame OR completed the welding of the underside
of the tubes SO...picked up the welder to complete this ONLY to find the welder
was still broken forgot it broke Friday (had the weekend off) ...frocked around
fixing the hand piece up, the switch mechanism had snapped in half that
out of the way i completed the rest of the welding of the frame it is now FULLY WELDED...
The seat support still to be done and obviously the front bottom bracket and
of course the stabiliser mechanism...Frame itself though is DONE...shes nice and straight
and oober strong ready for Mr Rs CNC reduction drive Pr0n! Few pics OH and i weighed
the frame also-->

Frame_fab_series_pic3c.jpg


7kilo! (15 pound) Yup shes a lil heavier than your average frame but i guarantee its a
shitload stronger! i will feel ALOT safer hitting speeds on this than i would on a Wallmart or equivalent
shit quality china bike.

With above information in hand the seat shall be on the frame this time tomorrow!

OH...we went out yesterday curb side collecting as i have now decided to make a
girder style fork!-->

dsc03192.jpg


I think this will better suit the bike rather than a mountain bike fork...I plan
to use 4 front hubs (extended and reinforced..found 8 whells on curbside :))
rather than simply drilling a hole and sliding a bolt through, my plan is to utilise the front hubs with
the ball bearings so it is nice and free moving when tightened up
giving me (hopefully) a nice solid springy fork...more on that soon though
need to pickup a length of tubing to make the fork from :)

Back tomorrow with another update...till then...

KiM
 
I have been tossing up which way to mount the front bottom bracket the cranks will be mounted in
the two possibilities i have quickly photochopped onto the frame-->

Custom_frame_decesion_a_b.jpg


As i see it there's advantages too both options...

A) will allow easier mounting of the batteries but adds extra weight to the frame...i would say it
adds strength or rigidity as it does but its not needed its not flexing as is.

B) This options lighter but i have no top bar to mount tabs to that will aid in battery mounting...i think
i prefer this look though...

Seeing i'm unsure im throwing it out to the members of the forum, see what the general thought
on the two different designs is...ALTERNATIVELY, if you have another possibility that you think
would be better please, feel free to suggest away ...thanks in advance...

KiM
 
Inspirational Kim,
I love your builds because everything comes
together quickly, even if you hit snags. This thing is gonna be ridiculous!! Can't wait to see video of your drunk ass doing circle burnouts!! :twisted:

What kinda brakes are you going for? Are you gonna use a suicide shifter with a beer tap handle?
 
Hey Kim,
I saw from your preliminary sketch that the drop-down wheels may come in near the same area. Could you integrate the structures together somehow? Maybe try a few more sketches before you get stuck in with the welder? :D
 
Go with B if it is the weight that is the problem
have shite before you ride he he :D

HAHAA yeah Paul i agree ...b) has also gotten
the most interest across the 4 forums the log is on so
i will definitely go with B) if i dont change my mind
and go with A) hahaa...i'm worse than a wiminez the
way i change my mind LoL..

etard said:
Inspirational Kim,
I love your builds because everything comes
together quickly, even if you hit snags. This thing is
gonna be ridiculous!! Can't wait to see video of your
drunk ass doing circle burnouts!! :twisted:

What kinda brakes are you going for? Are you gonna
use a suicide shifter with a beer tap handle?

Thanks etard :)

Dunno about doing doughnuts buddy but im reeeeally
hoping she wheelstands well, when i used to ride
before my accident there wasn't a bicycle or a motorcycle
(with exception of mates Harley) i couldnt wheelstand well...
HAHA i can pull indefinite wheelstands in my wheelchair
LoL...Yes SiiiRee i'm wanting to stand this bike on its rear
BADLY so expect see that before anything IF its capable :: wink ::..
Brakes will be disks front and back buddy. Shifter will be
the stock job that comes with the EXTRA wide Sturmey
Archer 3 speed sold by Alan at Choppers US-->

02919.JPG


Its BIG and chunky looking my mate has the exact same
hub on his crusier, WHERE i will mount the shifter though
is uncertain till i have it here and put it up next to the bike
see which position looks more appealing :)

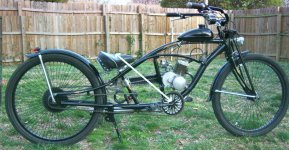
Grinhill....the stabiliser wheels will actually NOT
be as in the picture but further towards the rear wheel
buddy, i will DEFINITELY be upping some sketches before
tackling the stabilisers, i think i will also wait until i have
the linear actuator AND reduction drive as i STILL am in
two minds WHERE to mount the linear actuator. I
have designs for mounting it along the bottom tube and
on the seat tube either front side or backside BUT need to
see where Mr Recumpence SIRs reduction drives
looks best i would like to put it behind the seat tube i THINK
i have allowed adequate room for this but want to make
absolute sure before going ahead with the stabiliser setup...

Update

Today i started work on the seat pan/support that the actual
seat itself will be fastened too. I am NOT using the seat in
picture...i had this seat on the first trike i built, i cut it down
a lil too much and is now too uncomfortable for my unstable
pelvis, I shall pick up a new one from Movement Systems
for final assembly, the one in picture is merely
for "mock up" purposes....ok that out of the way...
Pics of today's progress-->

Frame_fab_series_pic3_seat_tray.jpg


Pretty self explanatory i think? the front pivot hole
i have welded a tube through, this will have LIBERAL
amounts of graphite grease applied when final assembly
happens this should ensure a squeak free pivot and
hopefully not wear excessively. I was going to go with
sealed bearings but finally after procrastinating over
it for few sleepless nights hahaa chose the K.I.S.S method.

I only need weld the front plates on they are shaped
ready for fitting but it was late when i finished and the
light was gone (my garage has poor lightening need the
sunlight when welding or cant see what the frock im
doing hahaa.)
Will weld these plates first up tomorrow
along with the bracket for the mini shock and the rear
seat shock mounts will also be cut and welded to the
pan...totally forgot these but again was late so wouldn't
have gotten to them anywayz

Thanks for the positive feed back fellas as always much
appreciated, shall be back tomorrow with another
update of the days activities...till then its hooroo from
me :)

KiM

EDIT: GREAT NEWS!!! Matt just advised me my motor
has arrived along with the Throttle interface I purchased
from Mr Fechter Matt informs me 7-10 days approx and
he will have the Drive ready for shipping WOOTz all
happening :)
 
Back
Top